
Reference Manual
Page 3
Introduction Parts of the Camera Preparing for Shooting Using the Camera Shooting Features Using the Menus Connecting the Camera to a TV, Computer, or Printer Reference Section Technical Notes and Index i
Introduction Parts of the Camera Preparing for Shooting Using the Camera Shooting Features Using the Menus Connecting the Camera to a TV, Computer, or Printer Reference Section Technical Notes and Index i
Reference Manual
Page 4
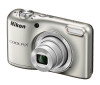
Introduction Introduction Read This First Thank you for purchasing the Nikon COOLPIX L29 digital camera. ii Before using the camera, please read the information in "For Your Safety" (A viii-xi) and familiarize yourself with the information provided in this manual handy and refer to it to enhance your enjoyment of your new camera. After reading, please keep this manual.
Introduction Introduction Read This First Thank you for purchasing the Nikon COOLPIX L29 digital camera. ii Before using the camera, please read the information in "For Your Safety" (A viii-xi) and familiarize yourself with the information provided in this manual handy and refer to it to enhance your enjoyment of your new camera. After reading, please keep this manual.

Reference Manual
Page 5
iii To learn about the parts of the Camera" (A 1). Introduction Attaching the Camera Strap 1 2 About This Manual If you want to start using the camera right away, see "Parts of the camera and information that is displayed in the monitor, see "Preparing for Shooting" (A 6) and "Using the Camera" (A 12).
iii To learn about the parts of the Camera" (A 1). Introduction Attaching the Camera Strap 1 2 About This Manual If you want to start using the camera right away, see "Parts of the camera and information that is displayed in the monitor, see "Preparing for Shooting" (A 6) and "Using the Camera" (A 12).

Reference Manual
Page 6
...SD, SDHC, and SDXC memory cards are referred to as the "default setting." • The names of menu items displayed in the camera monitor, and the names of purchase is referred to find the information you need, the following symbols and conventions are used in this manual ... monitor appear in this manual: Icon Description B This icon indicates cautions and information that should be read before using the camera. A/E/F These icons indicate other pages containing relevant information; C This icon indicates notes and information that should be read before using the...
...SD, SDHC, and SDXC memory cards are referred to as the "default setting." • The names of menu items displayed in the camera monitor, and the names of purchase is referred to find the information you need, the following symbols and conventions are used in this manual ... monitor appear in this manual: Icon Description B This icon indicates cautions and information that should be read before using the camera. A/E/F These icons indicate other pages containing relevant information; C This icon indicates notes and information that should be read before using the...

Reference Manual
Page 7
... highest standards and include complex electronic circuitry. Visit the site below for contact information: http://imaging.nikon.com/ Use Only Nikon Brand Electronic Accessories Nikon COOLPIX cameras are engineered and proven to operate within the operational and safety requirements of Nikon's "Life-Long Learning" commitment to ongoing product support and education, continually updated information is functioning...
... highest standards and include complex electronic circuitry. Visit the site below for contact information: http://imaging.nikon.com/ Use Only Nikon Brand Electronic Accessories Nikon COOLPIX cameras are engineered and proven to operate within the operational and safety requirements of Nikon's "Life-Long Learning" commitment to ongoing product support and education, continually updated information is functioning...
Reference Manual
Page 8
..., gift certificates, etc.), commuter passes, or coupon tickets, except when a minimum of necessary copies are to the attention of the Nikon representative in a foreign country is prohibited. Notice Concerning Prohibition of Copying or Reproduction Note that simply being in possession of material that ...was digitally copied or reproduced by means of a scanner, digital camera or other device may be reproduced, transmitted, transcribed, stored in a retrieval system, or translated into any language in these manuals ...
..., gift certificates, etc.), commuter passes, or coupon tickets, except when a minimum of necessary copies are to the attention of the Nikon representative in a foreign country is prohibited. Notice Concerning Prohibition of Copying or Reproduction Note that simply being in possession of material that ...was digitally copied or reproduced by means of a scanner, digital camera or other device may be reproduced, transmitted, transcribed, stored in a retrieval system, or translated into any language in these manuals ...

Reference Manual
Page 9
Ensuring the privacy of Data Storage Devices Please note that deleting images or formatting data storage devices such as memory cards or built-in camera memory does not completely erase the original image data. Care should be recovered from discarded storage devices using commercial deletion software, or format the device ...
Ensuring the privacy of Data Storage Devices Please note that deleting images or formatting data storage devices such as memory cards or built-in camera memory does not completely erase the original image data. Care should be recovered from discarded storage devices using commercial deletion software, or format the device ...
Reference Manual
Page 10
... equipment in the presence of flammable gas, as the result of the camera or AC adapter could result in the event of an infant or child. For Your Safety To prevent damage to your Nikon product or injury to yourself or to others, read them. This icon...AC adapter, unplug the AC adapter and remove the batteries immediately, taking care to a Nikon-authorized service representative for inspection. Should viii the camera or AC adapter break open as this Nikon product, to a Nikon-authorized service representative for inspection, after unplugging the product and/or removing the batteries. ...
... equipment in the presence of flammable gas, as the result of the camera or AC adapter could result in the event of an infant or child. For Your Safety To prevent damage to your Nikon product or injury to yourself or to others, read them. This icon...AC adapter, unplug the AC adapter and remove the batteries immediately, taking care to a Nikon-authorized service representative for inspection. Should viii the camera or AC adapter break open as this Nikon product, to a Nikon-authorized service representative for inspection, after unplugging the product and/or removing the batteries. ...
Reference Manual
Page 11
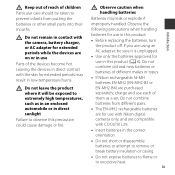
...(A 6). ix Introduction Do not remain in contact with the skin for extended periods while the devices are compatible with COOLPIX L29. • Insert batteries in direct contact with the camera, battery charger, or AC adapter for extended periods may leak or explode if improperly handled. Leaving the devices in ... the devices become hot. Do not leave the product where it is unplugged. • Use only the batteries approved for use with Nikon digital cameras only, and are on or in use in low-temperature burns. Keep out of reach of children Particular care should be exposed to...
...(A 6). ix Introduction Do not remain in contact with the skin for extended periods while the devices are compatible with COOLPIX L29. • Insert batteries in direct contact with the camera, battery charger, or AC adapter for extended periods may leak or explode if improperly handled. Leaving the devices in ... the devices become hot. Do not leave the product where it is unplugged. • Use only the batteries approved for use with Nikon digital cameras only, and are on or in use in low-temperature burns. Keep out of reach of children Particular care should be exposed to...
Reference Manual
Page 13
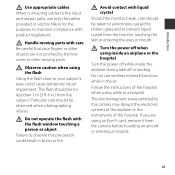
... less than 1 m (3 ft 4 in burns or fire. Avoid contact with care Be careful that your subject's eyes could result in .) from the camera before boarding an aircraft or entering a hospital. The flash should be taken to avoid injury caused by broken glass and to prevent liquid crystal from... flash with product regulations. Do not use only the cables provided or sold by Nikon for the purpose, to maintain compliance with the flash window touching a person or object Failure to observe this camera may disrupt the electronic systems of the airplane or the instruments of the hospital when...
... less than 1 m (3 ft 4 in burns or fire. Avoid contact with care Be careful that your subject's eyes could result in .) from the camera before boarding an aircraft or entering a hospital. The flash should be taken to avoid injury caused by broken glass and to prevent liquid crystal from... flash with product regulations. Do not use only the cables provided or sold by Nikon for the purpose, to maintain compliance with the flash window touching a person or object Failure to observe this camera may disrupt the electronic systems of the airplane or the instruments of the hospital when...

Reference Manual
Page 17
... iii About This Manual iii Information and Precautions v For Your Safety viii WARNINGS viii Notices xii Parts of the Camera 1 The Camera Body 1 The Monitor 3 Shooting Mode 3 Playback Mode 5 Preparing for Shooting 6 Insert the Batteries and Memory Card ......... 6 Applicable Batteries 6 Removing...-timer 19 Shooting Features 20 Changing the Shooting Mode 20 Recording and Playing Back Movies .......... 22 Using the Menus 24 Connecting the Camera to a TV, Computer, or Printer 26 Connection Methods 26 Using ViewNX 2 28 Installing ViewNX 2 28 Transferring Images to the Computer...
... iii About This Manual iii Information and Precautions v For Your Safety viii WARNINGS viii Notices xii Parts of the Camera 1 The Camera Body 1 The Monitor 3 Shooting Mode 3 Playback Mode 5 Preparing for Shooting 6 Insert the Batteries and Memory Card ......... 6 Applicable Batteries 6 Removing...-timer 19 Shooting Features 20 Changing the Shooting Mode 20 Recording and Playing Back Movies .......... 22 Using the Menus 24 Connecting the Camera to a TV, Computer, or Printer 26 Connection Methods 26 Using ViewNX 2 28 Installing ViewNX 2 28 Transferring Images to the Computer...
Reference Manual
Page 18
... a TV (Viewing Images on a TV E32 Connecting the Camera to a Printer (Direct Print E33 Connecting the Camera to Scenes E4 Tips and Notes E5 Smart Portrait Mode (Capturing Images of an Image E30 a Crop: Creating a Cropped Copy .... E33 Printing Individual Images E34 ...
... a TV (Viewing Images on a TV E32 Connecting the Camera to a Printer (Direct Print E33 Connecting the Camera to Scenes E4 Tips and Notes E5 Smart Portrait Mode (Capturing Images of an Image E30 a Crop: Creating a Cropped Copy .... E33 Printing Individual Images E34 ...

Reference Manual
Page 20
Introduction Technical Notes and Index F1 Caring for the Product F2 The Camera F2 Batteries F4 Memory Cards F6 Cleaning and Storage F7 Cleaning F7 Storage F7 Troubleshooting F8 Specifications F15 Approved Memory Cards F19 Index F21 xviii
Introduction Technical Notes and Index F1 Caring for the Product F2 The Camera F2 Batteries F4 Memory Cards F6 Cleaning and Storage F7 Cleaning F7 Storage F7 Troubleshooting F8 Specifications F15 Approved Memory Cards F19 Index F21 xviii
Reference Manual
Page 21
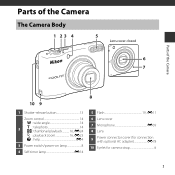
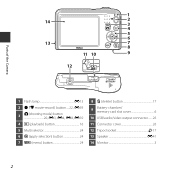
Parts of the Camera The Camera Body 1 23 4 5 Lens cover closed 6 7 Parts of the Camera 10 9 1 Shutter-release button 13 Zoom control 14 f : wide-angle 14 2 g : telephoto 14 h : thumbnail playback...........16, E24 i : playback zoom 16, E23 j : help E4 3 Power switch/power-on lamp 8 4 Self-timer lamp E14 8 5 Flash 19, E11 6 Lens cover 7 Microphone E39 8 Lens 9 Power connector cover (for connection with optional AC adapter E78 10 Eyelet for camera strap iii 1
Parts of the Camera The Camera Body 1 23 4 5 Lens cover closed 6 7 Parts of the Camera 10 9 1 Shutter-release button 13 Zoom control 14 f : wide-angle 14 2 g : telephoto 14 h : thumbnail playback...........16, E24 i : playback zoom 16, E23 j : help E4 3 Power switch/power-on lamp 8 4 Self-timer lamp E14 8 5 Flash 19, E11 6 Lens cover 7 Microphone E39 8 Lens 9 Power connector cover (for connection with optional AC adapter E78 10 Eyelet for camera strap iii 1
Reference Manual
Page 22
1 14 2 3 4 5 6 13 7 8 11 10 9 12 Parts of the Camera 1 Flash lamp E13 2 b (e movie-record) button.....22, E39 3 A (shooting mode) button 20, E3, E4, E8, E10 4 c (playback) button 16 5 Multi selector 24 6 k (apply selection) button 24 7 d (menu) button 24 8 l (delete) button 17 9 Battery-chamber/ memory card slot cover 6 10 USB/audio/video output connector.......26 11 Connector cover 26 12 Tripod socket F17 13 Speaker E41 14 Monitor 3 2
1 14 2 3 4 5 6 13 7 8 11 10 9 12 Parts of the Camera 1 Flash lamp E13 2 b (e movie-record) button.....22, E39 3 A (shooting mode) button 20, E3, E4, E8, E10 4 c (playback) button 16 5 Multi selector 24 6 k (apply selection) button 24 7 d (menu) button 24 8 l (delete) button 17 9 Battery-chamber/ memory card slot cover 6 10 USB/audio/video output connector.......26 11 Connector cover 26 12 Tripod socket F17 13 Speaker E41 14 Monitor 3 2

Reference Manual
Page 23
Parts of the Camera The Monitor The information that is displayed changes depending on and when you operate the camera, and turns off after a few seconds (when Photo info is first turned on the camera's settings and state of use. Shooting Mode 30 29 28 10 27 26 25 23 24 22 21 2 1 34 5 6 10 9 2 9 m 0 s 13 +1.0 1 / 2 5 0 F 3.2 999 7 8 10 11 12 14 18 17 16 9 9 9 15 9999 20 19 3 By default, information is displayed when the camera is set to Auto info in Monitor settings (A 24, E64) in the setup menu).
Parts of the Camera The Monitor The information that is displayed changes depending on and when you operate the camera, and turns off after a few seconds (when Photo info is first turned on the camera's settings and state of use. Shooting Mode 30 29 28 10 27 26 25 23 24 22 21 2 1 34 5 6 10 9 2 9 m 0 s 13 +1.0 1 / 2 5 0 F 3.2 999 7 8 10 11 12 14 18 17 16 9 9 9 15 9999 20 19 3 By default, information is displayed when the camera is set to Auto info in Monitor settings (A 24, E64) in the setup menu).

Reference Manual
Page 24
Parts of the Camera 1 Shooting mode 20 2 Macro mode 19, E15 3 Zoom indicator 14, E15 4 Focus indicator 13 5 Flash mode 19, E11 6 Battery level indicator 10 7 Eye-Fi communication ...
Parts of the Camera 1 Shooting mode 20 2 Macro mode 19, E15 3 Zoom indicator 14, E15 4 Focus indicator 13 5 Flash mode 19, E11 6 Battery level indicator 10 7 Eye-Fi communication ...

Reference Manual
Page 25
... icon E55 4 Eye-Fi communication indicator E71 5 Print order icon E52 6 Image mode E44 7 Movie options 22, E59 (a) Current image number/ 8 total number of the Camera Playback Mode 1 15/05/2014 12:00 16 9 9 9 9 . Parts of images (b) Movie length 9 Internal memory indicator 7 10 Movie playback guide 22, E41 11 Volume indicator...
... icon E55 4 Eye-Fi communication indicator E71 5 Print order icon E52 6 Image mode E44 7 Movie options 22, E59 (a) Current image number/ 8 total number of the Camera Playback Mode 1 15/05/2014 12:00 16 9 9 9 9 . Parts of images (b) Movie length 9 Internal memory indicator 7 10 Movie playback guide 22, E41 11 Volume indicator...

Reference Manual
Page 26
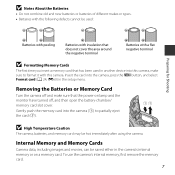
... for Shooting Preparing for Shooting Insert the Batteries and Memory Card 1 Open the battery-chamber/memory card slot cover. • Hold the camera upside down or backwards could damage the camera and the memory card. 3 Close the battery-chamber/memory card slot cover. B Be Careful to prevent the batteries from falling out...
... for Shooting Preparing for Shooting Insert the Batteries and Memory Card 1 Open the battery-chamber/memory card slot cover. • Hold the camera upside down or backwards could damage the camera and the memory card. 3 Close the battery-chamber/memory card slot cover. B Be Careful to prevent the batteries from falling out...
Reference Manual
Page 27
...lamp and the monitor have turned off and make sure to format it with this camera. Gently push the memory card into the camera (1) to partially eject the card (2). 12 B High Temperature Caution The camera, batteries, and memory card may be used: Preparing for Shooting Batteries with peeling ...insert a memory card that the power-on a memory card. To use the camera's internal memory, first remove the memory card. 7 Insert the card into this camera, make sure that has been used in another device into the camera, press the d button, and select Format card (A 24, E69) in ...
...lamp and the monitor have turned off and make sure to format it with this camera. Gently push the memory card into the camera (1) to partially eject the card (2). 12 B High Temperature Caution The camera, batteries, and memory card may be used: Preparing for Shooting Batteries with peeling ...insert a memory card that the power-on a memory card. To use the camera's internal memory, first remove the memory card. 7 Insert the card into this camera, make sure that has been used in another device into the camera, press the d button, and select Format card (A 24, E69) in ...


