
Reference Manual
Page 47
... printer, you can transfer images to a computer to perform simple retouching and manage image data. Connection method: Connect the camera directly to the printer's USB port with the USB Cable UC-E16. • Before connecting to a computer, install ViewNX 2 on the computer (A 28). Printing images without using a computer. Connection method: Connect the camera...
... printer, you can transfer images to a computer to perform simple retouching and manage image data. Connection method: Connect the camera directly to the printer's USB port with the USB Cable UC-E16. • Before connecting to a computer, install ViewNX 2 on the computer (A 28). Printing images without using a computer. Connection method: Connect the camera...
Reference Manual
Page 49
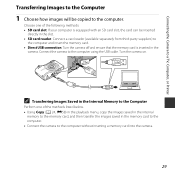
... slot. • SD card reader: Connect a card reader (available separately from third-party suppliers) to the computer and insert the memory card. • Direct USB connection: Turn the camera off and ensure that the memory card is equipped with an SD card slot, the card can be copied to the...: • SD card slot: If your computer is inserted in the memory card to the computer. • Connect the camera to the computer using the USB cable. C Transferring Images Saved in the Internal Memory to the Computer Perform one of the methods listed below. • Using Copy (A 24, E58) in the ...
... slot. • SD card reader: Connect a card reader (available separately from third-party suppliers) to the computer and insert the memory card. • Direct USB connection: Turn the camera off and ensure that the memory card is equipped with an SD card slot, the card can be copied to the...: • SD card slot: If your computer is inserted in the memory card to the computer. • Connect the camera to the computer using the USB cable. C Transferring Images Saved in the Internal Memory to the Computer Perform one of the methods listed below. • Using Copy (A 24, E58) in the ...

Reference Manual
Page 50
A program selection dialog will be copied to start. B Connecting the USB Cable The connection may take a while for Nikon Transfer 2 to the computer. 30 Wait until Nikon Transfer 2 starts. select Import File using Windows 7 If the dialog shown at right is displayed, follow the steps below to the computer. • Click ...Start Transfer • At default settings, all the images on the memory card will be recognized if the camera is connected to the computer via a USB hub. 2 Transfer images to select Nikon Transfer 2. 1 Under Import pictures and videos, click Change program.
A program selection dialog will be copied to start. B Connecting the USB Cable The connection may take a while for Nikon Transfer 2 to the computer. 30 Wait until Nikon Transfer 2 starts. select Import File using Windows 7 If the dialog shown at right is displayed, follow the steps below to the computer. • Click ...Start Transfer • At default settings, all the images on the memory card will be recognized if the camera is connected to the computer via a USB hub. 2 Transfer images to select Nikon Transfer 2. 1 Under Import pictures and videos, click Change program.
Reference Manual
Page 51
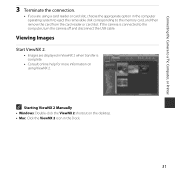
... on the desktop. • Mac: Click the ViewNX 2 icon in ViewNX 2 when transfer is connected to the computer, turn the camera off and disconnect the USB cable. Connecting the Camera to a TV, Computer, or Printer 3 Terminate the connection. • If you are displayed in the Dock. 31
... on the desktop. • Mac: Click the ViewNX 2 icon in ViewNX 2 when transfer is connected to the computer, turn the camera off and disconnect the USB cable. Connecting the Camera to a TV, Computer, or Printer 3 Terminate the connection. • If you are displayed in the Dock. 31

Reference Manual
Page 85
Connecting the Camera to a Printer 1 Turn off the camera. 2 Turn on the printer. • Check printer settings. 3 Connect the camera to the printer and print images without using the USB cable. • Make sure that the plugs are properly oriented. E33 Do not insert or remove the plugs at an angle when connecting or disconnecting them. Reference Section Connecting the Camera to a Printer (Direct Print) Users of PictBridge-compatible printers can connect the camera directly to the printer using a computer.
Connecting the Camera to a Printer 1 Turn off the camera. 2 Turn on the printer. • Check printer settings. 3 Connect the camera to the printer and print images without using the USB cable. • Make sure that the plugs are properly oriented. E33 Do not insert or remove the plugs at an angle when connecting or disconnecting them. Reference Section Connecting the Camera to a Printer (Direct Print) Users of PictBridge-compatible printers can connect the camera directly to the printer using a computer.

Reference Manual
Page 87
... nine) and press the k button. E35 PictBridge 004 prints Start print Copies Paper size 8 When printing is complete, turn the camera off and disconnect the USB cable. PictBridge 004 prints Start print Copies Paper size 6 Select the desired paper size and press the k button. • To apply the paper size setting configured...
... nine) and press the k button. E35 PictBridge 004 prints Start print Copies Paper size 8 When printing is complete, turn the camera off and disconnect the USB cable. PictBridge 004 prints Start print Copies Paper size 6 Select the desired paper size and press the k button. • To apply the paper size setting configured...

Reference Manual
Page 90
To view the current print order, select View images and press the k button. To print images, press the k button again. DPOF printing 010 prints Start print View images Cancel 6 When printing is displayed, select Start print and press the k button to start printing. Reference Section E38 DPOF printing Print images for which a print order was created using the Print order option (E52). • When the screen shown on the right is complete, turn the camera off and disconnect the USB cable.
To view the current print order, select View images and press the k button. To print images, press the k button again. DPOF printing 010 prints Start print View images Cancel 6 When printing is displayed, select Start print and press the k button to start printing. Reference Section E38 DPOF printing Print images for which a print order was created using the Print order option (E52). • When the screen shown on the right is complete, turn the camera off and disconnect the USB cable.

Reference Manual
Page 128
... while communicating with your printer for further guidance and information. If the error persists, contact your retailer or Nikon-authorized service representative. Select Cancel and press the k button to cancel printing. 8 E33 6, 8 * See... the documentation provided with the printer. If the error persists, contact your retailer or Nikon-authorized service representative. Printer error: check printer status. After solving the problem, select Resume and press the k button to... A lens error occurred. Turn the camera off and reconnect the USB cable.
... while communicating with your printer for further guidance and information. If the error persists, contact your retailer or Nikon-authorized service representative. Select Cancel and press the k button to cancel printing. 8 E33 6, 8 * See... the documentation provided with the printer. If the error persists, contact your retailer or Nikon-authorized service representative. Printer error: check printer status. After solving the problem, select Resume and press the k button to... A lens error occurred. Turn the camera off and reconnect the USB cable.

Reference Manual
Page 130
... batteries)* Battery Charger MH-73 (includes four EN-MH2 rechargeable Ni-MH batteries)* AC Adapter EH-65A (connect as shown) 1 1 2 2 USB cable Audio/video cable Make sure that the power connector cord has been properly aligned in the battery-chamber groove before closing the battery-chamber/memory card slot... cover. USB Cable UC-E16 Audio Video Cable EG-CP14 * To charge EN-MH2 batteries, use these battery chargers to charge any other type of battery. See our ...
... batteries)* Battery Charger MH-73 (includes four EN-MH2 rechargeable Ni-MH batteries)* AC Adapter EH-65A (connect as shown) 1 1 2 2 USB cable Audio/video cable Make sure that the power connector cord has been properly aligned in the battery-chamber groove before closing the battery-chamber/memory card slot... cover. USB Cable UC-E16 Audio Video Cable EG-CP14 * To charge EN-MH2 batteries, use these battery chargers to charge any other type of battery. See our ...

Reference Manual
Page 138
... AC adapter. If the camera does not turn the camera off to save power. Camera turns off . • The batteries are connected via a USB cable. • The camera and TV are exhausted. • The camera has entered standby mode to save power 11 (auto off until the inside of... common problems below before consulting your retailer or Nikon-authorized service representative. Note that although any data currently being recorded will be lost, data that have already been recorded will not be affected...
... AC adapter. If the camera does not turn the camera off to save power. Camera turns off . • The batteries are connected via a USB cable. • The camera and TV are exhausted. • The camera has entered standby mode to save power 11 (auto off until the inside of... common problems below before consulting your retailer or Nikon-authorized service representative. Note that although any data currently being recorded will be lost, data that have already been recorded will not be affected...

Reference Manual
Page 140
... in the setup menu. • Enable D (Best Shot Selector) for the Continuous setting in the shooting menu. • Use a tripod to shooting mode. Disconnect the USB cable. 26, 29, E33 No image captured when the shutter-release button is pressed. • When the camera is in playback mode, press the A button. •...
... in the setup menu. • Enable D (Best Shot Selector) for the Continuous setting in the shooting menu. • Use a tripod to shooting mode. Disconnect the USB cable. 26, 29, E33 No image captured when the shutter-release button is pressed. • When the camera is in playback mode, press the A button. •...
Reference Manual
Page 143
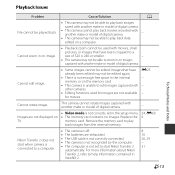
...been edited may not be edited. This camera cannot rotate images captured with another make or model of digital camera. - For more information about Nikon Transfer 2, refer to help information contained in on a computer. Cannot edit image. • Some images cannot be edited again. • ...8226; This camera is not set in on images captured with another make or model of digital camera. Images are exhausted. • The USB cable is not correctly connected. • The camera is not recognized by the computer. • The computer is unable to edit images captured with...
...been edited may not be edited. This camera cannot rotate images captured with another make or model of digital camera. - For more information about Nikon Transfer 2, refer to help information contained in on a computer. Cannot edit image. • Some images cannot be edited again. • ...8226; This camera is not set in on images captured with another make or model of digital camera. Images are exhausted. • The USB cable is not correctly connected. • The camera is not recognized by the computer. • The computer is unable to edit images captured with...

Reference Manual
Page 154
... Sunset h E4 T Thumbnail playback 16, E24 Time difference E62 Time zone 9, E62 Time zone and date 8, E62 Tripod socket 2, F17 TV 27, E32 U USB cable 27, 29, E33, E78 USB/audio/video output connector 2, 26, 29, E32, E33 V Video mode E69 ViewNX 2 28 Volume E41 W Welcome screen E61 White balance E46 Z Zoom 14...
... Sunset h E4 T Thumbnail playback 16, E24 Time difference E62 Time zone 9, E62 Time zone and date 8, E62 Tripod socket 2, F17 TV 27, E32 U USB cable 27, 29, E33, E78 USB/audio/video output connector 2, 26, 29, E32, E33 V Video mode E69 ViewNX 2 28 Volume E41 W Welcome screen E61 White balance E46 Z Zoom 14...


