
Reference Manual
Page 17
...the Batteries and Memory Card ......... 6 Applicable Batteries 6 Removing the Batteries or Memory Card ... 7 Internal Memory and Memory Cards 7 Turn the Camera On and Set the Display Language, Date, and Time 8 Using the Camera 12 Shooting with Easy Auto Mode 12 Using the Zoom 14 The Shutter-release Button 14... Play Back Images 16 Delete Images 17 Using the Flash and Self-timer 19 Shooting Features 20 Changing the Shooting Mode 20 Recording and Playing Back Movies .......... 22 Using the Menus 24 Connecting the Camera to a TV, Computer, or ...
...the Batteries and Memory Card ......... 6 Applicable Batteries 6 Removing the Batteries or Memory Card ... 7 Internal Memory and Memory Cards 7 Turn the Camera On and Set the Display Language, Date, and Time 8 Using the Camera 12 Shooting with Easy Auto Mode 12 Using the Zoom 14 The Shutter-release Button 14... Play Back Images 16 Delete Images 17 Using the Flash and Self-timer 19 Shooting Features 20 Changing the Shooting Mode 20 Recording and Playing Back Movies .......... 22 Using the Menus 24 Connecting the Camera to a TV, Computer, or ...

Reference Manual
Page 23
Parts of the Camera The Monitor The information that is set to Auto info in Monitor settings (A 24, E64) in the setup menu). Shooting Mode 30 29 28 10 27 26 25 23 24 22 21 2 1 34 5 6 10 9 2 9 m 0 s 13 +1.0 1 / 2 5 0 F 3.2 999 7 8 10 11 12 14 18 17 16 9 9 9 15 9999 20 19 3 By default, information is displayed when the camera is first turned on and when you operate the camera, and turns off after a few seconds (when Photo info is displayed changes depending on the camera's settings and state of use.
Parts of the Camera The Monitor The information that is set to Auto info in Monitor settings (A 24, E64) in the setup menu). Shooting Mode 30 29 28 10 27 26 25 23 24 22 21 2 1 34 5 6 10 9 2 9 m 0 s 13 +1.0 1 / 2 5 0 F 3.2 999 7 8 10 11 12 14 18 17 16 9 9 9 15 9999 20 19 3 By default, information is displayed when the camera is first turned on and when you operate the camera, and turns off after a few seconds (when Photo info is displayed changes depending on the camera's settings and state of use.
Reference Manual
Page 31
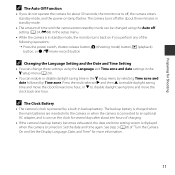
..., c (playback) button, or b (e movie-record) button C Changing the Language Setting and the Date and Time Setting • You can change these settings using the Language and Time zone and date settings in the z setup menu (A 24). • You can be changed using the Auto off setting (A 24, E68) in the setup menu. • While the...batteries are inserted into the camera or when the camera is connected to disable daylight saving time and move the clock back one hour. Set the date and time again. C The Clock Battery • The camera's clock is turned on if you do not operate the...
..., c (playback) button, or b (e movie-record) button C Changing the Language Setting and the Date and Time Setting • You can change these settings using the Language and Time zone and date settings in the z setup menu (A 24). • You can be changed using the Auto off setting (A 24, E68) in the setup menu. • While the...batteries are inserted into the camera or when the camera is connected to disable daylight saving time and move the clock back one hour. Set the date and time again. C The Clock Battery • The camera's clock is turned on if you do not operate the...
Reference Manual
Page 34
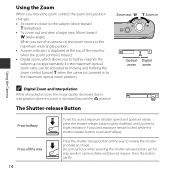
...zoom position. Focus and exposure remain locked while the shutter-release button is pressed halfway. Press the shutter-release button all the way 14 To set focus and exposure (shutter speed and aperture value), press the shutter-release button lightly (halfway) until you to further magnify the subject up ... when the zoom is increased beyond the V position. Press the button gently. Using the Zoom When you move the zoom control, the zoom lens position changes. • To zoom in closer to the subject: Move toward g (telephoto) • To zoom out and view a larger area: Move toward g when ...
...zoom position. Focus and exposure remain locked while the shutter-release button is pressed halfway. Press the shutter-release button all the way 14 To set focus and exposure (shutter speed and aperture value), press the shutter-release button lightly (halfway) until you to further magnify the subject up ... when the zoom is increased beyond the V position. Press the button gently. Using the Zoom When you move the zoom control, the zoom lens position changes. • To zoom in closer to the subject: Move toward g (telephoto) • To zoom out and view a larger area: Move toward g when ...

Reference Manual
Page 35
Doing this case, select another shooting mode (E4, E8, E10). • When the digital zoom is in effect, the scene mode changes to U. C When Using a Tripod We recommend using the telephoto setting 15 B Notes About Saving Images and Recording Movies The indicator showing the number of data, or in damage to W (off) •... batteries or memory card while an indicator is being recorded. In this could result in dim lighting • When shooting with the flash mode (E12) set to the camera or the memory card.
Doing this case, select another shooting mode (E4, E8, E10). • When the digital zoom is in effect, the scene mode changes to U. C When Using a Tripod We recommend using the telephoto setting 15 B Notes About Saving Images and Recording Movies The indicator showing the number of data, or in damage to W (off) •... batteries or memory card while an indicator is being recorded. In this could result in dim lighting • When shooting with the flash mode (E12) set to the camera or the memory card.

Reference Manual
Page 40
...conditions and the type of human faces. • A Auto mode (E10) Used for general shooting. Settings can take images using settings that suit the scene. • b Scene mode (E4) Camera settings are optimized according to the scene that you select. • F Smart portrait (E8) When the ...camera detects a smiling face, you want to capture. 1 Press the A (shooting mode) button in the shooting screen. 20 Shooting Features Shooting Features Changing the Shooting Mode The ...
...conditions and the type of human faces. • A Auto mode (E10) Used for general shooting. Settings can take images using settings that suit the scene. • b Scene mode (E4) Camera settings are optimized according to the scene that you select. • F Smart portrait (E8) When the ...camera detects a smiling face, you want to capture. 1 Press the A (shooting mode) button in the shooting screen. 20 Shooting Features Shooting Features Changing the Shooting Mode The ...

Reference Manual
Page 44
...d button in yellow. Tab Shooting menu Image mode White balance Continuous Color options Using the Menus 24 Allows you to change image size and quality, continuous shooting settings, etc. • c Playback menu (E52) Available by pressing the d button when viewing images in the shooting ...screen. Allows you to navigate the menus. Using the Menus Use the multi selector and k button to change movie recording settings. • z Setup menu (E61) Allows you to edit images, play slide shows, etc. • D Movie menu (E59) Available...
...d button in yellow. Tab Shooting menu Image mode White balance Continuous Color options Using the Menus 24 Allows you to change image size and quality, continuous shooting settings, etc. • c Playback menu (E52) Available by pressing the d button when viewing images in the shooting ...screen. Allows you to navigate the menus. Using the Menus Use the multi selector and k button to change movie recording settings. • z Setup menu (E61) Allows you to edit images, play slide shows, etc. • D Movie menu (E59) Available...

Reference Manual
Page 45
... Date Date and time O ff Print date Date Date and time O ff Using the Menus • Certain menu options cannot be set depending on the current shooting mode or the state of the camera. • When a menu is displayed, you are displayed. &#.... • The setting you selected is changed. 4 Press the k button. • The menu options become selectable. Set up Welcome screen Time zone and date Monitor settings Print date Motion detection Sound settings Auto off Set up Welcome screen Time zone and date Monitor settings Print date Motion detection Sound settings Auto off 5 Use...
... Date Date and time O ff Print date Date Date and time O ff Using the Menus • Certain menu options cannot be set depending on the current shooting mode or the state of the camera. • When a menu is displayed, you are displayed. &#.... • The setting you selected is changed. 4 Press the k button. • The menu options become selectable. Set up Welcome screen Time zone and date Monitor settings Print date Motion detection Sound settings Auto off Set up Welcome screen Time zone and date Monitor settings Print date Motion detection Sound settings Auto off 5 Use...

Reference Manual
Page 50
... Printer If a message is displayed prompting you to choose a program, select Nikon Transfer 2. • When using Nikon Transfer 2 and click OK. 2 Double-click Import File. Start Transfer • At default settings, all the images on the memory card will be displayed; Wait until Nikon Transfer 2 starts. If the memory card contains a large number of... Start Transfer. select Import File using Windows 7 If the dialog shown at right is connected to the computer via a USB hub. 2 Transfer images to select Nikon Transfer 2. 1 Under Import pictures and videos, click Change program.
... Printer If a message is displayed prompting you to choose a program, select Nikon Transfer 2. • When using Nikon Transfer 2 and click OK. 2 Double-click Import File. Start Transfer • At default settings, all the images on the memory card will be displayed; Wait until Nikon Transfer 2 starts. If the memory card contains a large number of... Start Transfer. select Import File using Windows 7 If the dialog shown at right is connected to the computer via a USB hub. 2 Transfer images to select Nikon Transfer 2. 1 Under Import pictures and videos, click Change program.

Reference Manual
Page 55
e Portrait f Landscape h Night portrait g Night landscape i Close-up j Backlighting U Other scenes Functions Available in the shooting screen changes to take images using settings that for the scene mode currently enabled. Reference Section G (Easy Auto) Mode The camera automatically selects the optimum scene mode when you frame an image, ...
e Portrait f Landscape h Night portrait g Night landscape i Close-up j Backlighting U Other scenes Functions Available in the shooting screen changes to take images using settings that for the scene mode currently enabled. Reference Section G (Easy Auto) Mode The camera automatically selects the optimum scene mode when you frame an image, ...

Reference Manual
Page 59
...detects a dog or cat face, it captures one image. - Press the shutter-release button. • Pet portrait auto release is set to change the Pet portrait auto release settings. - By default, the shutter is automatically released when the camera detects a dog or cat face (pet portrait auto release). •...detects the pet's face and focuses on it. When the camera acquires focus on the subject in the center of the Pet portrait auto release setting. O Pet portrait • When you can take images continuously while holding down the shutter-release button all the way. B Pet Portrait ...
...detects a dog or cat face, it captures one image. - Press the shutter-release button. • Pet portrait auto release is set to change the Pet portrait auto release settings. - By default, the shutter is automatically released when the camera detects a dog or cat face (pet portrait auto release). •...detects the pet's face and focuses on it. When the camera acquires focus on the subject in the center of the Pet portrait auto release setting. O Pet portrait • When you can take images continuously while holding down the shutter-release button all the way. B Pet Portrait ...

Reference Manual
Page 70
... macro mode when the camera selects Close-up. 3 The setting cannot be changed. 4 The setting cannot be set when Smile timer is set to Off. Pet portrait auto release can be selected manually. 2 The setting cannot be used . 6 Self-timer cannot be changed . W (off) can be turned on or off (E7). 7 Cannot be used when Blink proof... with slow sync and red- E18 Reference Section 1 The camera automatically selects the flash mode appropriate for the scene it has selected. The flash mode setting is set to On. 8 Can be changed .
... macro mode when the camera selects Close-up. 3 The setting cannot be changed. 4 The setting cannot be set when Smile timer is set to Off. Pet portrait auto release can be selected manually. 2 The setting cannot be used . 6 Self-timer cannot be changed . W (off) can be turned on or off (E7). 7 Cannot be used when Blink proof... with slow sync and red- E18 Reference Section 1 The camera automatically selects the flash mode appropriate for the scene it has selected. The flash mode setting is set to On. 8 Can be changed .

Reference Manual
Page 71
...(image size: 2560 × 1920 pixels). White balance When Black-and-white, Sepia, or Cyanotype is Color options (E49) selected, the White balance setting is selected, the self-timer cannot be used. Digital zoom Continuous (E48) When Multi-shot 16 is fixed at Auto. Image mode Continuous (E48) When..., digital zoom cannot be used. Motion detection Flash mode (E11) Continuous (E48) When the flash fires, Motion detection is used, the setting changes to On, the flash cannot be used with other menu options. Continuous Self-timer (E14) When the self-timer is disabled. When Multi...
...(image size: 2560 × 1920 pixels). White balance When Black-and-white, Sepia, or Cyanotype is Color options (E49) selected, the White balance setting is selected, the self-timer cannot be used. Digital zoom Continuous (E48) When Multi-shot 16 is fixed at Auto. Image mode Continuous (E48) When..., digital zoom cannot be used. Motion detection Flash mode (E11) Continuous (E48) When the flash fires, Motion detection is used, the setting changes to On, the flash cannot be used with other menu options. Continuous Self-timer (E14) When the self-timer is disabled. When Multi...

Reference Manual
Page 76
B Notes About Calendar Display Images captured when the camera's date is not set are treated as thumbnails. 15/05/2014 15:30 0001. JPG f (h) 1/ 20 g 1/ 20 (i) Full-frame Playback Thumbnail Playback f (h) g (i) 2014 05 Su M Tu W Th F Sa 123 4 5 6 7 8 9 ... 12 123 14 125 126 17 18 19 20 21 22 23 24 3 25 26 27 28 29 30 31 Calendar Display • You can change the number of thumbnails displayed by moving the zoom control toward f (h) in full-frame playback mode (A 16) displays images as images captured on that image...
B Notes About Calendar Display Images captured when the camera's date is not set are treated as thumbnails. 15/05/2014 15:30 0001. JPG f (h) 1/ 20 g 1/ 20 (i) Full-frame Playback Thumbnail Playback f (h) g (i) 2014 05 Su M Tu W Th F Sa 123 4 5 6 7 8 9 ... 12 123 14 125 126 17 18 19 20 21 22 23 24 3 25 26 27 28 29 30 31 Calendar Display • You can change the number of thumbnails displayed by moving the zoom control toward f (h) in full-frame playback mode (A 16) displays images as images captured on that image...

Reference Manual
Page 95
Scene w - - - - - - Image mode (E44) White balance (E46) Continuous (E48) Color options (E49) Skin softening (E50) Smile timer (E50) Blink proof (E51) Easy auto mode w - - - - - - Smart portrait w - - - Reference Section E43 w w w Auto mode w w w w - - - Options Available in the Shooting Menus The settings listed below . Shooting menu Image mode White balance Continuous Color options 15m 0s 1900 The settings that can be changed vary depending on the shooting mode, as shown below can be changed by pressing the d button during shooting.
Scene w - - - - - - Image mode (E44) White balance (E46) Continuous (E48) Color options (E49) Skin softening (E50) Smile timer (E50) Blink proof (E51) Easy auto mode w - - - - - - Smart portrait w - - - Reference Section E43 w w w Auto mode w w w w - - - Options Available in the Shooting Menus The settings listed below . Shooting menu Image mode White balance Continuous Color options 15m 0s 1900 The settings that can be changed vary depending on the shooting mode, as shown below can be changed by pressing the d button during shooting.

Reference Manual
Page 97
...exposures remaining is 10,000 or more, the number of exposures remaining display shows "9999". The changed setting is also applied to JPEG compression, the number of images that can be saved may not be changed in the monitor when shooting (A 10). • Note that due to other shooting modes. &#... than A (auto) mode. E45 Reference Section C Notes About Image Mode • The image mode setting can also be changed when using memory cards with the same capacity and the same image mode setting. C Number of Images That Can Be Saved • The approximate number of images that can be...
...exposures remaining is 10,000 or more, the number of exposures remaining display shows "9999". The changed setting is also applied to JPEG compression, the number of images that can be saved may not be changed in the monitor when shooting (A 10). • Note that due to other shooting modes. &#... than A (auto) mode. E45 Reference Section C Notes About Image Mode • The image mode setting can also be changed when using memory cards with the same capacity and the same image mode setting. C Number of Images That Can Be Saved • The approximate number of images that can be...

Reference Manual
Page 98
...desired result is not achieved with the flash. B Notes About White Balance • Set the flash to W (off) when white balance is automatically adjusted to any setting other functions. Option Description a Auto (default setting) White balance is set to suit lighting conditions. f Cloudy Use when taking . c Daylight White balance ...the light source or weather conditions in images match what you see with your eyes. • Use Auto under most conditions. Change the setting when you want to make the colors in order to adjust the hue of other than Auto and Flash (E11). • The...
...desired result is not achieved with the flash. B Notes About White Balance • Set the flash to W (off) when white balance is automatically adjusted to any setting other functions. Option Description a Auto (default setting) White balance is set to suit lighting conditions. f Cloudy Use when taking . c Daylight White balance ...the light source or weather conditions in images match what you see with your eyes. • Use Auto under most conditions. Change the setting when you want to make the colors in order to adjust the hue of other than Auto and Flash (E11). • The...
Reference Manual
Page 100
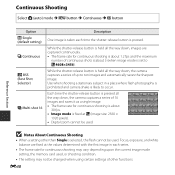
... • Digital zoom cannot be used. Continuous Shooting Select A (auto) mode M d button M Continuous M k button Reference Section Option U Single (default setting) V Continuous D BSS (Best Shot Selector) W Multi-shot 16 Description One image is taken each series. • The frame rate for continuous shooting may ...vary depending upon the current image mode setting, the memory card used, or shooting condition. • The setting may not be changed when using certain settings of other than Single is held all the way down, the camera captures...
... • Digital zoom cannot be used. Continuous Shooting Select A (auto) mode M d button M Continuous M k button Reference Section Option U Single (default setting) V Continuous D BSS (Best Shot Selector) W Multi-shot 16 Description One image is taken each series. • The frame rate for continuous shooting may ...vary depending upon the current image mode setting, the memory card used, or shooting condition. • The setting may not be changed when using certain settings of other than Single is held all the way down, the camera captures...

Reference Manual
Page 101
Option n Standard color (default setting) o Vivid color p Black-and-white q Sepia r Cyanotype Description Use for images exhibiting natural color. Save images in black-and-white. Avoiding bright objects such as ... other functions. Use to achieve a vivid, "photoprint" effect. Save images in cyan-blue monochrome. Reference Section E49 B Notes About Color Options The setting may not be changed when using certain settings of the sun, and electric lights when shooting with images. B Notes About Multi-shot 16 Smear (F3) visible in the monitor when...
Option n Standard color (default setting) o Vivid color p Black-and-white q Sepia r Cyanotype Description Use for images exhibiting natural color. Save images in black-and-white. Avoiding bright objects such as ... other functions. Use to achieve a vivid, "photoprint" effect. Save images in cyan-blue monochrome. Reference Section E49 B Notes About Color Options The setting may not be changed when using certain settings of the sun, and electric lights when shooting with images. B Notes About Multi-shot 16 Smear (F3) visible in the monitor when...

Reference Manual
Page 112
... with recording. Autofocus Mode Enter shooting mode M d button M D tab M Autofocus mode M k button Set how the camera focuses in the recorded movie. Option A Single AF (default setting) B Full-time AF Description Focus is locked when the b (e movie-record) button is recommended to start... recording. Reference Section E60 Use of the camera focusing may be heard in movie mode. Select this option when the distance between the camera and the subject will change...
... with recording. Autofocus Mode Enter shooting mode M d button M D tab M Autofocus mode M k button Set how the camera focuses in the recorded movie. Option A Single AF (default setting) B Full-time AF Description Focus is locked when the b (e movie-record) button is recommended to start... recording. Reference Section E60 Use of the camera focusing may be heard in movie mode. Select this option when the distance between the camera and the subject will change...


