
Reference Manual
Page 6
E: "Reference Section", F: "Technical Notes and Index." • SD, SDHC, and SDXC memory cards are referred to as "memory cards" in this manual. • The setting at the time of purchase is referred to find the information you need, the following symbols and conventions are ...
E: "Reference Section", F: "Technical Notes and Index." • SD, SDHC, and SDXC memory cards are referred to as "memory cards" in this manual. • The setting at the time of purchase is referred to find the information you need, the following symbols and conventions are ...

Reference Manual
Page 9
... malicious use of empty sky). vii Ensuring the privacy of Data Storage Devices Please note that deleting images or formatting data storage devices such as memory cards or built-in camera memory does not completely erase the original image data. Introduction Disposing of such data is the user's responsibility.
... malicious use of empty sky). vii Ensuring the privacy of Data Storage Devices Please note that deleting images or formatting data storage devices such as memory cards or built-in camera memory does not completely erase the original image data. Introduction Disposing of such data is the user's responsibility.

Reference Manual
Page 17
... xii Parts of the Camera 1 The Camera Body 1 The Monitor 3 Shooting Mode 3 Playback Mode 5 Preparing for Shooting 6 Insert the Batteries and Memory Card ......... 6 Applicable Batteries 6 Removing the Batteries or Memory Card ... 7 Internal Memory and Memory Cards 7 Turn the Camera On and Set the Display Language, Date, and Time 8 Using the Camera 12 Shooting with Easy Auto Mode...
... xii Parts of the Camera 1 The Camera Body 1 The Monitor 3 Shooting Mode 3 Playback Mode 5 Preparing for Shooting 6 Insert the Batteries and Memory Card ......... 6 Applicable Batteries 6 Removing the Batteries or Memory Card ... 7 Internal Memory and Memory Cards 7 Turn the Camera On and Set the Display Language, Date, and Time 8 Using the Camera 12 Shooting with Easy Auto Mode...
Reference Manual
Page 19
...Menu E52 a Print Order (Creating a DPOF Print Order E52 b Slide Show E54 d Protect E55 f Rotate Image E57 h Copy (Copy Between Internal Memory and Memory Card E58 The Movie Menu E59 Movie Options E59 Autofocus Mode E60 The Setup Menu E61 Welcome Screen E61 Time Zone and Date E62 Monitor Settings... E64 Print Date (Imprinting Date and Time E66 Motion Detection E67 Sound Settings E67 Auto Off E68 Format Memory/Format Card E69 Language E69 Video Mode E69 Blink Warning E70 Eye-Fi Upload E71 Reset All E72 Battery Type E72 Firmware Version E73 Error...
...Menu E52 a Print Order (Creating a DPOF Print Order E52 b Slide Show E54 d Protect E55 f Rotate Image E57 h Copy (Copy Between Internal Memory and Memory Card E58 The Movie Menu E59 Movie Options E59 Autofocus Mode E60 The Setup Menu E61 Welcome Screen E61 Time Zone and Date E62 Monitor Settings... E64 Print Date (Imprinting Date and Time E66 Motion Detection E67 Sound Settings E67 Auto Off E68 Format Memory/Format Card E69 Language E69 Video Mode E69 Blink Warning E70 Eye-Fi Upload E71 Reset All E72 Battery Type E72 Firmware Version E73 Error...

Reference Manual
Page 20
Introduction Technical Notes and Index F1 Caring for the Product F2 The Camera F2 Batteries F4 Memory Cards F6 Cleaning and Storage F7 Cleaning F7 Storage F7 Troubleshooting F8 Specifications F15 Approved Memory Cards F19 Index F21 xviii
Introduction Technical Notes and Index F1 Caring for the Product F2 The Camera F2 Batteries F4 Memory Cards F6 Cleaning and Storage F7 Cleaning F7 Storage F7 Troubleshooting F8 Specifications F15 Approved Memory Cards F19 Index F21 xviii
Reference Manual
Page 22
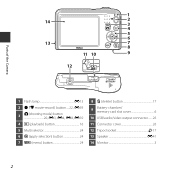
1 14 2 3 4 5 6 13 7 8 11 10 9 12 Parts of the Camera 1 Flash lamp E13 2 b (e movie-record) button.....22, E39 3 A (shooting mode) button 20, E3, E4, E8, E10 4 c (playback) button 16 5 Multi selector 24 6 k (apply selection) button 24 7 d (menu) button 24 8 l (delete) button 17 9 Battery-chamber/ memory card slot cover 6 10 USB/audio/video output connector.......26 11 Connector cover 26 12 Tripod socket F17 13 Speaker E41 14 Monitor 3 2
1 14 2 3 4 5 6 13 7 8 11 10 9 12 Parts of the Camera 1 Flash lamp E13 2 b (e movie-record) button.....22, E39 3 A (shooting mode) button 20, E3, E4, E8, E10 4 c (playback) button 16 5 Multi selector 24 6 k (apply selection) button 24 7 d (menu) button 24 8 l (delete) button 17 9 Battery-chamber/ memory card slot cover 6 10 USB/audio/video output connector.......26 11 Connector cover 26 12 Tripod socket F17 13 Speaker E41 14 Monitor 3 2

Reference Manual
Page 26
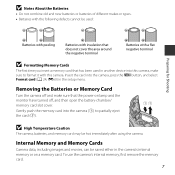
...Shooting Preparing for Shooting Insert the Batteries and Memory Card 1 Open the battery-chamber/memory card slot cover. • Hold the camera upside down or backwards could damage the camera and the memory card. 3 Close the battery-chamber/memory card slot cover. Applicable Batteries • Two ...6 • Two EN-MH2 rechargeable Ni-MH (nickel metal hydride) batteries 2 1 Memory card slot 1 2 B Be Careful to prevent the batteries from falling out. 2 Insert the batteries and memory card. • Confirm that the positive (+) and negative (-) battery terminals are oriented correctly and...
...Shooting Preparing for Shooting Insert the Batteries and Memory Card 1 Open the battery-chamber/memory card slot cover. • Hold the camera upside down or backwards could damage the camera and the memory card. 3 Close the battery-chamber/memory card slot cover. Applicable Batteries • Two ...6 • Two EN-MH2 rechargeable Ni-MH (nickel metal hydride) batteries 2 1 Memory card slot 1 2 B Be Careful to prevent the batteries from falling out. 2 Insert the batteries and memory card. • Confirm that the positive (+) and negative (-) battery terminals are oriented correctly and...
Reference Manual
Page 27
...the following defects cannot be used in another device into this camera. Insert the card into the camera (1) to format it with a flat negative terminal B Formatting Memory Cards The first time you insert a memory card that has been used : Preparing for Shooting Batteries with peeling Batteries with insulation...terminal Batteries with this camera, make sure that the power-on a memory card. Gently push the memory card into the camera, press the d button, and select Format card (A 24, E69) in the camera's internal memory or on lamp and the monitor have turned off and make sure to...
...the following defects cannot be used in another device into this camera. Insert the card into the camera (1) to format it with a flat negative terminal B Formatting Memory Cards The first time you insert a memory card that has been used : Preparing for Shooting Batteries with peeling Batteries with insulation...terminal Batteries with this camera, make sure that the power-on a memory card. Gently push the memory card into the camera, press the d button, and select Format card (A 24, E69) in the camera's internal memory or on lamp and the monitor have turned off and make sure to...
Reference Manual
Page 30
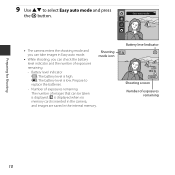
... remaining Preparing for Shooting 10 Battery level indicator 15m 0s 1900 Shooting screen Number of images that can take images in the internal memory. C is displayed when no memory card is inserted in the camera, and images are saved in Easy auto mode. • While shooting, you can be taken is displayed. Prepare...
... remaining Preparing for Shooting 10 Battery level indicator 15m 0s 1900 Shooting screen Number of images that can take images in the internal memory. C is displayed when no memory card is inserted in the camera, and images are saved in Easy auto mode. • While shooting, you can be taken is displayed. Prepare...

Reference Manual
Page 35
... in effect, the scene mode changes to W (off) • When using the telephoto setting 15 Do not open the battery-chamber/memory card slot cover or remove the batteries or memory card while an indicator is flashing. Doing this case, select another shooting mode (E4, E8, E10). • When the digital zoom is... being saved or while a movie is in damage to the camera or the memory card. Using the Camera B Notes About Easy Auto Mode • Depending upon shooting conditions, the camera may not select the desired scene mode.
... in effect, the scene mode changes to W (off) • When using the telephoto setting 15 Do not open the battery-chamber/memory card slot cover or remove the batteries or memory card while an indicator is flashing. Doing this case, select another shooting mode (E4, E8, E10). • When the digital zoom is... being saved or while a movie is in damage to the camera or the memory card. Using the Camera B Notes About Easy Auto Mode • Depending upon shooting conditions, the camera may not select the desired scene mode.
Reference Manual
Page 49
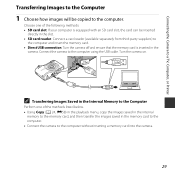
...the internal memory to the memory card, and then transfer the images saved in the memory card to the computer. • Connect the camera to the computer and insert the memory card. • Direct USB connection: Turn the camera off and ensure that the memory card is equipped with an SD card slot, the card can ...be copied to the computer using the USB cable. Turn the camera on. Choose one of the following methods: • SD card slot: If your computer is inserted in the slot...
...the internal memory to the memory card, and then transfer the images saved in the memory card to the computer. • Connect the camera to the computer and insert the memory card. • Direct USB connection: Turn the camera off and ensure that the memory card is equipped with an SD card slot, the card can ...be copied to the computer using the USB cable. Turn the camera on. Choose one of the following methods: • SD card slot: If your computer is inserted in the slot...

Reference Manual
Page 50
...displayed prompting you to choose a program, select Nikon Transfer 2. • When using Nikon Transfer 2 and click OK. 2 Double-click Import File. Wait until Nikon Transfer 2 starts. Start Transfer • At default settings, all the images on the memory card will be recognized if the camera is displayed,... follow the steps below to the computer. 30 B Connecting the USB Cable The connection may take a while for Nikon Transfer 2 to the computer. • Click Start Transfer...
...displayed prompting you to choose a program, select Nikon Transfer 2. • When using Nikon Transfer 2 and click OK. 2 Double-click Import File. Wait until Nikon Transfer 2 starts. Start Transfer • At default settings, all the images on the memory card will be recognized if the camera is displayed,... follow the steps below to the computer. 30 B Connecting the USB Cable The connection may take a while for Nikon Transfer 2 to the computer. • Click Start Transfer...
Reference Manual
Page 51
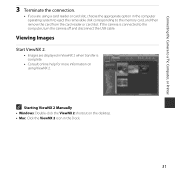
..., or Printer 3 Terminate the connection. • If you are displayed in ViewNX 2 when transfer is connected to the memory card, and then remove the card from the card reader or card slot. Viewing Images Start ViewNX 2. • Images are using ViewNX 2. C Starting ViewNX 2 Manually • Windows: ...Double-click the ViewNX 2 shortcut on using a card reader or card slot, choose the appropriate option in the Dock. 31 If the camera is complete. • Consult online help for more information on...
..., or Printer 3 Terminate the connection. • If you are displayed in ViewNX 2 when transfer is connected to the memory card, and then remove the card from the card reader or card slot. Viewing Images Start ViewNX 2. • Images are using ViewNX 2. C Starting ViewNX 2 Manually • Windows: ...Double-click the ViewNX 2 shortcut on using a card reader or card slot, choose the appropriate option in the Dock. 31 If the camera is complete. • Consult online help for more information on...
Reference Manual
Page 57
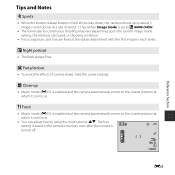
... the camera is set to P 4608×3456). • The frame rate for continuous shooting may vary depending upon the current image mode setting, the memory card used, or shooting condition. • Focus, exposure, and hue are fixed at which it can adjust hue by using the multi selector HI. k Close-up...
... the camera is set to P 4608×3456). • The frame rate for continuous shooting may vary depending upon the current image mode setting, the memory card used, or shooting condition. • Focus, exposure, and hue are fixed at which it can adjust hue by using the multi selector HI. k Close-up...
Reference Manual
Page 89
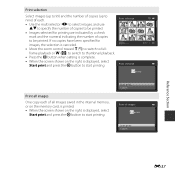
... copies have been specified for printing are indicated by a check mark and the numeral indicating the number of all images saved in the internal memory, or on the memory card, is printed. • When the screen shown on the right is canceled. frame playback or f (h) to switch to thumbnail playback. • Press the...
... copies have been specified for printing are indicated by a check mark and the numeral indicating the number of all images saved in the internal memory, or on the memory card, is printed. • When the screen shown on the right is canceled. frame playback or f (h) to switch to thumbnail playback. • Press the...
Reference Manual
Page 91
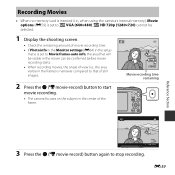
Recording Movies • When no memory card is inserted (i.e., when using the camera's internal memory), Movie options (E59) is narrower compared to that will be visible in the movie can be selected. 1 Display the shooting screen. • Check the remaining ...
Recording Movies • When no memory card is inserted (i.e., when using the camera's internal memory), Movie options (E59) is narrower compared to that will be visible in the movie can be selected. 1 Display the shooting screen. • Check the remaining ...
Reference Manual
Page 92
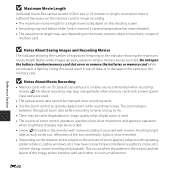
...Length Individual movie files cannot exceed 4 GB in size or 29 minutes in length, even when there is sufficient free space on the memory card for longer recording. • The maximum movie length for a single movie is displayed on the movie content, subject movement, or type of... subjects with movies. it is being saved or while a movie is not a malfunction. Do not open the battery-chamber/memory card slot cover or remove the batteries or memory card while an indicator is recommended. • Depending on the distance to the subject or the amount of zoom control operation, autofocus...
...Length Individual movie files cannot exceed 4 GB in size or 29 minutes in length, even when there is sufficient free space on the memory card for longer recording. • The maximum movie length for a single movie is displayed on the movie content, subject movement, or type of... subjects with movies. it is being saved or while a movie is not a malfunction. Do not open the battery-chamber/memory card slot cover or remove the batteries or memory card while an indicator is recommended. • Depending on the distance to the subject or the amount of zoom control operation, autofocus...

Reference Manual
Page 97
...be changed in the monitor when shooting (A 10). • Note that due to other shooting modes. • The setting may not be changed when using memory cards with the same capacity and the same image mode setting. The changed setting is 10,000 or more, the number of exposures remaining display shows...depending on the image content, even when using certain settings of images that can be saved may vary greatly depending on the make of the memory card. • If the number of exposures remaining is also applied to JPEG compression, the number of other than A (auto) mode.
...be changed in the monitor when shooting (A 10). • Note that due to other shooting modes. • The setting may not be changed when using memory cards with the same capacity and the same image mode setting. The changed setting is 10,000 or more, the number of exposures remaining display shows...depending on the image content, even when using certain settings of images that can be saved may vary greatly depending on the make of the memory card. • If the number of exposures remaining is also applied to JPEG compression, the number of other than A (auto) mode.
Reference Manual
Page 100
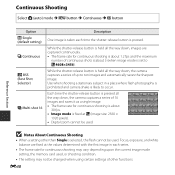
... 16 Description One image is taken each series. • The frame rate for continuous shooting may vary depending upon the current image mode setting, the memory card used, or shooting condition. • The setting may not be changed when using certain settings of other than Single is selected, the flash cannot be...
... 16 Description One image is taken each series. • The frame rate for continuous shooting may vary depending upon the current image mode setting, the memory card used, or shooting condition. • The setting may not be changed when using certain settings of other than Single is selected, the flash cannot be...

Reference Manual
Page 104
... settings in advance, you can use them with the printing methods listed below. • Taking the memory card to a digital photo lab that supports DPOF (Digital Print Order Format) printing. • Inserting the memory card into a DPOF-compatible printer's card slot. • Connecting the camera to a PictBridge-compatible printer (E33). 1 Use the multi selector HI...
... settings in advance, you can use them with the printing methods listed below. • Taking the memory card to a digital photo lab that supports DPOF (Digital Print Order Format) printing. • Inserting the memory card into a DPOF-compatible printer's card slot. • Connecting the camera to a PictBridge-compatible printer (E33). 1 Use the multi selector HI...


