Reference Manual
Page 13
...output jacks, use only the cables provided or sold by Nikon for use could result in overheating and damage to the charger. • Dust on battery power for an extended period. Observe the following precautions when handling batteries for use with travel converters or adapters designed to convert ...product, be sure it is not in use, attach the terminal cover and store in or expose to water. • Replace the terminal cover when transporting the battery. Before removing the battery turn the camera off and allow the battery to cool. • Discontinue use or when the product has been...
...output jacks, use only the cables provided or sold by Nikon for use could result in overheating and damage to the charger. • Dust on battery power for an extended period. Observe the following precautions when handling batteries for use with travel converters or adapters designed to convert ...product, be sure it is not in use, attach the terminal cover and store in or expose to water. • Replace the terminal cover when transporting the battery. Before removing the battery turn the camera off and allow the battery to cool. • Discontinue use or when the product has been...
Reference Manual
Page 20
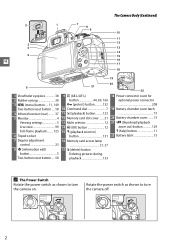
...9 A (AE-L/AF-L) button 44, 69, 166 L (protect) button ...........132 10 Command dial 7 11 K (playback) button..........123 12 Memory card slot cover .......21 13 Multi selector 12 14 J (OK) button 12 15 X (playback zoom in) button 131 16 Memory card access lamp 21, 27 17 O (...delete) button Deleting pictures during playback 133 18 Power connector cover for optional power connector 208 19 Battery-chamber cover latch 15 20 Battery-chamber cover........ 15 21 W (thumbnail/playback zoom out) button 129 Q (help) button 11 22 Battery latch 15 A The Power Switch Rotate the power switch as...
...9 A (AE-L/AF-L) button 44, 69, 166 L (protect) button ...........132 10 Command dial 7 11 K (playback) button..........123 12 Memory card slot cover .......21 13 Multi selector 12 14 J (OK) button 12 15 X (playback zoom in) button 131 16 Memory card access lamp 21, 27 17 O (...delete) button Deleting pictures during playback 133 18 Power connector cover for optional power connector 208 19 Battery-chamber cover latch 15 20 Battery-chamber cover........ 15 21 W (thumbnail/playback zoom out) button 129 Q (help) button 11 22 Battery latch 15 A The Power Switch Rotate the power switch as...

Reference Manual
Page 32
... if its temperature is complete. Remove and reinsert the battery to fully recharge the battery when no charge remains. Remove the terminal cover from the battery. 2 Insert the battery. Attempting to observe this precaution could damage the product. 1 Remove the terminal cover. The battery will blink while the battery charges. Charging is powered by an EN-EL14 rechargeable...
... if its temperature is complete. Remove and reinsert the battery to fully recharge the battery when no charge remains. Remove the terminal cover from the battery. 2 Insert the battery. Attempting to observe this precaution could damage the product. 1 Remove the terminal cover. The battery will blink while the battery charges. Charging is powered by an EN-EL14 rechargeable...

Reference Manual
Page 33
... arrow to e one side. w X q r Battery latch A Removing the Battery Turn the camera off and open (w) the battery-chamber cover. 3 Insert the battery. Press the battery latch in place when the battery is fully inserted (r). 4 Close the battery-chamber cover. Insert the Battery 1 Turn the camera off before inserting or removing batteries. 2 Open the battery-chamber cover. A Inserting and Removing Batteries Always turn the camera...
... arrow to e one side. w X q r Battery latch A Removing the Battery Turn the camera off and open (w) the battery-chamber cover. 3 Insert the battery. Press the battery latch in place when the battery is fully inserted (r). 4 Close the battery-chamber cover. Insert the Battery 1 Turn the camera off before inserting or removing batteries. 2 Open the battery-chamber cover. A Inserting and Removing Batteries Always turn the camera...

Reference Manual
Page 56
... mode. For information on choosing the duration of the self-timer, and the number of exposures selected for the first time, remove the clear plastic battery-insulator sheet. This prevents light entering via the viewfinder interfering with the flash in P, S, A, M, or 0 modes, press the M button to be displayed in which light... using the remote control for Custom Setting c3 (Self-timer; 0 160). once the flash is released. In auto or scene modes in the viewfinder (0 50). A Cover the Viewfinder When taking a photograph with exposure.
... mode. For information on choosing the duration of the self-timer, and the number of exposures selected for the first time, remove the clear plastic battery-insulator sheet. This prevents light entering via the viewfinder interfering with the flash in P, S, A, M, or 0 modes, press the M button to be displayed in which light... using the remote control for Custom Setting c3 (Self-timer; 0 160). once the flash is released. In auto or scene modes in the viewfinder (0 50). A Cover the Viewfinder When taking a photograph with exposure.
Reference Manual
Page 155
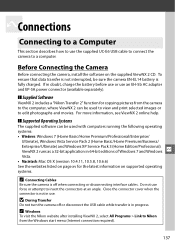
...During Transfer Do not turn the camera off when connecting or disconnecting interface cables. ViewNX 2 runs as a 32-bit application in doubt, charge the battery before use or use the supplied UC-E6 USB cable to connect the camera to a computer. For more information, see ViewNX 2 online help. ...use force or attempt to insert the connectors at an angle. Close the connector cover when the connector is fully charged. A Windows To visit the Nikon website after installing ViewNX 2, select All Programs > Link to Nikon from the camera to the computer, where ViewNX 2 can be used with ...
...During Transfer Do not turn the camera off when connecting or disconnecting interface cables. ViewNX 2 runs as a 32-bit application in doubt, charge the battery before use or use the supplied UC-E6 USB cable to connect the camera to a computer. For more information, see ViewNX 2 online help. ...use force or attempt to insert the connectors at an angle. Close the connector cover when the connector is fully charged. A Windows To visit the Nikon website after installing ViewNX 2, select All Programs > Link to Nikon from the camera to the computer, where ViewNX 2 can be used with ...
Reference Manual
Page 225
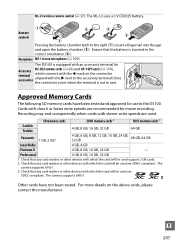
... the connector aligned with class 6 or faster write speeds are SDXC-compliant. Remote controls Pressing the battery-chamber latch to the accessory terminal (close the connector cover when the terminal is not in the correct orientation (r). Other cards have been tested and approved for... supports UHS-1. n 207 Microphones ME-1 stereo microphone (0 109) The D5100 is inserted in use in the D5100. Cards with the 2 next to the right (q), insert a fingernail into the gap and open the battery chamber (w). Recording may end unexpectedly when cards with which connect with the...
... the connector aligned with class 6 or faster write speeds are SDXC-compliant. Remote controls Pressing the battery-chamber latch to the accessory terminal (close the connector cover when the terminal is not in the correct orientation (r). Other cards have been tested and approved for... supports UHS-1. n 207 Microphones ME-1 stereo microphone (0 109) The D5100 is inserted in use in the D5100. Cards with the 2 next to the right (q), insert a fingernail into the gap and open the battery chamber (w). Recording may end unexpectedly when cards with which connect with the...
Reference Manual
Page 226
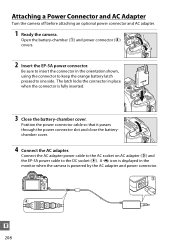
... by the AC adapter and power connector. A P icon is displayed in the monitor when the camera is fully inserted. 3 Close the battery-chamber cover. Attaching a Power Connector and AC Adapter Turn the camera off before attaching an optional power connector and AC adapter. 1 Ready the camera.... Open the battery-chamber (q) and power connector (w) covers. 2 Insert the EP-5A power connector. The latch locks the connector in the orientation shown, using the connector to keep the orange battery latch pressed to the DC socket (r). Position the power ...
... by the AC adapter and power connector. A P icon is displayed in the monitor when the camera is fully inserted. 3 Close the battery-chamber cover. Attaching a Power Connector and AC Adapter Turn the camera off before attaching an optional power connector and AC adapter. 1 Ready the camera.... Open the battery-chamber (q) and power connector (w) covers. 2 Insert the EP-5A power connector. The latch locks the connector in the orientation shown, using the connector to keep the orange battery latch pressed to the DC socket (r). Position the power ...

Reference Manual
Page 227
...with a blower. Do not use alcohol, thinner, or other foreign matter inside the camera may cause damage not covered under warranty. Caring for an extended period, remove the battery and store it be included when the camera is a precision device and requires regular servicing. Do not store ... of over 60% • are next to remove dust and lint, then wipe gently with care. Nikon recommends that the camera be inspected by the original retailer or Nikon-authorized service representative once every one to two years, and that produces strong electromagnetic fields, such as this...
...with a blower. Do not use alcohol, thinner, or other foreign matter inside the camera may cause damage not covered under warranty. Caring for an extended period, remove the battery and store it be included when the camera is a precision device and requires regular servicing. Do not store ... of over 60% • are next to remove dust and lint, then wipe gently with care. Nikon recommends that the camera be inspected by the original retailer or Nikon-authorized service representative once every one to two years, and that produces strong electromagnetic fields, such as this...

Reference Manual
Page 233
... used at room temperature indicates that do not light. If you notice moiré in your location, it fully charged. Purchase a new EN-EL14 battery. • Charge the battery before use in a building, with a blower. recycle in accord with an ambient temperature of 15 to 25 °C (59 to 77 °F; To... keep it may be difficult to see in the monitor may be charged before use and replace the terminal cover. Store the battery in and out, or changing the angle between the subject and the camera. Dust or lint on cold days, the capacity of storage at least ...
... used at room temperature indicates that do not light. If you notice moiré in your location, it fully charged. Purchase a new EN-EL14 battery. • Charge the battery before use in a building, with a blower. recycle in accord with an ambient temperature of 15 to 25 °C (59 to 77 °F; To... keep it may be difficult to see in the monitor may be charged before use and replace the terminal cover. Store the battery in and out, or changing the angle between the subject and the camera. Dust or lint on cold days, the capacity of storage at least ...
Reference Manual
Page 250
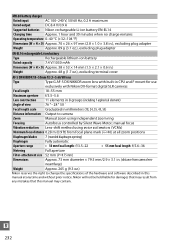
... at any mistakes that may result from camera lens- n 232 MH-24 battery charger Rated input AC 100-240 V, 50/60 Hz, 0.2 A maximum Rated output DC 8.4 V/0.9 A Supported batteries Nikon rechargeable Li-ion battery EN-EL14 Charging time Approx. 1 hour and 30 minutes when no charge ... Rechargeable lithium-ion battery Rated capacity 7.4 V/1030 mAh Dimensions (W × H × D) Approx. 38 × 53 × 14 mm (1.5 × 2.1 × 0.6 in.) Weight Approx. 48 g (1.7 oz.), excluding terminal cover AF-S DX NIKKOR 18-55mm f/3.5-5.6G VR lens Type Type G AF-S DX NIKKOR zoom...
... at any mistakes that may result from camera lens- n 232 MH-24 battery charger Rated input AC 100-240 V, 50/60 Hz, 0.2 A maximum Rated output DC 8.4 V/0.9 A Supported batteries Nikon rechargeable Li-ion battery EN-EL14 Charging time Approx. 1 hour and 30 minutes when no charge ... Rechargeable lithium-ion battery Rated capacity 7.4 V/1030 mAh Dimensions (W × H × D) Approx. 38 × 53 × 14 mm (1.5 × 2.1 × 0.6 in.) Weight Approx. 48 g (1.7 oz.), excluding terminal cover AF-S DX NIKKOR 18-55mm f/3.5-5.6G VR lens Type Type G AF-S DX NIKKOR zoom...


