
User Manual
Page 3
GPS Unit GP-1 User's Manual Table of Contents En For Your Safety 2 Notices 3 Introduction 4 The GP-1 and Supplied Accessories 4 Parts of the GP-1 5 Features of the GP-1 5 Supported Cameras 6 Turning the GP-1 on and O 6 Connecting the GP-1 7 Connecting the Optional MC-DC2 9 Mounting the GP-1 on the Camera 9 Recording GPS Data 11 Notes on the GP-1 15 Precautions for Use 16 Specifications 17 1
GPS Unit GP-1 User's Manual Table of Contents En For Your Safety 2 Notices 3 Introduction 4 The GP-1 and Supplied Accessories 4 Parts of the GP-1 5 Features of the GP-1 5 Supported Cameras 6 Turning the GP-1 on and O 6 Connecting the GP-1 7 Connecting the Optional MC-DC2 9 Mounting the GP-1 on the Camera 9 Recording GPS Data 11 Notes on the GP-1 15 Precautions for Use 16 Specifications 17 1

User Manual
Page 6
See your camera manual for a list of a GP-1 GPS unit, a camera accessory that the package contains the following items: ❑ GP-1 GPS unit ❑ GP1-CA10 cable for ten-pin remote terminals ❑ GP1-CA90 cable for accessory terminals ❑ GP1-CL1 strap adapter &#...cameras, see page 6). Be sure to read this pamphlet) ❑ Warranty D Terminology Function names differ from camera to camera. The GP-1 and Supplied Accessories Confirm that records the latitude, longitude, altitude, and Coordinated Universal Time (UTC) with your photographs (for details. 4
See your camera manual for a list of a GP-1 GPS unit, a camera accessory that the package contains the following items: ❑ GP-1 GPS unit ❑ GP1-CA10 cable for ten-pin remote terminals ❑ GP1-CA90 cable for accessory terminals ❑ GP1-CL1 strap adapter &#...cameras, see page 6). Be sure to read this pamphlet) ❑ Warranty D Terminology Function names differ from camera to camera. The GP-1 and Supplied Accessories Confirm that records the latitude, longitude, altitude, and Coordinated Universal Time (UTC) with your photographs (for details. 4

User Manual
Page 7
Parts of this manual. ቢ LED 11 ባ USB terminal 18 ቤ Eyelet for remote shutter release can be connected via the GP-1). 5 use cell phone strap or other similar strap) ብ Accessory terminal for optional MC-DC2 remote cord 9 ቦ Mount 9, 10 ቧ... ቪ GP1-CA90 cable for connection to cameras with accessory terminals 8 Features of the GP-1 En When connected to the illustration inside the front cover of the GP-1 Refer to a camera that supports GPS, the GP-1 records location information with photographs (if desired, an optional MC-DC2 remote cord for strap...
Parts of this manual. ቢ LED 11 ባ USB terminal 18 ቤ Eyelet for remote shutter release can be connected via the GP-1). 5 use cell phone strap or other similar strap) ብ Accessory terminal for optional MC-DC2 remote cord 9 ቦ Mount 9, 10 ቧ... ቪ GP1-CA90 cable for connection to cameras with accessory terminals 8 Features of the GP-1 En When connected to the illustration inside the front cover of the GP-1 Refer to a camera that supports GPS, the GP-1 records location information with photographs (if desired, an optional MC-DC2 remote cord for strap...

User Manual
Page 8
...For more information, see "Recording GPS Data" (page 13). GP1-CA10 cable for ten-pin remote terminals GP1-CA90 cable for accessory terminals 6 The GP-1 turns off only when the cable connecting it to receive GPS data. even when the camera is off, the GP-1 continues to the camera is ...supplied from the camera. Supported Cameras En The GP-1 can be used with the following cameras:...
...For more information, see "Recording GPS Data" (page 13). GP1-CA10 cable for ten-pin remote terminals GP1-CA90 cable for accessory terminals 6 The GP-1 turns off only when the cable connecting it to receive GPS data. even when the camera is off, the GP-1 continues to the camera is ...supplied from the camera. Supported Cameras En The GP-1 can be used with the following cameras:...
User Manual
Page 9
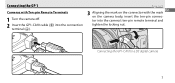
Connecting the GP1-CA10 to a D3 digital camera 7 Connecting the GP-1 Cameras with the mark on the camera body, insert the ten-pin connector into the connection terminal (ቧ). Page 1 of 2 En 3 Aligning the mark on the connector with Ten-pin Remote Terminals 1 Turn the camera off. 2 Insert the GP1-CA10 cable (ቩ) into the camera's ten-pin remote terminal and tighten the locking nut.
Connecting the GP1-CA10 to a D3 digital camera 7 Connecting the GP-1 Cameras with the mark on the camera body, insert the ten-pin connector into the connection terminal (ቧ). Page 1 of 2 En 3 Aligning the mark on the connector with Ten-pin Remote Terminals 1 Turn the camera off. 2 Insert the GP1-CA10 cable (ቩ) into the camera's ten-pin remote terminal and tighten the locking nut.

User Manual
Page 10
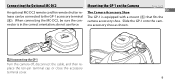
Connecting the GP-1 En Cameras with Accessory Terminals 1 Turn the camera off. 2 Insert the GP1-CA90 cable (ቪ) into the connection terminal (ቧ). Be sure that the connector is in the correct orientation; do not use force. Connecting the GP1-CA90 to a D90 digital camera 8 Page 2 of 2 3 Open the camera accessory terminal cover and insert the GP1-CA90 as shown.
Connecting the GP-1 En Cameras with Accessory Terminals 1 Turn the camera off. 2 Insert the GP1-CA90 cable (ቪ) into the connection terminal (ቧ). Be sure that the connector is in the correct orientation; do not use force. Connecting the GP1-CA90 to a D90 digital camera 8 Page 2 of 2 3 Open the camera accessory terminal cover and insert the GP1-CA90 as shown.
User Manual
Page 11
... is equipped with a mount (ቦ) that fits the camera accessory shoe. Mounting the GP-1 on the Camera Page 1 of 2 En The Camera Accessory Shoe The GP-1 is in the correct orientation; Slide the GP-1 onto the cam- do not use force. era accessory shoe as shown. D Disconnecting the... GP-1 Turn the camera off, disconnect the cable, and then replace the ten-pin terminal ...
... is equipped with a mount (ቦ) that fits the camera accessory shoe. Mounting the GP-1 on the Camera Page 1 of 2 En The Camera Accessory Shoe The GP-1 is in the correct orientation; Slide the GP-1 onto the cam- do not use force. era accessory shoe as shown. D Disconnecting the... GP-1 Turn the camera off, disconnect the cable, and then replace the ten-pin terminal ...

User Manual
Page 12
Page 2 of 2 2 Mount the GP-1 on the camera strap, and that the built-in the correct orientation when the GP-1 is doubled. D Mounting the GP-1 on the Camera Strap Note that signal quality may sometimes not be used to attach the GP-1 to the camera strap. 1 Attach the strap adapter as shown (ቦ). Do not attach the adapter where the strap is mounted on the camera strap as shown. Mounting the GP-1 on the Camera En Mounting the GP-1 on the Camera Strap The supplied strap adapter (ቨ) can be in GPS antenna may drop as a result. 10
Page 2 of 2 2 Mount the GP-1 on the camera strap, and that the built-in the correct orientation when the GP-1 is doubled. D Mounting the GP-1 on the Camera Strap Note that signal quality may sometimes not be used to attach the GP-1 to the camera strap. 1 Attach the strap adapter as shown (ቦ). Do not attach the adapter where the strap is mounted on the camera strap as shown. Mounting the GP-1 on the Camera En Mounting the GP-1 on the Camera Strap The supplied strap adapter (ቨ) can be in GPS antenna may drop as a result. 10
User Manual
Page 13
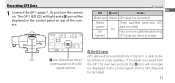
... (ቢ) will light and a O icon will be displayed in the control panel and no GPS data will be recorded only if the GP-1 is received from control panel for the D90 the GP-1 for over two seconds, the O icon will no longer digital camera) be recorded. 11 LED O icon Status Page 1 of the camera...
... (ቢ) will light and a O icon will be displayed in the control panel and no GPS data will be recorded only if the GP-1 is received from control panel for the D90 the GP-1 for over two seconds, the O icon will no longer digital camera) be recorded. 11 LED O icon Status Page 1 of the camera...

User Manual
Page 14
D Coordinated Universal Time (UTC) The Coordinated Universal Time (UTC) received from the time provided by the camera clock. 12 Recording GPS Data Page 2 of 4 En 2 To view GPS data, select GPS > Position in the camera setup menu (this option is recorded separately from the GPS satellite is not available with D2X, D2XS, D2HS, and D200 cameras). The current latitude, longitude, altitude, and Coordinated Universal Time (UTC) will be displayed (the example below shows the display for D90 digital cameras).
D Coordinated Universal Time (UTC) The Coordinated Universal Time (UTC) received from the time provided by the camera clock. 12 Recording GPS Data Page 2 of 4 En 2 To view GPS data, select GPS > Position in the camera setup menu (this option is recorded separately from the GPS satellite is not available with D2X, D2XS, D2HS, and D200 cameras). The current latitude, longitude, altitude, and Coordinated Universal Time (UTC) will be displayed (the example below shows the display for D90 digital cameras).

User Manual
Page 15
... or D90 camera is connected. The drain on the battery but may prevent GPS data from being recorded if the exposure meters are performed for GPS > Auto meter off, the exposure meters will not turn off. Recording GPS Data 3 Take pictures. Check that the O icon is displayed before the picture...off in use. 13 Page 3 of 4 En D Auto Meter Off If Enable is taken. GPS data will turn off while the GP-1 is connected with Disable selected for about three hours, the GP-1 will be reduced by turning the camera off when not in the setup menu for D3, D700,...
... or D90 camera is connected. The drain on the battery but may prevent GPS data from being recorded if the exposure meters are performed for GPS > Auto meter off, the exposure meters will not turn off. Recording GPS Data 3 Take pictures. Check that the O icon is displayed before the picture...off in use. 13 Page 3 of 4 En D Auto Meter Off If Enable is taken. GPS data will turn off while the GP-1 is connected with Disable selected for about three hours, the GP-1 will be reduced by turning the camera off when not in the setup menu for D3, D700,...
User Manual
Page 16
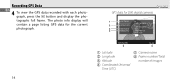
The photo info display will contain a page listing GPS data for the current photograph. 14 Page 4 of 4 GPS data for D90 digital cameras 1 LATITUDE. : N : 35º 36. 371' 2 LONGITUDE : E : 139º 43. 696' 3 ALTITUDE : 35m 4 TIME(UTC) : 2008/09/15 : 01:15:29 N I KON D90 5 12/12 6 ቢ Latitude ባ Longitude ቤ Altitude ብ Coordinated Universal Time (UTC) ቦ Camera name ቧ Frame number/Total number of images Recording GPS Data En 4 To view the GPS data recorded with each photograph, press the K button and display the photographs full frame.
The photo info display will contain a page listing GPS data for the current photograph. 14 Page 4 of 4 GPS data for D90 digital cameras 1 LATITUDE. : N : 35º 36. 371' 2 LONGITUDE : E : 139º 43. 696' 3 ALTITUDE : 35m 4 TIME(UTC) : 2008/09/15 : 01:15:29 N I KON D90 5 12/12 6 ቢ Latitude ባ Longitude ቤ Altitude ብ Coordinated Universal Time (UTC) ቦ Camera name ቧ Frame number/Total number of images Recording GPS Data En 4 To view the GPS data recorded with each photograph, press the K button and display the photographs full frame.

User Manual
Page 17
... not supply the compass heading. Note that block or reflect satellite signals. The GP-1 may be unable to receive GPS data indoors, underground, or in the vicinity of GPS data. Notes on frequencies close to reacquire a signal if the unit has not been used for an extended period or ...has been moved a great distance since GPS data were last received. 15 The presence of cellular telephones or other objects that the GP-1 may take several minutes to those of GPS satellites may prevent or delay the acquisition of the day.
... not supply the compass heading. Note that block or reflect satellite signals. The GP-1 may be unable to receive GPS data indoors, underground, or in the vicinity of GPS data. Notes on frequencies close to reacquire a signal if the unit has not been used for an extended period or ...has been moved a great distance since GPS data were last received. 15 The presence of cellular telephones or other objects that the GP-1 may take several minutes to those of GPS satellites may prevent or delay the acquisition of the day.

User Manual
Page 18
... exposing it to sudden changes in temperature. • Keep away from the appropriate governmental authorities. 16 Turn the camera off and disconnect and reconnect the GP-1. In the event of equipment that generates strong electromagnetic radiation or magnetic fields. This product shall not be exported without authorization from strong magnetic... if immersed in or exposed to water. • Avoid sudden changes in temperature: Sudden changes in the vicinity of continued malfunction, contact your retailer or Nikon-authorized service representative.
... exposing it to sudden changes in temperature. • Keep away from the appropriate governmental authorities. 16 Turn the camera off and disconnect and reconnect the GP-1. In the event of equipment that generates strong electromagnetic radiation or magnetic fields. This product shall not be exported without authorization from strong magnetic... if immersed in or exposed to water. • Avoid sudden changes in temperature: Sudden changes in the vicinity of continued malfunction, contact your retailer or Nikon-authorized service representative.

User Manual
Page 19
... remote cord (available separately) UC-E4 USB cable (supplied with version 3.01) Geodesics WGS84 GPS accuracy * Horizontal: 10 m/33 ft. Specifications En Supported cameras Nikon D3, D700, D300, D2X, D2XS, D2HS, D200, and D90 digital cameras Receiver Tracking channels: 18 (SBAS compliant) Acquisition times* Cold start: Approx. 45 s Hot start: Approx...
... remote cord (available separately) UC-E4 USB cable (supplied with version 3.01) Geodesics WGS84 GPS accuracy * Horizontal: 10 m/33 ft. Specifications En Supported cameras Nikon D3, D700, D300, D2X, D2XS, D2HS, D200, and D90 digital cameras Receiver Tracking channels: 18 (SBAS compliant) Acquisition times* Cold start: Approx. 45 s Hot start: Approx...

User Manual
Page 20
... only. 18 Drivers for use with mapping software and other information on using the GP-1 with a computer: • For users in the U.S.A.: http://www.nikonusa.com/ • For users in Europe and Africa: http://www.europe-nikon.com/support • For users in Asia, Oceania, and the Middle East: ...http://www.nikon-asia.com/ If the GP-1 is supplied from the following Nikon websites, together with your digital camera to the GP-1 USB terminal (ባ) and connect the cable to the computer. Connect the UC-E4 USB cable supplied ...
... only. 18 Drivers for use with mapping software and other information on using the GP-1 with a computer: • For users in the U.S.A.: http://www.nikonusa.com/ • For users in Europe and Africa: http://www.europe-nikon.com/support • For users in Asia, Oceania, and the Middle East: ...http://www.nikon-asia.com/ If the GP-1 is supplied from the following Nikon websites, together with your digital camera to the GP-1 USB terminal (ባ) and connect the cable to the computer. Connect the UC-E4 USB cable supplied ...
User Manual
Page 224
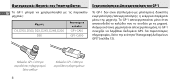
GP1-CA10 6 GP1-CA90 Gr Το GP-1 Μηχανή D3, D700, D300, D2X, D2XS, D2HS, D200 D90 GP1-CA10 GP1-CA90 GP-1 Το GP-1 GP-1 GP-1 GPS GPS 13).
GP1-CA10 6 GP1-CA90 Gr Το GP-1 Μηχανή D3, D700, D300, D2X, D2XS, D2HS, D200 D90 GP1-CA10 GP1-CA90 GP-1 Το GP-1 GP-1 GP-1 GPS GPS 13).

