PrintSuperVision Configuration Guide
Page 58
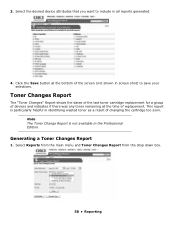
... Toner Changes Report from the drop down box. 58 • Reporting Toner Changes Report The "Toner Changes" Report shows the dates of the last toner cartridge replacement for a group of devices and indicates if there was any toner remaining at the bottom of changing the...
... Toner Changes Report from the drop down box. 58 • Reporting Toner Changes Report The "Toner Changes" Report shows the dates of the last toner cartridge replacement for a group of devices and indicates if there was any toner remaining at the bottom of changing the...

C130n User's Guide (English)
Page 5
... 60 Tray 1 (Multipurpose Tray 60 Other Media 63 Tray 2 65 Duplexing 68 Duplex Printing 68 Output Tray 70 Media Storage 71 6 Replacing Consumables 72 Toner Cartridges 73 General Information 73 Storing and Handling Toner Cartridges 73 5 - C130n User's Guide
... 60 Tray 1 (Multipurpose Tray 60 Other Media 63 Tray 2 65 Duplexing 68 Duplex Printing 68 Output Tray 70 Media Storage 71 6 Replacing Consumables 72 Toner Cartridges 73 General Information 73 Storing and Handling Toner Cartridges 73 5 - C130n User's Guide

C130n User's Guide (English)
Page 6
Replacing a Toner Cartridge 75 Replacing All Toner Cartridges at the Same Time 82 Imaging Cartridges 84 Replacing the Imaging Cartridge 84 The Fuser Unit 87 Replacing the Fuser Unit 87 7 Maintaining the Printer 94 Maintaining the Printer 95 Cleaning the Printer 98 Cleaning the Exterior ... Service Messages 156 9 Installing Accessories 157 Introduction 158 Tray 2 158 Installing Tray 2 158 Duplex Option 162 Installing the Duplexing Attachment 162 Installing the Duplexer 165 6 - C130n User's Guide
Replacing a Toner Cartridge 75 Replacing All Toner Cartridges at the Same Time 82 Imaging Cartridges 84 Replacing the Imaging Cartridge 84 The Fuser Unit 87 Replacing the Fuser Unit 87 7 Maintaining the Printer 94 Maintaining the Printer 95 Cleaning the Printer 98 Cleaning the Exterior ... Service Messages 156 9 Installing Accessories 157 Introduction 158 Tray 2 158 Installing Tray 2 158 Duplex Option 162 Installing the Duplexing Attachment 162 Installing the Duplexer 165 6 - C130n User's Guide

C130n User's Guide (English)
Page 11
Printer Parts The following drawings illustrate the parts of your printer referred to throughout this guide, so please take some time to become familiar with them. C130n User's Guide Front View 1 1-Output tray 6 2-Control panel 3-Front cover 4-Dust cover 5-Tray 1 (Multipurpose tray) 6-Top cover 7-Fuser unit 8-Fuser separator levers 9-Fuser cover lever 10-Imaging cartridge 11-Toner cartridge 7 8 2 3 4 5 9 8 7 10 10 11 11 11 -
Printer Parts The following drawings illustrate the parts of your printer referred to throughout this guide, so please take some time to become familiar with them. C130n User's Guide Front View 1 1-Output tray 6 2-Control panel 3-Front cover 4-Dust cover 5-Tray 1 (Multipurpose tray) 6-Top cover 7-Fuser unit 8-Fuser separator levers 9-Fuser cover lever 10-Imaging cartridge 11-Toner cartridge 7 8 2 3 4 5 9 8 7 10 10 11 11 11 -

C130n User's Guide (English)
Page 32
... MAIN MENU /SYSTEM DEFAULT /SECURITY /CONFIG /ENABLE is different according to the authority of toner that remains in the yellow (Y), magenta (M), cyan (C), and black (K) toner cartridges. C130n User's Guide The displayed menu is set to ON, the user password or administrator password must be printed. 32 - QUALITY MENU (see ) - PAPER MENU (see...
... MAIN MENU /SYSTEM DEFAULT /SECURITY /CONFIG /ENABLE is different according to the authority of toner that remains in the yellow (Y), magenta (M), cyan (C), and black (K) toner cartridges. C130n User's Guide The displayed menu is set to ON, the user password or administrator password must be printed. 32 - QUALITY MENU (see ) - PAPER MENU (see...

C130n User's Guide (English)
Page 39
... CONTINUE is selected, printing continues even if the toner cartridge is selected, the carousel rotates to "Replacing All Toner Cartridges at the same time. For details on page 75. For details on replacing all toner cartridges at the Same Time" on page 75. C130n User's Guide REPLACE BLACK TONER Settings YES/NO If YES...
... CONTINUE is selected, printing continues even if the toner cartridge is selected, the carousel rotates to "Replacing All Toner Cartridges at the same time. For details on page 75. For details on replacing all toner cartridges at the Same Time" on page 75. C130n User's Guide REPLACE BLACK TONER Settings YES/NO If YES...
C130n User's Guide (English)
Page 73
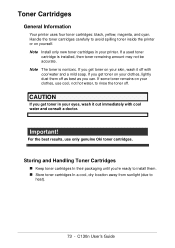
... cool water and consult a doctor. If you get toner in your clothes, use only genuine Oki toner cartridges. Important! For the best results, use cool, not hot water, to install them. " Store toner cartridges In a cool, dry location away from sunlight (due to avoid spilling toner inside the printer ...or on your printer. C130n User's Guide If you get toner on your eyes, wash it off . Note The toner...
... cool water and consult a doctor. If you get toner in your clothes, use only genuine Oki toner cartridges. Important! For the best results, use cool, not hot water, to install them. " Store toner cartridges In a cool, dry location away from sunlight (due to avoid spilling toner inside the printer ...or on your printer. C130n User's Guide If you get toner on your eyes, wash it off . Note The toner...

C130n User's Guide (English)
Page 74
...cartridge is 85% (noncondensing). C130n User's Guide " Always keep toner cartridges level when handling or storing them upside down; Allow the toner to adapt to a warm, humid place, condensation may become caked or unequally distributed. Do not hold, stand or store cartridges on their ends or turn them . the toner inside the cartridges... may occur, degrading print quality. " Keep toner cartridges away from a cold place to the environment for ...
...cartridge is 85% (noncondensing). C130n User's Guide " Always keep toner cartridges level when handling or storing them upside down; Allow the toner to adapt to a warm, humid place, condensation may become caked or unequally distributed. Do not hold, stand or store cartridges on their ends or turn them . the toner inside the cartridges... may occur, degrading print quality. " Keep toner cartridges away from a cold place to the environment for ...

C130n User's Guide (English)
Page 75
...- The message X TONER OUT/REPLACE XXXX (where "X" and "XXXX" represent the color of the toner) appears when a toner cartridge becomes empty. Replacing a Toner Cartridge Important! If toner spills, immediately wipe it off with a soft, dry cloth. Perform the operation described below to see which color... set to CONTINUE, the message X TONER OUT appears. 1 Check the message window to replace the toner cartridge. Follow the steps below to spill toner while replacing a toner cartridge. C130n User's Guide Note If the item TONER OUT ACTION on the MAIN MENU /QUALITY MENU is empty.
...- The message X TONER OUT/REPLACE XXXX (where "X" and "XXXX" represent the color of the toner) appears when a toner cartridge becomes empty. Replacing a Toner Cartridge Important! If toner spills, immediately wipe it off with a soft, dry cloth. Perform the operation described below to see which color... set to CONTINUE, the message X TONER OUT appears. 1 Check the message window to replace the toner cartridge. Follow the steps below to spill toner while replacing a toner cartridge. C130n User's Guide Note If the item TONER OUT ACTION on the MAIN MENU /QUALITY MENU is empty.

C130n User's Guide (English)
Page 76
C130n User's Guide Note Before opening the front cover, open . 76 - ENTER REPLACE TONER X X *YES ENTER *YES IS SELECTED The display then changes to move the toner cartridge for the specified color, so that it is displayed. carousel to OPEN DOOR AND REPLACE X TINER 2 Open the front cover. Press Key ENTER Until Display Reads MENU MAIN MANU ENTER MAIN MENU PRINT MENU × 2 ENTER MAIN MENU QUALITY MENU QUALITY MENU REPLACE TONER ENTER REPLACE TONER BLACK Press until appropriate color (X) is not already open Tray 1 if it can be replaced.
C130n User's Guide Note Before opening the front cover, open . 76 - ENTER REPLACE TONER X X *YES ENTER *YES IS SELECTED The display then changes to move the toner cartridge for the specified color, so that it is displayed. carousel to OPEN DOOR AND REPLACE X TINER 2 Open the front cover. Press Key ENTER Until Display Reads MENU MAIN MANU ENTER MAIN MENU PRINT MENU × 2 ENTER MAIN MENU QUALITY MENU QUALITY MENU REPLACE TONER ENTER REPLACE TONER BLACK Press until appropriate color (X) is not already open Tray 1 if it can be replaced.

C130n User's Guide (English)
Page 77
Note You can identify the toner cartridge by the color of the handle. 4 Pull down the handle on the toner cartridge until the toner cartridge is unlocked and moves out slightly toward you 5 Remove the toner cartridge CAUTION Do not manually rotate the toner cartridge carousel. C130n User's Guide In addition, do not rotate the carousel with force, otherwise it may be replaced has been moved to be damaged. 77 - 3 Check that the toner cartridge to the front.
Note You can identify the toner cartridge by the color of the handle. 4 Pull down the handle on the toner cartridge until the toner cartridge is unlocked and moves out slightly toward you 5 Remove the toner cartridge CAUTION Do not manually rotate the toner cartridge carousel. C130n User's Guide In addition, do not rotate the carousel with force, otherwise it may be replaced has been moved to be damaged. 77 - 3 Check that the toner cartridge to the front.

C130n User's Guide (English)
Page 78
CAUTION Dispose of the empty toner cartridge according to distribute the toner. C130n User's Guide Important! Do not touch the contact indicated in the illustration. Note Make sure that the toner roller cover is securely attached before shaking the toner cartridge. 78 - Do not burn the toner cartridge. 6 Unpack the new toner cartridge. 7 Shake the cartridge horizontally a few times to your local regulations.
CAUTION Dispose of the empty toner cartridge according to distribute the toner. C130n User's Guide Important! Do not touch the contact indicated in the illustration. Note Make sure that the toner roller cover is securely attached before shaking the toner cartridge. 78 - Do not burn the toner cartridge. 6 Unpack the new toner cartridge. 7 Shake the cartridge horizontally a few times to your local regulations.

C130n User's Guide (English)
Page 80
Note Before inserting the toner cartridge, make sure that the color of the toner cartridge with its holders, and then insert the cartridge. 9 Align the shaft on each end of the toner cartridge to be installed is the same as the label on the toner cartridge carousel. 80 - C130n User's Guide
Note Before inserting the toner cartridge, make sure that the color of the toner cartridge with its holders, and then insert the cartridge. 9 Align the shaft on each end of the toner cartridge to be installed is the same as the label on the toner cartridge carousel. 80 - C130n User's Guide

C130n User's Guide (English)
Page 81
Note The printer must complete a calibration cycle (less than 2 minutes) after the toner cartridge has been replaced. C130n User's Guide Important! If you open the top or front cover before the message IDLE appears, the printer stops and repeats the calibration cycle. 81 - Do not touch the contact indicated in the illustration. 10 Press in the toner cartridge until it locks into place. 11 Close the front cover.
Note The printer must complete a calibration cycle (less than 2 minutes) after the toner cartridge has been replaced. C130n User's Guide Important! If you open the top or front cover before the message IDLE appears, the printer stops and repeats the calibration cycle. 81 - Do not touch the contact indicated in the illustration. 10 Press in the toner cartridge until it locks into place. 11 Close the front cover.

C130n User's Guide (English)
Page 82
C130n User's Guide By using the REMOVE ALL mode, all toner cartridges can be replaced at the Same Time CAUTION Be careful not to the REMOVE ALL mode. Replacing All Toner Cartridges at the same time. 1 Perform the operation described below to switch the printer to spill toner while replacing a toner cartridge. If toner spills...
C130n User's Guide By using the REMOVE ALL mode, all toner cartridges can be replaced at the Same Time CAUTION Be careful not to the REMOVE ALL mode. Replacing All Toner Cartridges at the same time. 1 Perform the operation described below to switch the printer to spill toner while replacing a toner cartridge. If toner spills...
C130n User's Guide (English)
Page 83
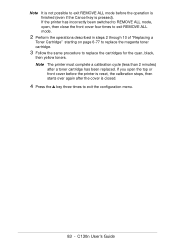
...incorrectly been switched to REMOVE ALL mode, open the top or front cover before the operation is finished (even if the Cancel key is pressed). C130n User's Guide If you open , then close the front cover four times to exit REMOVE ALL mode. 2 Perform the operations described in steps 2...toners. Note It is not possible to exit REMOVE ALL mode before the printer is reset, the calibration stops, then starts over again after a toner cartridge has been replaced. Note The printer must complete a calibration cycle (less than 2 minutes) after the cover is closed. 4 Press the key three times...
...incorrectly been switched to REMOVE ALL mode, open the top or front cover before the operation is finished (even if the Cancel key is pressed). C130n User's Guide If you open , then close the front cover four times to exit REMOVE ALL mode. 2 Perform the operations described in steps 2...toners. Note It is not possible to exit REMOVE ALL mode before the printer is reset, the calibration stops, then starts over again after a toner cartridge has been replaced. Note The printer must complete a calibration cycle (less than 2 minutes) after the cover is closed. 4 Press the key three times...

C130n User's Guide (English)
Page 84
Imaging Cartridges Replacing the Imaging Cartridge Important! C130n User's Guide Note If there is paper in the output tray, remove it, and then fold up the output tray before opening the top cover. 2 Grab the handle and lift it up slightly to the back, and then slowly pull the imaging cartridge out vertically. 84 - When replacing an imaging cartridge, use only a genuine Oki imaging cartridge for your specific printer type. 1 Open the top cover.
Imaging Cartridges Replacing the Imaging Cartridge Important! C130n User's Guide Note If there is paper in the output tray, remove it, and then fold up the output tray before opening the top cover. 2 Grab the handle and lift it up slightly to the back, and then slowly pull the imaging cartridge out vertically. 84 - When replacing an imaging cartridge, use only a genuine Oki imaging cartridge for your specific printer type. 1 Open the top cover.

C130n User's Guide (English)
Page 85
Do not touch the PC drum and the transfer belt on the imaging cartridge. 4 Slowly insert the new imaging cartridge vertically, and then push it slightly down toward you to your local regulations. Do not burn the imaging cartridge. 3 Prepare the new imaging cartridge. Important! C130n User's Guide CAUTION Dispose of the used imaging cartridge according to finish installing the imaging cartridge. 85 -
Do not touch the PC drum and the transfer belt on the imaging cartridge. 4 Slowly insert the new imaging cartridge vertically, and then push it slightly down toward you to your local regulations. Do not burn the imaging cartridge. 3 Prepare the new imaging cartridge. Important! C130n User's Guide CAUTION Dispose of the used imaging cartridge according to finish installing the imaging cartridge. 85 -

C130n User's Guide (English)
Page 86
If you open the top cover before the message IDLE appears, the printer stops and repeats the calibration cycle. 86 - 5 Carefully close the top cover. C130n User's Guide Note The printer must complete a calibration cycle (less than 2 minutes) after the imaging cartridge has been replaced.
If you open the top cover before the message IDLE appears, the printer stops and repeats the calibration cycle. 86 - 5 Carefully close the top cover. C130n User's Guide Note The printer must complete a calibration cycle (less than 2 minutes) after the imaging cartridge has been replaced.

C130n User's Guide (English)
Page 96
...-lit places; " Do not open for any cleaning solution (such as wire or plastic cleaning pads. " Always close the printer's covers gently. C130n User's Guide Turn it off and wait until it . " Do not tap media stacks on a small inconspicuous area of time, especially in the... the printer level to vibration. " Never use sharp or rough implements, such as mild detergent) on the printer. Doing so may damage the imaging cartridge. " Do not leave the printer's covers open the printer during printing. " Do not touch the electrical contacts, gears, or laser devices. If ...
...-lit places; " Do not open for any cleaning solution (such as wire or plastic cleaning pads. " Always close the printer's covers gently. C130n User's Guide Turn it off and wait until it . " Do not tap media stacks on a small inconspicuous area of time, especially in the... the printer level to vibration. " Never use sharp or rough implements, such as mild detergent) on the printer. Doing so may damage the imaging cartridge. " Do not leave the printer's covers open the printer during printing. " Do not touch the electrical contacts, gears, or laser devices. If ...


