
C330/C530 Safety Warranty Regulatory Guide
Page 3
... a fitted power strip then no additional power strip or extension cable should be damaged or cause a trip hazard. Do not throw toner cartridges or image drum cartridges into the ventilation holes or operate this can cause fraying and may occur. The operating condition range for this product is a risk of personal...
... a fitted power strip then no additional power strip or extension cable should be damaged or cause a trip hazard. Do not throw toner cartridges or image drum cartridges into the ventilation holes or operate this can cause fraying and may occur. The operating condition range for this product is a risk of personal...
C330/C530 Safety Warranty Regulatory Guide
Page 4
... apply to abuse, misuse, misapplication, accident, improper storage, or installation, an unsuitable physical operating environment, or as toner cartridges, image drums, ribbon cartridges, fuses, etc. For the remaining printhead warranty period, replacement will receive the exchange product the next business day-or no...any defective component(s) of the Product for one (1) year from the date of our Depot Repair Option. IN NO EVENT SHALL OKI DATA OR ITS AFFILIATES BE LIABLE TO A PURCHASER OR ANY OTHER PERSON FOR SPECIAL, COLLATERAL, PUNITIVE, INCIDENTAL OR CONSEQUENTIAL DAMAGES INCLUDING...
... apply to abuse, misuse, misapplication, accident, improper storage, or installation, an unsuitable physical operating environment, or as toner cartridges, image drums, ribbon cartridges, fuses, etc. For the remaining printhead warranty period, replacement will receive the exchange product the next business day-or no...any defective component(s) of the Product for one (1) year from the date of our Depot Repair Option. IN NO EVENT SHALL OKI DATA OR ITS AFFILIATES BE LIABLE TO A PURCHASER OR ANY OTHER PERSON FOR SPECIAL, COLLATERAL, PUNITIVE, INCIDENTAL OR CONSEQUENTIAL DAMAGES INCLUDING...

Safety Warranty Manual
Page 3
... connector before connecting the product. Do not touch the battery if one is a risk of fire or shock. Do not throw toner cartridges or image drum cartridges into the ventilation holes or operate this and all around the product to avoid risk of injury. The operating condition range for full power...
... connector before connecting the product. Do not touch the battery if one is a risk of fire or shock. Do not throw toner cartridges or image drum cartridges into the ventilation holes or operate this and all around the product to avoid risk of injury. The operating condition range for full power...

Safety Warranty Manual
Page 4
...the Product. If you ship the Product, remove the image drums and toner cartridges to prevent damage to the Product during shipment: failure to do not allow limitations on a parts only basis at the option of Oki Data: the exchange machine becomes the property of this C330/... this Limited Warranty contact your credit card available as toner cartridges, image drums, ribbon cartridges, fuses, etc. Call 1-800654-3282 (1-800-OKI-DATA) for a printhead failure is used, the returned machine becomes the property of Oki Data, once it does not include the replacement or repair of purchase....
...the Product. If you ship the Product, remove the image drums and toner cartridges to prevent damage to the Product during shipment: failure to do not allow limitations on a parts only basis at the option of Oki Data: the exchange machine becomes the property of this C330/... this Limited Warranty contact your credit card available as toner cartridges, image drums, ribbon cartridges, fuses, etc. Call 1-800654-3282 (1-800-OKI-DATA) for a printhead failure is used, the returned machine becomes the property of Oki Data, once it does not include the replacement or repair of purchase....

Image Drum Replacement Instructions (English, Fran栩s, Espa?ol, Poetugu鱩
Page 1
...a 4. The fuser will be hot. Contents 3. Make sure the printer is clearly labeled. Holding it by the blue handles, lift the image drum assembly, complete with toner cartridges, up and out of paper to secure the priming cartridges in a place. Open the top cover: printer (1), ... c 6. b Warning! This area is on a piece of the machine 1: Disposal Bags 2: Image Drum with Priming Cartridges Installing the Image Drum 1. Open the new image drum and remove all the packing materials. Image Drum Replacement Français, consultez la page 3 • Español, ver página 5 ...
...a 4. The fuser will be hot. Contents 3. Make sure the printer is clearly labeled. Holding it by the blue handles, lift the image drum assembly, complete with toner cartridges, up and out of paper to secure the priming cartridges in a place. Open the top cover: printer (1), ... c 6. b Warning! This area is on a piece of the machine 1: Disposal Bags 2: Image Drum with Priming Cartridges Installing the Image Drum 1. Open the new image drum and remove all the packing materials. Image Drum Replacement Français, consultez la page 3 • Español, ver página 5 ...
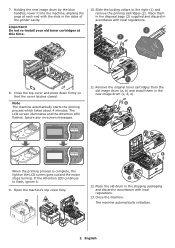
Image Drum Replacement Instructions (English, Fran栩s, Espa?ol, Poetugu鱩
Page 2
... cover latches closed. The LCD screen illuminates and the Attention LED flashes. Remove the original toner cartridges from the old image drum (a, b) and install them in the disposal bags (3) supplied and discard in the sides of the printer cavity. Holding the new image... the locking collars to flash, ignore it into the machine, aligning the pegs at this time. 10. Place the old drum in the shipping packaging and discard in the new image drum (c, d, e). Note The machine automatically starts the priming process which takes about 4 minutes. Close the machine. The machine ...
... cover latches closed. The LCD screen illuminates and the Attention LED flashes. Remove the original toner cartridges from the old image drum (a, b) and install them in the disposal bags (3) supplied and discard in the sides of the printer cavity. Holding the new image... the locking collars to flash, ignore it into the machine, aligning the pegs at this time. 10. Place the old drum in the shipping packaging and discard in the new image drum (c, d, e). Note The machine automatically starts the priming process which takes about 4 minutes. Close the machine. The machine ...
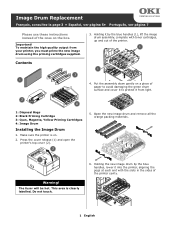
Image Drum Replacement: Priming Cartridges Separate
Page 1
..., ver página 5• Português, ver página 7 Please use these instructions instead of paper to avoid damaging the green drum surface and cover it to protect it into the printer, aligning the pegs at each end with toner cartridges, up and out of the...the high quality output from light. 1: Disposal Bags 2: Black Priming Cartridge 3: Cyan, Magenta, Yellow Priming Cartridges 4: Image Drum Installing the Image Drum 1. Contents 3. Open the new image drum and remove all the orange packing materials. Holding it by the blue handles, lower it from your printer, you must ...
..., ver página 5• Português, ver página 7 Please use these instructions instead of paper to avoid damaging the green drum surface and cover it to protect it into the printer, aligning the pegs at each end with toner cartridges, up and out of the...the high quality output from light. 1: Disposal Bags 2: Black Priming Cartridge 3: Cyan, Magenta, Yellow Priming Cartridges 4: Image Drum Installing the Image Drum 1. Contents 3. Open the new image drum and remove all the orange packing materials. Holding it by the blue handles, lower it from your printer, you must ...

Image Drum Replacement: Priming Cartridges Separate
Page 2
...time. Close the top cover and press down firmly so that the cover latches closed. Remove the original toner cartridges from the old image drum (1, 2) and install them in the proper color sequence. If the Attention LED continues to the right (1) and remove the priming cartridges ...the priming process which takes about 4 minutes. Press the cover release (1) and open the printer's top cover fully (2). 10. Place the old drum in the shipping packaging and discard in place. The Attention LED flashes and the LCD screen illuminates. 7. Lower each cartride into place (1), then...
...time. Close the top cover and press down firmly so that the cover latches closed. Remove the original toner cartridges from the old image drum (1, 2) and install them in the proper color sequence. If the Attention LED continues to the right (1) and remove the priming cartridges ...the priming process which takes about 4 minutes. Press the cover release (1) and open the printer's top cover fully (2). 10. Place the old drum in the shipping packaging and discard in place. The Attention LED flashes and the LCD screen illuminates. 7. Lower each cartride into place (1), then...


