
Software Installation Guide (160 KB)
Page 1
... symbol}. NOTE: Please pay special attention to QuickTime 5 installation window appears. Click OK to restart your camera is available on "Reference Manual" from the Olympus Software Setup Menu. 2. We recommend using all of the suggested settings. 3. message appears, click OK....). 2 INSTALLING THE SOFTWARE Installing the camera software will now be installed to continue installing the program. Reference Manual The complete Reference Manual for your digital camera. c. Follow the on the CAMEDIA Master 4.0 CD. The Reference Manual can skip this section. After you ...
... symbol}. NOTE: Please pay special attention to QuickTime 5 installation window appears. Click OK to restart your camera is available on "Reference Manual" from the Olympus Software Setup Menu. 2. We recommend using all of the suggested settings. 3. message appears, click OK....). 2 INSTALLING THE SOFTWARE Installing the camera software will now be installed to continue installing the program. Reference Manual The complete Reference Manual for your digital camera. c. Follow the on the CAMEDIA Master 4.0 CD. The Reference Manual can skip this section. After you ...
Software Installation Guide (160 KB)
Page 2
... GUIDE for more expert in the CAMEDIA Master application. Connecting the camera to the Pro version appears. 3. To start the program, a dialog box will appear prompting you can be obtained at: http://olympus.com/digital/ OLYMPUS OPTICAL CO. (EUROPA) GMBH. The CAMEDIA Master main menu appears.... In the main menu, click "From Camera". Choose the Media tab (CD & Floppy disc icon) in the help manual and the PDF manual. If you to Friday) ET E-Mail: distec@olympus.com Olympus software ...
... GUIDE for more expert in the CAMEDIA Master application. Connecting the camera to the Pro version appears. 3. To start the program, a dialog box will appear prompting you can be obtained at: http://olympus.com/digital/ OLYMPUS OPTICAL CO. (EUROPA) GMBH. The CAMEDIA Master main menu appears.... In the main menu, click "From Camera". Choose the Media tab (CD & Floppy disc icon) in the help manual and the PDF manual. If you to Friday) ET E-Mail: distec@olympus.com Olympus software ...

Camedia Master 4.1 Instruction Manual (4.9MB)
Page 2
... Trademarks 5 Intellectual property rights 5 Purchasing the Pro Version 6 Purchasing the Pro version and upgrading 6 How to Use This Manual 8 Conventions used in this manual 8 Terminology 8 Help information 8 Overview 9 Features ...9 Intuitive operation 9 Album creation functions 10 Slide show 10 Find function 10...My Album location 21 Quick Reference 22 Transferring Images 23 Transferring Images from a Camera 23 Connecting the camera to the computer (Windows 23 Connecting the camera to the computer (Macintosh 24 Transferring images 25 Transferring Images from Media 26 ...
... Trademarks 5 Intellectual property rights 5 Purchasing the Pro Version 6 Purchasing the Pro version and upgrading 6 How to Use This Manual 8 Conventions used in this manual 8 Terminology 8 Help information 8 Overview 9 Features ...9 Intuitive operation 9 Album creation functions 10 Slide show 10 Find function 10...My Album location 21 Quick Reference 22 Transferring Images 23 Transferring Images from a Camera 23 Connecting the camera to the computer (Windows 23 Connecting the camera to the computer (Macintosh 24 Transferring images 25 Transferring Images from Media 26 ...

Camedia Master 4.1 Instruction Manual (4.9MB)
Page 8
In this software, this manual The symbol indicates functions which data is handled on a computer or digital camera. Once you have an overall understanding of the following file types. • Image files • Movie files • Sound files Thumbnail This refers to ...independently, in order to the reduced images used in the Pro version. File A file is organized with this manual. Help information To access the help button . How to Use This Manual This manual describes how to use any of the functions, you can use the Help information for reference while using the...
In this software, this manual The symbol indicates functions which data is handled on a computer or digital camera. Once you have an overall understanding of the following file types. • Image files • Movie files • Sound files Thumbnail This refers to ...independently, in order to the reduced images used in the Pro version. File A file is organized with this manual. Help information To access the help button . How to Use This Manual This manual describes how to use any of the functions, you can use the Help information for reference while using the...

Camedia Master 4.1 Instruction Manual (4.9MB)
Page 22
... (page 88) "Create and Share" - "Viewing Images" (page 41) "Editing Images" - "Transferring Images from a Camera" (page 23) "Transferring Images" - "Creating an HTML Album" (page 96) "Backing Up" (page 112) When ...Camera" (page 23) "Create and Share" - "Viewing Images" (page 41) "Printing" - "Using the filter functions" (page 130) To create a panorama "Create and Share" - "Display Modes" (page 34) - "Watching a Slide Show" (page 103) "Browsing Images" - "Viewing Files" (page 37) - "Free Stitch Panorama Function" (page 109) 22 Quick Reference Use this manual...
... (page 88) "Create and Share" - "Viewing Images" (page 41) "Editing Images" - "Transferring Images from a Camera" (page 23) "Transferring Images" - "Creating an HTML Album" (page 96) "Backing Up" (page 112) When ...Camera" (page 23) "Create and Share" - "Viewing Images" (page 41) "Printing" - "Using the filter functions" (page 130) To create a panorama "Create and Share" - "Display Modes" (page 34) - "Watching a Slide Show" (page 103) "Browsing Images" - "Viewing Files" (page 37) - "Free Stitch Panorama Function" (page 109) 22 Quick Reference Use this manual...

Camedia Master 4.1 Instruction Manual (4.9MB)
Page 129
Correcting distortion Use the following procedure to correct distortion in Exif-JPEG format by an Olympus digital camera. 129 Auto Manual Preview display Slider Apply button 2 Select [Auto] or [Manual]. If you select [Auto], skip to step 4 . 3 Watching the preview display, drag the slider to apply the distortion correction after applying other editing functions. The [...
Correcting distortion Use the following procedure to correct distortion in Exif-JPEG format by an Olympus digital camera. 129 Auto Manual Preview display Slider Apply button 2 Select [Auto] or [Manual]. If you select [Auto], skip to step 4 . 3 Watching the preview display, drag the slider to apply the distortion correction after applying other editing functions. The [...

Camedia Master 4.1 Instruction Manual (4.9MB)
Page 146
... 112 Basic operations 117 Blur 130 Brightness 130 Browse mode 34 Browsing images 31 C Calendar creating and printing 76 saving images with the calendar 28 Cameras supported by this software 142 Closing the software 15 Connections Macintosh 24 serial cable 23, 24 USB cable 23, 24 Windows 23 Contact sheet 85... 35 Folders creating 54 temporary 113 Free stitch panorama 109 Functions supported 144 G Gamma 130 Group 52 creating 53 H Help information 8 How to use this manual 8 HTML album 96 Hue 130 146
... 112 Basic operations 117 Blur 130 Brightness 130 Browse mode 34 Browsing images 31 C Calendar creating and printing 76 saving images with the calendar 28 Cameras supported by this software 142 Closing the software 15 Connections Macintosh 24 serial cable 23, 24 USB cable 23, 24 Windows 23 Contact sheet 85... 35 Folders creating 54 temporary 113 Free stitch panorama 109 Functions supported 144 G Gamma 130 Group 52 creating 53 H Help information 8 How to use this manual 8 HTML album 96 Hue 130 146

C-5000 Zoom Quick Start Guide (555 KB)
Page 1
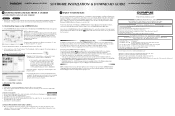
...U.S.A. http://support.olympusamerica.com/ OLYMPUS CO. (EUROPA) GMBH. UNPACKING THE BOX CONTENTS Gather your Olympus Digital camera... PREPARING THE CAMERA FOR USE Before you follow . Before use, be displayed. Inserting the battery xD-Picture card 1) Make sure the camera is turned off , turn the...The following items are also included in the Digital camera package: Basic Manual, video cable, RM-2 remote control, battery charger (LI10C), warranty card, registration card (not provided in direction D. b. TURNING ON THE CAMERA The camera Mode dial is not fully charged when purchased...
...U.S.A. http://support.olympusamerica.com/ OLYMPUS CO. (EUROPA) GMBH. UNPACKING THE BOX CONTENTS Gather your Olympus Digital camera... PREPARING THE CAMERA FOR USE Before you follow . Before use, be displayed. Inserting the battery xD-Picture card 1) Make sure the camera is turned off , turn the...The following items are also included in the Digital camera package: Basic Manual, video cable, RM-2 remote control, battery charger (LI10C), warranty card, registration card (not provided in direction D. b. TURNING ON THE CAMERA The camera Mode dial is not fully charged when purchased...
C-5000 Zoom Quick Start Guide (555 KB)
Page 2
... photos. • Video Playback: View your pictures and movies on the monitor. About the Olympus CAMEDIA Master CD-ROM Your Olympus Digital Camera comes bundled with the PC. Additional Camera Features This Digital camera offers a host of each method. See the Basic Manual for Windows 98" software before connecting it easy to compose your subject: using the monitor...
... photos. • Video Playback: View your pictures and movies on the monitor. About the Olympus CAMEDIA Master CD-ROM Your Olympus Digital Camera comes bundled with the PC. Additional Camera Features This Digital camera offers a host of each method. See the Basic Manual for Windows 98" software before connecting it easy to compose your subject: using the monitor...

C-5000 Zoom Reference Manual (7.0 MB)
Page 1
PC CONNECTION OPERATION MANUAL Explanation of digital camera functions and operating instructions. DIGITAL CAMERA - DIGITAL CAMERA C-5000ZOOM REFERENCE MANUAL CAMERA OPERATION MANUAL Explanation of how to download images between your digital camera and PC.
PC CONNECTION OPERATION MANUAL Explanation of digital camera functions and operating instructions. DIGITAL CAMERA - DIGITAL CAMERA C-5000ZOOM REFERENCE MANUAL CAMERA OPERATION MANUAL Explanation of how to download images between your digital camera and PC.

C-5000 Zoom Reference Manual (7.0 MB)
Page 2
In the interest of continually improving products, Olympus reserves the right to your new camera, please read these instructions carefully to enjoy optimum performance and a longer service life. We recommend that you take test shots to get accustomed to update or modify information contained in a safe place for purchasing an Olympus digital camera. Before you start to use your camera before taking important photographs. DIGITAL CAMERA C-5000ZOOM REFERENCE MANUAL Thank you for future reference. Keep this manual in this manual.
In the interest of continually improving products, Olympus reserves the right to your new camera, please read these instructions carefully to enjoy optimum performance and a longer service life. We recommend that you take test shots to get accustomed to update or modify information contained in a safe place for purchasing an Olympus digital camera. Before you start to use your camera before taking important photographs. DIGITAL CAMERA C-5000ZOOM REFERENCE MANUAL Thank you for future reference. Keep this manual in this manual.

C-5000 Zoom Reference Manual (7.0 MB)
Page 3
...in Europe. For customers in Canada This Class B digital apparatus meets all requirements of Conformity Model Number : C-5000ZOOM RM-2 (Remote control) Trade Name : OLYMPUS Responsible Party : Olympus America Inc. "CE" mark cameras are registered trademarks and/or trademarks of the FCC ... may not cause harmful interference. (2) This device must accept any interference received, including interference that this manual are the "Design Rule for Camera File System/DCF" standards stipulated by the Japan Electronics and Information Technology Industries Association (JEITA). 2 Telephone...
...in Europe. For customers in Canada This Class B digital apparatus meets all requirements of Conformity Model Number : C-5000ZOOM RM-2 (Remote control) Trade Name : OLYMPUS Responsible Party : Olympus America Inc. "CE" mark cameras are registered trademarks and/or trademarks of the FCC ... may not cause harmful interference. (2) This device must accept any interference received, including interference that this manual are the "Design Rule for Camera File System/DCF" standards stipulated by the Japan Electronics and Information Technology Industries Association (JEITA). 2 Telephone...

C-5000 Zoom Reference Manual (7.0 MB)
Page 4
Composition of the manual Contents P.4 Names of parts P.10 Introduction of terms Index 10 P.151 P.172 P.174 P.178 3 For playing back and editing pictures Settings that particular shot using ... Flash 4 P.56 Advanced shooting 5 P.68 Adjusting the image quality and exposure P.91 6 Playback 7 P.105 Useful functions 8 P.121 Print setting 9 P.144 Miscellaneous Specifications Glossary of the camera's functions Getting started Using the menus 1 P.17 2 P.32 Basic Photography Shooting basics 3 P.41 Advanced Photography To get that make the...
Composition of the manual Contents P.4 Names of parts P.10 Introduction of terms Index 10 P.151 P.172 P.174 P.178 3 For playing back and editing pictures Settings that particular shot using ... Flash 4 P.56 Advanced shooting 5 P.68 Adjusting the image quality and exposure P.91 6 Playback 7 P.105 Useful functions 8 P.121 Print setting 9 P.144 Miscellaneous Specifications Glossary of the camera's functions Getting started Using the menus 1 P.17 2 P.32 Basic Photography Shooting basics 3 P.41 Advanced Photography To get that make the...

C-5000 Zoom Reference Manual (7.0 MB)
Page 5
Contents Composition of the manual 3 Names of parts 10 Camera 10 Monitor indications 12 Memory gauge 15 Battery check 15 How to use this manual 16 1 Getting started 17 Attaching the strap 17 Battery/Card basics 18 Charging the battery 18 Card basics 20 Inserting and removing the battery and ...23 Power on/off 24 If the card is not recognized (card check 26 Selecting a language 27 Setting the date and time 29 Holding the camera 31 2 Using the menus 32 About the menus 32 How to use the menus 33 Shortcut menus 35 Mode Menus 37 3 Shooting basics 41 Shooting...
Contents Composition of the manual 3 Names of parts 10 Camera 10 Monitor indications 12 Memory gauge 15 Battery check 15 How to use this manual 16 1 Getting started 17 Attaching the strap 17 Battery/Card basics 18 Charging the battery 18 Card basics 20 Inserting and removing the battery and ...23 Power on/off 24 If the card is not recognized (card check 26 Selecting a language 27 Setting the date and time 29 Holding the camera 31 2 Using the menus 32 About the menus 32 How to use the menus 33 Shortcut menus 35 Mode Menus 37 3 Shooting basics 41 Shooting...

C-5000 Zoom Reference Manual (7.0 MB)
Page 10
Useful information and hints that should be absolutely avoided. Reference pages describing details or associated information. 9 Indications used in this manual l Important information on factors which may lead to a malfunction or operational problems. Also warns of operations Note that will help you get the most out of your camera.
Useful information and hints that should be absolutely avoided. Reference pages describing details or associated information. 9 Indications used in this manual l Important information on factors which may lead to a malfunction or operational problems. Also warns of operations Note that will help you get the most out of your camera.

C-5000 Zoom Reference Manual (7.0 MB)
Page 13
F8.0 4 Exposure compensation -2.0 - +2.0 Exposure differential -3.0 - +3.0 5 Battery check e, f 6 Green lamp 7 Flash stand-by Camera movement warning/Flash charge 8 Macro mode Super macro mode Manual focus | # (Lights) # (Blinks) & % MF Ref. Names of parts Monitor indications INFO setting allows you to select how much information to ON are shown below. g"Information ...
F8.0 4 Exposure compensation -2.0 - +2.0 Exposure differential -3.0 - +3.0 5 Battery check e, f 6 Green lamp 7 Flash stand-by Camera movement warning/Flash charge 8 Macro mode Super macro mode Manual focus | # (Lights) # (Blinks) & % MF Ref. Names of parts Monitor indications INFO setting allows you to select how much information to ON are shown below. g"Information ...
C-5000 Zoom Reference Manual (7.0 MB)
Page 21
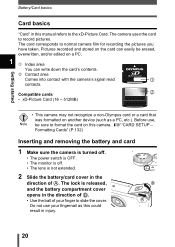
... in the direction of B. • Use the ball of A. Compatible cards d • xD-Picture Card (16 - 512MB) Getting started • This camera may not recognize a non-Olympus card or a card that was formatted on a PC. 1 c Index area You can write down the card's contents. The lock is not extended. 2...and stored on the card can easily be sure to format the card on this manual refers to slide the cover. Before use your finger to the xD-Picture Card. The camera uses the card to normal camera film for recording the pictures you have taken. Formatting Cards" (P.132) Inserting ...
... in the direction of B. • Use the ball of A. Compatible cards d • xD-Picture Card (16 - 512MB) Getting started • This camera may not recognize a non-Olympus card or a card that was formatted on a PC. 1 c Index area You can write down the card's contents. The lock is not extended. 2...and stored on the card can easily be sure to format the card on this manual refers to slide the cover. Before use your finger to the xD-Picture Card. The camera uses the card to normal camera film for recording the pictures you have taken. Formatting Cards" (P.132) Inserting ...

C-5000 Zoom Reference Manual (7.0 MB)
Page 28
Power switch Mode dial 1 Getting started 2 Press e. • The top menu is displayed. 3 Press d on the area where you purchased this camera. SETUP tab SEtUP CARD PIC CAM Arrow pad OK button MODE MENU WB Top menu ALL RESEt PW ON/OFF SEtUP REC VIEW ON ENGLISH ...ON ON ON 27 Available languages vary depending on the arrow pad to select MODE MENU. 4 Press ac to P and turn the camera on -screen display. This reference manual shows the English on-screen display in the illustrations and explanations. 1 Set the mode dial to select the SETUP tab, then press d. Selecting...
Power switch Mode dial 1 Getting started 2 Press e. • The top menu is displayed. 3 Press d on the area where you purchased this camera. SETUP tab SEtUP CARD PIC CAM Arrow pad OK button MODE MENU WB Top menu ALL RESEt PW ON/OFF SEtUP REC VIEW ON ENGLISH ...ON ON ON 27 Available languages vary depending on the arrow pad to select MODE MENU. 4 Press ac to P and turn the camera on -screen display. This reference manual shows the English on-screen display in the illustrations and explanations. 1 Set the mode dial to select the SETUP tab, then press d. Selecting...

C-5000 Zoom Reference Manual (7.0 MB)
Page 194
...Terminal Windows USB port The location of the USB port varies depending on your camera's reference manual. 2 Insert the marked end of the USB connector or multi connector varies depending on the camera. Computer Rectangular terminal Smaller terminal USB port USB cable USB connector or multi... connector 11 For details on how to [SETUP] tab Arrow pad Menu button operate the menu, refer to the camera manual for details. Refer to your...
...Terminal Windows USB port The location of the USB port varies depending on your camera's reference manual. 2 Insert the marked end of the USB connector or multi connector varies depending on the camera. Computer Rectangular terminal Smaller terminal USB port USB cable USB connector or multi... connector 11 For details on how to [SETUP] tab Arrow pad Menu button operate the menu, refer to the camera manual for details. Refer to your...

C-5000 Zoom Reference Manual (7.0 MB)
Page 207
..., connect the end of the USB port varies depending on the camera. Terminal Macintosh USB port The location of the USB cable to the USB connector on the computer. For details, refer to the camera manual for this setting. Look for details. The location of the USB... cable into the USB port on the camera model. Connecting the camera to your camera's reference manual. 2 Insert the marked end of the USB connector or multi...
..., connect the end of the USB port varies depending on the camera. Terminal Macintosh USB port The location of the USB cable to the USB connector on the computer. For details, refer to the camera manual for this setting. Look for details. The location of the USB... cable into the USB port on the camera model. Connecting the camera to your camera's reference manual. 2 Insert the marked end of the USB connector or multi...


