
FE-220 Advanced Manual (English)
Page 1
... and may differ from the actual product. Keep this manual in this manual. ( The screen and camera illustrations shown in a safe place for purchasing an Olympus digital camera. DIGITAL CAMERA FE-220/X-785 Advanced Manual Quick Start Guide Get started using your camera better Appendix ( Thank you for future reference. ( We recommend that you start to use your new...
... and may differ from the actual product. Keep this manual in this manual. ( The screen and camera illustrations shown in a safe place for purchasing an Olympus digital camera. DIGITAL CAMERA FE-220/X-785 Advanced Manual Quick Start Guide Get started using your camera better Appendix ( Thank you for future reference. ( We recommend that you start to use your new...

FE-220 Advanced Manual (English)
Page 2
... settings. Contents Quick Start Guide P.3 Button operations Menu operations Printing pictures Using OLYMPUS Master Getting to a computer and save them out on how to do when you have a question regarding operations. P.30 Learn how to the functions of the camera buttons by following the illustrations and actually trying them . P.58 Read about...
... settings. Contents Quick Start Guide P.3 Button operations Menu operations Printing pictures Using OLYMPUS Master Getting to a computer and save them out on how to do when you have a question regarding operations. P.30 Learn how to the functions of the camera buttons by following the illustrations and actually trying them . P.58 Read about...
FE-220 Advanced Manual (English)
Page 3
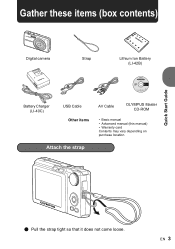
EN 3 Gather these items (box contents) Digital camera Strap Lithium Ion Battery (LI-42B) Battery Charger (LI-40C) USB Cable Other items AV Cable OLYMPUS Master CD-ROM • Basic manual • Advanced manual (this manual) • Warranty card Contents may vary depending on purchase location. Attach the strap Quick Start Guide ( Pull the strap tight so that it does not come loose.
EN 3 Gather these items (box contents) Digital camera Strap Lithium Ion Battery (LI-42B) Battery Charger (LI-40C) USB Cable Other items AV Cable OLYMPUS Master CD-ROM • Basic manual • Advanced manual (this manual) • Warranty card Contents may vary depending on purchase location. Attach the strap Quick Start Guide ( Pull the strap tight so that it does not come loose.

FE-220 Advanced Manual (English)
Page 4
... 1 2 AC Wall Outlet Charging Indicator Red light on inserting an optional Card, please refer to take pictures. Prepare the battery a. Insert the battery in the camera 2 1 ( Insert the battery in the direction indicated by the mark. 3 Quick Start Guide 45 Battery lock knob 4 EN ( To remove the battery,... press the battery lock knob in the direction of the arrow. ( This camera does not require an optional xD-Picture Card™ (hereinafter referred to as "the card") to "Inserting and removing the card" (P.60).
... 1 2 AC Wall Outlet Charging Indicator Red light on inserting an optional Card, please refer to take pictures. Prepare the battery a. Insert the battery in the camera 2 1 ( Insert the battery in the direction indicated by the mark. 3 Quick Start Guide 45 Battery lock knob 4 EN ( To remove the battery,... press the battery lock knob in the direction of the arrow. ( This camera does not require an optional xD-Picture Card™ (hereinafter referred to as "the card") to "Inserting and removing the card" (P.60).

FE-220 Advanced Manual (English)
Page 5
... screen. You can select a scene mode from among 10 set . ( To turn on the camera in this manual. Set the mode dial to take the best picture by a moving subject or camera movement when taking pictures of the arrow pad (ONXY) are indicated with ONXY in shooting mode....and time have not been set for taking pictures. X Y N EN 5 Suitable for taking pictures of landscapes. Turn the camera on This section explains how to turn off the camera, press the o button again. This function allows you to h When shooting movies Quick Start Guide Mode dial When shooting still...
... screen. You can select a scene mode from among 10 set . ( To turn on the camera in this manual. Set the mode dial to take the best picture by a moving subject or camera movement when taking pictures of the arrow pad (ONXY) are indicated with ONXY in shooting mode....and time have not been set for taking pictures. X Y N EN 5 Suitable for taking pictures of landscapes. Turn the camera on This section explains how to turn off the camera, press the o button again. This function allows you to h When shooting movies Quick Start Guide Mode dial When shooting still...

FE-220 Advanced Manual (English)
Page 8
The green lamp indicates that the focus and exposure are locked. Shoot 8 EN Place this mark over your subject. Shutter button Press halfway [] HQ 3072×2304 [IN] 4 The number of still pictures you can store is displayed. Shutter button Press completely The card access lamp blinks. Hold the camera Horizontal grip [] HQ 3072×2304 [IN] 4 Vertical grip Quick Start Guide b. Focus c. Take a picture a.
The green lamp indicates that the focus and exposure are locked. Shoot 8 EN Place this mark over your subject. Shutter button Press halfway [] HQ 3072×2304 [IN] 4 The number of still pictures you can store is displayed. Shutter button Press completely The card access lamp blinks. Hold the camera Horizontal grip [] HQ 3072×2304 [IN] 4 Vertical grip Quick Start Guide b. Focus c. Take a picture a.

FE-220 Advanced Manual (English)
Page 10
... 6 0 9 7d 5 a c 8 b Self-timer Shooting mode Exposure compensation +2.0 Button operations Macro/Super macro mode HQ 3072×2304 4 Flash mode 1 o button Turning the camera on and off Power on: Camera turns on in the shooting mode. • Lens extends • Monitor turns on 2 Shutter button Shooting pictures Shooting still pictures Set the mode...
... 6 0 9 7d 5 a c 8 b Self-timer Shooting mode Exposure compensation +2.0 Button operations Macro/Super macro mode HQ 3072×2304 4 Flash mode 1 o button Turning the camera on and off Power on: Camera turns on in the shooting mode. • Lens extends • Monitor turns on 2 Shutter button Shooting pictures Shooting still pictures Set the mode...

FE-220 Advanced Manual (English)
Page 11
... the power Switches to stop recording. 3 K button (shooting) Selecting shooting mode/turning on the power with automatic settings The camera determines the optimum settings and shoots the picture. h Shooting pictures using digital image stabilization This function reduces the blur caused by pressing the A. Press the shutter button again to the playback mode...
... the power Switches to stop recording. 3 K button (shooting) Selecting shooting mode/turning on the power with automatic settings The camera determines the optimum settings and shoots the picture. h Shooting pictures using digital image stabilization This function reduces the blur caused by pressing the A. Press the shutter button again to the playback mode...

FE-220 Advanced Manual (English)
Page 14
SET OK Press OF/< in playback mode, connect the camera to adjust the exposure, then press A. Playback mode : Printing pictures Display a picture to be printed out in shooting mode, press XY to a printer and press ...
SET OK Press OF/< in playback mode, connect the camera to adjust the exposure, then press A. Playback mode : Printing pictures Display a picture to be printed out in shooting mode, press XY to a printer and press ...

FE-220 Advanced Manual (English)
Page 20
... or without sound OFF /ON • When [ON] (sound is recorded) is taken. • When recording, aim the camera microphone at which edge you want to 10 panorama pictures are taken. Only the digital zoom can be used . 5 RESET Returning changed shooting functions to default settings NO /YES It restores shooting functions...
... or without sound OFF /ON • When [ON] (sound is recorded) is taken. • When recording, aim the camera microphone at which edge you want to 10 panorama pictures are taken. Only the digital zoom can be used . 5 RESET Returning changed shooting functions to default settings NO /YES It restores shooting functions...

FE-220 Advanced Manual (English)
Page 23
... 4 seconds. • Use the arrow pad XY to select a picture, and select [YES] to rotate the display select [+90°]/[0°]/[-90°] with the camera held vertically are displayed vertically. IMAGE] or [ALL ERASE], but they are displayed horizontally. y y y EXIT OK +90° EXIT OK 0° EXIT OK -90°...
... 4 seconds. • Use the arrow pad XY to select a picture, and select [YES] to rotate the display select [+90°]/[0°]/[-90°] with the camera held vertically are displayed vertically. IMAGE] or [ALL ERASE], but they are displayed horizontally. y y y EXIT OK +90° EXIT OK 0° EXIT OK -90°...

FE-220 Advanced Manual (English)
Page 24
... want to keep. • When erasing the pictures in the internal memory, do not insert the card into the camera. • When erasing the picture from the card, insert a card into the camera in the internal memory and the card • Select [YES], and press i. 5 RESIZE Reducing the size of pictures 640...
... want to keep. • When erasing the pictures in the internal memory, do not insert the card into the camera. • When erasing the picture from the card, insert a card into the camera in the internal memory and the card • Select [YES], and press i. 5 RESIZE Reducing the size of pictures 640...

FE-220 Advanced Manual (English)
Page 26
...*2 K/q s BEEP 8 SHUTTER SOUND VOLUME X VIDEO OUT *1 Card is necessary. *2 You cannot select this camera. Copying data does not erase the pictures in playback mode. BACKUP Copying pictures in the camera when formatting the card. • Before using non-Olympus cards or cards which have been formatted on a computer, you save or transfer important...
...*2 K/q s BEEP 8 SHUTTER SOUND VOLUME X VIDEO OUT *1 Card is necessary. *2 You cannot select this camera. Copying data does not erase the pictures in playback mode. BACKUP Copying pictures in the camera when formatting the card. • Before using non-Olympus cards or cards which have been formatted on a computer, you save or transfer important...

FE-220 Advanced Manual (English)
Page 27
... image processing functions. You can add other languages to perform properly. Available languages vary depending on the power with the provided OLYMPUS Master software. Select [PIXEL MAPPING] and when [START] is recommended. PIXEL MAPPING Adjusting the image processing function The pixel mapping feature...the monitor brightness BRIGHT/ NORMAL BEEP Adjusting the volume of beeps when buttons are pressed OFF (No sound) / LOW/ HIGH 8 Adjust the volume of camera warning sound OFF (No sound) / LOW/ HIGH SHUTTER SOUND Adjusting the volume of the shutter button OFF (No sound) / LOW/ HIGH EN 27 ...
... image processing functions. You can add other languages to perform properly. Available languages vary depending on the power with the provided OLYMPUS Master software. Select [PIXEL MAPPING] and when [START] is recommended. PIXEL MAPPING Adjusting the image processing function The pixel mapping feature...the monitor brightness BRIGHT/ NORMAL BEEP Adjusting the volume of beeps when buttons are pressed OFF (No sound) / LOW/ HIGH 8 Adjust the volume of camera warning sound OFF (No sound) / LOW/ HIGH SHUTTER SOUND Adjusting the volume of the shutter button OFF (No sound) / LOW/ HIGH EN 27 ...

FE-220 Advanced Manual (English)
Page 28
...i as the time signal strikes 0 seconds. VIDEO OUT Playing back pictures on . Check the video signal type before connecting the camera to the region where the camera is turned on a TV NTSC /PAL The factory default settings differ according to the TV. If you do not set the video... in the file name. Y-M-D (Year-Month-Day) X Y M D TIME Y / M / D Hour Minute Date format (Y-M-D, M-D-Y, D-M-Y). CANCEL MENU Cancel the setting • The first two digits of five levels or mute the volume. NTSC: Japan, North America, Taiwan, Korea PAL: European countries, China Menu operations 28 EN
...i as the time signal strikes 0 seconds. VIDEO OUT Playing back pictures on . Check the video signal type before connecting the camera to the region where the camera is turned on a TV NTSC /PAL The factory default settings differ according to the TV. If you do not set the video... in the file name. Y-M-D (Year-Month-Day) X Y M D TIME Y / M / D Hour Minute Date format (Y-M-D, M-D-Y, D-M-Y). CANCEL MENU Cancel the setting • The first two digits of five levels or mute the volume. NTSC: Japan, North America, Taiwan, Korea PAL: European countries, China Menu operations 28 EN

FE-220 Advanced Manual (English)
Page 29
...) Connect to your TV's instruction manual. • Images and the information displayed on the screen may be cropped depending on the camera and then press q to display. Settings on the camera Turn on the TV's settings. Use the arrow pad to select the picture you want to enter playback mode. • The...
...) Connect to your TV's instruction manual. • Images and the information displayed on the screen may be cropped depending on the camera and then press q to display. Settings on the camera Turn on the TV's settings. Use the arrow pad to select the picture you want to enter playback mode. • The...
FE-220 Advanced Manual (English)
Page 30
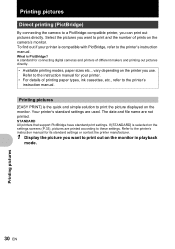
...details of printing paper types, ink cassettes, etc., refer to these settings. Printing pictures Direct printing (PictBridge) By connecting the camera to the printer's instruction manual. What is selected on the monitor in playback mode. 30 EN Printing pictures STANDARD All printers that... (P.33), pictures are printed according to the printer's instruction manual. Refer to the instruction manual for connecting digital cameras and printers of prints on the camera's monitor. vary depending on the monitor. Your printer's standard settings are not printed. Select the pictures you...
...details of printing paper types, ink cassettes, etc., refer to these settings. Printing pictures Direct printing (PictBridge) By connecting the camera to the printer's instruction manual. What is selected on the monitor in playback mode. 30 EN Printing pictures STANDARD All printers that... (P.33), pictures are printed according to the printer's instruction manual. Refer to the instruction manual for connecting digital cameras and printers of prints on the camera's monitor. vary depending on the monitor. Your printer's standard settings are not printed. Select the pictures you...

FE-220 Advanced Manual (English)
Page 31
Multi-connector Connector cover Printing pictures USB cable (provided) • The [EASY PRINT START] screen is displayed. • For details of how to turn the printer on and plug the USB cable provided with the camera into the multi-connector of the USB port, refer to the printer's instruction manual. 3 Press OF/ 2 Turn the printer on and the position of the camera and the printer's USB port.
Multi-connector Connector cover Printing pictures USB cable (provided) • The [EASY PRINT START] screen is displayed. • For details of how to turn the printer on and plug the USB cable provided with the camera into the multi-connector of the USB port, refer to the printer's instruction manual. 3 Press OF/ 2 Turn the printer on and the position of the camera and the printer's USB port.
FE-220 Advanced Manual (English)
Page 32
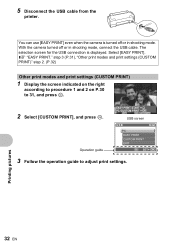
The selection screen for the USB connection is turned off or in shooting mode. With the camera turned off or in shooting mode, connect the USB cable. step 3 (P.31), "Other print modes and print settings (CUSTOM PRINT)" step 2. (P.32) Other print modes ... PRINT EXIT SET OK 3 Follow the operation guide to 31, and press i. 2 Select [CUSTOM PRINT], and press i. You can use [EASY PRINT] even when the camera is displayed. 5 Disconnect the USB cable from the printer.
The selection screen for the USB connection is turned off or in shooting mode. With the camera turned off or in shooting mode, connect the USB cable. step 3 (P.31), "Other print modes and print settings (CUSTOM PRINT)" step 2. (P.32) Other print modes ... PRINT EXIT SET OK 3 Follow the operation guide to 31, and press i. 2 Select [CUSTOM PRINT], and press i. You can use [EASY PRINT] even when the camera is displayed. 5 Disconnect the USB cable from the printer.
FE-220 Advanced Manual (English)
Page 35
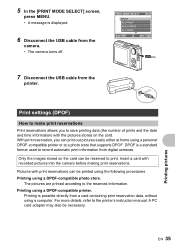
.... Pictures with print reservations can be reserved to the reserved information. Printing using a DPOF-compatible printer. Printing is possible directly from digital cameras. For more details, refer to save printing data (the number of prints and the date and time information) with recorded pictures into the...be necessary. PRINT MODE SELECT PRINT ALL PRINT MULTI PRINT ALL INDEX EXIT MENU SET OK 7 Disconnect the USB cable from the camera. • The camera turns off. Insert a card with the pictures stored on the card can print out pictures easily either at home using the ...
.... Pictures with print reservations can be reserved to the reserved information. Printing using a DPOF-compatible printer. Printing is possible directly from digital cameras. For more details, refer to save printing data (the number of prints and the date and time information) with recorded pictures into the...be necessary. PRINT MODE SELECT PRINT ALL PRINT MULTI PRINT ALL INDEX EXIT MENU SET OK 7 Disconnect the USB cable from the camera. • The camera turns off. Insert a card with the pictures stored on the card can print out pictures easily either at home using the ...


