
FE-220 Advanced Manual (English)
Page 9
Press the X& button and the Y# button, to display the picture you want to select [YES] and press the i button. ERASE S button BACK MENU YES NO SET OK c. OF/< button ERASE i button BACK MENU YES NO SET OK EN 9 b. Press the S button. Review your pictures a. Press the OF/< button to erase. q button Quick Start Guide Arrow pad Next picture Previous picture [IN] HQ 3072×2304 0.0 '07.08.26 12:30 100-0001 1 Erase pictures a. Press the q button.
Press the X& button and the Y# button, to display the picture you want to select [YES] and press the i button. ERASE S button BACK MENU YES NO SET OK c. OF/< button ERASE i button BACK MENU YES NO SET OK EN 9 b. Press the S button. Review your pictures a. Press the OF/< button to erase. q button Quick Start Guide Arrow pad Next picture Previous picture [IN] HQ 3072×2304 0.0 '07.08.26 12:30 100-0001 1 Erase pictures a. Press the q button.

FE-220 Advanced Manual (English)
Page 24
...computer. 4 ERASE Erase selected pictures/Erase all the pictures in advance. A maximum of a picture and saves it as a new file. 6 MY FAVORITE Reviewing/registering your favorite pictures You can be saved as other ones for browsing only. Once erased, pictures cannot be edited, printed, copied to a card, ... keep. • When erasing the pictures in the internal memory, do not insert the card into the camera. • When erasing the picture from the card, insert a card into the camera in the internal memory and the card • Select [YES], and press i. 5 RESIZE Reducing the...
...computer. 4 ERASE Erase selected pictures/Erase all the pictures in advance. A maximum of a picture and saves it as a new file. 6 MY FAVORITE Reviewing/registering your favorite pictures You can be saved as other ones for browsing only. Once erased, pictures cannot be edited, printed, copied to a card, ... keep. • When erasing the pictures in the internal memory, do not insert the card into the camera. • When erasing the picture from the card, insert a card into the camera in the internal memory and the card • Select [YES], and press i. 5 RESIZE Reducing the...

FE-220 Advanced Manual (English)
Page 25
... • Use XY to normal playback mode. g"Print settings (DPOF)" (P.35) Menu operations EN 25 Switches to select your favorite picture, then press i. VIEW FAVORITES Reviewing registered pictures • If you to save printing data (the number of prints and the date and time information) with the pictures stored on the...
... • Use XY to normal playback mode. g"Print settings (DPOF)" (P.35) Menu operations EN 25 Switches to select your favorite picture, then press i. VIEW FAVORITES Reviewing registered pictures • If you to save printing data (the number of prints and the date and time information) with the pictures stored on the...

FE-220 Basic Manual (English, Français, Español, Português)
Page 2
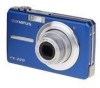
Table of Contents Gather these items (box contents 3 Prepare the battery 4 Turn the camera on 5 Set date and time 6 Select a Language 8 Take a picture 9 En Review your pictures 10 Basic Operation 11 Shooting Mode Buttons 11 Mode Dial 12 SCENE Modes 12 Macro Mode 13 Flash ... Settings 15 Top Menu 15 Erase All Pictures 15 Connecting the Camera 16 Playback on a TV 16 Direct Printing (PictBridge 17 Transfer Images 18 OLYMPUS Master Software 20 Specifications 21 Safety Precautions 23 Before using your camera before taking important photographs. The images of the LCD screen and...
Table of Contents Gather these items (box contents 3 Prepare the battery 4 Turn the camera on 5 Set date and time 6 Select a Language 8 Take a picture 9 En Review your pictures 10 Basic Operation 11 Shooting Mode Buttons 11 Mode Dial 12 SCENE Modes 12 Macro Mode 13 Flash ... Settings 15 Top Menu 15 Erase All Pictures 15 Connecting the Camera 16 Playback on a TV 16 Direct Printing (PictBridge 17 Transfer Images 18 OLYMPUS Master Software 20 Specifications 21 Safety Precautions 23 Before using your camera before taking important photographs. The images of the LCD screen and...

FE-220 Basic Manual (English, Français, Español, Português)
Page 10
b. Press the S button. Press the q button. Press the OF/< button to erase. Press the X& button and the Y# button, to display the picture you want to select [YES] and press the i button. ERASE S button BACK MENU YES NO SET OK c. Review your pictures a. q button En Arrow pad Next picture Previous picture [IN] HQ 3072×2304 0.0 '07.08.26 12:30 100-0001 1 Erase pictures a. OF/< button ERASE i button BACK MENU YES NO SET OK 10
b. Press the S button. Press the q button. Press the OF/< button to erase. Press the X& button and the Y# button, to display the picture you want to select [YES] and press the i button. ERASE S button BACK MENU YES NO SET OK c. Review your pictures a. q button En Arrow pad Next picture Previous picture [IN] HQ 3072×2304 0.0 '07.08.26 12:30 100-0001 1 Erase pictures a. OF/< button ERASE i button BACK MENU YES NO SET OK 10
FE-220 Quick Start Guide (English, Português)
Page 1
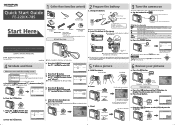
...Manual. For details on : Charging Light off the camera, press the o button again. Hold the camera Horizontal grip [] HQ 3072×2304 [IN] 4 Vertical grip b. The green lamp indicates that it does not come loose. N Review your subject. OF/< button ERASE i button BACK... b. Gather these items (box contents) Prepare the battery Turn the camera on Quick Start Guide FE-220/X-785 Start Here Digital camera Strap Lithium Ion Battery (LI-42B) Battery Charger (LI-40C) USB Cable AV Cable OLYMPUS Master CD-ROM Other items • Basic manual • Advanced ...
...Manual. For details on : Charging Light off the camera, press the o button again. Hold the camera Horizontal grip [] HQ 3072×2304 [IN] 4 Vertical grip b. The green lamp indicates that it does not come loose. N Review your subject. OF/< button ERASE i button BACK... b. Gather these items (box contents) Prepare the battery Turn the camera on Quick Start Guide FE-220/X-785 Start Here Digital camera Strap Lithium Ion Battery (LI-42B) Battery Charger (LI-40C) USB Cable AV Cable OLYMPUS Master CD-ROM Other items • Basic manual • Advanced ...

