
SP-565UZ Instruction Manual (English)
Page 2
... and Playing Back Images "Shooting, Playback and Erasing" (p. 14) 4 Step Printing Direct printing (PictBridge) (p. 64) Print reservations (DPOF) (p. 67) Contents Names of Parts 6 Preparing the Camera 10 Shooting, Playback and Erasing ........14 Using Shooting Modes 17 Using Shooting Functions 21 Using Playback Features 28 Menus for Shooting Functions...........31 Menus for Playback...
... and Playing Back Images "Shooting, Playback and Erasing" (p. 14) 4 Step Printing Direct printing (PictBridge) (p. 64) Print reservations (DPOF) (p. 67) Contents Names of Parts 6 Preparing the Camera 10 Shooting, Playback and Erasing ........14 Using Shooting Modes 17 Using Shooting Functions 21 Using Playback Features 28 Menus for Shooting Functions...........31 Menus for Playback...

SP-565UZ Instruction Manual (English)
Page 6
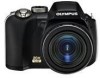
p.10 6 Battery compartment lock p.10 7 Tripod socket 8 Speaker 9 Diopter adjustment dial p.25 10 # button (flash flip-up p.22 11 DC-IN jack p.78 12 Connector cover p.61, 64, 70 13 Multi-connector p.61, 64, 70 6 EN Names of Parts Camera unit 2 1 3 4 9 10 5 11 6 12 13 7 8 1 Self-timer lamp/ AF illuminator p.24, 37 2 Flash p.22 3 Microphone p.53 4 Lens 5 Battery compartment cover...........
p.10 6 Battery compartment lock p.10 7 Tripod socket 8 Speaker 9 Diopter adjustment dial p.25 10 # button (flash flip-up p.22 11 DC-IN jack p.78 12 Connector cover p.61, 64, 70 13 Multi-connector p.61, 64, 70 6 EN Names of Parts Camera unit 2 1 3 4 9 10 5 11 6 12 13 7 8 1 Self-timer lamp/ AF illuminator p.24, 37 2 Flash p.22 3 Microphone p.53 4 Lens 5 Battery compartment cover...........

SP-565UZ Instruction Manual (English)
Page 7
p.23 9 button (macro p.24 8button (self-timer p.24 : button (flash p.22 10 o button p.26 11 f/D button (SHADOW ADJ/ erase p.16, 22 12 g/E button (menu guide/information display change/date and time check) ...p.25, 29 13 Card slot p.... dial p.3, 13 16 Zoom lever p.21, 28 17 Shutter button p.14, 20 18 o button p.11, 12, 14 EN 7 1 4 5 2 6 7 3 8 9 10 11 12 15 16 13 17 18 14 1 Viewfinder p.25 2 Strap eyelet p.10 3 Monitor p.8, 14, 59 4 u button (monitor/viewfinder) .... p.25 5 z/m button (custom/sequential playback p.26, 29 6 Card access lamp...
p.23 9 button (macro p.24 8button (self-timer p.24 : button (flash p.22 10 o button p.26 11 f/D button (SHADOW ADJ/ erase p.16, 22 12 g/E button (menu guide/information display change/date and time check) ...p.25, 29 13 Card slot p.... dial p.3, 13 16 Zoom lever p.21, 28 17 Shutter button p.14, 20 18 o button p.11, 12, 14 EN 7 1 4 5 2 6 7 3 8 9 10 11 12 15 16 13 17 18 14 1 Viewfinder p.25 2 Strap eyelet p.10 3 Monitor p.8, 14, 59 4 u button (monitor/viewfinder) .... p.25 5 z/m button (custom/sequential playback p.26, 29 6 Card access lamp...

SP-565UZ Instruction Manual (English)
Page 8
...p.33 31 White balance p.32 32 Drive p.34 33 White balance fine adjust p.39 8 EN Monitor Shooting mode display 1 2 3 4 56 7 8 9 10 33 C 32 NR AEL AFL +2.0 11 12 13 31 +2 14 30 ISO 1600 29 +2 +2 15 16 17 28 10M 12s 27 FINE +2.0 1/400 F3.5 18...2 Flash mode p.23 3 Silent mode p.63 4 Digital image stabilization p.37 5 Macro/super macro mode p.24 6 SHADOW ADJ p.22 7 Noise reduction p.40 8 AE lock p.63 9 Battery check p.10, 73 10 AF lock (s p.63 Manual focus (a p.36 AF predict p.37 11 Flash standby/camera shake warning/flash charge p.72 12 Flash intensity...
...p.33 31 White balance p.32 32 Drive p.34 33 White balance fine adjust p.39 8 EN Monitor Shooting mode display 1 2 3 4 56 7 8 9 10 33 C 32 NR AEL AFL +2.0 11 12 13 31 +2 14 30 ISO 1600 29 +2 +2 15 16 17 28 10M 12s 27 FINE +2.0 1/400 F3.5 18...2 Flash mode p.23 3 Silent mode p.63 4 Digital image stabilization p.37 5 Macro/super macro mode p.24 6 SHADOW ADJ p.22 7 Noise reduction p.40 8 AE lock p.63 9 Battery check p.10, 73 10 AF lock (s p.63 Manual focus (a p.36 AF predict p.37 11 Flash standby/camera shake warning/flash charge p.72 12 Flash intensity...

SP-565UZ Instruction Manual (English)
Page 9
... 2 Print reservation/ number of prints p.66, 67 3 Sound record p.39 4 Protect p.52 5 Sequential playback (index/slideshow p.29 6 Battery check p.10, 73 7 Shutter speed p.17 8 Aperture value p.17 9 Exposure compensation p.23 1 34 6 15 10 15 VGA 11 2008.10.26 12:30 17 100-0004 12 IN 00:14 /00:34 13 14 Movie... 10 White balance p.32 11 Image size p.31,32 12 File number p.58 13 Frame number Playing time/total recording time...
... 2 Print reservation/ number of prints p.66, 67 3 Sound record p.39 4 Protect p.52 5 Sequential playback (index/slideshow p.29 6 Battery check p.10, 73 7 Shutter speed p.17 8 Aperture value p.17 9 Exposure compensation p.23 1 34 6 15 10 15 VGA 11 2008.10.26 12:30 17 100-0004 12 IN 00:14 /00:34 13 14 Movie... 10 White balance p.32 11 Image size p.31,32 12 File number p.58 13 Frame number Playing time/total recording time...

SP-565UZ Instruction Manual (English)
Page 10
...strap tight so that can be used, see "Battery handling precautions" (p. 77). Flashes in red 5 10 EN ● Attach the strap to fall out, resulting in the same manner. Attaching the camera strap and lens cap 1 2 3 4 ● Slide the battery compartment lock from ) to replace... to the other eyelet in loss of the box Loading the batteries 1 2 Digital camera Lens cap and lens cap strap 3 Camera strap Four AA batteries Battery compartment lock USB cable AV cable OLYMPUS Master 2 CD-ROM microSD Attachment Other accessories not shown: Instruction Manual warranty card...
...strap tight so that can be used, see "Battery handling precautions" (p. 77). Flashes in red 5 10 EN ● Attach the strap to fall out, resulting in the same manner. Attaching the camera strap and lens cap 1 2 3 4 ● Slide the battery compartment lock from ) to replace... to the other eyelet in loss of the box Loading the batteries 1 2 Digital camera Lens cap and lens cap strap 3 Camera strap Four AA batteries Battery compartment lock USB cable AV cable OLYMPUS Master 2 CD-ROM microSD Attachment Other accessories not shown: Instruction Manual warranty card...

SP-565UZ Instruction Manual (English)
Page 12
... MENU SETUP PANORAMA EXIT MENU SCN SILENT MODE SET OK SEL. Arrow pad and operation guide The symbols 1243, KJLM displayed on the camera. ● The date and time setting screen is displayed when the date and time are not set here are saved to image file names, ... to turn on various setting and movie playback screens indicate that the m button, o button, zoom lever or D button is used . X CANCEL MENU SET OK 2008.10.26 12:30 100-0004 IN 00:14 /00:34 / 1 K 4 L 3 M Y M D TIME Y M D CANCEL MENU Date and time setting screen 2 Use 78 to save the setting for...
... MENU SETUP PANORAMA EXIT MENU SCN SILENT MODE SET OK SEL. Arrow pad and operation guide The symbols 1243, KJLM displayed on the camera. ● The date and time setting screen is displayed when the date and time are not set here are saved to image file names, ... to turn on various setting and movie playback screens indicate that the m button, o button, zoom lever or D button is used . X CANCEL MENU SET OK 2008.10.26 12:30 100-0004 IN 00:14 /00:34 / 1 K 4 L 3 M Y M D TIME Y M D CANCEL MENU Date and time setting screen 2 Use 78 to save the setting for...

SP-565UZ Instruction Manual (English)
Page 15
... of the image can be changed. To shoot movies "Shooting movies (A mode)" (p. 20) To turn off the camera Press the o button to turn off the camera, and attach the lens cap to the lens. 2008.10.26 12:30 NORM 10M 100-0001 IN 1 Playback image 2 Use 789: to q. 6 To take the picture... way down . To return to shooting, either press the q button again or press the shutter button halfway down while being careful not to shake the camera. Displays 10 frames before the current image Displays next image Displays previous image Displays...
... of the image can be changed. To shoot movies "Shooting movies (A mode)" (p. 20) To turn off the camera Press the o button to turn off the camera, and attach the lens cap to the lens. 2008.10.26 12:30 NORM 10M 100-0001 IN 1 Playback image 2 Use 789: to q. 6 To take the picture... way down . To return to shooting, either press the q button again or press the shutter button halfway down while being careful not to shake the camera. Displays 10 frames before the current image Displays next image Displays previous image Displays...

SP-565UZ Instruction Manual (English)
Page 16
... displayed. ERASE IN CANCEL MENU YES NO SET OK 2 Press 7 to select [YES], and press the o button. [D ERASE] (p. 54) Elapsed time/ Total recording time 2008.10.26 12:30 100-0004 IN 00:12 /00:34 During playback First (last) frame/frame advance: During pause, press 7 to display the first... frame, and press 8 to display the next frame. Pause: Press the o button. 1 Press the D button when the playback image to resume playback. 2008.10.26 12:30 100-0004 IN 00:14 /00:34 / During pause To stop movie playback Press the m button. 16 EN Press 9 to display the...
... displayed. ERASE IN CANCEL MENU YES NO SET OK 2 Press 7 to select [YES], and press the o button. [D ERASE] (p. 54) Elapsed time/ Total recording time 2008.10.26 12:30 100-0004 IN 00:12 /00:34 During playback First (last) frame/frame advance: During pause, press 7 to display the first... frame, and press 8 to display the next frame. Pause: Press the o button. 1 Press the D button when the playback image to resume playback. 2008.10.26 12:30 100-0004 IN 00:14 /00:34 / During pause To stop movie playback Press the m button. 16 EN Press 9 to display the...

SP-565UZ Instruction Manual (English)
Page 24
Item Description OFF Macro mode is automatically canceled after one shot. By securing the camera on for approx. 10 seconds, and then blinks for approx. 2 seconds before taking the picture. 2s SELFTIMER After setting, when the shutter button is pressed all the way ...down , the self-time lamp turns on a tripod, this function enables the user to take pictures without the camera shake (k). 1 Press 8. Self-timer shooting is deactivated. MACRO This enables shooting as close as 10 cm (3.9 in .)*2 to the subject. *1 When the zoom is at the widest (W) setting. *2 The zoom is...
Item Description OFF Macro mode is automatically canceled after one shot. By securing the camera on for approx. 10 seconds, and then blinks for approx. 2 seconds before taking the picture. 2s SELFTIMER After setting, when the shutter button is pressed all the way ...down , the self-time lamp turns on a tripod, this function enables the user to take pictures without the camera shake (k). 1 Press 8. Self-timer shooting is deactivated. MACRO This enables shooting as close as 10 cm (3.9 in .)*2 to the subject. *1 When the zoom is at the widest (W) setting. *2 The zoom is...

SP-565UZ Instruction Manual (English)
Page 28
... image in single-image view. Single-image view W Closeup view 2008.10.26 12:30 NORM 10M 100-0004 T IN 4 W T Index view T x10 2008.10.26 12:30 W IN 4 2008.10.26 12:30 W W IN 4 T 2008.10.26 12:30 IN 4 T 2008.10.26 12:30 W Calendar view SUN MON TUE WED THU FRI SAT... 2008 10 28 29 30 1 2 3 4 5 6 7 8 9 10 11 12 13 14 15 16 17 18 19 20...
... image in single-image view. Single-image view W Closeup view 2008.10.26 12:30 NORM 10M 100-0004 T IN 4 W T Index view T x10 2008.10.26 12:30 W IN 4 2008.10.26 12:30 W W IN 4 T 2008.10.26 12:30 IN 4 T 2008.10.26 12:30 W Calendar view SUN MON TUE WED THU FRI SAT... 2008 10 28 29 30 1 2 3 4 5 6 7 8 9 10 11 12 13 14 15 16 17 18 19 20...

SP-565UZ Instruction Manual (English)
Page 29
... image with a sequential- To display the index view Press the m button. shot icon during playback. "Viewing images" (p. 15) Sequential-shot icon Detailed No information 2008.10.26 12:30 1/1000 F3.5 +2.0 ISO 400 NORM 10M 100-0004 IN 4 [u (Histogram)] (p. 61), "Reading a histogram" (p. 25) EXPAND 10M 100-0002 ...(p. 16) when displaying the first frame will apply the setting to index view before setting. Normal Histogram 2008.10.26 12:30 NORM 10M 100-0004 IN 4 2008.10.26 12:30 1/1000 F3.5 +2.0 ISO 400 NORM 10M IN 4 Playing back sequentially shot images For images that were...
... image with a sequential- To display the index view Press the m button. shot icon during playback. "Viewing images" (p. 15) Sequential-shot icon Detailed No information 2008.10.26 12:30 1/1000 F3.5 +2.0 ISO 400 NORM 10M 100-0004 IN 4 [u (Histogram)] (p. 61), "Reading a histogram" (p. 25) EXPAND 10M 100-0002 ...(p. 16) when displaying the first frame will apply the setting to index view before setting. Normal Histogram 2008.10.26 12:30 NORM 10M 100-0004 IN 4 2008.10.26 12:30 1/1000 F3.5 +2.0 ISO 400 NORM 10M IN 4 Playing back sequentially shot images For images that were...

SP-565UZ Instruction Manual (English)
Page 30
Restart scrolling : Press the o button. "Viewing images" (p. 15) 2008.10.26 12:30 2 Press the o button. Pause : Press the o button. Playback direction : Press 789: during zoom playback to scroll in /Zoom out : Turn the ...viewing area Operations during playback. Stop playback : Press the m button. 30 EN Playing back panoramic images Panorama images that were combined together using [COMBINE IN CAMERA 1] or [COMBINE IN CAMERA 2] can be scrolled for viewing. [v PANORAMA] (p. 45) 1 Select a panorama image during panorama image playback Zoom in the direction of the pressed button...
Restart scrolling : Press the o button. "Viewing images" (p. 15) 2008.10.26 12:30 2 Press the o button. Pause : Press the o button. Playback direction : Press 789: during zoom playback to scroll in /Zoom out : Turn the ...viewing area Operations during playback. Stop playback : Press the m button. 30 EN Playing back panoramic images Panorama images that were combined together using [COMBINE IN CAMERA 1] or [COMBINE IN CAMERA 2] can be scrolled for viewing. [v PANORAMA] (p. 45) 1 Select a panorama image during panorama image playback Zoom in the direction of the pressed button...

SP-565UZ Instruction Manual (English)
Page 34
...number of approx. 13.5 frames/sec. Sequential shooting at a speed of sequential images is approx. 30 or less. (This includes the 10 images immediately before shooting when [PRE-CAPTURE ON] is selected.) 34 EN Sequential shooting at a focus and brightness (exposure) that were .... *1 The shooting speed varies depending on the settings for each time the shutter button is fixed to [PRE-CAPTURE ON], 10 frames (from pressing the button halfway down [DRIVE] K CAMERA MENU X DRIVE : P A S M r s Submenu 2 o j*1 c Submenu 3 - When [D IMAGE QUALITY] is set to [c], [IMAGE SIZE] is ...
...number of approx. 13.5 frames/sec. Sequential shooting at a speed of sequential images is approx. 30 or less. (This includes the 10 images immediately before shooting when [PRE-CAPTURE ON] is selected.) 34 EN Sequential shooting at a focus and brightness (exposure) that were .... *1 The shooting speed varies depending on the settings for each time the shutter button is fixed to [PRE-CAPTURE ON], 10 frames (from pressing the button halfway down [DRIVE] K CAMERA MENU X DRIVE : P A S M r s Submenu 2 o j*1 c Submenu 3 - When [D IMAGE QUALITY] is set to [c], [IMAGE SIZE] is ...

SP-565UZ Instruction Manual (English)
Page 38
This function is also used for taking pictures. Using an external flash [Q FLASH] K CAMERA MENU X Q FLASH : P A S M r s Submenu 2 IN #RC SLAVE Submenu 3 - The commercially-available slave flash that is synchronized with the Olympus Wireless RC Flash System" (p. 80) When set to a setting other than [o], but if ...the flash intensity is large, the interval between sequential shots becomes longer. 38 EN CH1 to CH4 1 to 10 Application The built-in fl...
This function is also used for taking pictures. Using an external flash [Q FLASH] K CAMERA MENU X Q FLASH : P A S M r s Submenu 2 IN #RC SLAVE Submenu 3 - The commercially-available slave flash that is synchronized with the Olympus Wireless RC Flash System" (p. 80) When set to a setting other than [o], but if ...the flash intensity is large, the interval between sequential shots becomes longer. 38 EN CH1 to CH4 1 to 10 Application The built-in fl...

SP-565UZ Instruction Manual (English)
Page 47
...is displayed. Adjust the settings for the functions while referring to 10 frames. Panorama shooting is possible for details on how to take...• Menu functions in the same way as steps 3 to 4. ● After the third frame is taken, the camera automatically processes the frames and the combined panoram image is displayed, you cannot continue shooting any further. To cancel a panoramic ...number of the 2nd frame 4 Press the shutter button to create panoramic images. EN 47 Refer to the OLYMPUS Master 2 help guide for up to "Using the Menu" (p. 3). 3 Compose the second shot so...
...is displayed. Adjust the settings for the functions while referring to 10 frames. Panorama shooting is possible for details on how to take...• Menu functions in the same way as steps 3 to 4. ● After the third frame is taken, the camera automatically processes the frames and the combined panoram image is displayed, you cannot continue shooting any further. To cancel a panoramic ...number of the 2nd frame 4 Press the shutter button to create panoramic images. EN 47 Refer to the OLYMPUS Master 2 help guide for up to "Using the Menu" (p. 3). 3 Compose the second shot so...

SP-565UZ Instruction Manual (English)
Page 59
... set in the [ON] setting are reflected on the image file names and date prints. time set with [X]. X Date order Y M D TIME 2008 10 26 12 30 Y M D CANCEL MENU EN 59 s BACK MENU SET OK Setting the date and time [X] x SETUP X X "Setting the date and time" (p. 12) Submenu 2 Submenu... select the date display order 1 Press : after setting Minute, and use 78 to the date and time that were set in [DUALTIME] when using the camera in another time zone [DUALTIME] x SETUP X DUALTIME The date and time set in [X (Date/time)].
... set in the [ON] setting are reflected on the image file names and date prints. time set with [X]. X Date order Y M D TIME 2008 10 26 12 30 Y M D CANCEL MENU EN 59 s BACK MENU SET OK Setting the date and time [X] x SETUP X X "Setting the date and time" (p. 12) Submenu 2 Submenu... select the date display order 1 Press : after setting Minute, and use 78 to the date and time that were set in [DUALTIME] when using the camera in another time zone [DUALTIME] x SETUP X DUALTIME The date and time set in [X (Date/time)].

SP-565UZ Instruction Manual (English)
Page 66
PRINT INFO Press 8 to set the displayed image for the displayed image. To make detailed printer settings for single reservation. 6 Use 9: to select an image. 7 Press the < button to make the detailed printer settings 1 Use 789:, and press the o button.
PRINT INFO Press 8 to set the displayed image for the displayed image. To make detailed printer settings for single reservation. 6 Use 9: to select an image. 7 Press the < button to make the detailed printer settings 1 Use 789:, and press the o button.

SP-565UZ Instruction Manual (English)
Page 67
... 12 When the message [REMOVE USB CABLE] is displayed. 2 Select [CANCEL] using the original device. Making new DPOF reservations with this camera. Single-frame print reservations [ Make changes using 7 8, and press the o button. DPOF reservations set by another DPOF device cannot be made by this... camera will erase the reservations made for up to 999 images per card. To cancel printing 1 Press the o button when [TRANSFERRING] is ...
... 12 When the message [REMOVE USB CABLE] is displayed. 2 Select [CANCEL] using the original device. Making new DPOF reservations with this camera. Single-frame print reservations [ Make changes using 7 8, and press the o button. DPOF reservations set by another DPOF device cannot be made by this... camera will erase the reservations made for up to 999 images per card. To cancel printing 1 Press the o button when [TRANSFERRING] is ...

SP-565UZ Instruction Manual (English)
Page 72
... temperature and dry out before taking pictures. ● With prolonged camera use, the internal temperature may also increase during use, however this occurs, remove the battery from 1, 3, 5 or 10 minutes. Troubleshooting Battery "The camera does not work as intended, or if an error message is...a warm, humid room. "Setting the date and time" (p. 12) 72 EN "Loading the batteries" (p. 10) ● Battery performance may have been reduced temporarily due to turn the camera on dust in the final image. "Switching between the monitor and viewfinder" (p. 25) &#...
... temperature and dry out before taking pictures. ● With prolonged camera use, the internal temperature may also increase during use, however this occurs, remove the battery from 1, 3, 5 or 10 minutes. Troubleshooting Battery "The camera does not work as intended, or if an error message is...a warm, humid room. "Setting the date and time" (p. 12) 72 EN "Loading the batteries" (p. 10) ● Battery performance may have been reduced temporarily due to turn the camera on dust in the final image. "Switching between the monitor and viewfinder" (p. 25) &#...


