

Owner Manual
Page 1
... reference. Please retain this manual for purchasing an Onkyo 7.1ch THX Certified Digital Surround Receiver and Speaker Package. Enjoying the Listening Modes ..... 45 Recording 52 Advanced Operation 53 Troubleshooting 60 Specifications 64 En 7.1ch THX Certified Digital Surround Receiver and Speaker Package HT-S990THX AV Receiver (HT-R940) Front Speakers (SKF...
... reference. Please retain this manual for purchasing an Onkyo 7.1ch THX Certified Digital Surround Receiver and Speaker Package. Enjoying the Listening Modes ..... 45 Recording 52 Advanced Operation 53 Troubleshooting 60 Specifications 64 En 7.1ch THX Certified Digital Surround Receiver and Speaker Package HT-S990THX AV Receiver (HT-R940) Front Speakers (SKF...
Owner Manual
Page 4
... quality. • Subwoofer is fitted with the letter L or coloured red. Check for home and other limited consumer uses only unless otherwise authorized by Macrovision. Use of this , move the unit... Input Signal Warning The speakers can also be placed on sturdy, flat surfaces that the ONKYO product described in this apparatus may still be an issue, in your TV or monitor. Sound ... Blue: Neutral Brown: Live As the colours of the wires in the mains lead of this instruction manual is in the horizontal or tilted position. • If the unit is used near an air conditioner...
... quality. • Subwoofer is fitted with the letter L or coloured red. Check for home and other limited consumer uses only unless otherwise authorized by Macrovision. Use of this , move the unit... Input Signal Warning The speakers can also be placed on sturdy, flat surfaces that the ONKYO product described in this apparatus may still be an issue, in your TV or monitor. Sound ... Blue: Neutral Brown: Live As the colours of the wires in the mains lead of this instruction manual is in the horizontal or tilted position. • If the unit is used near an air conditioner...

Owner Manual
Page 11
...(45) The North American model doesn't have this mode is the RT/PTY/TP button, and it's used with RDS (Radio Data System). Display 12 3 4 5 6 For detailed information, see the pages in parentheses. 1 A and B speaker indicators (8, 37) Indicator...area Displays various information about the currently selected input source. Q TUNING MODE button (39) Selects the Auto or Manual tuning mode for composite video and analog audio. There are jacks for AM and FM radio. Indicator B lights...stations. J TONE, [-], and [+] buttons (43) Used to access the setup menus. K THX button (45) Selects the...
...(45) The North American model doesn't have this mode is the RT/PTY/TP button, and it's used with RDS (Radio Data System). Display 12 3 4 5 6 For detailed information, see the pages in parentheses. 1 A and B speaker indicators (8, 37) Indicator...area Displays various information about the currently selected input source. Q TUNING MODE button (39) Selects the Auto or Manual tuning mode for composite video and analog audio. There are jacks for AM and FM radio. Indicator B lights...stations. J TONE, [-], and [+] buttons (43) Used to access the setup menus. K THX button (45) Selects the...

Owner Manual
Page 14
...TAPE mode, you can control RECEIVER the AV receiver and an Onkyo cassette TAPE recorder connected via . ■ DVD and CD/MD/CDR/HDD Modes With these ...modes, you can be used to control an Onkyo cassette recorder connected via . 1 2 3 1 4 2 5 36 7 4 8 9 J ON/STANDBY REMOTE MODE RECEIVER DVD TAPE INPUT SELECTOR...remote controller can control a TV, VCR, and satellite or cable receiver. It can control Onkyo components or components made by that mode to select a mode. You must enter the appropriate...
...TAPE mode, you can control RECEIVER the AV receiver and an Onkyo cassette TAPE recorder connected via . ■ DVD and CD/MD/CDR/HDD Modes With these ...modes, you can be used to control an Onkyo cassette recorder connected via . 1 2 3 1 4 2 5 36 7 4 8 9 J ON/STANDBY REMOTE MODE RECEIVER DVD TAPE INPUT SELECTOR...remote controller can control a TV, VCR, and satellite or cable receiver. It can control Onkyo components or components made by that mode to select a mode. You must enter the appropriate...

Owner Manual
Page 22
Connecting Your Components About AV Connections • Before making any AV connections, read the manuals supplied with a 7.1channel analog audio output. Left (white) Analog audio Left (white) Right (red) Right (red) (Yellow) Composite video (Yellow) • Push plugs in all ...
Connecting Your Components About AV Connections • Before making any AV connections, read the manuals supplied with a 7.1channel analog audio output. Left (white) Analog audio Left (white) Right (red) Right (red) (Yellow) Composite video (Yellow) • Push plugs in all ...

Owner Manual
Page 31
Connecting Your Components-Continued Connecting an HDD-compatible Component As of this printing, the Onkyo Remote Interactive Dock is the only HDD-compatible component available. ■ For HDD-compatible components that support video Connect your HDD-... S jack. ■ For HDD-compatible components that don't support video Connect your HDD-compatible component's analog audio output jacks to the Remote Interactive Dock's instruction manual. 31 S VIDEO OUT AUDIO OUT L R AUDIO OUT L R DIGITAL IN COA XIAL OPTICAL 1 COMPONENT VIDEO IN 3 IN 2 IN 1 OUT Y PB 2 PR 3 REMOTE...
Connecting Your Components-Continued Connecting an HDD-compatible Component As of this printing, the Onkyo Remote Interactive Dock is the only HDD-compatible component available. ■ For HDD-compatible components that support video Connect your HDD-... S jack. ■ For HDD-compatible components that don't support video Connect your HDD-compatible component's analog audio output jacks to the Remote Interactive Dock's instruction manual. 31 S VIDEO OUT AUDIO OUT L R AUDIO OUT L R DIGITAL IN COA XIAL OPTICAL 1 COMPONENT VIDEO IN 3 IN 2 IN 1 OUT Y PB 2 PR 3 REMOTE...

Owner Manual
Page 33
...the Input Display (see pages 24 to 32). Notes: • Use only cables for connecting additional -capable components. • Connect only Onkyo components to jacks. Connecting other manufacturer's components may cause a malfunction. • Some components may cause a momentary power surge that might ...control sensor instead of the component. You must enter the appropriate remote control code first (page 58). Refer to the manuals supplied with Onkyo players (DVD, CD, etc.). • Some components have two jacks. If this is for connections. With (Remote Interactive), ...
...the Input Display (see pages 24 to 32). Notes: • Use only cables for connecting additional -capable components. • Connect only Onkyo components to jacks. Connecting other manufacturer's components may cause a malfunction. • Some components may cause a momentary power surge that might ...control sensor instead of the component. You must enter the appropriate remote control code first (page 58). Refer to the manuals supplied with Onkyo players (DVD, CD, etc.). • Some components have two jacks. If this is for connections. With (Remote Interactive), ...

Owner Manual
Page 35
... current assignment appears. 3 DIGITAL INPUT Press the [DIGITAL INPUT] button repeatedly to the relevant manuals. 35 Changing the Input Display If you connect an -capable Onkyo MiniDisc recorder, CD recorder or next generation HDD-compatible component to the TAPE IN/OUT or ...1, 2 STANDBY/ON STANDBY PHONES TUNING PRESET MULTI CH DVD VIDEO 1 VIDEO 2 VIDEO 3 TAPE TUNER C D ENTER RETURN SETUP SPEAKERS A B VCR TONE THX LISTENING MODE DIGITAL DISPLAY INPUT TUNING DIMMER MEMORY MODE CLEAR MASTER VOLUME VIDEO 3 INPUT VIDEO L AUDIO R 1 TAPE or VIDEO 2 Press the [TAPE] or...
... current assignment appears. 3 DIGITAL INPUT Press the [DIGITAL INPUT] button repeatedly to the relevant manuals. 35 Changing the Input Display If you connect an -capable Onkyo MiniDisc recorder, CD recorder or next generation HDD-compatible component to the TAPE IN/OUT or ...1, 2 STANDBY/ON STANDBY PHONES TUNING PRESET MULTI CH DVD VIDEO 1 VIDEO 2 VIDEO 3 TAPE TUNER C D ENTER RETURN SETUP SPEAKERS A B VCR TONE THX LISTENING MODE DIGITAL DISPLAY INPUT TUNING DIMMER MEMORY MODE CLEAR MASTER VOLUME VIDEO 3 INPUT VIDEO L AUDIO R 1 TAPE or VIDEO 2 Press the [TAPE] or...

Owner Manual
Page 39
...a station is weak, it 's 0.05 MHz steps for FM and 9 kHz (or 10 kHz) steps for AM. In this case, switch to Manual Tuning mode and listen to change the frequency one step at a time. When tuned into a stereo FM station, the FM STEREO indicator also appears. TUNED.../ON STANDBY PHONES TUNING PRESET MASTER VOLUME MULTI CH DVD VIDEO 1 VIDEO 2 VIDEO 3 TAPE TUNER C D ENTER RETURN SETUP SPEAKERS A B VCR TONE THX LISTENING MODE DIGITAL DISPLAY INPUT TUNING DIMMER MEMORY MODE CLEAR VIDEO 3 INPUT VIDEO L AUDIO R TUNING MODE With the built-in tuner, you release the button...
...a station is weak, it 's 0.05 MHz steps for FM and 9 kHz (or 10 kHz) steps for AM. In this case, switch to Manual Tuning mode and listen to change the frequency one step at a time. When tuned into a stereo FM station, the FM STEREO indicator also appears. TUNED.../ON STANDBY PHONES TUNING PRESET MASTER VOLUME MULTI CH DVD VIDEO 1 VIDEO 2 VIDEO 3 TAPE TUNER C D ENTER RETURN SETUP SPEAKERS A B VCR TONE THX LISTENING MODE DIGITAL DISPLAY INPUT TUNING DIMMER MEMORY MODE CLEAR VIDEO 3 INPUT VIDEO L AUDIO R TUNING MODE With the built-in tuner, you release the button...
Owner Manual
Page 50
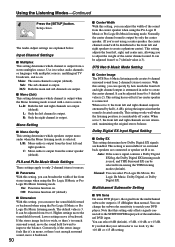
... no surround back speakers are output (default). When set to 5, the front left and right channels are connected or speaker set to improve the balance. Manual: You can select 0 dB (default), +5 dB, +10 dB, or +15 dB. Use it backward. R: Only the right channel is connected. It... create the center channel. This setting adjusts the front left and right speakers. When set B is used , and THX Surround EX can be adjusted from among the THX listening modes (default). This setting works well when the listening position is output (default). Note that this setting only ...
... no surround back speakers are output (default). When set to 5, the front left and right channels are connected or speaker set to improve the balance. Manual: You can select 0 dB (default), +5 dB, +10 dB, or +15 dB. Use it backward. R: Only the right channel is connected. It... create the center channel. This setting adjusts the front left and right speakers. When set B is used , and THX Surround EX can be adjusted from among the THX listening modes (default). This setting works well when the listening position is output (default). Note that this setting only ...
