

Owner Manual
Page 1
... Before using Important Safeguards 2 Precautions 3 Features 4 Supplied accessories 4 Before using this manual for purchasing the Onkyo Audio Video Control Receiver. ONKYO® Audio Video Control Receiver TX-DS656 Instruction Manual CL = 0 0 OO0 - CY 0 Thank you to FM/AM broadcasts 32 Receiving RDS broadcasts (European models only) 36 Using the Surround modes 38 Recording from your new Audio...
... Before using Important Safeguards 2 Precautions 3 Features 4 Supplied accessories 4 Before using this manual for purchasing the Onkyo Audio Video Control Receiver. ONKYO® Audio Video Control Receiver TX-DS656 Instruction Manual CL = 0 0 OO0 - CY 0 Thank you to FM/AM broadcasts 32 Receiving RDS broadcasts (European models only) 36 Using the Surround modes 38 Recording from your new Audio...

Owner Manual
Page 2
... THIS APPLIANCE TO RAIN OR MOISTURE. NO USERSERVICEABLE PARTS INSIDE. for future reference. 3. Wall or Ceiling Mounting - Tinder no circumstances should be referred to the receiver, be sure the antenna system is still trouble, the user should be serviced by the manufacturer. 8. The appliance should the user attempt to provide some...
... THIS APPLIANCE TO RAIN OR MOISTURE. NO USERSERVICEABLE PARTS INSIDE. for future reference. 3. Wall or Ceiling Mounting - Tinder no circumstances should be referred to the receiver, be sure the antenna system is still trouble, the user should be serviced by the manufacturer. 8. The appliance should the user attempt to provide some...

Owner Manual
Page 3
...Rear Panel) Worldwide models are equipped with a voltage selector to conform with the following measures: • Reorient or relocate the receiving antenna. • Increase the separation between other chemical solvents or cloths since these may cause harmful interference to set this appliance... remove the panel lettering. 5. ATTENTIONFOR BRITISH NOM: Replacement and mounting of the unit. FOREWOMAN M Declaration of Conformity We, ONKYO EUROPE ELECTRONICS GmbH INDUSTRIESTRASSE 20 82110 GERMERING, GERMANY CE in own responsibility, that of an AC plug on a circuit different ...
...Rear Panel) Worldwide models are equipped with a voltage selector to conform with the following measures: • Reorient or relocate the receiving antenna. • Increase the separation between other chemical solvents or cloths since these may cause harmful interference to set this appliance... remove the panel lettering. 5. ATTENTIONFOR BRITISH NOM: Replacement and mounting of the unit. FOREWOMAN M Declaration of Conformity We, ONKYO EUROPE ELECTRONICS GmbH INDUSTRIESTRASSE 20 82110 GERMERING, GERMANY CE in own responsibility, that of an AC plug on a circuit different ...

Owner Manual
Page 5
...battery replacement is low. and Canada : 10kHz Other areas : 9kHz Setting Worldwide models are replaced. If the preset voltage is appropriate. (Di O O O TX-DS656 Remote control sensor STAND-BY indicator 30' 30° approx. 5m (16 feet) 4 ,/: / RC-373M Installing the batteries 1. Insert two AA (... glass. The following information will help you press a button on the frequency of use from the remote controller. Before using this receiver away from direct bright light, which could prevent proper operation of the remote controller. • Make sure audio rack doors do ...
...battery replacement is low. and Canada : 10kHz Other areas : 9kHz Setting Worldwide models are replaced. If the preset voltage is appropriate. (Di O O O TX-DS656 Remote control sensor STAND-BY indicator 30' 30° approx. 5m (16 feet) 4 ,/: / RC-373M Installing the batteries 1. Insert two AA (... glass. The following information will help you press a button on the frequency of use from the remote controller. Before using this receiver away from direct bright light, which could prevent proper operation of the remote controller. • Make sure audio rack doors do ...

Owner Manual
Page 8
... fnlll DIGITAL 1 (OPTICAL) DIGITAL 2 (COAXIAL) DIGITAL 3 (COAXIAL) TX-DS656 • II fl:i • it via optical or coaxial cable, it to monitor the sound being recorded. inerefore, you to the TAPE-2 IN jacks. To receiver's DIGITAL °4: 3 = INPUT DIGITAL 2 (COAXIAL) or DIGITAL 3...----- CD player, DAT deck or MD recorder 8 ® Connecting digital audio source equipment ine TX-DS656 has three digital input terminals. The TX-DS656 receives analog signals from input source equipment only during recording or when the Multi-source function is connected ...
... fnlll DIGITAL 1 (OPTICAL) DIGITAL 2 (COAXIAL) DIGITAL 3 (COAXIAL) TX-DS656 • II fl:i • it via optical or coaxial cable, it to monitor the sound being recorded. inerefore, you to the TAPE-2 IN jacks. To receiver's DIGITAL °4: 3 = INPUT DIGITAL 2 (COAXIAL) or DIGITAL 3...----- CD player, DAT deck or MD recorder 8 ® Connecting digital audio source equipment ine TX-DS656 has three digital input terminals. The TX-DS656 receives analog signals from input source equipment only during recording or when the Multi-source function is connected ...

Owner Manual
Page 9
...least one digital audio output terminal, its audio connection cable to the TX-DS656 fromits VIDEO-1VINjack. DVD CENTER WIADAN , L muLn CHANNEL! audio output jack 1/2/3/DVD L IN jack (White) (White) (Red) (Red) To source's Right To receiver's VIDEO- Similarly, input signals to the VIDEO1/2/3/DVD V IN ... 9 If a monaural video camera is used to connect recording equipment such as a video cassette recorder. • Video input signals to the TX-DS656 cannot be output from the MONITOR OUTPUT V jack and the VIDEO-l/2 V OUT jack only. • See the owner's manual of your ...
...least one digital audio output terminal, its audio connection cable to the TX-DS656 fromits VIDEO-1VINjack. DVD CENTER WIADAN , L muLn CHANNEL! audio output jack 1/2/3/DVD L IN jack (White) (White) (Red) (Red) To source's Right To receiver's VIDEO- Similarly, input signals to the VIDEO1/2/3/DVD V IN ... 9 If a monaural video camera is used to connect recording equipment such as a video cassette recorder. • Video input signals to the TX-DS656 cannot be output from the MONITOR OUTPUT V jack and the VIDEO-l/2 V OUT jack only. • See the owner's manual of your ...
Owner Manual
Page 10
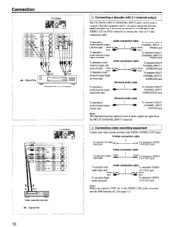
... the VIDEO-1/2/3 or DVD connector to connect a decoder equipped with 5.1-ch output T N/ r1CNCr I /N- to the VIDEO-1/VIDEO-2 OUT jacks. Connection TX-DS656 t) FRO 0 an C INPUI OUT : Signal flow O OUT = 0 =I Decoder with 5.1-ch audio output (dts decoder, MPEG decoder, etc.)....Right surround jack Audio connection cable To receiver's MULTI CHANNEL INPUT L (White) FRONT jack (Red) To receiver's MULTI CHANNEL INPUT R FRONT jack Audio connection cable To receivers MULTI CHANNEL INPUT L (White) SURROUND jack (Red) To receiver's MULTI CHANNEL INPUT R SURROUND jack ...
... the VIDEO-1/2/3 or DVD connector to connect a decoder equipped with 5.1-ch output T N/ r1CNCr I /N- to the VIDEO-1/VIDEO-2 OUT jacks. Connection TX-DS656 t) FRO 0 an C INPUI OUT : Signal flow O OUT = 0 =I Decoder with 5.1-ch audio output (dts decoder, MPEG decoder, etc.)....Right surround jack Audio connection cable To receiver's MULTI CHANNEL INPUT L (White) FRONT jack (Red) To receiver's MULTI CHANNEL INPUT R FRONT jack Audio connection cable To receivers MULTI CHANNEL INPUT L (White) SURROUND jack (Red) To receiver's MULTI CHANNEL INPUT R SURROUND jack ...

Owner Manual
Page 11
...failure of the equipment. • You cannot operate turntables and MD recorders by using the equalizer. To sources Left Audio connection cable To receiver's TAPE- TX-DS656 •,1111,- (0) ••• (0 (PLAY) TAPE-2 : Signal flow Graphic equalizer OUT IN .-- • m rilM...receiver's remote controller. CD player Cassette tape deck DVD player AI* UM, O1 RI REMOTE CONTROL ® Connecting the R I remote control cables An Onkyo cassette tape deck, CD player or DVD player equipped with the unit. Note: • Connect the remote control cable to the TX-DS656...
...failure of the equipment. • You cannot operate turntables and MD recorders by using the equalizer. To sources Left Audio connection cable To receiver's TAPE- TX-DS656 •,1111,- (0) ••• (0 (PLAY) TAPE-2 : Signal flow Graphic equalizer OUT IN .-- • m rilM...receiver's remote controller. CD player Cassette tape deck DVD player AI* UM, O1 RI REMOTE CONTROL ® Connecting the R I remote control cables An Onkyo cassette tape deck, CD player or DVD player equipped with the unit. Note: • Connect the remote control cable to the TX-DS656...

Owner Manual
Page 12
... OUTPUT S jack Video connection cable To TV's Video input (Yellow) jack (Yellow)To receiver's MONITOR OUTPUT V jack Note: If distortion of your TV's power switch and, in about 5 minutes. To activate the IPM function... 1. Connect the audio ...can be connected to the TXDS656's VIDEO-2 L IN jack. 2. flashes on the display. 4. You cannot turn on automatically. MONITOR OUTPUT Signal flow IN TV 1 TV TX-DS656 Signal flow OUT VIDEO-1 s- Just turn off the TV's power switch, "." Press the VIDEO-2 VCR-2/TV button on the display. 3. "VIDEO-2 VCR" or "VIDEO-2...
... OUTPUT S jack Video connection cable To TV's Video input (Yellow) jack (Yellow)To receiver's MONITOR OUTPUT V jack Note: If distortion of your TV's power switch and, in about 5 minutes. To activate the IPM function... 1. Connect the audio ...can be connected to the TXDS656's VIDEO-2 L IN jack. 2. flashes on the display. 4. You cannot turn on automatically. MONITOR OUTPUT Signal flow IN TV 1 TV TX-DS656 Signal flow OUT VIDEO-1 s- Just turn off the TV's power switch, "." Press the VIDEO-2 VCR-2/TV button on the display. 3. "VIDEO-2 VCR" or "VIDEO-2...

Owner Manual
Page 13
With your receiver is a worldwide model. b C am, 1=> Insert into slit C. 3. Press down on the lever. 2. CD Insert the end of the cable. ® Clamp it into the hole. type splitter To TX-DS656 To TV (or VCR) (-- If you must use a common FM/TV (or VCR) antenna, use the same antenna for both FM...
With your receiver is a worldwide model. b C am, 1=> Insert into slit C. 3. Press down on the lever. 2. CD Insert the end of the cable. ® Clamp it into the hole. type splitter To TX-DS656 To TV (or VCR) (-- If you must use a common FM/TV (or VCR) antenna, use the same antenna for both FM...

Owner Manual
Page 14
...you install the outdoor antenna. 14 Follow item 19 of an outdoor antenna is recommended. Connecting the AM loop antenna: The AM loop antenna is received. Set it is stretched horizontally above a window or outside. • Do not remove the AM loop antenna. • To avoid the risk... pins or similar implements in various directions until the clearest signal is for indoor use of the "Important Safeguards" on page 2 when you receive the clearest sound. U.S. It is necessary. Follow item 19 of lightning and electrical shock, grounding is dangerous to put the antenna close to...
...you install the outdoor antenna. 14 Follow item 19 of an outdoor antenna is recommended. Connecting the AM loop antenna: The AM loop antenna is received. Set it is stretched horizontally above a window or outside. • Do not remove the AM loop antenna. • To avoid the risk... pins or similar implements in various directions until the clearest signal is for indoor use of the "Important Safeguards" on page 2 when you receive the clearest sound. U.S. It is necessary. Follow item 19 of lightning and electrical shock, grounding is dangerous to put the antenna close to...

Owner Manual
Page 16
.... © Connecting power amplifiers . Doing so may cause damage to the receiver. • Do not connect two or more speaker cables to the receiver's corresponding speaker terminals. If power amplifiers are connecting the speaker's positive (+) and negative (-) binding posts with the TX-DS656 alone. tround speakers Note: • Be sure to connect the Right...
.... © Connecting power amplifiers . Doing so may cause damage to the receiver. • Do not connect two or more speaker cables to the receiver's corresponding speaker terminals. If power amplifiers are connecting the speaker's positive (+) and negative (-) binding posts with the TX-DS656 alone. tround speakers Note: • Be sure to connect the Right...

Owner Manual
Page 17
... power cord from other electrical equipment, such as the POWER button on the area of other components connected to this receiver's power may differ depending on the TX-DS656. Plug the power cord into an AC wall outlet. or Canadian models 1. The shape, number, and total capacity...SWITCHED type, you press the POWER button again, the receiver returns to both the TX-DS656 and the connected audio devices. and Canadian models Capacity is total 120 watts. L_J Note: If your TX-DS656 has a POWER switch, first turn on the receiver is fully turned counterclockwise. • Turning on the...
... power cord from other electrical equipment, such as the POWER button on the area of other components connected to this receiver's power may differ depending on the TX-DS656. Plug the power cord into an AC wall outlet. or Canadian models 1. The shape, number, and total capacity...SWITCHED type, you press the POWER button again, the receiver returns to both the TX-DS656 and the connected audio devices. and Canadian models Capacity is total 120 watts. L_J Note: If your TX-DS656 has a POWER switch, first turn on the receiver is fully turned counterclockwise. • Turning on the...

Owner Manual
Page 18
...connected to "A". Select the correct input channel that is incorrect. Canadian models) The on the TV is being received, change the system setting. If the picture on the TX-DS656 even though the remote controller's SENDING/LEARNED indicator lights, verify that the AB-SUBROOM/LEARN switch is connected ...to a TV set to the MONITOR OUTPUT V connector of the TX-DS656. 18 Press the VIDEO-1 button to the MONITOR OUTPUT V connector. The Menu will not appear if it WIII1Mted tAl the MONITOR OUTPUT ) ...
...connected to "A". Select the correct input channel that is incorrect. Canadian models) The on the TV is being received, change the system setting. If the picture on the TX-DS656 even though the remote controller's SENDING/LEARNED indicator lights, verify that the AB-SUBROOM/LEARN switch is connected ...to a TV set to the MONITOR OUTPUT V connector of the TX-DS656. 18 Press the VIDEO-1 button to the MONITOR OUTPUT V connector. The Menu will not appear if it WIII1Mted tAl the MONITOR OUTPUT ) ...

Owner Manual
Page 31
When this button is 10 minutes or less cancels the Sleep function. 31 Note: • Audio output to the TX-DS656 automatically at which the unit turns off appears on the display and the audio output to 0 (OFF). Falling asleep with a standard stereo plug can be ..., changes the set time has elapsed, the unit automatically turns off . 6 -6 000 000 1J MUTING octal coc u 00 SLEEP Using the Muting function When you receive a phone call, you press this button, the brightness changes in a darkened room and make it brighter when operating the unit. The 1-i-- When the set time...
When this button is 10 minutes or less cancels the Sleep function. 31 Note: • Audio output to the TX-DS656 automatically at which the unit turns off appears on the display and the audio output to 0 (OFF). Falling asleep with a standard stereo plug can be ..., changes the set time has elapsed, the unit automatically turns off . 6 -6 000 000 1J MUTING octal coc u 00 SLEEP Using the Muting function When you receive a phone call, you press this button, the brightness changes in a darkened room and make it brighter when operating the unit. The 1-i-- When the set time...

Owner Manual
Page 32
...tune in an FAIVAM station by specifying the frequency (Manual tuning) - The AUTO indicator lights up if the signal is heard in with the TX-DS656's built-in tuner. • Tune in the station you switch from one of stations toward the higher (or lower) frequencies. "Tuning" ...is shown on the display. 3. In this indicator. RA lAUTE Tuning in the next station. Follow the same procedure to receive the signal in an FM station (Auto tuning) • Recall a preset broadcasting station You can easily find the desired station. The selected frequency ...
...tune in an FAIVAM station by specifying the frequency (Manual tuning) - The AUTO indicator lights up if the signal is heard in with the TX-DS656's built-in tuner. • Tune in the station you switch from one of stations toward the higher (or lower) frequencies. "Tuning" ...is shown on the display. 3. In this indicator. RA lAUTE Tuning in the next station. Follow the same procedure to receive the signal in an FM station (Auto tuning) • Recall a preset broadcasting station You can easily find the desired station. The selected frequency ...

Owner Manual
Page 34
... press the Mo- cursor button. Press the TUNER GROUP button repeatedly until the desired group is displayed. 3. Listening to ofO = er ENTER/ 00O 00Oo c7 b 0 ONKYO ** Input Selector ** Picture = VIDEO-3 OE Sound = TUNER TAPE -2 Moni. = OFF RR Group = C RR Preset No. = 10 RR Surround Mode= STEREO RID Using the on the...
... press the Mo- cursor button. Press the TUNER GROUP button repeatedly until the desired group is displayed. 3. Listening to ofO = er ENTER/ 00O 00Oo c7 b 0 ONKYO ** Input Selector ** Picture = VIDEO-3 OE Sound = TUNER TAPE -2 Moni. = OFF RR Group = C RR Preset No. = 10 RR Surround Mode= STEREO RID Using the on the...

Owner Manual
Page 36
... past or present sales charts (e.g., Top 40) Popular music with an alternative appeal, often not appearing on the display if the TX-DS656 receives characters that , for example, you can choose a station broadcasting your favorite categories of music or other information. (Refer to the right column ..., the characters displayed on the European model, and only in Europe None News reports No program type Reports on the display 36 Receiving RDS broadcasts (European models only) RDS reception is available only on the TX-DS656's display may appear on sales charts. What is displayed.
... past or present sales charts (e.g., Top 40) Popular music with an alternative appeal, often not appearing on the display if the TX-DS656 receives characters that , for example, you can choose a station broadcasting your favorite categories of music or other information. (Refer to the right column ..., the characters displayed on the European model, and only in Europe None News reports No program type Reports on the display 36 Receiving RDS broadcasts (European models only) RDS reception is available only on the TX-DS656's display may appear on sales charts. What is displayed.

Owner Manual
Page 37
...Each time you press the DISPLAY button, the displayed RDS information changes as shown on the left. • If the current station you are received, it takes about 15 seconds for stations of r favorite program type (PTY scan) 1. Press the PTY/TP button repeatedly until "TP" ...is required to appear on the display. • If "WAIT" appears on the display. 2. LCA Searching for approximately 5 seconds, then resumes. 4. Receiving RDS broadcasts (European models only) SMART STAN CONTROLLER jog dial TUNING button Orflr/la 6Ey.. 600(75'65 1 PTY/TP C7C\ 2 SMART SCAN CONTROLLER...
...Each time you press the DISPLAY button, the displayed RDS information changes as shown on the left. • If the current station you are received, it takes about 15 seconds for stations of r favorite program type (PTY scan) 1. Press the PTY/TP button repeatedly until "TP" ...is required to appear on the display. • If "WAIT" appears on the display. 2. LCA Searching for approximately 5 seconds, then resumes. 4. Receiving RDS broadcasts (European models only) SMART STAN CONTROLLER jog dial TUNING button Orflr/la 6Ey.. 600(75'65 1 PTY/TP C7C\ 2 SMART SCAN CONTROLLER...

Owner Manual
Page 48
... speakers. To use the remote controller unless specified otherwise. 1. Adjust the sound volume using the VOLUME V button. You can operate the receiver using the remote controller. Note: Pressing a source selector button when the MULTI-SOURCE indicator is possible through the remote controller only.) In ... sub-room speakers. In the following procedure, use the front panel.. Press the SPEAKERS REMOTE button. 5. You can operate the receiver using the front panel and the remote controller. (Adjusting the sound volume is not flashing changes the input source for sub-room...
... speakers. To use the remote controller unless specified otherwise. 1. Adjust the sound volume using the VOLUME V button. You can operate the receiver using the remote controller. Note: Pressing a source selector button when the MULTI-SOURCE indicator is possible through the remote controller only.) In ... sub-room speakers. In the following procedure, use the front panel.. Press the SPEAKERS REMOTE button. 5. You can operate the receiver using the front panel and the remote controller. (Adjusting the sound volume is not flashing changes the input source for sub-room...


