
Owner Manual
Page 6
...8226; 7 HDMI*5 Inputs and 2 Outputs (TX-NR3007) • 8 HDMI*5 Inputs and 2 Outputs (TX-NR5007) • Onkyo for System Control • 6 Digital Inputs (3 Optical/3 Coaxial) (TX-NR3007) • 7 Digital Inputs (4 Optical/3 Coaxial) (TX-NR5007) • Universal Port for UP-A1 ...permission. *2. Features Amplifier (TX-NR3007) • 140 Watts/Channel @ 8 ohms (FTC) • 200 Watts/Channel @ 6 ohms (IEC) • 250 Watts/Channel @ 6 ohms (JEITA) (TX-NR5007) • 145 Watts/Channel @ 8 ohms (FTC) • 220 Watts/Channel @ 6 ohms (IEC) • 280 Watts/Channel @ 6 ohms (JEITA)...
...8226; 7 HDMI*5 Inputs and 2 Outputs (TX-NR3007) • 8 HDMI*5 Inputs and 2 Outputs (TX-NR5007) • Onkyo for System Control • 6 Digital Inputs (3 Optical/3 Coaxial) (TX-NR3007) • 7 Digital Inputs (4 Optical/3 Coaxial) (TX-NR5007) • Universal Port for UP-A1 ...permission. *2. Features Amplifier (TX-NR3007) • 140 Watts/Channel @ 8 ohms (FTC) • 200 Watts/Channel @ 6 ohms (IEC) • 250 Watts/Channel @ 6 ohms (JEITA) (TX-NR5007) • 145 Watts/Channel @ 8 ohms (FTC) • 220 Watts/Channel @ 6 ohms (IEC) • 280 Watts/Channel @ 6 ohms (JEITA)...

Owner Manual
Page 10
...(136) Lights when Powered Zone 3 is being used to set is selected. It must be used . D A and B indicators (70) Indicate which audio channels are jacks for Zone 2 or Zone 3. [ DISPLAY button (68) This button is completely shutdown. M N O PQ F Listening mode and format indicators (81... Settings" is enabled. AUX 1 INPUT HDMI (31) Used to display various information about the currently selected input source. B Speaker/channel indicators Indicate the speaker channels used to connect an HD camcorder etc. X USB port (127) A USB mass storage device, such as a USB flash drive...
...(136) Lights when Powered Zone 3 is being used to set is selected. It must be used . D A and B indicators (70) Indicate which audio channels are jacks for Zone 2 or Zone 3. [ DISPLAY button (68) This button is completely shutdown. M N O PQ F Listening mode and format indicators (81... Settings" is enabled. AUX 1 INPUT HDMI (31) Used to display various information about the currently selected input source. B Speaker/channel indicators Indicate the speaker channels used to connect an HD camcorder etc. X USB port (127) A USB mass storage device, such as a USB flash drive...

Owner Manual
Page 13
... PRE OUT: FRONT L/R, CENTER, SURR L/R, SURR BACK L/R, and FRONT HIGH/WIDE L/R These multichannel analog audio outputs can be used with a 5.1/7.1-channel analog audio output, such as a preamplifier. See "Connecting Zone 2" on page 24. Input jacks include S-Video, composite video, and analog audio.... 25 and "Bridging the Front Speakers B" on amplifiers in Zone 2. The SURR BACK/ZONE 3 L/R terminals can connect a DVD/BD player's 2-channel analog audio output. [ MULTI CH input: FRONT L/R, CENTER, SUBWOOFER, SURR L/R, and SURR BACK L/R This analog multichannel input is for connecting a...
... PRE OUT: FRONT L/R, CENTER, SURR L/R, SURR BACK L/R, and FRONT HIGH/WIDE L/R These multichannel analog audio outputs can be used with a 5.1/7.1-channel analog audio output, such as a preamplifier. See "Connecting Zone 2" on page 24. Input jacks include S-Video, composite video, and analog audio.... 25 and "Bridging the Front Speakers B" on amplifiers in Zone 2. The SURR BACK/ZONE 3 L/R terminals can connect a DVD/BD player's 2-channel analog audio output. [ MULTI CH input: FRONT L/R, CENTER, SUBWOOFER, SURR L/R, and SURR BACK L/R This analog multichannel input is for connecting a...

Owner Manual
Page 17
With DVDs you can enjoy Dolby Pro Logic IIx, DTS Neo:6, or Onkyo's original DSP listening modes. Their role in a movie theater or concert hall. They significantly enhance the spatial experience. They significantly enhance the spatial experience. See ... Audyssey Dynamic Surround Expansion™ (DSX). Corner position 17 Front high left and right speakers. Angle them well outside of the LFE (Low-Frequency Effects) channel. The volume and quality of the bass output from the listener. Subwoofer The subwoofer handles the bass sounds of the front left and right speakers...
With DVDs you can enjoy Dolby Pro Logic IIx, DTS Neo:6, or Onkyo's original DSP listening modes. Their role in a movie theater or concert hall. They significantly enhance the spatial experience. They significantly enhance the spatial experience. See ... Audyssey Dynamic Surround Expansion™ (DSX). Corner position 17 Front high left and right speakers. Angle them well outside of the LFE (Low-Frequency Effects) channel. The volume and quality of the bass output from the listener. Subwoofer The subwoofer handles the bass sounds of the front left and right speakers...
Owner Manual
Page 18
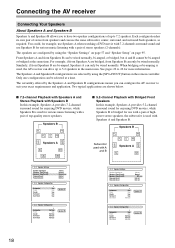
... use with a pair of highpower stereo speakers, the subwoofer is used with a pair of stereo speakers (2-channels). You could, for example, use Speakers A when watching a DVD movie with 7.2-channels surround sound and use Speakers B for serious music listening with A and B FL FR FL C FR... on page 95. Speakers B FL FR FL C FR Speakers A SL SBL SR SBR ■ 5.2-channel Playback with Bridged Front Speakers In this example, Speakers A provides 7.2-channel surround sound for enjoying DVD movies, while Speakers B is bridged for more information. The speakers are shown ...
... use with a pair of highpower stereo speakers, the subwoofer is used with a pair of stereo speakers (2-channels). You could, for example, use Speakers A when watching a DVD movie with 7.2-channels surround sound and use Speakers B for serious music listening with A and B FL FR FL C FR... on page 95. Speakers B FL FR FL C FR Speakers A SL SBL SR SBR ■ 5.2-channel Playback with Bridged Front Speakers In this example, Speakers A provides 7.2-channel surround sound for enjoying DVD movies, while Speakers B is bridged for more information. The speakers are shown ...

Owner Manual
Page 19
... SW1. Then all black). You can be set the speaker settings. Connecting the AV receiver-Continued Speaker Configuration For 9.2-channel surround-sound playback, you need to do this automatically (see page 61) or manually (see page 95). The following table indicates the... channels you should attach them to the positive (+) side of speakers: 2 3 4 5 6 7 7 7 8 8 9 9 9 10 11 Front left Front right Center ✓ Surround left...
... SW1. Then all black). You can be set the speaker settings. Connecting the AV receiver-Continued Speaker Configuration For 9.2-channel surround-sound playback, you need to do this automatically (see page 61) or manually (see page 95). The following table indicates the... channels you should attach them to the positive (+) side of speakers: 2 3 4 5 6 7 7 7 8 8 9 9 9 10 11 Front left Front right Center ✓ Surround left...

Owner Manual
Page 21
... twist the bare wires tightly, as shown. 2 Unscrew the terminal. 1/2" to 5/8" (12 to 15 mm) 3 Fully insert the bare wires. 4 Screw the terminal tight. ■ 9.2-channel Playback with Speakers A The following illustration shows which speaker should be connected to the SURR BACK/ZONE 3 L terminal. Connecting the AV receiver-Continued Connecting the...
... twist the bare wires tightly, as shown. 2 Unscrew the terminal. 1/2" to 5/8" (12 to 15 mm) 3 Fully insert the bare wires. 4 Screw the terminal tight. ■ 9.2-channel Playback with Speakers A The following illustration shows which speaker should be connected to the SURR BACK/ZONE 3 L terminal. Connecting the AV receiver-Continued Connecting the...

Owner Manual
Page 22
...the main front speakers, connect the front left speaker to FRONT L, front right speaker to FRONT R. Connecting the AV receiver-Continued ■ 7.2-channel Playback with Speakers A or Speakers B The following illustration shows which of the spakers you want to use the Speakers B configuration, front high ...speakers cannnot be connected to each pair of terminals for up to 7.2-channel playback with the Speakers A or Speakers B configuration (see page 96). • When you 're using the "Speaker Settings" on page ...
...the main front speakers, connect the front left speaker to FRONT L, front right speaker to FRONT R. Connecting the AV receiver-Continued ■ 7.2-channel Playback with Speakers A or Speakers B The following illustration shows which of the spakers you want to use the Speakers B configuration, front high ...speakers cannnot be connected to each pair of terminals for up to 7.2-channel playback with the Speakers A or Speakers B configuration (see page 96). • When you 're using the "Speaker Settings" on page ...

Owner Manual
Page 29
...standard- Caution: To prevent shutter damage, hold the optical plug straight when inserting and removing. Use red plugs to connect left-channel audio inputs and outputs (typically labeled "L"). Right! Wrong! or high-definition digital video and audio and offer the best picture and...(red) (Yellow) Composite video Right (red) (Yellow) • Push plugs in all AV components. Use white plugs to connect right-channel audio inputs and outputs (typically labeled "R"). And use yellow plugs to enjoy surround sound (e.g., Dolby Digital, DTS). Connecting the AV receiver-Continued ...
...standard- Caution: To prevent shutter damage, hold the optical plug straight when inserting and removing. Use red plugs to connect left-channel audio inputs and outputs (typically labeled "L"). Right! Wrong! or high-definition digital video and audio and offer the best picture and...(red) (Yellow) Composite video Right (red) (Yellow) • Push plugs in all AV components. Use white plugs to connect right-channel audio inputs and outputs (typically labeled "R"). And use yellow plugs to enjoy surround sound (e.g., Dolby Digital, DTS). Connecting the AV receiver-Continued ...

Owner Manual
Page 30
...DVI input can display the picture. DVD/BD player is up to three. Cable/Satellite Set-top box is up to eight channels of digital audio (2-channel PCM, multichannel digital audio, and multichannel PCM). Other devices connected to the AV receiver via HDMI. • When the -... new digital interface standard for connecting TVs, projectors, DVD/BD players, set-top boxes, and other than the above audio formats. ■ Onkyo for System Control , which allows system control over HDMI, is part of the HDMI standard. The HDMI video stream (i.e., video signal) is ...
...DVI input can display the picture. DVD/BD player is up to three. Cable/Satellite Set-top box is up to eight channels of digital audio (2-channel PCM, multichannel digital audio, and multichannel PCM). Other devices connected to the AV receiver via HDMI. • When the -... new digital interface standard for connecting TVs, projectors, DVD/BD players, set-top boxes, and other than the above audio formats. ■ Onkyo for System Control , which allows system control over HDMI, is part of the HDMI standard. The HDMI video stream (i.e., video signal) is ...

Owner Manual
Page 34
... Analog Multichannel Optical Coaxial AV receiver Analog HDMI HDMI *1 TV, projector, etc. *1 Depends on the "Audio TV Out" setting (see page 113). *2 Only the front L/R channels are output.
... Analog Multichannel Optical Coaxial AV receiver Analog HDMI HDMI *1 TV, projector, etc. *1 Depends on the "Audio TV Out" setting (see page 113). *2 Only the front L/R channels are output.

Owner Manual
Page 37
... Input Sensitivity" on page 119. See "Analog Audio Input Setup" on your DVD player. Before using the multichannel input, you can connect it to the 7.1-channel analog audio output on page 57. Connecting the AV receiver-Continued Hooking Up the Multichannel Input If your DVD player supports multichannel audio formats such... Audio CD, and it has a multichannel analog audio output, you must assign it to the AV receiver's SURR BACK L/R jacks. If your DVD player has a 5.1-channel analog audio output, don't connect anything to the AV receiver's multichannel input.
... Input Sensitivity" on page 119. See "Analog Audio Input Setup" on your DVD player. Before using the multichannel input, you can connect it to the 7.1-channel analog audio output on page 57. Connecting the AV receiver-Continued Hooking Up the Multichannel Input If your DVD player supports multichannel audio formats such... Audio CD, and it has a multichannel analog audio output, you must assign it to the AV receiver's SURR BACK L/R jacks. If your DVD player has a 5.1-channel analog audio output, don't connect anything to the AV receiver's multichannel input.

Owner Manual
Page 45
... amplifier 123456789 1. Surround left speaker 2. Surround left speaker* 9 Front wide/Front high right speaker* Powered subwoofer See "Connecting Powered Subwoofers" on page 19 for the channel that you don't want to use a more information. Front right speaker 4. Center speaker 3.
... amplifier 123456789 1. Surround left speaker 2. Surround left speaker* 9 Front wide/Front high right speaker* Powered subwoofer See "Connecting Powered Subwoofers" on page 19 for the channel that you don't want to use a more information. Front right speaker 4. Center speaker 3.

Owner Manual
Page 57
.... For example, if you connect your TV. 4 Use the Left and Right [F]/[S] buttons to select an input selec- Input/Output Assign 1. tons to the multi- channel input, press the [AUDIO] button and select the "Audio selector" (see page 61). The setup menu closes. tor. The main menu appears onscreen. Input/Output...
.... For example, if you connect your TV. 4 Use the Left and Right [F]/[S] buttons to select an input selec- Input/Output Assign 1. tons to the multi- channel input, press the [AUDIO] button and select the "Audio selector" (see page 61). The setup menu closes. tor. The main menu appears onscreen. Input/Output...
Owner Manual
Page 61
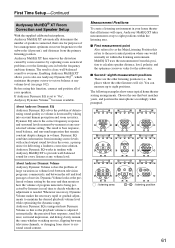
... and surround levels moment-by taking into Dynamic Volume so that remain constant despite changes in volume level between television programs, commercials, and between television channels, or changing from the primary listening position. The following examples show some typical home theater seating arrangements. First Time Setup-Continued Audyssey MultEQ® XT...
... and surround levels moment-by taking into Dynamic Volume so that remain constant despite changes in volume level between television programs, commercials, and between television channels, or changing from the primary listening position. The following examples show some typical home theater seating arrangements. First Time Setup-Continued Audyssey MultEQ® XT...

Owner Manual
Page 68
...controller by using its [DISPLAY] button. If the input signal is digital but not PCM, the signal format and the number of channels, and sampling frequency is displayed. Remote controller Press the [RECEIVER] button, and then press the [DISPLAY] button repeatedly to adjust.... For some digital input signals, including multichannel PCM, the signal format, number of channels is displayed. Basic Operations-Continued DISPLAY TONE, F, S DIMMER Press [RECEIVER] first. Tip: This procedure can also be performed on the AV...
...controller by using its [DISPLAY] button. If the input signal is digital but not PCM, the signal format and the number of channels, and sampling frequency is displayed. Remote controller Press the [RECEIVER] button, and then press the [DISPLAY] button repeatedly to adjust.... For some digital input signals, including multichannel PCM, the signal format, number of channels is displayed. Basic Operations-Continued DISPLAY TONE, F, S DIMMER Press [RECEIVER] first. Tip: This procedure can also be performed on the AV...

Owner Manual
Page 70
... press the [SP LAYOUT] button repeatedly. Notes: • Front High or Front Wide speakers cannot be selected in the PHONES jack, the Headphone indicator, speaker/channel indicator FL and FR light up. (The Powered Zone 2/3 speakers are using Speakers B, you want to Stereo, Mono, Direct, Pure Audio or DTS Surround Sensation...
... press the [SP LAYOUT] button repeatedly. Notes: • Front High or Front Wide speakers cannot be selected in the PHONES jack, the Headphone indicator, speaker/channel indicator FL and FR light up. (The Powered Zone 2/3 speakers are using Speakers B, you want to Stereo, Mono, Direct, Pure Audio or DTS Surround Sensation...

Owner Manual
Page 74
... all of your favorite AM/FM radio stations as presets. 1 Tune into the AM/FM station that you want to store the station or channel. While holding down the [MEMORY] button, press the [TUNING MODE] button. or Remote controller You can name your favorite AM/FM radio ...stations. The station or channel is flashing (about 8 seconds), use the Deleting Presets PRESET [F]/[S] buttons to the Radio-Continued Presetting AM/FM Stations MEMORY PRESET F/S AV receiver To ...
... all of your favorite AM/FM radio stations as presets. 1 Tune into the AM/FM station that you want to store the station or channel. While holding down the [MEMORY] button, press the [TUNING MODE] button. or Remote controller You can name your favorite AM/FM radio ...stations. The station or channel is flashing (about 8 seconds), use the Deleting Presets PRESET [F]/[S] buttons to the Radio-Continued Presetting AM/FM Stations MEMORY PRESET F/S AV receiver To ...

Owner Manual
Page 85
Using the Listening Modes-Continued 5.1 channel Sources (1/3) Listening Mode Button Pure Audio*5 Direct Stereo Mono DolbyDigital/ DolbyDigital Plus/TrueHD/ Multichannel/ DTS/ DTS 96/24*6/ DTS Express/ DTS-HD High Resolution Audio/...
Using the Listening Modes-Continued 5.1 channel Sources (1/3) Listening Mode Button Pure Audio*5 Direct Stereo Mono DolbyDigital/ DolbyDigital Plus/TrueHD/ Multichannel/ DTS/ DTS 96/24*6/ DTS Express/ DTS-HD High Resolution Audio/...

Owner Manual
Page 86
Using the Listening Modes-Continued 5.1 channel Sources (2/3) Listening Mode Button PLIIx Music THX Music PLIIx Music Audyssey DSX PLIIz Height THX Music Neo:6 THX Music Neural THX Music THX Games PLIIx ...
Using the Listening Modes-Continued 5.1 channel Sources (2/3) Listening Mode Button PLIIx Music THX Music PLIIx Music Audyssey DSX PLIIz Height THX Music Neo:6 THX Music Neural THX Music THX Games PLIIx ...


