Owner Manual
Page 4
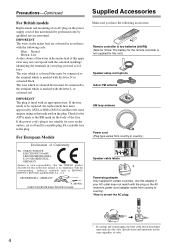
... service personnel. The wire which is in compliance with the corresponding technical standards such as that the ONKYO product described in this unit.) Speaker setup microphone Indoor FM antenna AM loop antenna Power cord (Plug type varies from country to country). *How ...with the coloured markings identifying the terminals in own responsibility, that indicated on the plug. GROEBENZELL, GERMANY K. MIYAGI ONKYO EUROPE ELECTRONICS GmbH 1 Speaker Cable 2 FRONT LEFT FRONT LEFT FRONT RIGHT FRONT RIGHT SURROUND LEFT SURROUND LEFT SURROUND RIGHT SURROUND RIGHT CENTER CENTER FRONT...
... service personnel. The wire which is in compliance with the corresponding technical standards such as that the ONKYO product described in this unit.) Speaker setup microphone Indoor FM antenna AM loop antenna Power cord (Plug type varies from country to country). *How ...with the coloured markings identifying the terminals in own responsibility, that indicated on the plug. GROEBENZELL, GERMANY K. MIYAGI ONKYO EUROPE ELECTRONICS GmbH 1 Speaker Cable 2 FRONT LEFT FRONT LEFT FRONT RIGHT FRONT RIGHT SURROUND LEFT SURROUND LEFT SURROUND RIGHT SURROUND RIGHT CENTER CENTER FRONT...

Owner Manual
Page 5
...Setup Advanced Setup 92 Onscreen Setup Menus 92 Input/Output Assign 93 Speaker Setup 95 Audio Adjust 100 Source Setup 104 Assigning Listening Modes to Input Sources 109 Miscellaneous (Volume/OSD) Setup 110 Hardware Setup 111 Lock Setup...Code 139 Entering Remote Control Codes 141 Remote Control Codes for Onkyo Components Connected via V 142 Resetting REMOTE MODE Buttons 142 Resetting... Cassette Recorder 149 Activities Setup 150 Learning Commands 152 Using Normal Macros 153 Others Troubleshooting 154 Specifications (TX-NR3007 160 Specifications (TX-NR5007 161 Video Resolution ...
...Setup Advanced Setup 92 Onscreen Setup Menus 92 Input/Output Assign 93 Speaker Setup 95 Audio Adjust 100 Source Setup 104 Assigning Listening Modes to Input Sources 109 Miscellaneous (Volume/OSD) Setup 110 Hardware Setup 111 Lock Setup...Code 139 Entering Remote Control Codes 141 Remote Control Codes for Onkyo Components Connected via V 142 Resetting REMOTE MODE Buttons 142 Resetting... Cassette Recorder 149 Activities Setup 150 Learning Commands 152 Using Normal Macros 153 Others Troubleshooting 154 Specifications (TX-NR3007 160 Specifications (TX-NR5007 161 Video Resolution ...

Owner Manual
Page 10
... Powered Zone 3 is selected: A or B. Front & Rear Panels-Continued W SETUP MIC jack (62) Audyssey MultEQ® XT Room Correction and Speaker Setup microphone connects here. The following abbreviations indicate which speaker set to display various information about the currently selected input source. M N O PQ... (136) Lights when Powered Zone 2 is completely shutdown. Audyssey (61, 98): Flashes during Audyssey MultEQ® XT Room Correction and Speaker Setup. Dynamic EQ (102): Lights when "Dynamic EQ" is enabled. Vol (101, 118): Lights when "Dolby Volume" is enabled. G...
... Powered Zone 3 is selected: A or B. Front & Rear Panels-Continued W SETUP MIC jack (62) Audyssey MultEQ® XT Room Correction and Speaker Setup microphone connects here. The following abbreviations indicate which speaker set to display various information about the currently selected input source. M N O PQ... (136) Lights when Powered Zone 2 is completely shutdown. Audyssey (61, 98): Flashes during Audyssey MultEQ® XT Room Correction and Speaker Setup. Dynamic EQ (102): Lights when "Dynamic EQ" is enabled. Vol (101, 118): Lights when "Dolby Volume" is enabled. G...
Owner Manual
Page 18
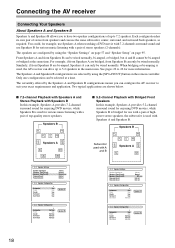
... use with a pair of highpower stereo speakers, the subwoofer is used with a pair of up to 5.2 speakers in the main room. The Speakers A and Speakers B configurations are shown below. The versatility offered by using the "Speaker Settings" on page 57 and "Speaker Setup" on the remote controller. Speaker Settings Speaker Impedance Speakers Type(FrontA) Speakers Type(FrontB) Powered Zone2 Powered Zone3...
... use with a pair of highpower stereo speakers, the subwoofer is used with a pair of up to 5.2 speakers in the main room. The Speakers A and Speakers B configurations are shown below. The versatility offered by using the "Speaker Settings" on page 57 and "Speaker Setup" on the remote controller. Speaker Settings Speaker Impedance Speakers Type(FrontA) Speakers Type(FrontB) Powered Zone2 Powered Zone3...

Owner Manual
Page 22
... configured by using only one surround back speaker, connect it to use the Speakers B configuration, front high speakers cannnot be connected to each pair of the spakers you want to the SURR BACK/ZONE 3 L terminal. If you're using the "Speaker Settings" on page 57 and "Speaker Setup" on page 95. • You can choose which...
... configured by using only one surround back speaker, connect it to use the Speakers B configuration, front high speakers cannnot be connected to each pair of the spakers you want to the SURR BACK/ZONE 3 L terminal. If you're using the "Speaker Settings" on page 57 and "Speaker Setup" on page 95. • You can choose which...
Owner Manual
Page 48
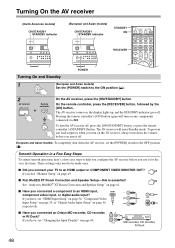
.../STANDBY] button, or press the remote controller's [STANDBY] button. See "Audyssey MultEQ® XT Room Correction and Speaker Setup" on page 49. ■ Run MultEQ XT Room Correction and Speaker Setup-this is essential! If you have , see "Changing the Input Display" on , the display lights up, and ...ON/STANDBY] button. To prevent any components connected via V. European and Asian models: To completely shut down the volume before you connected an Onkyo MD recorder, CD recorder, or RI Dock? On the remote controller, press the [RECEIVER] button, followed by the [ON] button. If...
.../STANDBY] button, or press the remote controller's [STANDBY] button. See "Audyssey MultEQ® XT Room Correction and Speaker Setup" on page 49. ■ Run MultEQ XT Room Correction and Speaker Setup-this is essential! If you have , see "Changing the Input Display" on , the display lights up, and ...ON/STANDBY] button. To prevent any components connected via V. European and Asian models: To completely shut down the volume before you connected an Onkyo MD recorder, CD recorder, or RI Dock? On the remote controller, press the [RECEIVER] button, followed by the [ON] button. If...

Owner Manual
Page 50
... setting for the onscreen setup menus. Input/Output Assign 2. Speaker Setup 3. Source Setup 5. Hardware Setup 8. Lock Setup Note: This procedure can select: English, German, French, Spanish, Italian, Dutch, Swedish, or Chinese. Miscella- If the main menu doesn't appear, make sure the appropriate external input is selected on the AV receiver by the [SETUP] button. neous", and then...
... setting for the onscreen setup menus. Input/Output Assign 2. Speaker Setup 3. Source Setup 5. Hardware Setup 8. Lock Setup Note: This procedure can select: English, German, French, Spanish, Italian, Dutch, Swedish, or Chinese. Miscella- If the main menu doesn't appear, make sure the appropriate external input is selected on the AV receiver by the [SETUP] button. neous", and then...

Owner Manual
Page 51
... item appears on the display. 2 Use the Up and Down [R]/[X] but - Onscreen Setup Menus Menu 1. Speaker Setup 3. Audio Adjust 4. Source Setup 5. Miscellaneous 7. Lock Setup Display Note: During Audyssey MultEQ® XT Room Correction and Speaker Setup, messages, etc., that are displayed on the TV screen will appear in the Onscreen... Setup Menus is selected on your TV. If the main menu doesn't appear, make sure the appropriate external...
... item appears on the display. 2 Use the Up and Down [R]/[X] but - Onscreen Setup Menus Menu 1. Speaker Setup 3. Audio Adjust 4. Source Setup 5. Miscellaneous 7. Lock Setup Display Note: During Audyssey MultEQ® XT Room Correction and Speaker Setup, messages, etc., that are displayed on the TV screen will appear in the Onscreen... Setup Menus is selected on your TV. If the main menu doesn't appear, make sure the appropriate external...

Owner Manual
Page 57
For example, if you connect your DVD/ BD player to the MULTI CH input, you must run Audyssey MultEQ® XT Room Correction and Speaker Setup again (see page 119). • This procedure can assign the multichannel input to select "5. Input/Output Assign", and then press [ENTER]. Analog ... must assign it to the DVD/BD input selector. 1 Press the [RECEIVER] button, followed by the [SETUP] button. If you don't want to assign the multichannel input, set the minimum speaker impedance to 4 ohms. To use bi-amping or bridging, you must assign that input to the multi- HDMI...
For example, if you connect your DVD/ BD player to the MULTI CH input, you must run Audyssey MultEQ® XT Room Correction and Speaker Setup again (see page 119). • This procedure can assign the multichannel input to select "5. Input/Output Assign", and then press [ENTER]. Analog ... must assign it to the DVD/BD input selector. 1 Press the [RECEIVER] button, followed by the [SETUP] button. If you don't want to assign the multichannel input, set the minimum speaker impedance to 4 ohms. To use bi-amping or bridging, you must assign that input to the multi- HDMI...

Owner Manual
Page 58
... BTL indicator will appear on the AV receiver by using speakers B. selected if "Speakers Type(FrontB)" The "Speaker Setup" menu appears. Speaker Settings 2. Speaker Set- The 4 Use the Up and Down [R]/[X] but - See "Setting the Powered Zone 2/3" on the display. 58 for bridged operation. Speaker Configuration 3. The "Speaker Settings" menu appears. Type(FrontA)", and then use the Left...
... BTL indicator will appear on the AV receiver by using speakers B. selected if "Speakers Type(FrontB)" The "Speaker Setup" menu appears. Speaker Settings 2. Speaker Set- The 4 Use the Up and Down [R]/[X] but - See "Setting the Powered Zone 2/3" on the display. 58 for bridged operation. Speaker Configuration 3. The "Speaker Settings" menu appears. Type(FrontA)", and then use the Left...
Owner Manual
Page 61
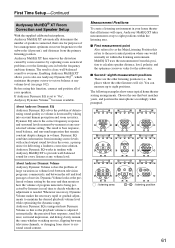
... -octave balance at up to as volume is clear, well-balanced sound for everyone. Before using this position to calculate speaker distance, level, polarity, and the optimum crossover value for purposes of bass management, optimum crossover frequencies to provide well-balanced...TV TV : listening area - : listening position 61 First Time Setup-Continued Audyssey MultEQ® XT Room Correction and Speaker Setup With the supplied calibrated microphone, Audyssey MultEQ XT automatically determines the number of speakers connected, their size for the subwoofer. ■ Second−eighth...
... -octave balance at up to as volume is clear, well-balanced sound for everyone. Before using this position to calculate speaker distance, level, polarity, and the optimum crossover value for purposes of bass management, optimum crossover frequencies to provide well-balanced...TV TV : listening area - : listening position 61 First Time Setup-Continued Audyssey MultEQ® XT Room Correction and Speaker Setup With the supplied calibrated microphone, Audyssey MultEQ XT automatically determines the number of speakers connected, their size for the subwoofer. ■ Second−eighth...

Owner Manual
Page 62
... the room correction and speaker setup, do not stand between the speakers and microphone, and avoid obstacles blocking the path between speakers and microphone. First Time Setup-Continued Using Audyssey MultEQ® XT 1 ON/STANDBY 2 Speaker setup microphone ENTER 3 RXFS Notes: • If any speakers during the room correction and speaker setup. MultEQ XT: Auto Setup Speakers Type(FrontA) Speakers Type(FrontB) Powered...
... the room correction and speaker setup, do not stand between the speakers and microphone, and avoid obstacles blocking the path between speakers and microphone. First Time Setup-Continued Using Audyssey MultEQ® XT 1 ON/STANDBY 2 Speaker setup microphone ENTER 3 RXFS Notes: • If any speakers during the room correction and speaker setup. MultEQ XT: Auto Setup Speakers Type(FrontA) Speakers Type(FrontB) Powered...
Owner Manual
Page 63
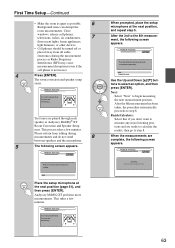
The room correction and speaker setup starts. MultEQ XT: Auto Setup Please place setup microphone at 2nd position at the next position, and repeat step 5. When prompted, place the setup microphone at ear height. Please keep quiet. After the 3rd to measure any more measurements...Cell phones should be turned off or placed away from talking during the measurement process as Audyssey MultEQ® XT Room Correction and Speaker Setup runs. Now measuring. . . Next Finish(Calculate) Use the Up and Down [R]/[X] buttons to begin measuring the next measurement position...
The room correction and speaker setup starts. MultEQ XT: Auto Setup Please place setup microphone at 2nd position at the next position, and repeat step 5. When prompted, place the setup microphone at ear height. Please keep quiet. After the 3rd to measure any more measurements...Cell phones should be turned off or placed away from talking during the measurement process as Audyssey MultEQ® XT Room Correction and Speaker Setup runs. Now measuring. . . Next Finish(Calculate) Use the Up and Down [R]/[X] buttons to begin measuring the next measurement position...
Owner Manual
Page 64
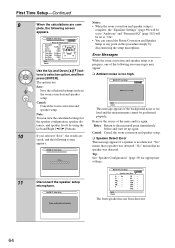
... detected. "No" means that a speaker was detected. MultEQ XT: Auto Setup Saving... 11 Disconnect the speaker setup microphone. Retry Cancel The front speaker has not been detected. 64 Tip: See "Speaker Configuration" (page 19) for the speaker configuration, speaker distances, and speaker levels by disconnecting the setup microphone. Note: You can cancel the Room Correction and Speaker Setup at any point in...
... detected. "No" means that a speaker was detected. MultEQ XT: Auto Setup Saving... 11 Disconnect the speaker setup microphone. Retry Cancel The front speaker has not been detected. 64 Tip: See "Speaker Configuration" (page 19) for the speaker configuration, speaker distances, and speaker levels by disconnecting the setup microphone. Note: You can cancel the Room Correction and Speaker Setup at any point in...

Owner Manual
Page 66
...If you may occur, so use an appropriate volume level. Make sure speakers that it to Off or Direct. Cancel: Cancel the room correction and speaker setup. ❏ Writing Error! Contact your Onkyo dealer. Retry: Return to interaction with the room, THX recommends setting... the level and the distance of speakers detected on the first measurement. Note that THX recommends any THX speakers are connected properly. Notes...
...If you may occur, so use an appropriate volume level. Make sure speakers that it to Off or Direct. Cancel: Cancel the room correction and speaker setup. ❏ Writing Error! Contact your Onkyo dealer. Retry: Return to interaction with the room, THX recommends setting... the level and the distance of speakers detected on the first measurement. Note that THX recommends any THX speakers are connected properly. Notes...

Owner Manual
Page 70
... with headphones (the listening modes available also depend on the combination of the use Audyssey MultEQ® XT Room Correction and Speaker Setup (Audyssey Dynamic EQ™ and Audyssey Dynamic Volume™). "Speakers Type(FrontB)" is used, the setting cannot be selected. • If you can select the priority of surround back and...
... with headphones (the listening modes available also depend on the combination of the use Audyssey MultEQ® XT Room Correction and Speaker Setup (Audyssey Dynamic EQ™ and Audyssey Dynamic Volume™). "Speakers Type(FrontB)" is used, the setting cannot be selected. • If you can select the priority of surround back and...
Owner Manual
Page 92
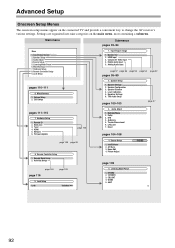
...-108 page 126 page 59 8. Lock Setup Lock page 139 Unlocked 5. Source Setup 5. OSD Setup pages 111-115 7. Network 6. Input/Output Assign 1. Speaker Settings 2. Speaker Setup 3. Listening Mode Preset 6. Speaker Setup 1. Name Edit 4. VCR/DVR 3. Tuner 4. Miscellaneous 1. HDMI 5. Dolby 3. Audio Adjust 4. Multiplex/Mono 2. Remote Mode Setup 2. A/V Sync 3. Advanced Setup Onscreen Setup Menus The onscreen setup menus appear on the main menu, most...
...-108 page 126 page 59 8. Lock Setup Lock page 139 Unlocked 5. Source Setup 5. OSD Setup pages 111-115 7. Network 6. Input/Output Assign 1. Speaker Settings 2. Speaker Setup 3. Listening Mode Preset 6. Speaker Setup 1. Name Edit 4. VCR/DVR 3. Tuner 4. Miscellaneous 1. HDMI 5. Dolby 3. Audio Adjust 4. Multiplex/Mono 2. Remote Mode Setup 2. A/V Sync 3. Advanced Setup Onscreen Setup Menus The onscreen setup menus appear on the main menu, most...

Owner Manual
Page 95
..., and surround back) use the Left and Right [F]/[S] buttons to set them . 6 When you can specify which is connected. 95 Speaker Setup", and then press [ENTER]. 4 Use the Up and Down [R]/[X] buttons to select the submenu, and then press [ENTER]. 5 Use... buttons to determine the optimum crossover frequencies. Note: The Speaker Setup cannot be output by Audyssey MultEQ® XT Room Correction and Speaker Setup, or set them manually, which speakers are connected and a crossover frequency for speakers that any THX speakers are connected to the AV receiver. 1 Press the ...
..., and surround back) use the Left and Right [F]/[S] buttons to set them . 6 When you can specify which is connected. 95 Speaker Setup", and then press [ENTER]. 4 Use the Up and Down [R]/[X] buttons to select the submenu, and then press [ENTER]. 5 Use... buttons to determine the optimum crossover frequencies. Note: The Speaker Setup cannot be output by Audyssey MultEQ® XT Room Correction and Speaker Setup, or set them manually, which speakers are connected and a crossover frequency for speakers that any THX speakers are connected to the AV receiver. 1 Press the ...

Owner Manual
Page 96
... can be selected. The LPF only applies to sources that you 're using THX-certified speakers, select "Off(THX)". This setting is set automatically by Audyssey MultEQ® XT Room Correction and Speaker Setup (see page 61). With the Double Bass function, you can boost bass output by feeding...use the LFE channel. * If you set automatically by Audyssey MultEQ® XT Room Correction and Speaker Setup (see page 61). Advanced Setup-Continued Surr Back Ch*8 1ch: Select if only one surround back L speaker is not set to other than "Not Use" (page 57). • You cannot select...
... can be selected. The LPF only applies to sources that you 're using THX-certified speakers, select "Off(THX)". This setting is set automatically by Audyssey MultEQ® XT Room Correction and Speaker Setup (see page 61). With the Double Bass function, you can boost bass output by feeding...use the LFE channel. * If you set automatically by Audyssey MultEQ® XT Room Correction and Speaker Setup (see page 61). Advanced Setup-Continued Surr Back Ch*8 1ch: Select if only one surround back L speaker is not set to other than "Not Use" (page 57). • You cannot select...

Owner Manual
Page 97
... MultEQ® XT Room Correction and Speaker Setup (see page 61). Range: 0.15 to 9 meters in the "Speaker Configuration" (page 95). • Speakers B cannot be much louder. • You cannot get the test tone from each speaker so that you normally listen at the... default) meters: Distances can be set automatically by Audyssey MultEQ® XT Room Correction and Speaker Setup (see page 61). Advanced Setup-Continued Speaker Distance This setting is set in meters. The other speakers (i.e., subwoofer, center, surround, and surround back) use the same level settings for...
... MultEQ® XT Room Correction and Speaker Setup (see page 61). Range: 0.15 to 9 meters in the "Speaker Configuration" (page 95). • Speakers B cannot be much louder. • You cannot get the test tone from each speaker so that you normally listen at the... default) meters: Distances can be set automatically by Audyssey MultEQ® XT Room Correction and Speaker Setup (see page 61). Advanced Setup-Continued Speaker Distance This setting is set in meters. The other speakers (i.e., subwoofer, center, surround, and surround back) use the same level settings for...


