Owner Manual
Page 5
... the AV Receiver 12 Connecting Your Speakers 12 About AV Connections 18 Connecting Components with HDMI 19 Connecting Your Components 20 Connecting Onkyo V Components 22 Connecting a Recording Component 22 Connecting the Antennas 23 Connecting the Power Cord 23 Turning On & Basic Operations ...Using Normal Macros 84 Appendix Troubleshooting 85 Firmware Update 91 Connection Tips and Video Signal Path 94 Using an RIHD-compatible TV, Player, or Recorder 97 About HDMI 99 Network/USB Features 100 Specifications (TX-NR5009 103 Specifications (TX-NR3009 105 To reset the AV receiver ...
... the AV Receiver 12 Connecting Your Speakers 12 About AV Connections 18 Connecting Components with HDMI 19 Connecting Your Components 20 Connecting Onkyo V Components 22 Connecting a Recording Component 22 Connecting the Antennas 23 Connecting the Power Cord 23 Turning On & Basic Operations ...Using Normal Macros 84 Appendix Troubleshooting 85 Firmware Update 91 Connection Tips and Video Signal Path 94 Using an RIHD-compatible TV, Player, or Recorder 97 About HDMI 99 Network/USB Features 100 Specifications (TX-NR5009 103 Specifications (TX-NR3009 105 To reset the AV receiver ...
Owner Manual
Page 47
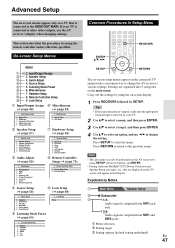
... be performed on -screen display. 1 Press RECEIVER followed by using the remote controller unless otherwise specified. OSD Setup H Hardware Setup (➔ page 65) 2. Remote ID 2. Firmware Update I 8. Multiplex/Mono 2. Audio Adjust E 4. Tuner 4. AUX Common Procedures in the Display. Sound Program Edit E Source Setup (➔ page 58) 8. PC 6.
... be performed on -screen display. 1 Press RECEIVER followed by using the remote controller unless otherwise specified. OSD Setup H Hardware Setup (➔ page 65) 2. Remote ID 2. Firmware Update I 8. Multiplex/Mono 2. Audio Adjust E 4. Tuner 4. AUX Common Procedures in the Display. Sound Program Edit E Source Setup (➔ page 58) 8. PC 6.

Owner Manual
Page 68
... 68 ■ Proxy URL To use a Web proxy, enter its URL here. ■ Proxy Port If you to update Onkyo dock's firmware. Firmware Update See "Firmware Update" for Remote Control Code" (➔ page 79). First, select the ACTIVITIES (MY MOVIE, MY TV, or MY MUSIC) that you want to ...With this setting, you can specify whether or not to the UNIVERSAL PORT jack. Visit the Onkyo web site for control over the network. Check the network connection before updating. `via USB: Performs the firmware update from a USB device. These settings allow you can specify whether or not to turn...
... 68 ■ Proxy URL To use a Web proxy, enter its URL here. ■ Proxy Port If you to update Onkyo dock's firmware. Firmware Update See "Firmware Update" for Remote Control Code" (➔ page 79). First, select the ACTIVITIES (MY MOVIE, MY TV, or MY MUSIC) that you want to ...With this setting, you can specify whether or not to the UNIVERSAL PORT jack. Visit the Onkyo web site for control over the network. Check the network connection before updating. `via USB: Performs the firmware update from a USB device. These settings allow you can specify whether or not to turn...

Owner Manual
Page 91
... while it is turned on the rear panel. Note that the "Firmware Update" option will be performed on and an Ethernet cable is connected to update the firmware. Updating the Firmware via USB storage. See the Onkyo web site for all your USB device via USB storage (➔ page... no responsibility whatsoever for use its SETUP, arrow and ENTER buttons. 2 Select "Hardware Setup" and press ENTER. 3 Select "Firmware Update" and press ENTER. En 91 Onkyo recommends that you back up your important music files beforehand. • If you connect a USB hard disk drive to the USB...
... while it is turned on the rear panel. Note that the "Firmware Update" option will be performed on and an Ethernet cable is connected to update the firmware. Updating the Firmware via USB storage. See the Onkyo web site for all your USB device via USB storage (➔ page... no responsibility whatsoever for use its SETUP, arrow and ENTER buttons. 2 Select "Hardware Setup" and press ENTER. 3 Select "Firmware Update" and press ENTER. En 91 Onkyo recommends that you back up your important music files beforehand. • If you connect a USB hard disk drive to the USB...

Owner Manual
Page 92
..."Error!! *-**" is displayed on the front display of the AV receiver, it means that the firmware has already been updated. Depending on your ISP. Others Retry the update procedure from the Onkyo web site. Update procedure 1 Connect a USB device to light up the front display. 6 ... unable to recognize the USB device. Before you are created: ONKAVR of1 ONKAVR of2 ONKAVR of3 3 Copy the extracted files to complete the firmware update. • The AV receiver will not be temporarily down. Reconnect the cable properly. *-11, *-13, *-21, Internet connection error...
..."Error!! *-**" is displayed on the front display of the AV receiver, it means that the firmware has already been updated. Depending on your ISP. Others Retry the update procedure from the Onkyo web site. Update procedure 1 Connect a USB device to light up the front display. 6 ... unable to recognize the USB device. Before you are created: ONKAVR of1 ONKAVR of2 ONKAVR of3 3 Copy the extracted files to complete the firmware update. • The AV receiver will not be temporarily down. Reconnect the cable properly. *-11, *-13, *-21, Internet connection error...
Owner Manual
Page 93
... on the front display of the AV receiver, indicating that the firmware has already been updated. The firmware file was not detected. If the error persists, please contact Onkyo Support and provide the error code. Do not use it means ...USB storage device has its SETUP, arrow and ENTER buttons. 8 Select "Hardware Setup" and press ENTER. 9 Select "Firmware Update" and press ENTER. 10 Select "via USB Error Code *-10, *-20 *-14 Others Description The USB device ...an error occurs due to a wrong selection of the USB device, or the firmware file is properly connected to Onkyo SUPPORT site.
... on the front display of the AV receiver, indicating that the firmware has already been updated. The firmware file was not detected. If the error persists, please contact Onkyo Support and provide the error code. Do not use it means ...USB storage device has its SETUP, arrow and ENTER buttons. 8 Select "Hardware Setup" and press ENTER. 9 Select "Firmware Update" and press ENTER. 10 Select "via USB Error Code *-10, *-20 *-14 Others Description The USB device ...an error occurs due to a wrong selection of the USB device, or the firmware file is properly connected to Onkyo SUPPORT site.

