

HD29Darbee User Manual
Page 1
DLP® Projector User manual
DLP® Projector User manual

HD29Darbee User Manual
Page 2
... control...12 Remote control 2...13 SETUP AND INSTALLATION 14 Installing the projector...14 Connecting sources to the projector 15 Adjusting the projector image...16 Remote setup...17 USING THE PROJECTOR 19 Powering on / off the projector 19 Selecting an input source...20 USING THE PROJECTOR 21 Menu navigation and features 21 OSD Menu tree...22 Display...
... control...12 Remote control 2...13 SETUP AND INSTALLATION 14 Installing the projector...14 Connecting sources to the projector 15 Adjusting the projector image...16 Remote setup...17 USING THE PROJECTOR 19 Powering on / off the projector 19 Selecting an input source...20 USING THE PROJECTOR 21 Menu navigation and features 21 OSD Menu tree...22 Display...

HD29Darbee User Manual
Page 3
... MAINTENANCE 39 Replacing the lamp...39 Installing and cleaning the dust filter 41 ADDITIONAL INFORMATION 42 Compatible resolutions...42 Image size and projection distance 43 Projector dimensions and ceiling mount installation 45 IR remote codes...46 IR remote control 2 codes...48 Troubleshooting...50 Warning indicators...51 Specifications...54...
... MAINTENANCE 39 Replacing the lamp...39 Installing and cleaning the dust filter 41 ADDITIONAL INFORMATION 42 Compatible resolutions...42 Image size and projection distance 43 Projector dimensions and ceiling mount installation 45 IR remote codes...46 IR remote control 2 codes...48 Troubleshooting...50 Warning indicators...51 Specifications...54...

HD29Darbee User Manual
Page 4
...light will heat the object and my melt, cause burns or start a fire. ‡‡ Please do not place the projector on to the projector. ±± Projector has been exposed to persons. The exclamation point within an equilateral triangle is intended to alert the user to the presence of...±± In extremely hot, cold or humid environments. (i) Ensure that emits heat. ‡‡ Do not let objects or liquids enter the projector. Physical damage/abuse would be of sufficient magnitude to constitute a risk of electric shock to rain or moisture. ±± Something has fallen in ...
...light will heat the object and my melt, cause burns or start a fire. ‡‡ Please do not place the projector on to the projector. ±± Projector has been exposed to persons. The exclamation point within an equilateral triangle is intended to alert the user to the presence of...±± In extremely hot, cold or humid environments. (i) Ensure that emits heat. ‡‡ Do not let objects or liquids enter the projector. Physical damage/abuse would be of sufficient magnitude to constitute a risk of electric shock to rain or moisture. ±± Something has fallen in ...
HD29Darbee User Manual
Page 5
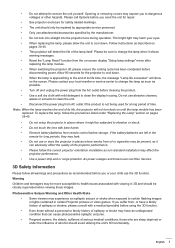
...possible. ‡‡ Turn off , please ensure the cooling cycle has been completed before storage. Do not use or store the projector in certain Projector pictures or video games. Photosensitive Seizure Warning and Other Health Risks ‡‡ Some viewers may experience an epileptic seizure or stroke ...have a family history of epilepsy or strokes, please consult with viewing in 3D and should avoid utilizing the unit's 3D functionality. Please call Optoma before you suffer from the AC outlet before you to cool down . ‡‡ When the lamp is not being used for long ...
...possible. ‡‡ Turn off , please ensure the cooling cycle has been completed before storage. Do not use or store the projector in certain Projector pictures or video games. Photosensitive Seizure Warning and Other Health Risks ‡‡ Some viewers may experience an epileptic seizure or stroke ...have a family history of epilepsy or strokes, please consult with viewing in 3D and should avoid utilizing the unit's 3D functionality. Please call Optoma before you suffer from the AC outlet before you to cool down . ‡‡ When the lamp is not being used for long ...

HD29Darbee User Manual
Page 6
... of this device and do not resume using it for an extended period of these symptoms. ‡‡ Watching 3D projection may weaken your 3D PROJECTOR near open stairwells, cables, balconies, or other countries throughout the world. It is a trademark of MHL Licensing, LLC. 6 English DLP , DLP Link and the DLP...
... of this device and do not resume using it for an extended period of these symptoms. ‡‡ Watching 3D projection may weaken your 3D PROJECTOR near open stairwells, cables, balconies, or other countries throughout the world. It is a trademark of MHL Licensing, LLC. 6 English DLP , DLP Link and the DLP...

HD29Darbee User Manual
Page 7
...;‡ Low Voltage Directive 2014/35/EC ‡‡ R & TTE Directive 1999/5/EC (if product has RF function) WEEE Disposal instructions Do not throw this projector. However, there is subject to Part 15 of the FCC Rules. Notice: Shielded cables All connections to other computing devices must accept any interference received...
...;‡ Low Voltage Directive 2014/35/EC ‡‡ R & TTE Directive 1999/5/EC (if product has RF function) WEEE Disposal instructions Do not throw this projector. However, there is subject to Part 15 of the FCC Rules. Notice: Shielded cables All connections to other computing devices must accept any interference received...

HD29Darbee User Manual
Page 8
... Keystone Mute DB 3D Sleep Timer Volume Source Re-sync Menu Volume HDMI1 HDMI2 VGA1 VGA2 Video YPbPr Warranty Card* Basic User Manual Projector Remote control Power lead Note: ‡‡ ‡‡ The remote control is only supplied in some specific regions. Documentation Optional accessories CD User...
... Keystone Mute DB 3D Sleep Timer Volume Source Re-sync Menu Volume HDMI1 HDMI2 VGA1 VGA2 Video YPbPr Warranty Card* Basic User Manual Projector Remote control Power lead Note: ‡‡ ‡‡ The remote control is only supplied in some specific regions. Documentation Optional accessories CD User...

HD29Darbee User Manual
Page 9
Ventilation (inlet) 10. Input / Output English 9 Lamp Cover 2. IR Receiver 5. Tilt-Adjustment Foot 7. Keep a minimum distance of 20 cm between the "inlet" and "outlet" labels. Ventilation (outlet) 11. Zoom Lever 4. Keypad 6. Lens 9. KensingtonTM Lock Port 12. Security Bar No Item 8. Focus Ring 3. INTRODUCTION Product Overview 1 2 3 45 6 8 7 9 10 13 12 11 Note: ‡‡ ‡‡ Do not block projector inlet or outlet air vents. No Item 1. Power Socket 13.
Ventilation (inlet) 10. Input / Output English 9 Lamp Cover 2. IR Receiver 5. Tilt-Adjustment Foot 7. Keep a minimum distance of 20 cm between the "inlet" and "outlet" labels. Ventilation (outlet) 11. Zoom Lever 4. Keypad 6. Lens 9. KensingtonTM Lock Port 12. Security Bar No Item 8. Focus Ring 3. INTRODUCTION Product Overview 1 2 3 45 6 8 7 9 10 13 12 11 Note: ‡‡ ‡‡ Do not block projector inlet or outlet air vents. No Item 1. Power Socket 13.

HD29Darbee User Manual
Page 14
... personal preference will invalidate the warranty and may shorten the lifetime of four possible positions. For none standard installation advise please contact Optoma. 14 English Note: The further away the projector is designed to distance table on pages 43-44. Any other that table top or ceiling mount. Table mount front Ceiling...
... personal preference will invalidate the warranty and may shorten the lifetime of four possible positions. For none standard installation advise please contact Optoma. 14 English Note: The further away the projector is designed to distance table on pages 43-44. Any other that table top or ceiling mount. Table mount front Ceiling...

HD29Darbee User Manual
Page 15
Audio Out Cable 6. Power Cord Item Note: The internal speaker will be muted while the external speakers are connected. HDMI Dongle 9. HDMI / MHL Cable 3. 3D Emitter Cable 4. 12V DC Jack 5. HDMI Cable 2. USB Cable (mouse control) 7. English 15 USB Power Cable 8. SETUP AND INSTALLATION Connecting sources to the projector 12 3 4 MOLEX 8 7 6 5 9 MOLEX No 1.
Audio Out Cable 6. Power Cord Item Note: The internal speaker will be muted while the external speakers are connected. HDMI Dongle 9. HDMI / MHL Cable 3. 3D Emitter Cable 4. 12V DC Jack 5. HDMI Cable 2. USB Cable (mouse control) 7. English 15 USB Power Cable 8. SETUP AND INSTALLATION Connecting sources to the projector 12 3 4 MOLEX 8 7 6 5 9 MOLEX No 1.

HD29Darbee User Manual
Page 16
...the focus, turn the zoom lever clockwise or counterclockwise to 10m. 16 English Locate the adjustable foot you wish to raise or lower the projector. Tilt-Adjustment Feet Tilt-Adjustment Ring Zoom and focus ‡‡ To adjust the image size, turn the focus ring clockwise or ...counterclockwise until the image is equipped with elevator feet for adjusting the image height. 1. Zoom Lever Focus Ring Note: The projector will focus at a distance of the projector. 2. SETUP AND INSTALLATION Adjusting the projector image Image height The projector is sharp and legible.
...the focus, turn the zoom lever clockwise or counterclockwise to 10m. 16 English Locate the adjustable foot you wish to raise or lower the projector. Tilt-Adjustment Feet Tilt-Adjustment Ring Zoom and focus ‡‡ To adjust the image size, turn the focus ring clockwise or ...counterclockwise until the image is equipped with elevator feet for adjusting the image height. 1. Zoom Lever Focus Ring Note: The projector will focus at a distance of the projector. 2. SETUP AND INSTALLATION Adjusting the projector image Image height The projector is sharp and legible.

HD29Darbee User Manual
Page 17
...Replace only with this product may have different characteristics. ‡‡ Do not mix old and new batteries. Different types of the projector. Mixing old and new batteries can shorten the life of new batteries or cause chemical leakage in contact with skin can result in...135;‡ Please keep the remote controller away from time to time. ‡‡ If the remote control and the projector are within 30 degrees perpendicular to the projector's IR remote control sensor to function correctly. Replace back cover on the back of different types. Chemicals that leak from batteries...
...Replace only with this product may have different characteristics. ‡‡ Do not mix old and new batteries. Different types of the projector. Mixing old and new batteries can shorten the life of new batteries or cause chemical leakage in contact with skin can result in...135;‡ Please keep the remote controller away from time to time. ‡‡ If the remote control and the projector are within 30 degrees perpendicular to the projector's IR remote control sensor to function correctly. Replace back cover on the back of different types. Chemicals that leak from batteries...

HD29Darbee User Manual
Page 19
...in approximately 10 seconds and HthDeMOI1n/SHtaDnMdI2by LED will flash green or flash blue. Press power key again. 3. Turn on the projector by pressing the " " on the projector keypad or the " 2. Powering off procedure. The following message will shut down. 4. When you press the " " or...: " on , you wish to seleVcGt Ath1e VpGreAf2errVeiddeloanYgPubaPgre, projection orientation, and other settings. The cooling fans will continue to turn the projector back on the remote control. A start up screen will display in standby mode, simply press the " " button again to operate for...
...in approximately 10 seconds and HthDeMOI1n/SHtaDnMdI2by LED will flash green or flash blue. Press power key again. 3. Turn on the projector by pressing the " " on the projector keypad or the " 2. Powering off procedure. The following message will shut down. 4. When you press the " " or...: " on , you wish to seleVcGt Ath1e VpGreAf2errVeiddeloanYgPubaPgre, projection orientation, and other settings. The cooling fans will continue to turn the projector back on the remote control. A start up screen will display in standby mode, simply press the " " button again to operate for...

HD29Darbee User Manual
Page 20
... ratio Keystone DB 3D Mute Sleep Timer Video Volume Source Re-sync YPbPr Menu Volume HDMI1 HDMI2 VGA1 VGA2 Video YPbPr 20 English USING THE PROJECTOR User1 User2 Contrast Brightness User3 Mode Aspect ratio Keystone Selecting an input source DB 3D Turn on the connected source that you want to display...
... ratio Keystone DB 3D Mute Sleep Timer Video Volume Source Re-sync YPbPr Menu Volume HDMI1 HDMI2 VGA1 VGA2 Video YPbPr 20 English USING THE PROJECTOR User1 User2 Contrast Brightness User3 Mode Aspect ratio Keystone Selecting an input source DB 3D Turn on the connected source that you want to display...

HD29Darbee User Manual
Page 21
... multilingual on the remote control or the projector keyboard. 2. To open the OSD menu, press on -screen display menus that allow you to make image adjustments and change a variety of settings. While making a ... is displayed, use keys to be adjusted in the main menu. Press the or to the main menu. 6. The OSD menu will close and the projector will return to confirm, and the screen will automatically save the new settings. The...
... multilingual on the remote control or the projector keyboard. 2. To open the OSD menu, press on -screen display menus that allow you to make image adjustments and change a variety of settings. While making a ... is displayed, use keys to be adjusted in the main menu. Press the or to the main menu. 6. The OSD menu will close and the projector will return to confirm, and the screen will automatically save the new settings. The...

HD29Darbee User Manual
Page 22
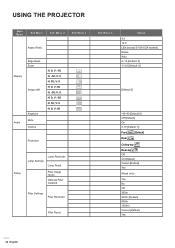
USING THE PROJECTOR OSD Menu tree Main Menu Sub Menu Sub Menu 2 Sub Menu 3 Sub Menu 4 Display Mode [Video] Wall Color [Data] Display Brightness Contrast Sharpness Image Settings Color Tint Gamma Film Video Graphics Standard(2.2) 1.8 2.0 2.4 BrilliantColorTM Color Temperature [Data model] Color Settings Color Matching Color Values Cinema Vivid Game Reference Bright USER 3D ISF Day ISF Night ISF 3D Off [Default] BlackBoard Light Yellow Light Green Light Blue Pink Gray -50~50 -50~50 1~15 -50~50 -50~50 1~10 Warm Standard Cool Cold R [Default] G B C Y M W 22 English
USING THE PROJECTOR OSD Menu tree Main Menu Sub Menu Sub Menu 2 Sub Menu 3 Sub Menu 4 Display Mode [Video] Wall Color [Data] Display Brightness Contrast Sharpness Image Settings Color Tint Gamma Film Video Graphics Standard(2.2) 1.8 2.0 2.4 BrilliantColorTM Color Temperature [Data model] Color Settings Color Matching Color Values Cinema Vivid Game Reference Bright USER 3D ISF Day ISF Night ISF 3D Off [Default] BlackBoard Light Yellow Light Green Light Blue Pink Gray -50~50 -50~50 1~15 -50~50 -50~50 1~10 Warm Standard Cool Cold R [Default] G B C Y M W 22 English

HD29Darbee User Manual
Page 23
... Screen Swipe Screen Off DLP-Link [Default] VESA 3D [Default] L R Auto [Default] SBS Top and Bottom Frame Sequential On Off [Default] English 23 USING THE PROJECTOR Main Menu Sub Menu Sub Menu 2 Sub Menu 3 Color Matching Sub Menu 4 Hue or R Saturation or G Gain or B Reset Color Settings RGB Gain/Bias Exit...
... Screen Swipe Screen Off DLP-Link [Default] VESA 3D [Default] L R Auto [Default] SBS Top and Bottom Frame Sequential On Off [Default] English 23 USING THE PROJECTOR Main Menu Sub Menu Sub Menu 2 Sub Menu 3 Color Matching Sub Menu 4 Hue or R Saturation or G Gain or B Reset Color Settings RGB Gain/Bias Exit...
HD29Darbee User Manual
Page 24
V: 50 H: -50; USING THE PROJECTOR Main Menu Sub Menu Sub Menu 2 Sub Menu 3 Aspect Ratio Edge Mask Zoom Display Image shift Audio Keystone Mute Volume H: 0; V: 0 H: 0; V: 0 H: 0; V: 0 H: 50; V: 0 H: 0; V: -50 H: 50; V: 50 Projection ...
V: 50 H: -50; USING THE PROJECTOR Main Menu Sub Menu Sub Menu 2 Sub Menu 3 Aspect Ratio Edge Mask Zoom Display Image shift Audio Keystone Mute Volume H: 0; V: 0 H: 0; V: 0 H: 0; V: 0 H: 50; V: 0 H: 0; V: -50 H: 50; V: 50 Projection ...

HD29Darbee User Manual
Page 25
USING THE PROJECTOR Main Menu Sub Menu Sub Menu 2 Sub Menu 3 Direct Power On Signal Power On Auto Power Off (min) Power Settings Sleep Timer (min) Always On ...
USING THE PROJECTOR Main Menu Sub Menu Sub Menu 2 Sub Menu 3 Direct Power On Signal Power On Auto Power Off (min) Power Settings Sleep Timer (min) Always On ...


