
ZH406 Datasheet
Page 1
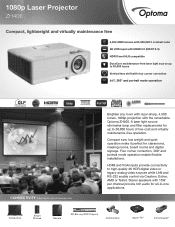
1080p Laser Projector ZH406 Compact, lightweight and virtually maintenance free 4,500 ANSI lumens with 300,000:1 contrast ratio 4K UHD input with HDMI 2.0 (HDCP 2.2) HDR10 and HLG compatible DuraCore ..., 4,500 lumen, 1080p projection with 15W per channel provide rich audio for classrooms, meeting rooms, board rooms and digital signage. Stereo speakers with the remarkable Optoma ZH406. A laser light source eliminates lamp and filter replacements for up to high-quality 4K HDR digital video or legacy analog video sources while LAN and...
1080p Laser Projector ZH406 Compact, lightweight and virtually maintenance free 4,500 ANSI lumens with 300,000:1 contrast ratio 4K UHD input with HDMI 2.0 (HDCP 2.2) HDR10 and HLG compatible DuraCore ..., 4,500 lumen, 1080p projection with 15W per channel provide rich audio for classrooms, meeting rooms, board rooms and digital signage. Stereo speakers with the remarkable Optoma ZH406. A laser light source eliminates lamp and filter replacements for up to high-quality 4K HDR digital video or legacy analog video sources while LAN and...

ZH406 Datasheet
Page 2
...Projector - Must manually switch to high altitude mode from 60Hz to 120Hz or 24Hz to 10,000 feet = 104° F (max); Vertical Scan Rate 24 ~ 85 Hz (120 Hz for an extended period of Texas Instruments™. Audio-In 8. VGA-Out Power On 13. Please consult the user manual for details. ZH406...9 13 15 10 11 12 14 16 17 1.HDMI 2 (1.4a) 2. HDMI 1 (2.0 wMHL) 4. RS232 12. AC Power 17. Optoma.com Copyright © 2019 Optoma Technology, Inc. COMPATIBILITY SPECIFICATIONS Computer Compatibility VGA, SVGA, HDTV(720P), WXGA, WXGA+, SXGA, SXGA+, UXGA, HDTV(1080p), WUXGA, 4K,...
...Projector - Must manually switch to high altitude mode from 60Hz to 120Hz or 24Hz to 10,000 feet = 104° F (max); Vertical Scan Rate 24 ~ 85 Hz (120 Hz for an extended period of Texas Instruments™. Audio-In 8. VGA-Out Power On 13. Please consult the user manual for details. ZH406...9 13 15 10 11 12 14 16 17 1.HDMI 2 (1.4a) 2. HDMI 1 (2.0 wMHL) 4. RS232 12. AC Power 17. Optoma.com Copyright © 2019 Optoma Technology, Inc. COMPATIBILITY SPECIFICATIONS Computer Compatibility VGA, SVGA, HDTV(720P), WXGA, WXGA+, SXGA, SXGA+, UXGA, HDTV(1080p), WUXGA, 4K,...

GT1090HDR_UM
Page 1
DLP® Projector User manual
DLP® Projector User manual

GT1090HDR_UM
Page 2
......8 Product Overview...9 Connections...11 Keypad...12 Remote control...13 SETUP AND INSTALLATION 14 Installing the projector...14 Connecting sources to the projector 18 Adjusting the projector image...19 Remote setup...21 USING THE PROJECTOR 23 Powering on / off the projector 23 Selecting an input source...24 Menu navigation and features 25 OSD Menu tree...26...
......8 Product Overview...9 Connections...11 Keypad...12 Remote control...13 SETUP AND INSTALLATION 14 Installing the projector...14 Connecting sources to the projector 18 Adjusting the projector image...19 Remote setup...21 USING THE PROJECTOR 23 Powering on / off the projector 23 Selecting an input source...24 Menu navigation and features 25 OSD Menu tree...26...

GT1090HDR_UM
Page 3
Setup security menu...46 Setup HDMI link settings menu 46 Setup test pattern menu...47 Setup remote settings menu...47 Setup projector ID menu...47 Setup 12V trigger menu...47 Setup options menu...48 Setup reset OSD menu...49 Network LAN menu...49 Network control menu...50 ... 51 Info menu...56 MAINTENANCE 57 Installing and cleaning the dust filter 57 ADDITIONAL INFORMATION 58 Compatible resolutions...58 Image size and projection distance 61 Projector dimensions and ceiling mount installation 64 IR remote codes...67 Troubleshooting...69 Warning indicators...71 Specifications...72...
Setup security menu...46 Setup HDMI link settings menu 46 Setup test pattern menu...47 Setup remote settings menu...47 Setup projector ID menu...47 Setup 12V trigger menu...47 Setup options menu...48 Setup reset OSD menu...49 Network LAN menu...49 Network control menu...50 ... 51 Info menu...56 MAINTENANCE 57 Installing and cleaning the dust filter 57 ADDITIONAL INFORMATION 58 Compatible resolutions...58 Image size and projection distance 61 Projector dimensions and ceiling mount installation 64 IR remote codes...67 Troubleshooting...69 Warning indicators...71 Specifications...72...

GT1090HDR_UM
Page 4
...The light will heat the object and may cause electric shock. ‡‡ Do not attempt to service the unit yourself. Please call Optoma before you to dangerous voltages or other apparatus such as this user's guide. As with arrow head within an equilateral triangle is intended to ... as a book case or a cabinet that does not block ventilation. They may expose you send the unit for repair. ‡‡ See projector enclosure for safety related markings. 4 English Opening or removing covers may touch dangerous voltage points and short out parts that the ambient room temperature is...
...The light will heat the object and may cause electric shock. ‡‡ Do not attempt to service the unit yourself. Please call Optoma before you to dangerous voltages or other apparatus such as this user's guide. As with arrow head within an equilateral triangle is intended to ... as a book case or a cabinet that does not block ventilation. They may expose you send the unit for repair. ‡‡ See projector enclosure for safety related markings. 4 English Opening or removing covers may touch dangerous voltage points and short out parts that the ambient room temperature is...

GT1090HDR_UM
Page 5
...;‡ When turning on . The bright light may cause damage by the manufacturer. ‡‡ Do not look into straight into beam when the projector is classified as it might be present, as CLASS 1 LASER PRODUCT - Allow 90 seconds for deviations pursuant to the eyes. ‡‡ Any ...not specifically instructed by the user's guide creates the risk of hazardous laser radiation exposure. ‡‡ Do not open or disassemble the projector as this may result in places where it can KILL devices. As power outages and brown-outs can adversely affect the quality of the...
...;‡ When turning on . The bright light may cause damage by the manufacturer. ‡‡ Do not look into straight into beam when the projector is classified as it might be present, as CLASS 1 LASER PRODUCT - Allow 90 seconds for deviations pursuant to the eyes. ‡‡ Any ...not specifically instructed by the user's guide creates the risk of hazardous laser radiation exposure. ‡‡ Do not open or disassemble the projector as this may result in places where it can KILL devices. As power outages and brown-outs can adversely affect the quality of the...

GT1090HDR_UM
Page 6
... under international copyright laws, with the instructions, may be determined by turning the device off and on a circuit different from time to time in this projector. 6 English Notice: Shielded cables All connections to other product names used in a particular installation. The manufacturer makes no guarantee that to which is connected. ‡...
... under international copyright laws, with the instructions, may be determined by turning the device off and on a circuit different from time to time in this projector. 6 English Notice: Shielded cables All connections to other product names used in a particular installation. The manufacturer makes no guarantee that to which is connected. ‡...

GT1090HDR_UM
Page 8
...Zoom Menu Format Freeze Remote ID All VGA S-Video HDMI1 HDMI2 123 HDBaseT Video DVI HDMI3 456 BNC YPbPr DisplayPort 3D 7890 Projector Remote control Power lead Note The remote control is only supplied in some specific regions. The warranty card is shipped with ...Geometric Correction PIP/PBP F1 Mode F2 AV Mute ENTER Info. Please check with the battery. *(1) For European warranty Information, please visit www.optoma.com. *(2) Available only for Asian region. Warranty Card*(1) Basic User Manual Paper UM*(2) Documentation Optional accessories ...
...Zoom Menu Format Freeze Remote ID All VGA S-Video HDMI1 HDMI2 123 HDBaseT Video DVI HDMI3 456 BNC YPbPr DisplayPort 3D 7890 Projector Remote control Power lead Note The remote control is only supplied in some specific regions. The warranty card is shipped with ...Geometric Correction PIP/PBP F1 Mode F2 AV Mute ENTER Info. Please check with the battery. *(1) For European warranty Information, please visit www.optoma.com. *(2) Available only for Asian region. Warranty Card*(1) Basic User Manual Paper UM*(2) Documentation Optional accessories ...

GT1090HDR_UM
Page 10
When operating the projector in an enclosed space, allow at least 30 cm clearance around the intake and exhaust vents. IR Receivers 2. Ventilation (inlet) 6. Ventilation (outlet) 8. Tilt-Adjustment Feet 10. No Item 1. Kensington™ Lock Port 9. Keypad 3. Zoom Lever No Item 7. Power Socket 12. Lens 10 English Focus Ring/Focus Lever 5. INTRODUCTION WUXGA model 1 2 9 12 5 6 3 4 9 11 10 9 7 8 Note: ‡‡ ‡‡ Do not block projector intake and exhaust vents. Lens Shift Dial 4. Input / Output 11.
When operating the projector in an enclosed space, allow at least 30 cm clearance around the intake and exhaust vents. IR Receivers 2. Ventilation (inlet) 6. Ventilation (outlet) 8. Tilt-Adjustment Feet 10. No Item 1. Kensington™ Lock Port 9. Keypad 3. Zoom Lever No Item 7. Power Socket 12. Lens 10 English Focus Ring/Focus Lever 5. INTRODUCTION WUXGA model 1 2 9 12 5 6 3 4 9 11 10 9 7 8 Note: ‡‡ ‡‡ Do not block projector intake and exhaust vents. Lens Shift Dial 4. Input / Output 11.

GT1090HDR_UM
Page 14
SETUP AND INSTALLATION Installing the projector Your projector is designed to be installed in one of your screen, the location of a suitable power outlet, as well as the location and distance between the projector and the rest of four possible positions. Take into consideration the size and position of your equipment. 1080p/WXGA/WUXGA model Table mount front Ceiling mount front Table mount rear Ceiling mount rear 14 English Your room layout or personal preference will dictate which installation location you select.
SETUP AND INSTALLATION Installing the projector Your projector is designed to be installed in one of your screen, the location of a suitable power outlet, as well as the location and distance between the projector and the rest of four possible positions. Take into consideration the size and position of your equipment. 1080p/WXGA/WUXGA model Table mount front Ceiling mount front Table mount rear Ceiling mount rear 14 English Your room layout or personal preference will dictate which installation location you select.

GT1090HDR_UM
Page 15
... mount rear Ceiling mount rear Projector should be placed flat on a surface and 90 degrees / perpendicular to the screen. ‡‡ How to determine projector location for a given screen size...distance, please refer to distance table on pages 61-63. Note: The further away the projector is placed from the screen the projected image size increases and vertical offset also increases proportionally... or ceiling mount. The projector should be horizontal and not tilted either forwards/backwards or left/right. English 15 Do not operate the projector in any orientation other orientation...
... mount rear Ceiling mount rear Projector should be placed flat on a surface and 90 degrees / perpendicular to the screen. ‡‡ How to determine projector location for a given screen size...distance, please refer to distance table on pages 61-63. Note: The further away the projector is placed from the screen the projected image size increases and vertical offset also increases proportionally... or ceiling mount. The projector should be horizontal and not tilted either forwards/backwards or left/right. English 15 Do not operate the projector in any orientation other orientation...

GT1090HDR_UM
Page 16
Minimum 100mm (3.94 inches) Minimum 300mm (11.81 inches) Minimum 300mm (11.81 inches) 16 English Minimum 100mm (3.94 inches) SETUP AND INSTALLATION Projector installation notice Note: Projector brightness will be decreased to 70% lumen and fan full load. 195°~345° ‡‡ Portrait mode Air outlet side 10° 10° 10° 10° 10° 10° ‡‡ Allow at least 30 cm clearance around the exhaust vent.
Minimum 100mm (3.94 inches) Minimum 300mm (11.81 inches) Minimum 300mm (11.81 inches) 16 English Minimum 100mm (3.94 inches) SETUP AND INSTALLATION Projector installation notice Note: Projector brightness will be decreased to 70% lumen and fan full load. 195°~345° ‡‡ Portrait mode Air outlet side 10° 10° 10° 10° 10° 10° ‡‡ Allow at least 30 cm clearance around the exhaust vent.

GT1090HDR_UM
Page 17
...(3.94 inches) ‡‡ Ensure that the intake vents do not recycle hot air from the exhaust vent. ‡‡ When operating the projector in an enclosed space, ensure that the surrounding air temperature within the enclosure does not exceed operation temperature while the... projector is running, and the air intake and exhaust vents are unobstructed. ‡‡ All enclosures should pass a certified thermal evaluation to ensure that the projector does not recycle exhaust air, as this may cause the device ...
...(3.94 inches) ‡‡ Ensure that the intake vents do not recycle hot air from the exhaust vent. ‡‡ When operating the projector in an enclosed space, ensure that the surrounding air temperature within the enclosure does not exceed operation temperature while the... projector is running, and the air intake and exhaust vents are unobstructed. ‡‡ All enclosures should pass a certified thermal evaluation to ensure that the projector does not recycle exhaust air, as this may cause the device ...

GT1090HDR_UM
Page 18
USB Power Cable 5. Audio In Cable 18 English No Item 10. 3D Emitter Cable 11. 12V DC Jack 12. Microphone Cable 14. RJ-45 Cable 18. HDMI Dongle 4. Audio In Cable 7. Audio Out Cable 13. USB Cable 17. Power Cord HDMI Cable 2. RCA Component Cable 9. VGA In Cable 8. RS232 Cable 16. SETUP AND INSTALLATION Connecting sources to the projector 5 6 7 2 4 1 3 8 9 10 16 12 11 18 17 15 14 13 No Item 1. VGA Out Cable 15. MHL Cable 3. Video Cable 6.
USB Power Cable 5. Audio In Cable 18 English No Item 10. 3D Emitter Cable 11. 12V DC Jack 12. Microphone Cable 14. RJ-45 Cable 18. HDMI Dongle 4. Audio In Cable 7. Audio Out Cable 13. USB Cable 17. Power Cord HDMI Cable 2. RCA Component Cable 9. VGA In Cable 8. RS232 Cable 16. SETUP AND INSTALLATION Connecting sources to the projector 5 6 7 2 4 1 3 8 9 10 16 12 11 18 17 15 14 13 No Item 1. VGA Out Cable 15. MHL Cable 3. Video Cable 6.

GT1090HDR_UM
Page 19
Locate the adjustable foot you wish to raise or lower the projector. Rotate the adjustable foot clockwise or counterclockwise to adjust on the underside of the projected image vertically. ‡‡ To adjust the focus, turn the .../focus lever clockwise or counterclockwise until the image is equipped with elevator feet for adjusting the image height. 1. SETUP AND INSTALLATION Adjusting the projector image Image height The projector is sharp and legible. Lens Shift Dial Focus Ring Zoom Lever 1080p/WXGA model English 19 Tilt-Adjustment Feet Tilt-Adjustment Ring Zoom...
Locate the adjustable foot you wish to raise or lower the projector. Rotate the adjustable foot clockwise or counterclockwise to adjust on the underside of the projected image vertically. ‡‡ To adjust the focus, turn the .../focus lever clockwise or counterclockwise until the image is equipped with elevator feet for adjusting the image height. 1. SETUP AND INSTALLATION Adjusting the projector image Image height The projector is sharp and legible. Lens Shift Dial Focus Ring Zoom Lever 1080p/WXGA model English 19 Tilt-Adjustment Feet Tilt-Adjustment Ring Zoom...

GT1090HDR_UM
Page 22
... close to Inverter-Type fluorescent lamps, it might become ineffective from the remote control to the screen and reflecting the IR beams back to the projector. Source ENTER F1 Mode F2 AV Mute SETUP AND INSTALLATION Effective range Infra-Red (IR) remote control sensor is less than 5 m from time ...to time. ‡‡ If the remote control and the projector are no obstacles between the remote control and the sensor should not be longer than 12 meters (39.4 feet). ‡‡ Make sure that there...
... close to Inverter-Type fluorescent lamps, it might become ineffective from the remote control to the screen and reflecting the IR beams back to the projector. Source ENTER F1 Mode F2 AV Mute SETUP AND INSTALLATION Effective range Infra-Red (IR) remote control sensor is less than 5 m from time ...to time. ‡‡ If the remote control and the projector are no obstacles between the remote control and the sensor should not be longer than 12 meters (39.4 feet). ‡‡ Make sure that there...

GT1090HDR_UM
Page 23
...Format Freeze Remote ID All VGA S-Video HDMI1 HDMI2 123 HDBaseT Video DVI HDMI3 456 BNC YPbPr DisplayPort 3D 7890 2. USING THE PROJECTOR Powering on the projector keypad or remote control. 4. A start up screen will display in standby mode, simply press the button again to turn red.... 3. Note: It is not recommended that the projector is in approximately 10 seconds and the Power LED will be flashing blue. The following message will be displayed: Power Off button on immediately...
...Format Freeze Remote ID All VGA S-Video HDMI1 HDMI2 123 HDBaseT Video DVI HDMI3 456 BNC YPbPr DisplayPort 3D 7890 2. USING THE PROJECTOR Powering on the projector keypad or remote control. 4. A start up screen will display in standby mode, simply press the button again to turn red.... 3. Note: It is not recommended that the projector is in approximately 10 seconds and the Power LED will be flashing blue. The following message will be displayed: Power Off button on immediately...

GT1090HDR_UM
Page 24
If multiple sources are connected, press the button on the projector keypad or the Source button on the remote control to display on the connected source that you want to select the desEirNeTEdR input. Source F3 ... Geometric Correction PIP/PBP Selecting an input source F1 F2 Mode AV Mute Turn on the screen, such as computer, notebook, video player, etc. The projector will automatically detect the source.
If multiple sources are connected, press the button on the projector keypad or the Source button on the remote control to display on the connected source that you want to select the desEirNeTEdR input. Source F3 ... Geometric Correction PIP/PBP Selecting an input source F1 F2 Mode AV Mute Turn on the screen, such as computer, notebook, video player, etc. The projector will automatically detect the source.

GT1090HDR_UM
Page 25
...or Enter button to view further settings. Press press the or Enter button to the main menu. 6. The OSD menu will close and the projector will return to confirm, and the screen will automatically save the new settings. Use tu keys to enter sub menu. 3. Select the next... Aspect Ratio Edge Mask Zoom Image Shift Geometric Correction Select Exit Navigation guide Enter English 25 SETUP AND INSTALLATION Menu navigation and features The projector has multilingual on-screen display menus that allow you to be adjusted in the sub menu and adjust as described above. 5. Adjust the...
...or Enter button to view further settings. Press press the or Enter button to the main menu. 6. The OSD menu will close and the projector will return to confirm, and the screen will automatically save the new settings. Use tu keys to enter sub menu. 3. Select the next... Aspect Ratio Edge Mask Zoom Image Shift Geometric Correction Select Exit Navigation guide Enter English 25 SETUP AND INSTALLATION Menu navigation and features The projector has multilingual on-screen display menus that allow you to be adjusted in the sub menu and adjust as described above. 5. Adjust the...


