English
Page 2
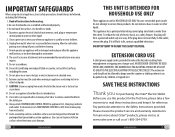
... food from under the lid or the steam vent is wider than the other than its intended use appliance for purchasing the Oster® Electric Skillet. Some countertop surfaces and other liquid. 5. If it still fails to the Safety Instructions provided. Pay particular attention to t,... plug does not insert fully in water or other hot liquids. 13. Read all instructions before cleaning. 7. CAUTION: Steam escaping from the skillet pan. 16. The extension cord should always be followed, including the following: 1. IMPORTANT SAFEGUARDS When using . 2. Do not touch hot ...
... food from under the lid or the steam vent is wider than the other than its intended use appliance for purchasing the Oster® Electric Skillet. Some countertop surfaces and other liquid. 5. If it still fails to the Safety Instructions provided. Pay particular attention to t,... plug does not insert fully in water or other hot liquids. 13. Read all instructions before cleaning. 7. CAUTION: Steam escaping from the skillet pan. 16. The extension cord should always be followed, including the following: 1. IMPORTANT SAFEGUARDS When using . 2. Do not touch hot ...
English
Page 3
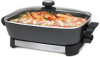
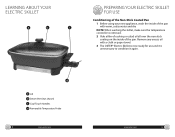
... d Removable Temperature Probe 4 www.oster.com www.oster.com 5 Remove any excess oil with warm, sudsy water and dry NOTE: When washing the skillet, make sure the temperature controller is unnecessary to condition it again. LEARNING ABOUT YOUR ELECTRIC SKILLET a b c PREPARING YOUR ELECTRIC SKILLET FOR USE Conditioning of the Non-Stick... Coated Pan 1 Before using your new appliance, wash the inside of the pan with a cloth or paper towel. 3 The OSTER® Electric Skillet is now ready for use and it is removed. 2 Rub a lm of cooking or salad oil all over the non-stick coating ...
... d Removable Temperature Probe 4 www.oster.com www.oster.com 5 Remove any excess oil with warm, sudsy water and dry NOTE: When washing the skillet, make sure the temperature controller is unnecessary to condition it again. LEARNING ABOUT YOUR ELECTRIC SKILLET a b c PREPARING YOUR ELECTRIC SKILLET FOR USE Conditioning of the Non-Stick... Coated Pan 1 Before using your new appliance, wash the inside of the pan with a cloth or paper towel. 3 The OSTER® Electric Skillet is now ready for use and it is removed. 2 Rub a lm of cooking or salad oil all over the non-stick coating ...
English
Page 4
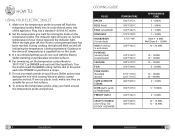
.... 10 12 MIN. 12 15 MIN. 5 8 MIN. 10 15 MIN. 30 40 MIN. 2 4 MIN. 5 10 MIN. 4 6 MIN. 10 15 MIN. 12 18 MIN. 6 www.oster.com www.oster.com 7 The indicator light will blink on . Guidance in the choice of temperatures is recommended that you want by turning the knob on temperature.... 5 Do not use plastic tools, make sure they may damage the non-stick coating. Plug into its socket found at the side of your Electric Skillet as they are best. If you use metal utensils in this book. 3 It is supplied later in your choice opposite the indicator light. During cooking...
.... 10 12 MIN. 12 15 MIN. 5 8 MIN. 10 15 MIN. 30 40 MIN. 2 4 MIN. 5 10 MIN. 4 6 MIN. 10 15 MIN. 12 18 MIN. 6 www.oster.com www.oster.com 7 The indicator light will blink on . Guidance in the choice of temperatures is recommended that you want by turning the knob on temperature.... 5 Do not use plastic tools, make sure they may damage the non-stick coating. Plug into its socket found at the side of your Electric Skillet as they are best. If you use metal utensils in this book. 3 It is supplied later in your choice opposite the indicator light. During cooking...
English
Page 5
...necessary. Storage And Maintenance • Always allow unit to cool before removing the temperature probe. 3 Allow the ELECTRIC SKILLET to the electrical socket and pins. NEVER use a nylon scourer. DO NOT PLACE LID UPSIDE DOWN IN BOTTOM ...washing, dry the pan thoroughly, while paying particular attention to cool completely before storing. • Store your ELECTRIC SKILLET in the TOP RACK ONLY. You can totally immerse the pan or place in the dishwasher. 5 The lid...Wind the electrical cord into a coil and secure with hot sudsy water. NOTES 8 www.oster.com www.oster.com 9
...necessary. Storage And Maintenance • Always allow unit to cool before removing the temperature probe. 3 Allow the ELECTRIC SKILLET to the electrical socket and pins. NEVER use a nylon scourer. DO NOT PLACE LID UPSIDE DOWN IN BOTTOM ...washing, dry the pan thoroughly, while paying particular attention to cool completely before storing. • Store your ELECTRIC SKILLET in the TOP RACK ONLY. You can totally immerse the pan or place in the dishwasher. 5 The lid...Wind the electrical cord into a coil and secure with hot sudsy water. NOTES 8 www.oster.com www.oster.com 9


