User Guide
Page 1
Taking Your First Trip with GPS Navigator by palmOne
Taking Your First Trip with GPS Navigator by palmOne

User Guide
Page 2
... no responsibility for any loss or claims by deletion of data as a result of this guide. PN: 406-10135-00 AN: 185-10056-00 ii GPS navigator by or licensed to make backup copies of their respective owners. palmOne, the palmOne logo, Zire, the Zire logo, Tungsten, the Tungsten logo, HotSync..., and Palm are used to identify products or services of all important data on other brand and product names are or may arise through the use of...
... no responsibility for any loss or claims by deletion of data as a result of this guide. PN: 406-10135-00 AN: 185-10056-00 ii GPS navigator by or licensed to make backup copies of their respective owners. palmOne, the palmOne logo, Zire, the Zire logo, Tungsten, the Tungsten logo, HotSync..., and Palm are used to identify products or services of all important data on other brand and product names are or may arise through the use of...

User Guide
Page 3
Table of Contents Introduction 1 Setting Up the Hardware 2 Connecting the car charger 6 GPS receiver status lights and features 8 Starting Navigator 9 Using Navigator 11 Using the menu 12 Planning a route to a specific address 13 The route summary 19 Deviating ... of favorites 22 Turning the sound on and off 23 Switching between day and night colors 24 Requesting an alternative route 25 Browsing a map 26 GPS navigator by palmOne iii
Table of Contents Introduction 1 Setting Up the Hardware 2 Connecting the car charger 6 GPS receiver status lights and features 8 Starting Navigator 9 Using Navigator 11 Using the menu 12 Planning a route to a specific address 13 The route summary 19 Deviating ... of favorites 22 Turning the sound on and off 23 Switching between day and night colors 24 Requesting an alternative route 25 Browsing a map 26 GPS navigator by palmOne iii

User Guide
Page 5
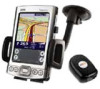
Introduction Introduction Your GPS navigator by palmOne is ready to Read This First for instructions. For more detailed instructions on an expansion card and activated the software so that ..., make sure that it is a global positioning system that provides detailed maps, route planning, and voice navigation to the User Guide provided on CD #1. The GPS navigator by palmOne 1 Refer to use. GPS navigator by palmOne uses TomTom Navigator software and maps.
Introduction Introduction Your GPS navigator by palmOne is ready to Read This First for instructions. For more detailed instructions on an expansion card and activated the software so that ..., make sure that it is a global positioning system that provides detailed maps, route planning, and voice navigation to the User Guide provided on CD #1. The GPS navigator by palmOne 1 Refer to use. GPS navigator by palmOne uses TomTom Navigator software and maps.
User Guide
Page 6
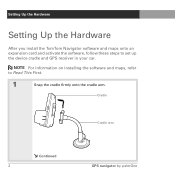
Setting Up the Hardware Setting Up the Hardware After you install the TomTom Navigator software and maps onto an expansion card and activate the software, follow these steps to Read This First. 0 1 Snap the cradle firmly onto the cradle arm. NOTE For information on installing the software and maps, refer to set up the device cradle and GPS receiver in your car. Cradle Cradle arm Continued 2 GPS navigator by palmOne
Setting Up the Hardware Setting Up the Hardware After you install the TomTom Navigator software and maps onto an expansion card and activate the software, follow these steps to Read This First. 0 1 Snap the cradle firmly onto the cradle arm. NOTE For information on installing the software and maps, refer to set up the device cradle and GPS receiver in your car. Cradle Cradle arm Continued 2 GPS navigator by palmOne

User Guide
Page 7
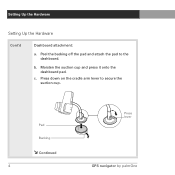
Windshield attachment: a. b. Press down on the cradle arm lever to the windshield or dashboard. Moisten the suction cup and press it onto the windshield. Continued GPS navigator by palmOne Press lever 3 Setting Up the Hardware Setting Up the Hardware 2 Attach the cradle arm to secure the suction cup.
Windshield attachment: a. b. Press down on the cradle arm lever to the windshield or dashboard. Moisten the suction cup and press it onto the windshield. Continued GPS navigator by palmOne Press lever 3 Setting Up the Hardware Setting Up the Hardware 2 Attach the cradle arm to secure the suction cup.
User Guide
Page 8
Setting Up the Hardware Setting Up the Hardware Cont'd Dashboard attachment: a. Pad Backing Continued 4 Press lever GPS navigator by palmOne c. Moisten the suction cup and press it onto the dashboard pad. Peel the backing off the pad and attach the pad to secure the suction cup. b. Press down on the cradle arm lever to the dashboard.
Setting Up the Hardware Setting Up the Hardware Cont'd Dashboard attachment: a. Pad Backing Continued 4 Press lever GPS navigator by palmOne c. Moisten the suction cup and press it onto the dashboard pad. Peel the backing off the pad and attach the pad to secure the suction cup. b. Press down on the cradle arm lever to the dashboard.
User Guide
Page 9
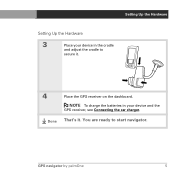
You are ready to secure it . Done That's it . 4 Place the GPS receiver on the dashboard. GPS navigator by palmOne 5 NOTE To charge the batteries in the cradle and adjust the cradle to start navigator. Setting Up the Hardware Setting Up the Hardware 3 Place your device in your device and the GPS receiver, see Connecting the car charger.
You are ready to secure it . Done That's it . 4 Place the GPS receiver on the dashboard. GPS navigator by palmOne 5 NOTE To charge the batteries in the cradle and adjust the cradle to start navigator. Setting Up the Hardware Setting Up the Hardware 3 Place your device in your device and the GPS receiver, see Connecting the car charger.

User Guide
Page 10
Continued 6 GPS navigator by palmOne When batteries are low, the GPS receiver and device cannot maintain a Bluetooth® connection. 0 1 Connect the appropriate cable adapter to the car charger. Connecting the car charger Connecting the car charger It's a good idea to connect the GPS receiver and your device to your device.
Continued 6 GPS navigator by palmOne When batteries are low, the GPS receiver and device cannot maintain a Bluetooth® connection. 0 1 Connect the appropriate cable adapter to the car charger. Connecting the car charger Connecting the car charger It's a good idea to connect the GPS receiver and your device to your device.

User Guide
Page 11
... to your device to the power cable, and then connect it to occur. Plug the large charging connector into the GPS receiver. NOTE If the battery light on the GPS receiver is red, the receiver is not charging. The battery light should be green (charging) or off (fully charged...). c. d. b. Plug the small charging connector into the car charger. You may need to turn the ignition key for your device. Done GPS navigator by palmOne 7 Connecting the car charger Connecting the car charger 2 Connect the charging cable and plug in the car charger: a. Plug the...
... to your device to the power cable, and then connect it to occur. Plug the large charging connector into the GPS receiver. NOTE If the battery light on the GPS receiver is red, the receiver is not charging. The battery light should be green (charging) or off (fully charged...). c. d. b. Plug the small charging connector into the car charger. You may need to turn the ignition key for your device. Done GPS navigator by palmOne 7 Connecting the car charger Connecting the car charger 2 Connect the charging cable and plug in the car charger: a. Plug the...
User Guide
Page 12
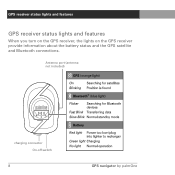
GPS receiver status lights and features GPS receiver status lights and features When you turn on the GPS receiver, the lights on the GPS receiver provide information about the battery status and the GPS satellite and Bluetooth connections. Antenna port (antenna not included) charging connector On-off switch 8 GPS navigator by palmOne
GPS receiver status lights and features GPS receiver status lights and features When you turn on the GPS receiver, the lights on the GPS receiver provide information about the battery status and the GPS satellite and Bluetooth connections. Antenna port (antenna not included) charging connector On-off switch 8 GPS navigator by palmOne

User Guide
Page 13
...receiver. Make sure the receiver has access to bring the card(s) with navigator? Be sure to the sky. Battery light Continued On-off on the GPS receiver. Starting Navigator Starting Navigator Are you need : • Did you install TomTom Navigator and the maps you ready to travel with you. &#...8226; Did you fully charge your palmOne device and GPS receiver? • Did you need to charge the batteries while using navigator. 0 1 Turn on your trip, check that you have what you need...
...receiver. Make sure the receiver has access to bring the card(s) with navigator? Be sure to the sky. Battery light Continued On-off on the GPS receiver. Starting Navigator Starting Navigator Are you need : • Did you install TomTom Navigator and the maps you ready to travel with you. &#...8226; Did you fully charge your palmOne device and GPS receiver? • Did you need to charge the batteries while using navigator. 0 1 Turn on your trip, check that you have what you need...
User Guide
Page 14
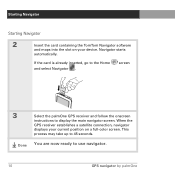
... automatically. screen 3 Select the palmOne GPS receiver and follow the onscreen instructions to 45 seconds. This process may take up to display the main navigator screen. If the card is already inserted, go to use navigator. 10 GPS navigator by palmOne Done You are now... ready to the Home and select Navigator . When the GPS receiver establishes a satellite connection, navigator displays your device. Starting Navigator Starting Navigator 2 Insert...
... automatically. screen 3 Select the palmOne GPS receiver and follow the onscreen instructions to 45 seconds. This process may take up to display the main navigator screen. If the card is already inserted, go to use navigator. 10 GPS navigator by palmOne Done You are now... ready to the Home and select Navigator . When the GPS receiver establishes a satellite connection, navigator displays your device. Starting Navigator Starting Navigator 2 Insert...
User Guide
Page 15
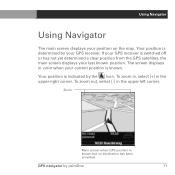
...the upper-right corner. Your position is determined by your GPS receiver. GPS navigator by the icon. Your position is indicated by palmOne 11 To zoom in, select [+] in color when your last known position. Zoom Main screen when GPS position is switched off or has not yet determined a ...clear position from the GPS satellites, the main screen displays your current position is known. To zoom out, select [-] in the ...
...the upper-right corner. Your position is determined by your GPS receiver. GPS navigator by the icon. Your position is indicated by palmOne 11 To zoom in, select [+] in color when your last known position. Zoom Main screen when GPS position is switched off or has not yet determined a ...clear position from the GPS satellites, the main screen displays your current position is known. To zoom out, select [-] in the ...
User Guide
Page 16
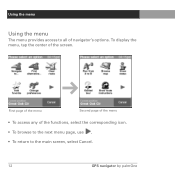
First page of the menu Second page of the menu • To access any of the screen. To display the menu, tap the center of the functions, select the corresponding icon. • To browse to the next menu page, use . • To return to all of navigator's options. Using the menu Using the menu The menu provides access to the main screen, select Cancel. 12 GPS navigator by palmOne
First page of the menu Second page of the menu • To access any of the screen. To display the menu, tap the center of the functions, select the corresponding icon. • To browse to the next menu page, use . • To return to all of navigator's options. Using the menu Using the menu The menu provides access to the main screen, select Cancel. 12 GPS navigator by palmOne
User Guide
Page 17
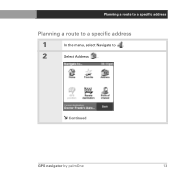
Continued GPS navigator by palmOne 13 Planning a route to a specific address Planning a route to a specific address 0 1 In the menu, select Navigate to . 2 Select Address .
Continued GPS navigator by palmOne 13 Planning a route to a specific address Planning a route to a specific address 0 1 In the menu, select Navigate to . 2 Select Address .

User Guide
Page 18
Then select the city. Continued 14 GPS navigator by palmOne Planning a route to a specific address Planning a route to a specific address 3 Enter the first letters of the city until the city you are looking for appears in the list.
Then select the city. Continued 14 GPS navigator by palmOne Planning a route to a specific address Planning a route to a specific address 3 Enter the first letters of the city until the city you are looking for appears in the list.
User Guide
Page 19
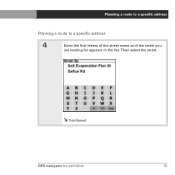
Continued GPS navigator by palmOne 15 Then select the street. Planning a route to a specific address Planning a route to a specific address 4 Enter the first letters of the street name until the street you are looking for appears in the list.
Continued GPS navigator by palmOne 15 Then select the street. Planning a route to a specific address Planning a route to a specific address 4 Enter the first letters of the street name until the street you are looking for appears in the list.

User Guide
Page 20
Navigator plans a route from your current location. Continued 16 GPS navigator by palmOne Planning a route to a specific address Planning a route to 45 seconds for a GPS connection. NOTE Route planning cannot start unless the GPS receiver knows your current GPS location to the destination you can select a street crossing instead. You may need to wait up to a specific address 5 Enter the address, and then select Done. If you don't know the address, you have just entered and displays a route summary.
Navigator plans a route from your current location. Continued 16 GPS navigator by palmOne Planning a route to a specific address Planning a route to 45 seconds for a GPS connection. NOTE Route planning cannot start unless the GPS receiver knows your current GPS location to the destination you can select a street crossing instead. You may need to wait up to a specific address 5 Enter the address, and then select Done. If you don't know the address, you have just entered and displays a route summary.
User Guide
Page 21
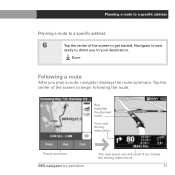
Planning a route to a specific address Planning a route to a specific address 6 Tap the center of the screen to begin following the route. Red indicates the planned route. Your next driving instruction. Navigator is now ready to direct you to get started. Tap the center of the screen to your destination. Route summary GPS navigator by palmOne The next street you will reach if you plan a route, navigator displays the route summary. Done Following a route After you follow the driving instructions. 17
Planning a route to a specific address Planning a route to a specific address 6 Tap the center of the screen to begin following the route. Red indicates the planned route. Your next driving instruction. Navigator is now ready to direct you to get started. Tap the center of the screen to your destination. Route summary GPS navigator by palmOne The next street you will reach if you plan a route, navigator displays the route summary. Done Following a route After you follow the driving instructions. 17