
Handbook
Page 2
Graffiti, HotSync, PalmConnect, and Palm OS are trademarks of malfunction, dead battery, or repairs. Palm, Inc. and it subsidiaries assume no responsibility for any damage or loss caused by third parties which may be trademarks or registered ...may arise through the use of adapters: 25-pin serial adapter (for use with Windows computers), Macintosh serial adapter, USB adapter (for Palm™ m100 Series Handhelds Disclaimer and Limitation of the End User Software License Agreement. and its subsidiaries. HotSync® Cradle/Cable Adapters and Software Download Available ...
Graffiti, HotSync, PalmConnect, and Palm OS are trademarks of malfunction, dead battery, or repairs. Palm, Inc. and it subsidiaries assume no responsibility for any damage or loss caused by third parties which may be trademarks or registered ...may arise through the use of adapters: 25-pin serial adapter (for use with Windows computers), Macintosh serial adapter, USB adapter (for Palm™ m100 Series Handhelds Disclaimer and Limitation of the End User Software License Agreement. and its subsidiaries. HotSync® Cradle/Cable Adapters and Software Download Available ...
Handbook
Page 3
... 1: Introduction to Your Palm™ m100 Series Handheld Getting to know your handheld 2 What is a Palm m100 series handheld 2 System requirements 3 Palm m100 series components 4 Using the protective flip cover 7 Changing the face plate 8 Installing the batteries 9 Palm Desktop organizer software 10 Connecting the HotSync cradle/cable 10 Installing Palm Desktop software 12 Using your handheld with another PIM...
... 1: Introduction to Your Palm™ m100 Series Handheld Getting to know your handheld 2 What is a Palm m100 series handheld 2 System requirements 3 Palm m100 series components 4 Using the protective flip cover 7 Changing the face plate 8 Installing the batteries 9 Palm Desktop organizer software 10 Connecting the HotSync cradle/cable 10 Installing Palm Desktop software 12 Using your handheld with another PIM...

Handbook
Page 4
... 42 Installing and removing applications 43 Installing add-on applications 43 Installing games 47 Removing applications 47 Removing Palm Desktop software 48 Security 49 Assigning a password 49 Changing or deleting a password 50 Locking your handheld 51 Recovering from a forgotten password 52 Chapter 4: Using Your Applications Overview of applications 54 Date Book 54... records 62 Purging records 63 Exchanging and updating data: HotSync operations 65 Beaming information 71 Categorizing records 73 Finding records 76 Page iv Handbook for Palm™ m100 Series Handhelds
... 42 Installing and removing applications 43 Installing add-on applications 43 Installing games 47 Removing applications 47 Removing Palm Desktop software 48 Security 49 Assigning a password 49 Changing or deleting a password 50 Locking your handheld 51 Recovering from a forgotten password 52 Chapter 4: Using Your Applications Overview of applications 54 Date Book 54... records 62 Purging records 63 Exchanging and updating data: HotSync operations 65 Beaming information 71 Categorizing records 73 Finding records 76 Page iv Handbook for Palm™ m100 Series Handhelds
Handbook
Page 5
... 136 Returning to cradle/cable HotSync operations 136 Conducting a HotSync operation via modem 137 Preparing your computer 138 Preparing your handheld 140 Selecting the conduits for a modem HotSync operation .........141 Performing a HotSync operation via a modem 142 Using File Link... 143 Creating a user profile 144 Chapter 6: Setting Preferences for Your Handheld Viewing preferences 147 Buttons preferences 148 Pen preferences 148 HotSync buttons preferences 150 Digitizer preferences 150 Formats preferences 150 Country default 151...
... 136 Returning to cradle/cable HotSync operations 136 Conducting a HotSync operation via modem 137 Preparing your computer 138 Preparing your handheld 140 Selecting the conduits for a modem HotSync operation .........141 Performing a HotSync operation via a modem 142 Using File Link... 143 Creating a user profile 144 Chapter 6: Setting Preferences for Your Handheld Viewing preferences 147 Buttons preferences 148 Pen preferences 148 HotSync buttons preferences 150 Digitizer preferences 150 Formats preferences 150 Country default 151...
Handbook
Page 6
... Connecting to your service 160 Creating additional service templates 161 Adding detailed information to a service template 161 Login scripts 164 Creating a login script on your handheld 165 Plug-in applications 167 Deleting a service template 167 Network preferences menu commands 167 TCP/IP troubleshooting 168 Owner preferences 169 ShortCuts preferences 170 Creating... 196 Appendix D: Non-ASCII Characters for Login Scripts Use of ^char 199 Carriage return and line feed 199 Literal characters 200 Page vi Handbook for Palm™ m100 Series Handhelds
... Connecting to your service 160 Creating additional service templates 161 Adding detailed information to a service template 161 Login scripts 164 Creating a login script on your handheld 165 Plug-in applications 167 Deleting a service template 167 Network preferences menu commands 167 TCP/IP troubleshooting 168 Owner preferences 169 ShortCuts preferences 170 Creating... 196 Appendix D: Non-ASCII Characters for Login Scripts Use of ^char 199 Carriage return and line feed 199 Literal characters 200 Page vi Handbook for Palm™ m100 Series Handhelds
Handbook
Page 8
... to help you get up and running quickly. Page 1 It describes all the parts of your handheld s Viewing and entering data s Using your handheld with your computer s Personalizing your handheld with your own preference settings After you become familiar with the basic functionality of information if you have... problems operating it. This handbook is designed to the Handbook for maintaining your handheld, and also as a source of your handheld, you need to know about how to use the rest of this handbook as a reference for less common tasks...
... to help you get up and running quickly. Page 1 It describes all the parts of your handheld s Viewing and entering data s Using your handheld with your computer s Personalizing your handheld with your own preference settings After you become familiar with the basic functionality of information if you have... problems operating it. This handbook is designed to the Handbook for maintaining your handheld, and also as a source of your handheld, you need to know about how to use the rest of this handbook as a reference for less common tasks...

Handbook
Page 9
.... To make sure you don't lose any of this important information, you can even jot quick notes directly on your Palm™ m100 series handheld, how to use your handheld for the first time, and how to use HotSync® technology to synchronize your contact names, addresses, phone numbers, ...for displaying current events and To Do items at home. Chapter 1 Introduction to Your Palm™ m100 Series Handheld This chapter explains the physical buttons and controls on the screen in Note Pad. Your handheld can enter all these areas, both at work and at the same time. You can...
.... To make sure you don't lose any of this important information, you can even jot quick notes directly on your Palm™ m100 series handheld, how to use your handheld for the first time, and how to use HotSync® technology to synchronize your contact names, addresses, phone numbers, ...for displaying current events and To Do items at home. Chapter 1 Introduction to Your Palm™ m100 Series Handheld This chapter explains the physical buttons and controls on the screen in Note Pad. Your handheld can enter all these areas, both at work and at the same time. You can...

Handbook
Page 10
...) s Infrared communication device Page 3 Introduction to Your Palm™ m100 Series Handheld for best results, use High Color: 16 bit) s CD-ROM drive (you can also download the Palm Desktop software from http://www.palm.com) s Mouse s One available serial port or ...USB port (PalmConnect® USB Kit sold separately) Minimum requirements: Macintosh s Apple Macintosh or compatible with a Power PC processor s Mac OS...
...) s Infrared communication device Page 3 Introduction to Your Palm™ m100 Series Handheld for best results, use High Color: 16 bit) s CD-ROM drive (you can also download the Palm Desktop software from http://www.palm.com) s Mouse s One available serial port or ...USB port (PalmConnect® USB Kit sold separately) Minimum requirements: Macintosh s Apple Macintosh or compatible with a Power PC processor s Mac OS...

Handbook
Page 11
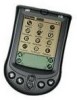
...174; alphabet. Pressing the power button for about two seconds turns the backlight on or off and controls the backlight feature. If your handheld is turned off, pressing the power button turns the unit on , pressing the power button turns the unit off . Displays the ...viewed. See Chapter 2 to learn how to the stylus. Chapter 1 Page 4 It is touch-sensitive and responds to write Graffiti characters. Palm m100 series components Locating front panel controls Power button/ Backlight control Scroll buttons/ Clock control Screen Graffiti writing area Face plate Application buttons Power ...
...174; alphabet. Pressing the power button for about two seconds turns the backlight on or off and controls the backlight feature. If your handheld is turned off, pressing the power button turns the unit on , pressing the power button turns the unit off . Displays the ...viewed. See Chapter 2 to learn how to the stylus. Chapter 1 Page 4 It is touch-sensitive and responds to write Graffiti characters. Palm m100 series components Locating front panel controls Power button/ Backlight control Scroll buttons/ Clock control Screen Graffiti writing area Face plate Application buttons Power ...

Handbook
Page 12
..., and Note Pad. Page 5 Introduction to view information above the viewing area. Release the button when the backlight turns on your handheld, you to illuminate your handheld. The backlight also turns off automatically (after a period of inactivity) with the Auto-off , pressing the top button displays the ...time. Holding down to view information below the viewing area, and pressing the upper button scrolls up to Your Palm™ m100 Series Handheld When your handheld's appearance. Using the backlight If lighting conditions make it down for more information.
..., and Note Pad. Page 5 Introduction to view information above the viewing area. Release the button when the backlight turns on your handheld, you to illuminate your handheld. The backlight also turns off automatically (after a period of inactivity) with the Auto-off , pressing the top button displays the ...time. Holding down to view information below the viewing area, and pressing the upper button scrolls up to Your Palm™ m100 Series Handheld When your handheld's appearance. Using the backlight If lighting conditions make it down for more information.

Handbook
Page 13
... can personalize the appearance of the storage slot and hold it as a pointing device for navigating through applications and entering data on your handheld and computer using HotSync technology. To use the reset button. See "Beaming information" in Chapter 4 and "IR HotSync operations" in... turn connects to use the stylus, slide it out of your computer. Connects your handheld. Uses infrared technology to transmit data to and receive data from other Palm OS® handhelds, and to use , you should not have to perform HotSync operations. Locating back panel components ...
... can personalize the appearance of the storage slot and hold it as a pointing device for navigating through applications and entering data on your handheld and computer using HotSync technology. To use the reset button. See "Beaming information" in Chapter 4 and "IR HotSync operations" in... turn connects to use the stylus, slide it out of your computer. Connects your handheld. Uses infrared technology to transmit data to and receive data from other Palm OS® handhelds, and to use , you should not have to perform HotSync operations. Locating back panel components ...
Handbook
Page 14
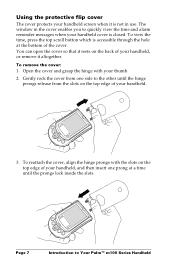
... can open the cover so that it rests on the top edge of your handheld, or remove it is not in the cover enables you to Your Palm™ m100 Series Handheld To view the time, press the top scroll button which is closed. To reattach the cover, align the hinge prongs ...with your thumb. 2. Using the protective flip cover The cover protects your handheld screen when it altogether.
... can open the cover so that it rests on the top edge of your handheld, or remove it is not in the cover enables you to Your Palm™ m100 Series Handheld To view the time, press the top scroll button which is closed. To reattach the cover, align the hinge prongs ...with your thumb. 2. Using the protective flip cover The cover protects your handheld screen when it altogether.

Handbook
Page 15
To change the face plate: 1. Gently press the top of your handheld by changing the face plate. Chapter 1 Page 8 Changing the face plate You can personalize the appearance of the face plate onto your handheld until it from your handheld and pull the existing face plate away from your handheld. Align the bottom edge of the new face plate with the slot on the bottom edge of your handheld. 3. Lift the face plate tab slightly to separate it clicks into position. Face plate tab 2. For information about face plate accessories, visit the web site: www.palm.com.
To change the face plate: 1. Gently press the top of your handheld by changing the face plate. Chapter 1 Page 8 Changing the face plate You can personalize the appearance of the face plate onto your handheld until it from your handheld and pull the existing face plate away from your handheld. Align the bottom edge of the new face plate with the slot on the bottom edge of your handheld. 3. Lift the face plate tab slightly to separate it clicks into position. Face plate tab 2. For information about face plate accessories, visit the web site: www.palm.com.

Handbook
Page 16
...A for more information. If you must install two AAA alkaline batteries. Page 9 Introduction to open battery door 2. Press tab to Your Palm™ m100 Series Handheld When the batteries are firmly seated in the interior of the batteries. Press the latch on the back of your...behind the battery door on the battery door and lift the battery door away from your handheld into place. Important: Do not force the battery door. Installing the batteries To use your handheld and "clicks" into place so that the batteries are correctly installed, the battery door ...
...A for more information. If you must install two AAA alkaline batteries. Page 9 Introduction to open battery door 2. Press tab to Your Palm™ m100 Series Handheld When the batteries are firmly seated in the interior of the batteries. Press the latch on the back of your...behind the battery door on the battery door and lift the battery door away from your handheld into place. Important: Do not force the battery door. Installing the batteries To use your handheld and "clicks" into place so that the batteries are correctly installed, the battery door ...

Handbook
Page 17
... you can view, enter, and modify any printer. However, when you use it with the information on your handheld or Palm Desktop software appear in both places after you can easily transfer data from another Palm OS handheld, follow the instructions in Appendix C, "Upgrade Information" before completing these steps. It is a one-step procedure that...
... you can view, enter, and modify any printer. However, when you use it with the information on your handheld or Palm Desktop software appear in both places after you can easily transfer data from another Palm OS handheld, follow the instructions in Appendix C, "Upgrade Information" before completing these steps. It is a one-step procedure that...
Handbook
Page 18
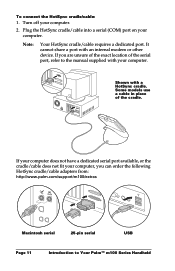
... computer, you are unsure of the exact location of the cradle. If you can order the following HotSync cradle/cable adapters from: http://www.palm.com/support/m100/extras Macintosh serial 25-pin serial USB Page 11 Introduction to the manual supplied with a HotSync cradle. To connect the HotSync ...port on your computer. Note: Your HotSync cradle/cable requires a dedicated port. Some models use a cable in place of the serial port, refer to Your Palm™ m100 Series Handheld Shown with your computer. It cannot share a port with an internal modem or other device.
... computer, you are unsure of the exact location of the cradle. If you can order the following HotSync cradle/cable adapters from: http://www.palm.com/support/m100/extras Macintosh serial 25-pin serial USB Page 11 Introduction to the manual supplied with a HotSync cradle. To connect the HotSync ...port on your computer. Note: Your HotSync cradle/cable requires a dedicated port. Some models use a cable in place of the serial port, refer to Your Palm™ m100 Series Handheld Shown with your computer. It cannot share a port with an internal modem or other device.

Handbook
Page 19
... connect the HotSync cradle/cable to the HotSync cradle/cable. To ensure a safe and uninterrupted installation of Palm Desktop software, please print these instructions and do the following instructions guide you are upgrading from another Palm OS handheld, follow the instructions in Appendix C, "Upgrade Information" before installing: s Turn off your computer. 2. Exit any open...
... connect the HotSync cradle/cable to the HotSync cradle/cable. To ensure a safe and uninterrupted installation of Palm Desktop software, please print these instructions and do the following instructions guide you are upgrading from another Palm OS handheld, follow the instructions in Appendix C, "Upgrade Information" before installing: s Turn off your computer. 2. Exit any open...

Handbook
Page 20
...use a cable in order to add HotSync Manager, the connection software, and other features of Palm Desktop software to your handheld with a HotSync cradle. Turn on the Palm Desktop software CD-ROM (Windows only); Double-click the Installer icon to complete the installation. Using... Outlook is included on your Macintosh's CD-ROM drive. 3. however, you use Palm Desktop software. For information on a Macintosh: 1. Page 13 Introduction to Your Palm™ m100 Series Handheld Shown with another personal information manager (PIM), such as Microsoft Outlook, you still ...
...use a cable in order to add HotSync Manager, the connection software, and other features of Palm Desktop software to your handheld with a HotSync cradle. Turn on the Palm Desktop software CD-ROM (Windows only); Double-click the Installer icon to complete the installation. Using... Outlook is included on your Macintosh's CD-ROM drive. 3. however, you use Palm Desktop software. For information on a Macintosh: 1. Page 13 Introduction to Your Palm™ m100 Series Handheld Shown with another personal information manager (PIM), such as Microsoft Outlook, you still ...

Handbook
Page 21
... the applications that come with it. Never use the stylus to drag the slider of the stylus for tapping or making strokes on the handheld screen. With your handheld turned on, you can tap the screen to do many operations, such as the following: s Open applications s Choose menu commands s ... instructions appear on the screen. Tapping and typing Tap with its touch-sensitive screen so that when you tap an element on the screen, the handheld can detect exactly which task you want to perform. These instructions include a calibration screen, or digitizer, and a Basic Skills tutorial. Basic Skills...
... the applications that come with it. Never use the stylus to drag the slider of the stylus for tapping or making strokes on the handheld screen. With your handheld turned on, you can tap the screen to do many operations, such as the following: s Open applications s Choose menu commands s ... instructions appear on the screen. Tapping and typing Tap with its touch-sensitive screen so that when you tap an element on the screen, the handheld can detect exactly which task you want to perform. These instructions include a calibration screen, or digitizer, and a Basic Skills tutorial. Basic Skills...

Handbook
Page 22
Tap the icons to the application. You can also press the up and down scroll buttons to activate the alphabetic keyboard. Elements of the handheld interface Menu bar Menu bar Icons Contrast control Clock abc 123 Icons A set the time and date. Tap to the left or right of commands ... slider to adjust the contrast in small increments or drag the slider to find text anywhere in an input field, tap the dot to Your Palm™ m100 Series Handheld
Tap the icons to the application. You can also press the up and down scroll buttons to activate the alphabetic keyboard. Elements of the handheld interface Menu bar Menu bar Icons Contrast control Clock abc 123 Icons A set the time and date. Tap to the left or right of commands ... slider to adjust the contrast in small increments or drag the slider to find text anywhere in an input field, tap the dot to Your Palm™ m100 Series Handheld


