User Guide
Page 4
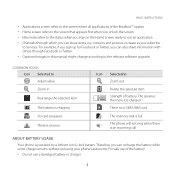
... of the Breakout™ appear. xx Idle mode refers to run an application. BASIC INSTRUCTIONS xx Applications screen refers to Zoom out Delete the selected item Strength of battery: The greener, the more it is charged There is no SIM/USIM card The memory disk is full The phone will not ...ring when there is an incoming call ABOUT BATTERY USAGE Your phone is an error Icon Selected to the screen where all applications of the battery: xx Do not use a damaged battery or charger. 3 xx Channels through Facebook or Twitter. ...
... of the Breakout™ appear. xx Idle mode refers to run an application. BASIC INSTRUCTIONS xx Applications screen refers to Zoom out Delete the selected item Strength of battery: The greener, the more it is charged There is no SIM/USIM card The memory disk is full The phone will not ...ring when there is an incoming call ABOUT BATTERY USAGE Your phone is an error Icon Selected to the screen where all applications of the battery: xx Do not use a damaged battery or charger. 3 xx Channels through Facebook or Twitter. ...
User Guide
Page 5
... in summer or winter, may shorten battery life, remove the phone from its capacity and life. xx Do not use your battery for the device per this standard. xx Replace the battery only with another battery that no metal objects come into the battery, immerse or expose to water or ... objects to fire, explosion or other hazard. xx Avoid dropping the phone or the battery. xx Do not put your battery in accordance with conductive objects. xx Battery life inevitably shortens over time. terminals of batteries by burning; xx Since overcharging may reduce its charger once it is...
... in summer or winter, may shorten battery life, remove the phone from its capacity and life. xx Do not use your battery for the device per this standard. xx Replace the battery only with another battery that no metal objects come into the battery, immerse or expose to water or ... objects to fire, explosion or other hazard. xx Avoid dropping the phone or the battery. xx Do not put your battery in accordance with conductive objects. xx Battery life inevitably shortens over time. terminals of batteries by burning; xx Since overcharging may reduce its charger once it is...

User Guide
Page 6
TABLE OF CONTENTS BASIC INSTRUCTIONS...2 BASIC INSTRUCTIONS...2 TABLE OF CONTENTS...5 1. GETTING STARTED GETTING STARTED...12 CHECKING PACKAGE...12 REMOVING THE BACK COVER...13 REPLACING THE BACK COVER...13 INSTALLING THE 4G SIM CARD...14 REMOVING THE 4G SIM CARD...14 INSTALLING THE microSD™ CARD...15 REMOVING THE microSD™ CARD...15 INSTALLING THE BATTERY...16 REMOVING THE BATTERY...16 CHARGING THE BATTERY...17 POWERING YOUR PHONE ON/OFF...17 MANAGING SCREEN...18 OVERVIEWING PRODUCT...20 GRIPPING Breakout™...23 ACTIVATING Breakout™...24 BACKING-UP DATA...26 5
TABLE OF CONTENTS BASIC INSTRUCTIONS...2 BASIC INSTRUCTIONS...2 TABLE OF CONTENTS...5 1. GETTING STARTED GETTING STARTED...12 CHECKING PACKAGE...12 REMOVING THE BACK COVER...13 REPLACING THE BACK COVER...13 INSTALLING THE 4G SIM CARD...14 REMOVING THE 4G SIM CARD...14 INSTALLING THE microSD™ CARD...15 REMOVING THE microSD™ CARD...15 INSTALLING THE BATTERY...16 REMOVING THE BATTERY...16 CHARGING THE BATTERY...17 POWERING YOUR PHONE ON/OFF...17 MANAGING SCREEN...18 OVERVIEWING PRODUCT...20 GRIPPING Breakout™...23 ACTIVATING Breakout™...24 BACKING-UP DATA...26 5
User Guide
Page 12
1 GETTING STARTED This chapter provides important information to know before using the Breakout™, including: CHECKING PACKAGE REMOVING THE BACK COVER REPLACING THE BACK COVER INSTALLING THE 4G SIM CARD REMOVING THE 4G SIM CARD INSTALLING THE microSD™ CARD REMOVING THE microSD™ CARD INSTALLING THE BATTERY REMOVING THE BATTERY CHARGING THE BATTERY POWERING YOUR PHONE ON/OFF MANAGING SCREEN OVERVIEWING PRODUCT GRIPPING Breakout™ ACTIVATING Breakout™ BACKING-UP DATA UNDERSTANDING HOME SCREEN CUSTOMIZING HOME SCREEN MANAGING APPLICATIONS SCREEN
1 GETTING STARTED This chapter provides important information to know before using the Breakout™, including: CHECKING PACKAGE REMOVING THE BACK COVER REPLACING THE BACK COVER INSTALLING THE 4G SIM CARD REMOVING THE 4G SIM CARD INSTALLING THE microSD™ CARD REMOVING THE microSD™ CARD INSTALLING THE BATTERY REMOVING THE BATTERY CHARGING THE BATTERY POWERING YOUR PHONE ON/OFF MANAGING SCREEN OVERVIEWING PRODUCT GRIPPING Breakout™ ACTIVATING Breakout™ BACKING-UP DATA UNDERSTANDING HOME SCREEN CUSTOMIZING HOME SCREEN MANAGING APPLICATIONS SCREEN
User Guide
Page 14
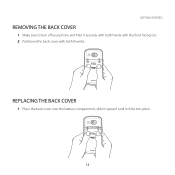
GETTING STARTED REMOVING THE BACK COVER 1 Make sure to turn off your phone and hold it clicks into place. 13 REPLACING THE BACK COVER 1 Place the back cover over the battery compartment, slide it upward until it securely with both hands with the front facing out. 2 Pull down the back cover with both thumbs.
GETTING STARTED REMOVING THE BACK COVER 1 Make sure to turn off your phone and hold it clicks into place. 13 REPLACING THE BACK COVER 1 Place the back cover over the battery compartment, slide it upward until it securely with both hands with the front facing out. 2 Pull down the back cover with both thumbs.
User Guide
Page 15
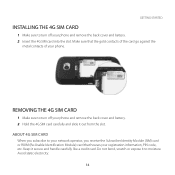
...) card or RUIM (Re-Usable Identification Module) card that the gold contacts of the card go against the metal contacts of your phone and remove the back cover and battery. 2 Insert the 4G SIM card into the slot. Avoid static electricity. 14 GETTING STARTED INSTALLING THE 4G SIM CARD 1 Make sure ...to turn off your phone. Do not bend, scratch or expose it secure and handle carefully like a credit card. Make sure that houses your phone and remove the back cover and battery. 2 Hold the 4G SIM card carefully and slide it out from the...
...) card or RUIM (Re-Usable Identification Module) card that the gold contacts of the card go against the metal contacts of your phone and remove the back cover and battery. 2 Insert the 4G SIM card into the slot. Avoid static electricity. 14 GETTING STARTED INSTALLING THE 4G SIM CARD 1 Make sure ...to turn off your phone. Do not bend, scratch or expose it secure and handle carefully like a credit card. Make sure that houses your phone and remove the back cover and battery. 2 Hold the 4G SIM card carefully and slide it out from the...

User Guide
Page 16
...™ card, refer to the SD card. GETTING STARTED INSTALLING THE microSD™ CARD 1 Make sure to turn off your phone and remove the back cover and battery. 2 Hold the microSD™ card carefully and slide it up to 32GB. Save pictures and contacts, and download applications to...can expand the external memory up until you format the microSD™ card before using the Breakout™. REMOVING THE microSD™ CARD 1 Make sure to turn off your phone and remove the back cover and battery. 2 Insert the microSD™ card into the slot. ABOUT microSD™ CARD A microSD...
...™ card, refer to the SD card. GETTING STARTED INSTALLING THE microSD™ CARD 1 Make sure to turn off your phone and remove the back cover and battery. 2 Hold the microSD™ card carefully and slide it up to 32GB. Save pictures and contacts, and download applications to...can expand the external memory up until you format the microSD™ card before using the Breakout™. REMOVING THE microSD™ CARD 1 Make sure to turn off your phone and remove the back cover and battery. 2 Insert the microSD™ card into the slot. ABOUT microSD™ CARD A microSD...
User Guide
Page 17
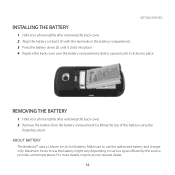
... cover over the battery compartment, slide it upward until it clicks into place. For more details, inquire at your phone tightly after removing the back cover. 2 Remove the battery from the battery compartment by the service provider and temperatures. ABOUT BATTERY The Breakout™ uses a Lithium Ion (Li-Ion) battery. GETTING STARTED INSTALLING THE BATTERY 1 Hold your nearest...
... cover over the battery compartment, slide it upward until it clicks into place. For more details, inquire at your phone tightly after removing the back cover. 2 Remove the battery from the battery compartment by the service provider and temperatures. ABOUT BATTERY The Breakout™ uses a Lithium Ion (Li-Ion) battery. GETTING STARTED INSTALLING THE BATTERY 1 Hold your nearest...
User Guide
Page 18
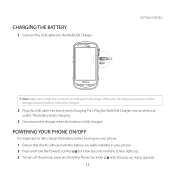
... sure to fully charge the battery before turning on your phone. 1 Ensure that the 4G SIM card and the battery are safely installed in the image. The battery starts charging. 3 Disconnect the charger when the battery is fully charged. Plug the Wall/USB Charger into the phone's Charging Port. POWERING YOUR PHONE ON/OFF It's important to...
... sure to fully charge the battery before turning on your phone. 1 Ensure that the 4G SIM card and the battery are safely installed in the image. The battery starts charging. 3 Disconnect the charger when the battery is fully charged. Plug the Wall/USB Charger into the phone's Charging Port. POWERING YOUR PHONE ON/OFF It's important to...
User Guide
Page 19
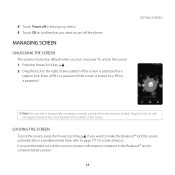
...Enter a PIN or a password if the screen is protected by default when you want to make the Breakout™ lock the screen automatically in the middle of the screen. MANAGING SCREEN UNLOCKING THE SCREEN The ... emails quickly when the screen is recommended to lock the screen to protect information contained in the Breakout™ and to the clock located in a predetermined time, refer to the right. If you...lock to page 171 for call, message or email to conserve battery power. 18 4 Touch Power off the phone. LOCKING THE SCREEN To lock the screen, press the Power/Lock Key F E.
...Enter a PIN or a password if the screen is protected by default when you want to make the Breakout™ lock the screen automatically in the middle of the screen. MANAGING SCREEN UNLOCKING THE SCREEN The ... emails quickly when the screen is recommended to lock the screen to protect information contained in the Breakout™ and to the clock located in a predetermined time, refer to the right. If you...lock to page 171 for call, message or email to conserve battery power. 18 4 Touch Power off the phone. LOCKING THE SCREEN To lock the screen, press the Power/Lock Key F E.
User Guide
Page 161
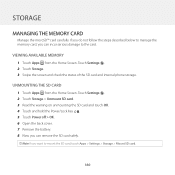
... on unmounting the SD card and touch OK. 4 Touch and hold the Power/Lock Key F E. 5 Touch Power off > OK. 6 Open the back cover. 7 Remove the battery. 8 Now you can remove the SD card safely. UNMOUNTING THE SD CARD 1 Touch Apps from the Home Screen. STORAGE MANAGING THE MEMORY CARD Manage the... microSD™ card carefully. Touch Settings . 2 Touch Storage. 3 Swipe the screen and check the status of the SD card and internal phone storage. Note If you want to the card. If you do not follow the steps described below to manage the memory card, you can incur...
... on unmounting the SD card and touch OK. 4 Touch and hold the Power/Lock Key F E. 5 Touch Power off > OK. 6 Open the back cover. 7 Remove the battery. 8 Now you can remove the SD card safely. UNMOUNTING THE SD CARD 1 Touch Apps from the Home Screen. STORAGE MANAGING THE MEMORY CARD Manage the... microSD™ card carefully. Touch Settings . 2 Touch Storage. 3 Swipe the screen and check the status of the SD card and internal phone storage. Note If you want to the card. If you do not follow the steps described below to manage the memory card, you can incur...

User Guide
Page 183
... the open source licenses and Google's legal information. 182 CHECKING THE STATUS OF THE PHONE 1 Touch Apps > Settings > About phone. 2 Touch Status if you want to check how the battery is being used. SEEING LEGAL INFORMATION 1 Touch Apps > Settings > About phone. 2 Touch Legal information if you want to check the latest software and download...
... the open source licenses and Google's legal information. 182 CHECKING THE STATUS OF THE PHONE 1 Touch Apps > Settings > About phone. 2 Touch Status if you want to check how the battery is being used. SEEING LEGAL INFORMATION 1 Touch Apps > Settings > About phone. 2 Touch Legal information if you want to check the latest software and download...

User Guide
Page 189
... xx DO NOT expose this equipment in serious bodily injury and/or property damage due to instability. xx DO NOT short-circuit the battery terminals with a potentially explosive atmosphere are often, but not always, clearly marked. areas where the air contains chemicals or particles, such ... or fire resulting in areas posted: "Turn off your phone OFF when in any other area where you would normally be advised to follow the directions below deck on (1) USB AC Adapter (2) Battery and (3) Product Using Battery. Before operating, read all instructions and cautionary markings on boats...
... xx DO NOT expose this equipment in serious bodily injury and/or property damage due to instability. xx DO NOT short-circuit the battery terminals with a potentially explosive atmosphere are often, but not always, clearly marked. areas where the air contains chemicals or particles, such ... or fire resulting in areas posted: "Turn off your phone OFF when in any other area where you would normally be advised to follow the directions below deck on (1) USB AC Adapter (2) Battery and (3) Product Using Battery. Before operating, read all instructions and cautionary markings on boats...

User Guide
Page 208
... TO MAKE A CALL: Your phone may be set to see if your phone when it is not in an area with low signal strength. Cancel the "fixed dial" function. 207 Turn off your phone works while recharging the battery. Change the battery when battery energy is charged. WHEN YOU ARE... UNABLE TO SEND A MESSAGE: Either you may be in an area where your battery is exhausted. WHEN YOU CANNOT TURN ON YOUR PHONE: Make sure your network service provider...
... TO MAKE A CALL: Your phone may be set to see if your phone when it is not in an area with low signal strength. Cancel the "fixed dial" function. 207 Turn off your phone works while recharging the battery. Change the battery when battery energy is charged. WHEN YOU ARE... UNABLE TO SEND A MESSAGE: Either you may be in an area where your battery is exhausted. WHEN YOU CANNOT TURN ON YOUR PHONE: Make sure your network service provider...


