

User Manual
Page 2
... any other brands or product names are trademarks of HOYA CORPORATION. Images taken with this PENTAX e/y Digital Camera. Regarding trademarks PENTAX, K-m/K2000 and smc PENTAX are trademarks or registered trademarks of the copyright as laid out in the Copyright Act, ...camera capabilities. This product supports PRINT Image Matching III. The PRINT Image Matching logo is 99.99% or better, you to understand all the features and functions. Please read this manual safe, as it can be taken here also. Keep this manual before using extremely high precision technology. All other lens...
... any other brands or product names are trademarks of HOYA CORPORATION. Images taken with this PENTAX e/y Digital Camera. Regarding trademarks PENTAX, K-m/K2000 and smc PENTAX are trademarks or registered trademarks of the copyright as laid out in the Copyright Act, ...camera capabilities. This product supports PRINT Image Matching III. The PRINT Image Matching logo is 99.99% or better, you to understand all the features and functions. Please read this manual safe, as it can be taken here also. Keep this manual before using extremely high precision technology. All other lens...

User Manual
Page 3
...the strap over their necks. • Do not look directly at the sun through the camera with the specified power and voltage. Warning Caution This symbol indicates that violating this product, with a telephoto lens attached, as smoke or a strange odor, stop use immediately, remove the batteries or ... this item could cause minor or medium personal injuries, or material losses. This symbol indicates that violating this product, we request your nearest PENTAX Service Center. Placing them in mouth may lead to a loss of eyesight. • Be sure to this product. There is the risk...
...the strap over their necks. • Do not look directly at the sun through the camera with the specified power and voltage. Warning Caution This symbol indicates that violating this product, with a telephoto lens attached, as smoke or a strange odor, stop use immediately, remove the batteries or ... this item could cause minor or medium personal injuries, or material losses. This symbol indicates that violating this product, we request your nearest PENTAX Service Center. Placing them in mouth may lead to a loss of eyesight. • Be sure to this product. There is the risk...

User Manual
Page 5
.... • Depending on a user's physical condition, some users may damage the lens. • Please contact PENTAX Service Center for professional cleaning of the CCD. (This will cause condensation on the monitor. Wipe dry any rain or water drops on the camera. • Refer to "Precautions When Using the SD Memory Card" (p.43) regarding...
.... • Depending on a user's physical condition, some users may damage the lens. • Please contact PENTAX Service Center for professional cleaning of the CCD. (This will cause condensation on the monitor. Wipe dry any rain or water drops on the camera. • Refer to "Precautions When Using the SD Memory Card" (p.43) regarding...

User Manual
Page 7
... FOR BATTERY USAGE 2 Care to be Taken During Handling 2 Contents 5 Composition of the Operating Manual 11 Before Using Your Camera 13 e/y Camera Characteristics 14 Checking the Contents of the Package 16 Names and Functions of Working Parts 17 Capture Mode 18 Playback Mode 20 Display... 39 Using the AC Adapter (Optional 40 Inserting/Removing the SD Memory Card 42 Recorded Pixels and Quality Level 44 Attaching the Lens 46 Adjusting the Viewfinder Diopter 48 Turning the Camera On and Off 49 Initial Settings 50 Setting the Display Language 50 Setting the Date and Time 54
... FOR BATTERY USAGE 2 Care to be Taken During Handling 2 Contents 5 Composition of the Operating Manual 11 Before Using Your Camera 13 e/y Camera Characteristics 14 Checking the Contents of the Package 16 Names and Functions of Working Parts 17 Capture Mode 18 Playback Mode 20 Display... 39 Using the AC Adapter (Optional 40 Inserting/Removing the SD Memory Card 42 Recorded Pixels and Quality Level 44 Attaching the Lens 46 Adjusting the Viewfinder Diopter 48 Turning the Camera On and Off 49 Initial Settings 50 Setting the Display Language 50 Setting the Date and Time 54

User Manual
Page 8
6 Basic Operations 57 Basic Shooting Operation 58 Holding the Camera 58 Letting the Camera Choose the Optimal Settings 59 Using a Zoom Lens 64 Using the Built-in Flash 65 Setting Flash Mode 65 Compensating Flash Output 70 Allowing Shooting while Charging the Flash 71 Playing Back Pictures ... Area (AF Point 113 Fixing the Focus (Focus Lock 114 Adjusting the Focus Manually (Manual Focus 116 Checking the Composition, Exposure and Focus Before Shooting (Digital Preview 119
6 Basic Operations 57 Basic Shooting Operation 58 Holding the Camera 58 Letting the Camera Choose the Optimal Settings 59 Using a Zoom Lens 64 Using the Built-in Flash 65 Setting Flash Mode 65 Compensating Flash Output 70 Allowing Shooting while Charging the Flash 71 Playing Back Pictures ... Area (AF Point 113 Fixing the Focus (Focus Lock 114 Adjusting the Focus Manually (Manual Focus 116 Checking the Composition, Exposure and Focus Before Shooting (Digital Preview 119

User Manual
Page 9
7 Using Shake Reduction Function to Prevent Camera Shake 121 Taking Pictures Using the Shake Reduction Function 121 Shooting with the Self-Timer 125 Shooting with the Remote Control (Optional 128 Continuous Shooting 130 Taking Pictures Using Digital Filters 132 Using the Flash 135 Flash Characteristics... in Each Exposure Mode 136 Using Slow-Speed-Sync 136 Distance and Aperture when Using the Built-in Flash............138 Lens Compatibility with the Built-in Flash 139 ...
7 Using Shake Reduction Function to Prevent Camera Shake 121 Taking Pictures Using the Shake Reduction Function 121 Shooting with the Self-Timer 125 Shooting with the Remote Control (Optional 128 Continuous Shooting 130 Taking Pictures Using Digital Filters 132 Using the Flash 135 Flash Characteristics... in Each Exposure Mode 136 Using Slow-Speed-Sync 136 Distance and Aperture when Using the Built-in Flash............138 Lens Compatibility with the Built-in Flash 139 ...

User Manual
Page 12
10 Appendix 235 Default Settings 236 Functions Available with Various Lens Combinations...........240 Notes on the CCD (Dust Alert 244 Removing Dust with a Blower 246 Optional Accessories 248 Error Messages 252 Troubleshooting 255 Main Specifications 258 Glossary 262 Index 267 WARRANTY POLICY 272 Using Aperture Ring 241 Cleaning the CCD 243 Removing Dust by Shaking the CCD (Dust Removal 243 Detecting Dust on [19.
10 Appendix 235 Default Settings 236 Functions Available with Various Lens Combinations...........240 Notes on the CCD (Dust Alert 244 Removing Dust with a Blower 246 Optional Accessories 248 Error Messages 252 Troubleshooting 255 Main Specifications 258 Glossary 262 Index 267 WARRANTY POLICY 272 Using Aperture Ring 241 Cleaning the CCD 243 Removing Dust by Shaking the CCD (Dust Removal 243 Detecting Dust on [19.
User Manual
Page 16
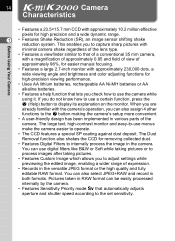
...effective pixels for removing collected dust. • Features Digital Filters to display its explanation on the monitor. Pictures taken in various parts of expression. • Records in the camera. You can be easily processed internally by the camera. • Features Sensitivity Priority mode K that lets... do not know how to use menus make the camera easier to operate. • The CCD features a special SP coating against dust deposit. This enables you to capture sharp pictures with minimal camera shake regardless of the lens type. • Features a viewfinder similar to adjust...
...effective pixels for removing collected dust. • Features Digital Filters to display its explanation on the monitor. Pictures taken in various parts of expression. • Records in the camera. You can be easily processed internally by the camera. • Features Sensitivity Priority mode K that lets... do not know how to use menus make the camera easier to operate. • The CCD features a special SP coating against dust deposit. This enables you to capture sharp pictures with minimal camera shake regardless of the lens type. • Features a viewfinder similar to adjust...

User Manual
Page 17
... Focal length is shaken, such as a 150 mm lens attached to a 35 mm camera 150÷1.5=100 Use a 100 mm lens with the e/y. 15 The captured area (view angle) will differ between the e/y and 35 mm SLR cameras even if the same lens is not a malfunction. To obtain an angle of ... (Auto) position, some operating noise when it is equivalent to a 450 mm lens on the e/y features a PENTAX original system which uses magnetic force to determine the focal length for 35 mm film and CCD are different. The camera may not match the actual conditions. Shake Reduction (SR) Shake Reduction (SR) on...
... Focal length is shaken, such as a 150 mm lens attached to a 35 mm camera 150÷1.5=100 Use a 100 mm lens with the e/y. 15 The captured area (view angle) will differ between the e/y and 35 mm SLR cameras even if the same lens is not a malfunction. To obtain an angle of ... (Auto) position, some operating noise when it is equivalent to a 450 mm lens on the e/y features a PENTAX original system which uses magnetic force to determine the focal length for 35 mm film and CCD are different. The camera may not match the actual conditions. Shake Reduction (SR) Shake Reduction (SR) on...

User Manual
Page 19
Names and Functions of Working 17 Parts Before Using Your Camera Power lamp Self-timer lamp/ Remote control receiver Card cover Lens mount index (red dot) MF AF Lens unlock button Built-in flash UP USB/Video terminal Terminal cover Hot shoe 1 Strap lug Mirror AF coupler Lens information contacts Diopter adjustment lever Viewfinder Card access lamp Monitor Tripod socket Battery cover unlock lever Battery cover * In the second illustration, the camera is shown with the Eyecup FQ removed.
Names and Functions of Working 17 Parts Before Using Your Camera Power lamp Self-timer lamp/ Remote control receiver Card cover Lens mount index (red dot) MF AF Lens unlock button Built-in flash UP USB/Video terminal Terminal cover Hot shoe 1 Strap lug Mirror AF coupler Lens information contacts Diopter adjustment lever Viewfinder Card access lamp Monitor Tripod socket Battery cover unlock lever Battery cover * In the second illustration, the camera is shown with the Eyecup FQ removed.
User Manual
Page 21
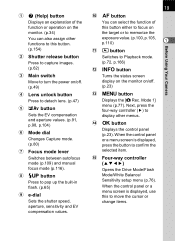
... target or to memorize the exposure value. (p.100, p.105, p.110) 1 Before Using Your Camera a Q button Switches to Playback mode. (p.72, p.166) b M button Turns the status screen display on the monitor on/off . (p.49) 4 Lens unlock button Press to detach lens. (p.47) 5 mc button Sets the EV compensation and aperture values. (p.91, p.98, p.104...
... target or to memorize the exposure value. (p.100, p.105, p.110) 1 Before Using Your Camera a Q button Switches to Playback mode. (p.72, p.166) b M button Turns the status screen display on the monitor on/off . (p.49) 4 Lens unlock button Press to detach lens. (p.47) 5 mc button Sets the EV compensation and aperture values. (p.91, p.98, p.104...

User Manual
Page 27
... 24 25 26 20 JPEG 10 AdobeRGB ± 0 27 28 29 30 21 07 / 07 / 2008 10 : 39 AM ± 0 31 22 Before Using Your Camera 1 Rotation information 2 Captured image 3 Protect setting 4 Capture mode 5 AE metering 6 Flash Mode 7 Shutter speed 8 Shake Reduction 9 Drive Mode 10 Exposure bracket 11 Aperture ...12 EV Compensation 13 Flash exposure compensation 14 Folder number-File number 15 Focus mode 16 AF area 17 Lens focal length 18 Image Tone 19 Saturation/Filter Effect 20 Hue/Toning 21 Contrast 22 Sharpness/Fine Sharpness 23 Sensitivity 24 White Balance 25 ...
... 24 25 26 20 JPEG 10 AdobeRGB ± 0 27 28 29 30 21 07 / 07 / 2008 10 : 39 AM ± 0 31 22 Before Using Your Camera 1 Rotation information 2 Captured image 3 Protect setting 4 Capture mode 5 AE metering 6 Flash Mode 7 Shutter speed 8 Shake Reduction 9 Drive Mode 10 Exposure bracket 11 Aperture ...12 EV Compensation 13 Flash exposure compensation 14 Folder number-File number 15 Focus mode 16 AF area 17 Lens focal length 18 Image Tone 19 Saturation/Filter Effect 20 Hue/Toning 21 Contrast 22 Sharpness/Fine Sharpness 23 Sensitivity 24 White Balance 25 ...

User Manual
Page 37
Attaching the Strap 36 Inserting the Batteries 37 Inserting/Removing the SD Memory Card ......... 42 Attaching the Lens 46 Adjusting the Viewfinder Diopter 48 Turning the Camera On and Off 49 Initial Settings 50 Be sure to taking pictures. 2 Getting Started This chapter explains your first steps from purchasing the camera to read it and follow the instructions.
Attaching the Strap 36 Inserting the Batteries 37 Inserting/Removing the SD Memory Card ......... 42 Attaching the Lens 46 Adjusting the Viewfinder Diopter 48 Turning the Camera On and Off 49 Initial Settings 50 Be sure to taking pictures. 2 Getting Started This chapter explains your first steps from purchasing the camera to read it and follow the instructions.

User Manual
Page 40
... illustration (1), slide the 1 battery cover toward the lens (2) and then flip open . • Use the AC adapter kit K-AC84 (optional) when using the camera for a prolonged period. (p.40) • Check the battery orientation if the camera does not operate properly after replacing the batteries. The camera will not turn on the batteries with the...
... illustration (1), slide the 1 battery cover toward the lens (2) and then flip open . • Use the AC adapter kit K-AC84 (optional) when using the camera for a prolonged period. (p.40) • Check the battery orientation if the camera does not operate properly after replacing the batteries. The camera will not turn on the batteries with the...

User Manual
Page 48
.... • When lenses described in (b) are used in place. Set [19. 46 Attaching the Lens Getting Started Attach a proper lens to use one of the following lenses with the e/y, all the camera's exposure modes will be available. (a) DA, DA L, D FA, FA J lenses (b) Lenses with an Aperture s (Auto) position, when used in a position other...
.... • When lenses described in (b) are used in place. Set [19. 46 Attaching the Lens Getting Started Attach a proper lens to use one of the following lenses with the e/y, all the camera's exposure modes will be available. (a) DA, DA L, D FA, FA J lenses (b) Lenses with an Aperture s (Auto) position, when used in a position other...

User Manual
Page 49
...and block dust when shipped. Getting Started 47 4 Remove the front lens cap by pushing the indicated portions inward. 2 To detach the lens, hold down the lens unlock button (3) and turn the lens counterclockwise. • We assume no responsibility nor liability for accidents, ...damages and malfunctions resulting from the use of lenses made by other manufacturers. • The camera body and lens mount incorporate lens information contacts...
...and block dust when shipped. Getting Started 47 4 Remove the front lens cap by pushing the indicated portions inward. 2 To detach the lens, hold down the lens unlock button (3) and turn the lens counterclockwise. • We assume no responsibility nor liability for accidents, ...damages and malfunctions resulting from the use of lenses made by other manufacturers. • The camera body and lens mount incorporate lens information contacts...

User Manual
Page 50
...250) AF frame • The Eyecup FQ is focused. You can adjust the diopter from approximately -2.5 to the viewfinder portion when the camera leaves the factory. However, the Eyecup FQ must be removed to suit your eyesight. Getting Started 48 Adjusting the Viewfinder Diopter Adjust the ...viewfinder diopter to use the optional diopter UP correction lens adapter M. If it out in the viewfinder is attached to +1.5 m-1. 1 2 Look through the viewfinder and slide the diopter adjustment lever...
...250) AF frame • The Eyecup FQ is focused. You can adjust the diopter from approximately -2.5 to the viewfinder portion when the camera leaves the factory. However, the Eyecup FQ must be removed to suit your eyesight. Getting Started 48 Adjusting the Viewfinder Diopter Adjust the ...viewfinder diopter to use the optional diopter UP correction lens adapter M. If it out in the viewfinder is attached to +1.5 m-1. 1 2 Look through the viewfinder and slide the diopter adjustment lever...

User Manual
Page 59
For information about advanced functions and settings for shooting by setting mode dial to I (Auto Picture) to chapter 4 and onward. Basic Shooting Operation 58 Using a Zoom Lens 64 Using the Built-in Flash 65 Playing Back Pictures 72 3 Basic Operations This chapter explains basic operations for taking pictures, refer to ensure successful capturing.
For information about advanced functions and settings for shooting by setting mode dial to I (Auto Picture) to chapter 4 and onward. Basic Shooting Operation 58 Using a Zoom Lens 64 Using the Built-in Flash 65 Playing Back Pictures 72 3 Basic Operations This chapter explains basic operations for taking pictures, refer to ensure successful capturing.

User Manual
Page 60
...; Press the shutter release button gently when taking a picture. 3 Basic Operations Horizontal position Vertical position • To reduce camera shake, support your body or the camera on a solid object such as a table, tree, or wall. • Although there are individual differences among photographers, ...the shutter speed for a handheld camera is heavier than the total weight of a second for a focal length of 50 mm and 1/150 of the camera and lens is recommended to avoid camera shake. • Do not use the Shake Reduction function when...
...; Press the shutter release button gently when taking a picture. 3 Basic Operations Horizontal position Vertical position • To reduce camera shake, support your body or the camera on a solid object such as a table, tree, or wall. • Although there are individual differences among photographers, ...the shutter speed for a handheld camera is heavier than the total weight of a second for a focal length of 50 mm and 1/150 of the camera and lens is recommended to avoid camera shake. • Do not use the Shake Reduction function when...

User Manual
Page 61
... the optimal capture mode for expressing your photographic vision. When the shutter release button is pressed halfway in =, the lens focuses automatically. (p.109) MF AF The focus mode changes to =. 59 Letting the Camera Choose the Optimal Settings The e/y features various Capture modes, Focus modes, and Drive modes for the subject. 3 1 Selecting...
... the optimal capture mode for expressing your photographic vision. When the shutter release button is pressed halfway in =, the lens focuses automatically. (p.109) MF AF The focus mode changes to =. 59 Letting the Camera Choose the Optimal Settings The e/y features various Capture modes, Focus modes, and Drive modes for the subject. 3 1 Selecting...


