
User Manual
Page 4
... discharging the flash. There is provided with a molded-on female connector body (with a specified IEC nonindustrial type configuration) or the equivalent. Disassembling the batteries or attempting to be recharged. This will be recharged. Do not mix battery brands, type or an old battery with a molded-on the batteries and the camera. Recharging...
... discharging the flash. There is provided with a molded-on female connector body (with a specified IEC nonindustrial type configuration) or the equivalent. Disassembling the batteries or attempting to be recharged. This will be recharged. Do not mix battery brands, type or an old battery with a molded-on the batteries and the camera. Recharging...

User Manual
Page 8
..., Exposure and Focus Before Shooting (Digital Preview 119 6 Basic Operations 57 Basic Shooting Operation 58 Holding the Camera 58 Letting the Camera Choose the Optimal Settings 59 Using a Zoom Lens 64 Using the Built-in Flash 65 Setting Flash Mode 65 Compensating Flash Output 70 Allowing Shooting while Charging the Flash 71 Playing Back Pictures 72 Playing...
..., Exposure and Focus Before Shooting (Digital Preview 119 6 Basic Operations 57 Basic Shooting Operation 58 Holding the Camera 58 Letting the Camera Choose the Optimal Settings 59 Using a Zoom Lens 64 Using the Built-in Flash 65 Setting Flash Mode 65 Compensating Flash Output 70 Allowing Shooting while Charging the Flash 71 Playing Back Pictures 72 Playing...

User Manual
Page 9
7 Using Shake Reduction Function to Prevent Camera Shake 121 Taking Pictures Using the Shake Reduction Function 121 Shooting with the Self-Timer 125 Shooting with the Remote Control (Optional 128 Continuous Shooting 130 Taking Pictures Using Digital Filters 132 Using the Flash 135 Flash Characteristics in Each Exposure Mode 136 Using Slow-Speed-Sync 136...
7 Using Shake Reduction Function to Prevent Camera Shake 121 Taking Pictures Using the Shake Reduction Function 121 Shooting with the Self-Timer 125 Shooting with the Remote Control (Optional 128 Continuous Shooting 130 Taking Pictures Using Digital Filters 132 Using the Flash 135 Flash Characteristics in Each Exposure Mode 136 Using Slow-Speed-Sync 136...
User Manual
Page 13
... 8 Explains the procedures for resetting all settings to taking and playing back pictures. 4 4 Shooting Functions Explains the shooting-related functions. 5 Using the Flash 5 Explains how to use the built-in RAW format. 9 9 Printing from purchasing the camera to their default settings. 12 Appendix Explains troubleshooting, introduces optional accessories and provides various resources.
... 8 Explains the procedures for resetting all settings to taking and playing back pictures. 4 4 Shooting Functions Explains the shooting-related functions. 5 Using the Flash 5 Explains how to use the built-in RAW format. 9 9 Printing from purchasing the camera to their default settings. 12 Appendix Explains troubleshooting, introduces optional accessories and provides various resources.

User Manual
Page 19
Names and Functions of Working 17 Parts Before Using Your Camera Power lamp Self-timer lamp/ Remote control receiver Card cover Lens mount index (red dot) MF AF Lens unlock button Built-in flash UP USB/Video terminal Terminal cover Hot shoe 1 Strap lug Mirror AF coupler Lens information contacts Diopter adjustment lever Viewfinder Card access lamp Monitor Tripod socket Battery cover unlock lever Battery cover * In the second illustration, the camera is shown with the Eyecup FQ removed.
Names and Functions of Working 17 Parts Before Using Your Camera Power lamp Self-timer lamp/ Remote control receiver Card cover Lens mount index (red dot) MF AF Lens unlock button Built-in flash UP USB/Video terminal Terminal cover Hot shoe 1 Strap lug Mirror AF coupler Lens information contacts Diopter adjustment lever Viewfinder Card access lamp Monitor Tripod socket Battery cover unlock lever Battery cover * In the second illustration, the camera is shown with the Eyecup FQ removed.
User Manual
Page 21
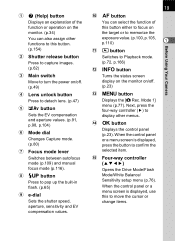
...(p.80) 7 Focus mode lever Switches between autofocus mode (p.109) and manual focus mode (p.116). 8 K button Press to pop up the built-in flash. (p.65) 9 e-dial Sets the shutter speed, aperture, sensitivity and EV compensation values. 19 0 = button You can select the function of this ...M button Turns the status screen display on the monitor on the target or to memorize the exposure value. (p.100, p.105, p.110) 1 Before Using Your Camera a Q button Switches to display other functions to this button. (p.154) 2 Shutter release button Press to capture images. (p.62) 3 Main switch Move to...
...(p.80) 7 Focus mode lever Switches between autofocus mode (p.109) and manual focus mode (p.116). 8 K button Press to pop up the built-in flash. (p.65) 9 e-dial Sets the shutter speed, aperture, sensitivity and EV compensation values. 19 0 = button You can select the function of this ...M button Turns the status screen display on the monitor on the target or to memorize the exposure value. (p.100, p.105, p.110) 1 Before Using Your Camera a Q button Switches to display other functions to this button. (p.154) 2 Shutter release button Press to capture images. (p.62) 3 Main switch Move to...

User Manual
Page 25
Press the 4 button to display the control panel and change settings. The Actual display may differ.) Before Using Your Camera 1/1 0 0 0 12345 F 11 +1.3 AWB AISUOTO3200 1.0 AF.A OK OFF JPEG 10M 1 23 4 5 6 7 8 9 11 13 14 10 12 15 16 17 18 23 19 20 21 22 4 M Scene ... (p.65) 12 Flash exposure compensation (p.70) 24 7 11 13 14 10 12 15 16 17 18 19 20 21 22 13 Drive Mode (p.76) 14 White Balance (p.159) 15 Custom Image (p.157) 16 Focus mode (p.109) 17 AE metering (p.101) 18 Shake Reduction (p.121) 19 Digital Filter (p.132) 20 File format (p.152...
Press the 4 button to display the control panel and change settings. The Actual display may differ.) Before Using Your Camera 1/1 0 0 0 12345 F 11 +1.3 AWB AISUOTO3200 1.0 AF.A OK OFF JPEG 10M 1 23 4 5 6 7 8 9 11 13 14 10 12 15 16 17 18 23 19 20 21 22 4 M Scene ... (p.65) 12 Flash exposure compensation (p.70) 24 7 11 13 14 10 12 15 16 17 18 19 20 21 22 13 Drive Mode (p.76) 14 White Balance (p.159) 15 Custom Image (p.157) 16 Focus mode (p.109) 17 AE metering (p.101) 18 Shake Reduction (p.121) 19 Digital Filter (p.132) 20 File format (p.152...

User Manual
Page 27
...27 28 29 30 21 07 / 07 / 2008 10 : 39 AM ± 0 31 22 Before Using Your Camera 1 Rotation information 2 Captured image 3 Protect setting 4 Capture mode 5 AE metering 6 Flash Mode 7 Shutter speed 8 Shake Reduction 9 Drive Mode 10 Exposure bracket 11 Aperture 12 EV Compensation 13... Flash exposure compensation 14 Folder number-File number 15 Focus mode 16 AF area 17 Lens focal length ... space 31 Shooting date/time * Indicators 6 and 13 only appear for images in which the flash was discharged.
...27 28 29 30 21 07 / 07 / 2008 10 : 39 AM ± 0 31 22 Before Using Your Camera 1 Rotation information 2 Captured image 3 Protect setting 4 Capture mode 5 AE metering 6 Flash Mode 7 Shutter speed 8 Shake Reduction 9 Drive Mode 10 Exposure bracket 11 Aperture 12 EV Compensation 13... Flash exposure compensation 14 Folder number-File number 15 Focus mode 16 AF area 17 Lens focal length ... space 31 Shooting date/time * Indicators 6 and 13 only appear for images in which the flash was discharged.

User Manual
Page 30
...28 Viewfinder The following information appears in the viewfinder. 1 2 1 1 Before Using Your Camera 34 5 67 8 9 10 11 1 AF frame (p.48) 2 Spot metering frame (p.101) 3 Flash status (p.65) Lit: when flash is activated. 6 Shutter speed (p.85) Shutter speed when capturing or adjusting. U (Normal... mode in use appears. Underlined when shutter speed can be adjusted with the e-dial. Blinks: when flash is recommended but not set. 4 Picture mode icon (p.80) The icon for Picture mode in I), = (Portrait), s (Landscape), q (Macro), ...
...28 Viewfinder The following information appears in the viewfinder. 1 2 1 1 Before Using Your Camera 34 5 67 8 9 10 11 1 AF frame (p.48) 2 Spot metering frame (p.101) 3 Flash status (p.65) Lit: when flash is activated. 6 Shutter speed (p.85) Shutter speed when capturing or adjusting. U (Normal... mode in use appears. Underlined when shutter speed can be adjusted with the e-dial. Blinks: when flash is recommended but not set. 4 Picture mode icon (p.80) The icon for Picture mode in I), = (Portrait), s (Landscape), q (Macro), ...

User Manual
Page 32
... Auto discharge 0.0 OK OK This section explains the basic ways to select a flash mode. 3 Press the 4 button. The [Flash Mode] screen appears. 2 Use the four-way controller (45) to change function settings. The camera returns to the status screen and is ready to set using the direct keys, the control... panel or the menu. less common functions can be set Flash Mode will be explained as an example. 1 Press the four-way ...
... Auto discharge 0.0 OK OK This section explains the basic ways to select a flash mode. 3 Press the 4 button. The [Flash Mode] screen appears. 2 Use the four-way controller (45) to change function settings. The camera returns to the status screen and is ready to set using the direct keys, the control... panel or the menu. less common functions can be set Flash Mode will be explained as an example. 1 Press the four-way ...

User Manual
Page 33
... F5.6 AWB ISO AUTO 400 AF.S OK OFF JPEG 10M 2 Use the four-way controller (2345) to select an item you want to change settings. Flash Mode Auto discharge AWB ISO AUTO 400 AF.A OFF JPEG 10M 3 Press the 4 button. JPEG Quality AWB ISO AUTO 400 AF.A OFF JPEG 10M The... item that cannot be explained as an example. 1 1 Check the status screen and then press the 4 button. 31 Using the Control Panel Before Using Your Camera While shooting, the current settings can also switch the display to the control panel and change the setting for. You can be checked on the...
... F5.6 AWB ISO AUTO 400 AF.S OK OFF JPEG 10M 2 Use the four-way controller (2345) to select an item you want to change settings. Flash Mode Auto discharge AWB ISO AUTO 400 AF.A OFF JPEG 10M 3 Press the 4 button. JPEG Quality AWB ISO AUTO 400 AF.A OFF JPEG 10M The... item that cannot be explained as an example. 1 1 Check the status screen and then press the 4 button. 31 Using the Control Panel Before Using Your Camera While shooting, the current settings can also switch the display to the control panel and change the setting for. You can be checked on the...

User Manual
Page 41
... conditions. Some deviation from the above figures may appear even when the battery level is sufficient if the camera is almost empty. The camera turns off and on shooting mode and shooting conditions. Approximate Image Storage Capacity and Playback Time (New Batteries...) Batteries AA lithium batteries Normal (Temperature) recording (23°C) 1650 ( 0°C) 1400 Flash photography Playback 50% use 100% use ...
... conditions. Some deviation from the above figures may appear even when the battery level is sufficient if the camera is almost empty. The camera turns off and on shooting mode and shooting conditions. Approximate Image Storage Capacity and Playback Time (New Batteries...) Batteries AA lithium batteries Normal (Temperature) recording (23°C) 1650 ( 0°C) 1400 Flash photography Playback 50% use 100% use ...

User Manual
Page 59
For information about advanced functions and settings for shooting by setting mode dial to I (Auto Picture) to chapter 4 and onward. 3 Basic Operations This chapter explains basic operations for taking pictures, refer to ensure successful capturing. Basic Shooting Operation 58 Using a Zoom Lens 64 Using the Built-in Flash 65 Playing Back Pictures 72
For information about advanced functions and settings for shooting by setting mode dial to I (Auto Picture) to chapter 4 and onward. 3 Basic Operations This chapter explains basic operations for taking pictures, refer to ensure successful capturing. Basic Shooting Operation 58 Using a Zoom Lens 64 Using the Built-in Flash 65 Playing Back Pictures 72

User Manual
Page 62
... button (p.62) 1 Subjects that are difficult to I (Auto Picture) mode, the optimal capture mode is taken. The focus indicator ] appears in Flash (p.65) 5 Press the shutter release button fully. Flash status Focus indicator A zoom lens can be used to view the subject. The autofocus system operates. 60 3 Look through the viewfinder to...
... button (p.62) 1 Subjects that are difficult to I (Auto Picture) mode, the optimal capture mode is taken. The focus indicator ] appears in Flash (p.65) 5 Press the shutter release button fully. Flash status Focus indicator A zoom lens can be used to view the subject. The autofocus system operates. 60 3 Look through the viewfinder to...

User Manual
Page 67
... about 0.7 m to s (Auto). Basic Operations Setting Flash Mode Flash Mode Function g Auto discharge Camera automatically determines ambient light and built-in flash pops up and discharges automatically when necessary, such as when using a sync cord. b Flash On Discharges flash manually. D Flash On+ Red-eye Discharges flash manually. The flash pops up . i Auto flash+ Redeye reduct Lights a red-eye reduction light...
... about 0.7 m to s (Auto). Basic Operations Setting Flash Mode Flash Mode Function g Auto discharge Camera automatically determines ambient light and built-in flash pops up and discharges automatically when necessary, such as when using a sync cord. b Flash On Discharges flash manually. D Flash On+ Red-eye Discharges flash manually. The flash pops up . i Auto flash+ Redeye reduct Lights a red-eye reduction light...

User Manual
Page 68
Basic Operations 2 Use the four-way controller (45) 3 to e, K, b, c or a, g and i appear gray and cannot be selected. 3 Press the 4 button. Flash Mode Auto discharge 0.0 OK OK The [Flash Mode] screen appears. Turn the e-dial to perform Flash exposure compensation. (p.70) When the mode dial is ready to take a picture. The camera returns to the status screen and is set to select a flash mode. 66 1 Press the four-way controller (3) in Capture mode.
Basic Operations 2 Use the four-way controller (45) 3 to e, K, b, c or a, g and i appear gray and cannot be selected. 3 Press the 4 button. Flash Mode Auto discharge 0.0 OK OK The [Flash Mode] screen appears. Turn the e-dial to perform Flash exposure compensation. (p.70) When the mode dial is ready to take a picture. The camera returns to the status screen and is set to select a flash mode. 66 1 Press the four-way controller (3) in Capture mode.

User Manual
Page 69
... taken. 4 Push down on the portion indicated in the illustration to retract the flash. The picture is popped up if necessary and begins charging. The flash is deactivated when A (Night Scene), K (Sunset), n (Stage Lighting), m (Candlelight) or E (Museum) is fully charged, b appears in... the viewfinder. (p.28) Basic Operations 3 Press the shutter release button fully. When the flash is selected in H (Scene) mode. 67 Using Auto Discharge g, i (Automatic Flash Popup) 1 Set the mode dial to l (Night Snap) in H (Scene) mode. 2 Press the shutter release...
... taken. 4 Push down on the portion indicated in the illustration to retract the flash. The picture is popped up if necessary and begins charging. The flash is deactivated when A (Night Scene), K (Sunset), n (Stage Lighting), m (Candlelight) or E (Museum) is fully charged, b appears in... the viewfinder. (p.28) Basic Operations 3 Press the shutter release button fully. When the flash is selected in H (Scene) mode. 67 Using Auto Discharge g, i (Automatic Flash Popup) 1 Set the mode dial to l (Night Snap) in H (Scene) mode. 2 Press the shutter release...

User Manual
Page 70
When the flash is taken. 3 Push the flash down to a (Flash Off), the built-in flash pops up even if the K button is used regardless of the flash mode settings. The flash discharges and the picture is fully charged, b appears in the viewfinder. (p.28) 2 Press the shutter release button fully. 68 Using Flash On Mode b, D 1 Press the K button. Basic Operations The built-in flash will not pop up and begins 3 charging. When the mode dial is set to retract. Flash On mode is pressed.
When the flash is taken. 3 Push the flash down to a (Flash Off), the built-in flash pops up even if the K button is used regardless of the flash mode settings. The flash discharges and the picture is fully charged, b appears in the viewfinder. (p.28) 2 Press the shutter release button fully. 68 Using Flash On Mode b, D 1 Press the K button. Basic Operations The built-in flash will not pop up and begins 3 charging. When the mode dial is set to retract. Flash On mode is pressed.

User Manual
Page 71
... red-eye by the reflection of the eye. To use . 3 • Use a flash that supports red-eye reduction. • Position the flash as far away from the camera as possible when using an external flash. This reduces pupil dilation. This phenomenon cannot be averted but the following measures can be used to combat it...
... red-eye by the reflection of the eye. To use . 3 • Use a flash that supports red-eye reduction. • Position the flash as far away from the camera as possible when using an external flash. This reduces pupil dilation. This phenomenon cannot be averted but the following measures can be used to combat it...

User Manual
Page 72
... eliminate shadows when a portrait picture is used when shooting with a person's face cast in shadow. Taking pictures 1 Pop up the flash manually and confirm that the flash is called Daylight-Sync Shooting. Use of steps in the [A Custom Setting 1] menu. Basic Operations Without Daylight-Sync With Daylight-Sync The picture may be...
... eliminate shadows when a portrait picture is used when shooting with a person's face cast in shadow. Taking pictures 1 Pop up the flash manually and confirm that the flash is called Daylight-Sync Shooting. Use of steps in the [A Custom Setting 1] menu. Basic Operations Without Daylight-Sync With Daylight-Sync The picture may be...