ZX-7 Manual
Page 4
...weather, water, or liquid resistant. Also check for inspection. • Be careful not to subject the camera to strong vibrations, shock or pressure. 1111131 PRECAUTIONS FOR YOUR CAMERA Your Pentax camera is taken from warm temperature to a subfreezing one or vice versa, the formation of icelets may cause damage...solvents such as in a car. • Do not store the camera in a closet with a dry soft cloth. • Do not drop the camera or allow it off what appears on the extreme edges of the film frame. Precautions for extended periods in places where the humidity and temperature...
...weather, water, or liquid resistant. Also check for inspection. • Be careful not to subject the camera to strong vibrations, shock or pressure. 1111131 PRECAUTIONS FOR YOUR CAMERA Your Pentax camera is taken from warm temperature to a subfreezing one or vice versa, the formation of icelets may cause damage...solvents such as in a car. • Do not store the camera in a closet with a dry soft cloth. • Do not drop the camera or allow it off what appears on the extreme edges of the film frame. Precautions for extended periods in places where the humidity and temperature...
ZX-7 Manual
Page 6
...13 Attaching the lens 14 Turning on the power 16 Operating the shutter release button 16 Using the data back 17 Film loading 18 Unloading film 21 • Rewinding a film in mid-roll 22 II BASIC OPERATION (SHOOTING) 23-36 Using the Auto Picture Mode 24 Using the Smart Flash ...26 Using zoom lenses 27 Setting the Single-Frame Drive Mode 28 Selecting the Autofocus Mode 28 Holding the Camera 29 Taking a picture 30 Selecting the various flash Modes 32 • AF illuminator 33 • About Red-eye Reduction Flash Function ..33 Activate the built-in flash in manual...
...13 Attaching the lens 14 Turning on the power 16 Operating the shutter release button 16 Using the data back 17 Film loading 18 Unloading film 21 • Rewinding a film in mid-roll 22 II BASIC OPERATION (SHOOTING) 23-36 Using the Auto Picture Mode 24 Using the Smart Flash ...26 Using zoom lenses 27 Setting the Single-Frame Drive Mode 28 Selecting the Autofocus Mode 28 Holding the Camera 29 Taking a picture 30 Selecting the various flash Modes 32 • AF illuminator 33 • About Red-eye Reduction Flash Function ..33 Activate the built-in flash in manual...

ZX-7 Manual
Page 7
OTHERS Troubleshooting Specifications Program lines Warranty policy 82-88 82 84 86 88 in flash 69 Setting the film speed (ISO) manually 70 Adjusting the Data Back 71 Installing the battery in Retractable Flash (RTF) 67 • Compatibility of field scale 81 ... Using the snap-in focus function 65 • Hard-To-Autofocus Subjects 66 Advanced operation for the Built-in the Data Back 73 Using a Pentax Dedicated External Flash 74 • Contrast-Control-Sync Flash Photography 75 • Overview of flash function 76 Daylight-sync shooting 77 Slow-shutter-sync shooting...
OTHERS Troubleshooting Specifications Program lines Warranty policy 82-88 82 84 86 88 in flash 69 Setting the film speed (ISO) manually 70 Adjusting the Data Back 71 Installing the battery in Retractable Flash (RTF) 67 • Compatibility of field scale 81 ... Using the snap-in focus function 65 • Hard-To-Autofocus Subjects 66 Advanced operation for the Built-in the Data Back 73 Using a Pentax Dedicated External Flash 74 • Contrast-Control-Sync Flash Photography 75 • Overview of flash function 76 Daylight-sync shooting 77 Slow-shutter-sync shooting...
ZX-7 Manual
Page 9
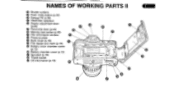
0000000 004500 NAMES OF WORKING PARTS II Shutter curtains Flash mode button (p.32) Eyecup FK (p.39) Viewfinder eyepiece Diopter adjustment lever (p.23) Panorama lever (p.44) Memory lock button (p.63) Film information window 00 Pressure plate Back cover (p.18) Film leader end mark (p.19) Battery cover chamber screw (p.12) Battery chamber cover (p.12) Sprocket (p.19) Tripod socket DX-information (p.19) GIN
0000000 004500 NAMES OF WORKING PARTS II Shutter curtains Flash mode button (p.32) Eyecup FK (p.39) Viewfinder eyepiece Diopter adjustment lever (p.23) Panorama lever (p.44) Memory lock button (p.63) Film information window 00 Pressure plate Back cover (p.18) Film leader end mark (p.19) Battery cover chamber screw (p.12) Battery chamber cover (p.12) Sprocket (p.19) Tripod socket DX-information (p.19) GIN

ZX-7 Manual
Page 10
...control release (p.40,42) 0 : Self-timer (p.38) ▪ : Multiple-exposure shooting (p.43) Av8.8 : Aperture value • : Exposure compensation (p.61) O : Film status information (p.20, 22) BB : Exposure counter (p.20) and exposure compensation value (p.61) LCD (Liquid-Crystal Display) When the LCD is exposed to high temperatures... (p.25, 36) : Red-eye reduction flash indication (p.32) COBB : Automatic flash information (p.25) ISO : Manual-set film speed (p.70) Tv 8860: Shutter speed a : Battery exhaustion warning (p.13) ▪ Remote control release with a 3-sec.
...control release (p.40,42) 0 : Self-timer (p.38) ▪ : Multiple-exposure shooting (p.43) Av8.8 : Aperture value • : Exposure compensation (p.61) O : Film status information (p.20, 22) BB : Exposure counter (p.20) and exposure compensation value (p.61) LCD (Liquid-Crystal Display) When the LCD is exposed to high temperatures... (p.25, 36) : Red-eye reduction flash indication (p.32) COBB : Automatic flash information (p.25) ISO : Manual-set film speed (p.70) Tv 8860: Shutter speed a : Battery exhaustion warning (p.13) ▪ Remote control release with a 3-sec.

ZX-7 Manual
Page 15
...shutter can be released and all indicators in the viewfinder disappear. BASIC OPERATION (PREPARATION) Battery Life (using 24-exposure film rolls at 20°C/68°F) General existing light photography Flash photography (using flash 50% of the times) ...) Bulb exposure time about 120 rolls about 20 rolls about 12 rolls about 8 hours Battery Life (using 24-exposure film rolls at -10°C/14°F) General existing light photography Flash photography (using flash 50% of the times) Flash...about 15 rolls about 5 rolls about 2 hours CR2 batteries were used under Pentax testing conditions.
...shutter can be released and all indicators in the viewfinder disappear. BASIC OPERATION (PREPARATION) Battery Life (using 24-exposure film rolls at 20°C/68°F) General existing light photography Flash photography (using flash 50% of the times) ...) Bulb exposure time about 120 rolls about 20 rolls about 12 rolls about 8 hours Battery Life (using 24-exposure film rolls at -10°C/14°F) General existing light photography Flash photography (using flash 50% of the times) Flash...about 15 rolls about 5 rolls about 2 hours CR2 batteries were used under Pentax testing conditions.

ZX-7 Manual
Page 18
To light up progressively. When taking a picture, depress the shutter release button gently to prevent camera shake. • To prevent camera shake, depress the shutter release button gently. • Before loading a roll of film, slowly depress the shutter release button to learn where the first position is released from the halfway position. Depressing the...
To light up progressively. When taking a picture, depress the shutter release button gently to prevent camera shake. • To prevent camera shake, depress the shutter release button gently. • Before loading a roll of film, slowly depress the shutter release button to learn where the first position is released from the halfway position. Depressing the...

ZX-7 Manual
Page 20
... as shown in the illustration. • Always load and unload film in the direction of the arrow. 2. Automatic film speed setting This camera is automatically set the film speed manually. (NOILVEIVd3Eld) NOI1V1:13d0 3ISVEI FILM LOADING We suggest that you first operate the camera with no film loaded to become familiar with ISO ratings from 25 to...
... as shown in the illustration. • Always load and unload film in the direction of the arrow. 2. Automatic film speed setting This camera is automatically set the film speed manually. (NOILVEIVd3Eld) NOI1V1:13d0 3ISVEI FILM LOADING We suggest that you first operate the camera with no film loaded to become familiar with ISO ratings from 25 to...

ZX-7 Manual
Page 21
... used to reach the take -up spool. Keep them gently with the film leader end mark 0 as shown. • Make sure that the film leader is positioned under the film retaine as shown in the illustration. • Make sure that the film perforations properly engage on the sprocket tooth 0. • If the end...• The DX information pins in the illustration, pull the film leader out only far enough to read film speed. DO NOT TOUCH THEM WITH YOUR FINGERS OR ANY OTHER OBJECT WHILE LOADING FILM. • If you have pulled out too much film, push it or cut off the bent portion. To remove ...
... used to reach the take -up spool. Keep them gently with the film leader end mark 0 as shown. • Make sure that the film leader is positioned under the film retaine as shown in the illustration. • Make sure that the film perforations properly engage on the sprocket tooth 0. • If the end...• The DX information pins in the illustration, pull the film leader out only far enough to read film speed. DO NOT TOUCH THEM WITH YOUR FINGERS OR ANY OTHER OBJECT WHILE LOADING FILM. • If you have pulled out too much film, push it or cut off the bent portion. To remove ...

ZX-7 Manual
Page 22
...on the LCD panel blinks, indicating E Pail@ No- c 5. The film automatically advances to ON. 6. IMMO X (NOLLVIIVd3ild) NOLLVIA3d0 3ISVS Film loaded flat 0, Yes! Close the back cover and set the main switch to the first frame. • Check that the film is not loaded ( properly, [ a_ E] on the LCD panel.... • The film counter indication advances one each time the shutter is released. 20 Film loaded with slack No! Open the back cover and load the...
...on the LCD panel blinks, indicating E Pail@ No- c 5. The film automatically advances to ON. 6. IMMO X (NOLLVIIVd3ild) NOLLVIA3d0 3ISVS Film loaded flat 0, Yes! Close the back cover and set the main switch to the first frame. • Check that the film is not loaded ( properly, [ a_ E] on the LCD panel.... • The film counter indication advances one each time the shutter is released. 20 Film loaded with slack No! Open the back cover and load the...

ZX-7 Manual
Page 23
The film automatically rewinds at the end of the roll. • During rewinding, [-] blinks on the LCD panel. When the film is fully rewound, only [0] blinks on the LCD panel, indicating that the film is being rewound, the exposure counter counts frame numbers in reverse. • Never open the back cover until the whole film roll is OFF ON (NOLIMEIVdal NOIIVEI3dO 0ISVS -""" V 1. UNLOADING FILM is completely rewound. • When removing the film from the camera, protect it from exposure to direct sun light. 2.
The film automatically rewinds at the end of the roll. • During rewinding, [-] blinks on the LCD panel. When the film is fully rewound, only [0] blinks on the LCD panel, indicating that the film is being rewound, the exposure counter counts frame numbers in reverse. • Never open the back cover until the whole film roll is OFF ON (NOLIMEIVdal NOIIVEI3dO 0ISVS -""" V 1. UNLOADING FILM is completely rewound. • When removing the film from the camera, protect it from exposure to direct sun light. 2.

ZX-7 Manual
Page 24
... the back cover, check that [e] is blinking. Open the back cover and remove the film. • A roll of 24-exposure film takes about 13 seconds to unload the film before exposing all the frames, use this function. " Rewinding a film in processing. MED 0 O r- Set the main switch to the ON position, and... then depress the mid-roll rewind button by the number of frames indicated on the film cartridge. However, those extra frames may be lost in mid-roll If you take important pictures, rewind the film when the film reaches the number of frames on the...
... the back cover, check that [e] is blinking. Open the back cover and remove the film. • A roll of 24-exposure film takes about 13 seconds to unload the film before exposing all the frames, use this function. " Rewinding a film in processing. MED 0 O r- Set the main switch to the ON position, and... then depress the mid-roll rewind button by the number of frames indicated on the film cartridge. However, those extra frames may be lost in mid-roll If you take important pictures, rewind the film when the film reaches the number of frames on the...

ZX-7 Manual
Page 37
... cannot be obtained, and you will see page 68. • The minimum effective range is always 0.7m (2.6ft) even if a lens with ISO 100 (400) film used Maximum Lens Aperture f/1.4 f/2 f/3.5, f/4.7 f/5.6 Effective Range approx. 0.8 - 3.9m (0.8 - 5.6m) 2.6 - 12.8ft (2.6 - 18.48) approx. 0.8 - 3.3m (0.8 - 4.8m) 2.6 - 10.8ft (2.6 - 15.7ft) approx. 0.7 - 2.4m (0.7 - 4.0m) 2.3 - 7.9ft (2.3 - 13...
... cannot be obtained, and you will see page 68. • The minimum effective range is always 0.7m (2.6ft) even if a lens with ISO 100 (400) film used Maximum Lens Aperture f/1.4 f/2 f/3.5, f/4.7 f/5.6 Effective Range approx. 0.8 - 3.9m (0.8 - 5.6m) 2.6 - 12.8ft (2.6 - 18.48) approx. 0.8 - 3.3m (0.8 - 4.8m) 2.6 - 10.8ft (2.6 - 15.7ft) approx. 0.7 - 2.4m (0.7 - 4.0m) 2.3 - 7.9ft (2.3 - 13...

ZX-7 Manual
Page 45
... panel blinks. 2. SNO111/1:13dO 033NVAaV Depress the drive button until [1] appears and repeat step 3. • In this mode, the data will not be restored. The film will be imprinted.
... panel blinks. 2. SNO111/1:13dO 033NVAaV Depress the drive button until [1] appears and repeat step 3. • In this mode, the data will not be restored. The film will be imprinted.

ZX-7 Manual
Page 46
... pictures to be cut off in the middle of safety. Turn the panorama lever to [ P to the position you selected. • What appears on the film). 1. AIM TAKING PANORAMA FORMAT PICTURES a I ML •I.•1 I" --...r SNOIJYH3dO O3ONVAaV You can switch between the panorama format and standard format picture taking mode in the...
... pictures to be cut off in the middle of safety. Turn the panorama lever to [ P to the position you selected. • What appears on the film). 1. AIM TAKING PANORAMA FORMAT PICTURES a I ML •I.•1 I" --...r SNOIJYH3dO O3ONVAaV You can switch between the panorama format and standard format picture taking mode in the...

ZX-7 Manual
Page 47
... to you have taken only panorama format pictures on the film, ask the clerk to develop the film with only the panorama format. am. Your local film processor or camera dealers will appear at the processing lab to develop the film with both panorama and standard format pictures on the entire ...roll of film, tell the clerk at the top and bottom of the picture. The number of exposures ...
... to you have taken only panorama format pictures on the film, ask the clerk to develop the film with only the panorama format. am. Your local film processor or camera dealers will appear at the processing lab to develop the film with both panorama and standard format pictures on the entire ...roll of film, tell the clerk at the top and bottom of the picture. The number of exposures ...

ZX-7 Manual
Page 70
The guide number (GN) depends upon the film speed used . Calculating the aperture according to the camera -to-subject distance Aperture = Guide Number ÷ Camera-to the subject is different than 0.7m (2.3ft), the flash cannot be overexposed. • The value 5 used within that distance, it... next smallest aperture ring number (f2.8 in this case). I S O25 I SO50 ISO100 GN5.5 GN7.8 GN11 ISO200 ISO400 GN15.6 GN22 If an ISO100 film is used at an aperture of f/2.8, the flash effective distance is distributed unevenly and the picture may be used as follows: Guide Number (11) f/2.8 =...
The guide number (GN) depends upon the film speed used . Calculating the aperture according to the camera -to-subject distance Aperture = Guide Number ÷ Camera-to the subject is different than 0.7m (2.3ft), the flash cannot be overexposed. • The value 5 used within that distance, it... next smallest aperture ring number (f2.8 in this case). I S O25 I SO50 ISO100 GN5.5 GN7.8 GN11 ISO200 ISO400 GN15.6 GN22 If an ISO100 film is used at an aperture of f/2.8, the flash effective distance is distributed unevenly and the picture may be used as follows: Guide Number (11) f/2.8 =...

ZX-7 Manual
Page 72
... to set the film speed manually. 70 SETTING THE FILM SPEED (ISO) MANUALLY O a * AA c) 0 egg .1_, Tv MAY a oO; After the ISO is set, set the mode dial to any other position other than [ ISO ]. • To change the ISO, turn the select switch to [ ISO ]. 2. SA SNOLLVEI3dO a33NIM0V This camera automatically reads...
... to set the film speed manually. 70 SETTING THE FILM SPEED (ISO) MANUALLY O a * AA c) 0 egg .1_, Tv MAY a oO; After the ISO is set, set the mode dial to any other position other than [ ISO ]. • To change the ISO, turn the select switch to [ ISO ]. 2. SA SNOLLVEI3dO a33NIM0V This camera automatically reads...

ZX-7 Manual
Page 74
... DATE SELECT UST ; Press the SELECT button to stop the adjusted hour/minute from 25 1600. • If high-speed film with... an ISO rating of 50 or slower is used, the printed characters may be dark or dim. • If you want to zero. 5. The digits blink in sync with ISO rating of 1000 or faster is being corrected, the data cannot be imprinted. Press the DATE... from blinking. SELECT DATElo A6DJUOST J #?`141 SELECT DATE0"ONOT ; To change blink. SELECT DATE AO OST SNOLLVEI3dO C13ONVACIV Adjusting the how ,i,inute 1. Hour 3. Hour - Press the SELECT ...
... DATE SELECT UST ; Press the SELECT button to stop the adjusted hour/minute from 25 1600. • If high-speed film with... an ISO rating of 50 or slower is used, the printed characters may be dark or dim. • If you want to zero. 5. The digits blink in sync with ISO rating of 1000 or faster is being corrected, the data cannot be imprinted. Press the DATE... from blinking. SELECT DATElo A6DJUOST J #?`141 SELECT DATE0"ONOT ; To change blink. SELECT DATE AO OST SNOLLVEI3dO C13ONVACIV Adjusting the how ,i,inute 1. Hour 3. Hour - Press the SELECT ...

ZX-7 Manual
Page 75
... invisible. INSTALLING THE BATTERY IN THE BATA BACK GEM SNOIIVE13d0 033NVAaV Replace the battery when the data information on the LCD panel, it means that a film is not loaded, then open the back cover. 2. Ensure that the battery has not been installed properly.
... invisible. INSTALLING THE BATTERY IN THE BATA BACK GEM SNOIIVE13d0 033NVAaV Replace the battery when the data information on the LCD panel, it means that a film is not loaded, then open the back cover. 2. Ensure that the battery has not been installed properly.


