

Owner's Manual
Page 2
... stitch selector 14/15 Straight stitching 15 Zigzag stitching 15 Foot control 15 Reverse sewing 16 Dropping the machine feed 16 Presser bar lifter 17 Stopmatic control 17 Dual feed 18/19 Sewing over cross seams Electronic control Changing the needle Changing the sewing foot Regulating the thread tensions Detachable workplate Felling Hemming Zipper insertion...
... stitch selector 14/15 Straight stitching 15 Zigzag stitching 15 Foot control 15 Reverse sewing 16 Dropping the machine feed 16 Presser bar lifter 17 Stopmatic control 17 Dual feed 18/19 Sewing over cross seams Electronic control Changing the needle Changing the sewing foot Regulating the thread tensions Detachable workplate Felling Hemming Zipper insertion...

Owner's Manual
Page 4
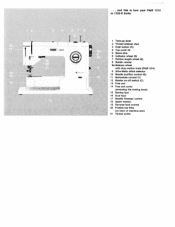
... parts of tour Pfaff 1213: 1 Take-up lever 2 Thread retainer stud 3 Push button (K) 4 Top cover lid 5 Spool pins 6 Indicator wheel (S) 7 Pattern length wheel (E) 8 Bobbin winder Ba Balance wheel with stop motion knob 9 Ultra-Matic stitch selector 10 Needle position control (D) 11 Buttonhole control () 12 Master... on-off switch (C) 13 Base (of portable machInes) 14 Bed cover 15 Sewing foot 16 Dualfeed 17 Needle threader control 18 Upper tension 19 Reverse-teed control 20 Presser bar lifter (on back of ...
... parts of tour Pfaff 1213: 1 Take-up lever 2 Thread retainer stud 3 Push button (K) 4 Top cover lid 5 Spool pins 6 Indicator wheel (S) 7 Pattern length wheel (E) 8 Bobbin winder Ba Balance wheel with stop motion knob 9 Ultra-Matic stitch selector 10 Needle position control (D) 11 Buttonhole control () 12 Master... on-off switch (C) 13 Base (of portable machInes) 14 Bed cover 15 Sewing foot 16 Dualfeed 17 Needle threader control 18 Upper tension 19 Reverse-teed control 20 Presser bar lifter (on back of ...
Owner's Manual
Page 5
... Balance wheel with stop motion knob (Pfaff 1214) 9 Ultra-Matic stitch selector 10 Needle position control (D) 11 Buttonhole control (1) 12 Master on-off switch (C) 13 Free arm 14 Free arm cover (enclosing the sewing hook) 15 Sewing foot 16 Dualfeed 17 Needle threader control 18 Upper tension 19 Reverse-feed control 20 Presser bar lifter (on back...
... Balance wheel with stop motion knob (Pfaff 1214) 9 Ultra-Matic stitch selector 10 Needle position control (D) 11 Buttonhole control (1) 12 Master on-off switch (C) 13 Free arm 14 Free arm cover (enclosing the sewing hook) 15 Sewing foot 16 Dualfeed 17 Needle threader control 18 Upper tension 19 Reverse-feed control 20 Presser bar lifter (on back...
Owner's Manual
Page 6
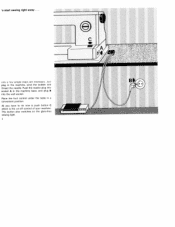
only a few simple steps are necessary. Just plug in the machine base, and plug B into socket A in the machine, wind the bobbin and thread the needle. Push the master plug into the wall socket. Place the foot control under the table in a convenient position. All you have to do now is push button C which is the on-off control of your machine This button also switches on the glare-free sewing light. 4 Th. o start sewing right away.
only a few simple steps are necessary. Just plug in the machine base, and plug B into socket A in the machine, wind the bobbin and thread the needle. Push the master plug into the wall socket. Place the foot control under the table in a convenient position. All you have to do now is push button C which is the on-off control of your machine This button also switches on the glare-free sewing light. 4 Th. o start sewing right away.
Owner's Manual
Page 9
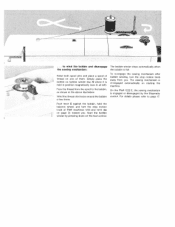
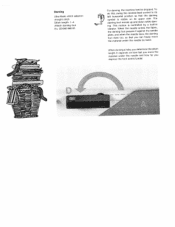
... place a spool of thread on one of Pfaft machines 1213 and 1214 (8a on page 2> toward you . For details please refer to the bobbin, as shown in position magnetically (see ill, at leffl. Simply place the bobbin on the foot control. Push lever E against the bobbin, hold the balance wheel, and... turn the stop motion knob of them. Pass the thread from you . The sewing mechanism is re-engaged automatically on starting the machine, On the Pfaff 1222-E, the sewing mechanism is engaged ...
... place a spool of thread on one of Pfaft machines 1213 and 1214 (8a on page 2> toward you . For details please refer to the bobbin, as shown in position magnetically (see ill, at leffl. Simply place the bobbin on the foot control. Push lever E against the bobbin, hold the balance wheel, and... turn the stop motion knob of them. Pass the thread from you . The sewing mechanism is re-engaged automatically on starting the machine, On the Pfaff 1222-E, the sewing mechanism is engaged ...
Owner's Manual
Page 15
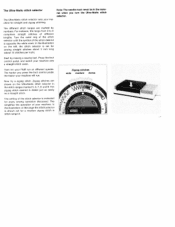
...the stitch desired is indicated for a medium zigzag stitch in the stitch ranges marked 5, 6, 7, 8 and 9. Start by numbers. Press the foot control pedal, and watch your machine. For instance, the range from 0 to 4 comprises straight stitches of the stitch selector is opposite the white ...mark. The Ultra-Matic stitch selector The Ultra-Matic stitch selector sets your Pfaff run . In the illustration on the Ultra-Matic stitch selector in stitch range 8. -U. The different stitch ranges are shown on the...
...the stitch desired is indicated for a medium zigzag stitch in the stitch ranges marked 5, 6, 7, 8 and 9. Start by numbers. Press the foot control pedal, and watch your machine. For instance, the range from 0 to 4 comprises straight stitches of the stitch selector is opposite the white ...mark. The Ultra-Matic stitch selector The Ultra-Matic stitch selector sets your Pfaff run . In the illustration on the Ultra-Matic stitch selector in stitch range 8. -U. The different stitch ranges are shown on the...
Owner's Manual
Page 19
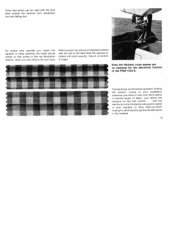
... machine to sew over thick seams or several layers of fabric. Just relieve the pressure on the foot control . . . and the electronic control instantly reduces the speed of the Pfaff 1222-E. No matter how carefully you have to slow stitchbystitch sewing for stitching through the thickest spots in...cross seams are no obstade for the dectronic Control of your assistance whenever you match the squares or other patterns, the result will be used with the dual feed include the hemmer foot, blindstitch foot and felling foot. The electronic control which can be similar to that shown in ...
... machine to sew over thick seams or several layers of fabric. Just relieve the pressure on the foot control . . . and the electronic control instantly reduces the speed of the Pfaff 1222-E. No matter how carefully you have to slow stitchbystitch sewing for stitching through the thickest spots in...cross seams are no obstade for the dectronic Control of your assistance whenever you match the squares or other patterns, the result will be used with the dual feed include the hemmer foot, blindstitch foot and felling foot. The electronic control which can be similar to that shown in ...
Owner's Manual
Page 26
... it against the needle plate, and when the needle rises, the darning foot rises too, so that the darning symbol is controlled by hand. The darning foot moves up and down while darn ing. When darning a hole, you depress the foot control pedal. It depends on its left horizontal position so that you can freely... move the material under the needle and how far you determine the stitch length. Darning Ultra-Matic stitch selector: straight stitch Stitch length: 1-4 Attach darning foot No. 93-040 960-91. 3 For darning, the machine feed is dropped.
... it against the needle plate, and when the needle rises, the darning foot rises too, so that the darning symbol is controlled by hand. The darning foot moves up and down while darn ing. When darning a hole, you depress the foot control pedal. It depends on its left horizontal position so that you can freely... move the material under the needle and how far you determine the stitch length. Darning Ultra-Matic stitch selector: straight stitch Stitch length: 1-4 Attach darning foot No. 93-040 960-91. 3 For darning, the machine feed is dropped.

Owner's Manual
Page 38
... ewhig buttonhoes Mtach buttonhole too \Io. 93-040 924-91. Begin by sewing the right seam according to sew the second bartack. 5, Release control T. The machine is thus set the machine for a medium stitch density (see ill above , center). When you have sewn all jecorative and ...-stitch outtons are out (see ill, above the setting mark. Now you turn the outer ring of the foot, and place both ends. 6. above , center). Lower the foot. Push buttonhole control T down again to the buttonhole length marked. 2. Pull the filler cord into place again with your seam ...
... ewhig buttonhoes Mtach buttonhole too \Io. 93-040 924-91. Begin by sewing the right seam according to sew the second bartack. 5, Release control T. The machine is thus set the machine for a medium stitch density (see ill above , center). When you have sewn all jecorative and ...-stitch outtons are out (see ill, above the setting mark. Now you turn the outer ring of the foot, and place both ends. 6. above , center). Lower the foot. Push buttonhole control T down again to the buttonhole length marked. 2. Pull the filler cord into place again with your seam ...


