

Owner's Manual
Page 3
Instructions CPFAFFi and 95 Foreword Your new Pfaff sewing machine will always enjoy sewing with your Pfaff. We hope you will enable you at any sewing problems, please do not hesitate to contact your machine. We suggest that you will be glad to help you to familiarize you have any time. This instruction book has been com piled...
Instructions CPFAFFi and 95 Foreword Your new Pfaff sewing machine will always enjoy sewing with your Pfaff. We hope you will enable you at any sewing problems, please do not hesitate to contact your machine. We suggest that you will be glad to help you to familiarize you have any time. This instruction book has been com piled...
Owner's Manual
Page 4
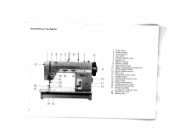
Essential Parts of Your Pfaff 94 345j64 17 16 15 -=------',w- - 14 13 2 1 Face cover 2 Take-up lever 3 Thread guide 4 Top cover 5 Thread retainer stud 6 Spool pins 7 Bobbin winder 8 Balance wheel 9 Stop motion knob 9 10 11 Motor Stitch disengaging length control mechanism 12 Reverse feed control 13 Bed cover 14 Transverse rotary hook 15 Needle plate 16 Sewing foot thumb screw 17 Light switch 18 Stitch width control 19 Needle position lever 20 Needle thread tension 21 Presser bar lifter (on back of machine arm) 22 Needle set screw 23 Sewing foot
Essential Parts of Your Pfaff 94 345j64 17 16 15 -=------',w- - 14 13 2 1 Face cover 2 Take-up lever 3 Thread guide 4 Top cover 5 Thread retainer stud 6 Spool pins 7 Bobbin winder 8 Balance wheel 9 Stop motion knob 9 10 11 Motor Stitch disengaging length control mechanism 12 Reverse feed control 13 Bed cover 14 Transverse rotary hook 15 Needle plate 16 Sewing foot thumb screw 17 Light switch 18 Stitch width control 19 Needle position lever 20 Needle thread tension 21 Presser bar lifter (on back of machine arm) 22 Needle set screw 23 Sewing foot
Owner's Manual
Page 5
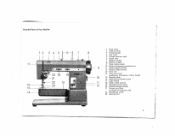
Essential Parts of Your Pfaff 95 17 1 Face cover 2 Take-up lever 3 Thread guide 4 Top cover 5 Thread retainer stud 6 Spool pins 7 Bobbin winder 8 Balance wheel 9 Stop motion knob 10 Motor disengaging mechanism 9 11 Stitch length contro' 12 Reverse feed control 13 Free arm 14 Free arm cover (enclosing transverse rotary hook) 10 15 Needle plate 16 Sewing foot thumb screw 17 Light switch 11 18 Stitch width control 19 20 Needle position lever Needle thread tension 21 Presser bar lifter (on back of machine arm) 22 Needle set screw 23 Sewing foot ii 3
Essential Parts of Your Pfaff 95 17 1 Face cover 2 Take-up lever 3 Thread guide 4 Top cover 5 Thread retainer stud 6 Spool pins 7 Bobbin winder 8 Balance wheel 9 Stop motion knob 10 Motor disengaging mechanism 9 11 Stitch length contro' 12 Reverse feed control 13 Free arm 14 Free arm cover (enclosing transverse rotary hook) 10 15 Needle plate 16 Sewing foot thumb screw 17 Light switch 11 18 Stitch width control 19 20 Needle position lever Needle thread tension 21 Presser bar lifter (on back of machine arm) 22 Needle set screw 23 Sewing foot ii 3

Owner's Manual
Page 6
To on switch on the back of the machine and the plug at the other end of the cord into the wall outlet. The harder you press, the faster the machine will run. 4 Preparing Your Machine for Sewing Push plug A into the receptacle on the the face cover sewlight, (see ill.). push the button Place the your machine is foot-operated, push the plug of the pedal. If your foot foot control and depress within easy reach of the sewlight cord into the wall out let.
To on switch on the back of the machine and the plug at the other end of the cord into the wall outlet. The harder you press, the faster the machine will run. 4 Preparing Your Machine for Sewing Push plug A into the receptacle on the the face cover sewlight, (see ill.). push the button Place the your machine is foot-operated, push the plug of the pedal. If your foot foot control and depress within easy reach of the sewlight cord into the wall out let.

Owner's Manual
Page 7
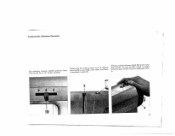
To engage the motor, flick this lever to its top position. After you have completed sewing, flick this lever down. Power-driven machines feature a lever (10) underneath the balance wheel which serves to swing the motor to its operative position. With the motor swung out of engagement, oil machines fitted with a treadle mechanism con be driven by foot power. 5
To engage the motor, flick this lever to its top position. After you have completed sewing, flick this lever down. Power-driven machines feature a lever (10) underneath the balance wheel which serves to swing the motor to its operative position. With the motor swung out of engagement, oil machines fitted with a treadle mechanism con be driven by foot power. 5
Owner's Manual
Page 15
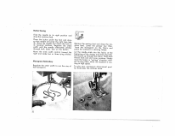
As you the stop motion do this, knob is at its highest after you check to make tightened firm ly. Always rotate balance wheel see sure arrow). Fundamentals of Machine Operation For (19) ordinary sewing, should be in its needle position center position, lever Make point sure the take-up lever before you begin and is (8) toward you have completed a seam (2).
As you the stop motion do this, knob is at its highest after you check to make tightened firm ly. Always rotate balance wheel see sure arrow). Fundamentals of Machine Operation For (19) ordinary sewing, should be in its needle position center position, lever Make point sure the take-up lever before you begin and is (8) toward you have completed a seam (2).

Owner's Manual
Page 16
...) to the right as far as it will run. 14 The harder you press, the faster the machine will go. Place the material under the sewing foot and lower the presser bar lifter. For ordinary sewing operations, set the stitch length control on the left-hand side of your foot and depress the... pedal. The stitch length is regulated by sewing a straight-stitch seam. Place the foot control within easy reach of the slot. Begin by turning stitch length control (11). The number indi cating the ...
...) to the right as far as it will run. 14 The harder you press, the faster the machine will go. Place the material under the sewing foot and lower the presser bar lifter. For ordinary sewing operations, set the stitch length control on the left-hand side of your foot and depress the... pedal. The stitch length is regulated by sewing a straight-stitch seam. Place the foot control within easy reach of the slot. Begin by turning stitch length control (11). The number indi cating the ...

Owner's Manual
Page 28
Make sure the needle takes one stitch into the fabric and the other over its maxi mum stitch width. This will cover the fabric edge securely. 26 uStitch length: 2 838 954 To overcast the edges of medium width. Overcasting Edges with a zigzag stitch of light and mediumweight fabrics, set the machine for its edge. Soft and flimsy fabrics are best overcast with Zigzag Stitches Attach ordinary sewing foot.
Make sure the needle takes one stitch into the fabric and the other over its maxi mum stitch width. This will cover the fabric edge securely. 26 uStitch length: 2 838 954 To overcast the edges of medium width. Overcasting Edges with a zigzag stitch of light and mediumweight fabrics, set the machine for its edge. Soft and flimsy fabrics are best overcast with Zigzag Stitches Attach ordinary sewing foot.

Owner's Manual
Page 32
To obtain more prominent buttonholes, place a filler cord of the sewing foot. Sewing Buttonholes Attach buttonhole foot No. 847616 to its left groove of medium size in the left position and put the stitch width control in notch R 1 (see ill.). Allpurpose sewing foot No. 91-100179-00 may also be used for this operation. 30 3 4 Flick the needle to the machine. For heavier threads, slightly increase the stitch length. When using No. 50 embroidery thread, set the stitch length control so that both dots are opposite each other (see ill.).
To obtain more prominent buttonholes, place a filler cord of the sewing foot. Sewing Buttonholes Attach buttonhole foot No. 847616 to its left groove of medium size in the left position and put the stitch width control in notch R 1 (see ill.). Allpurpose sewing foot No. 91-100179-00 may also be used for this operation. 30 3 4 Flick the needle to the machine. For heavier threads, slightly increase the stitch length. When using No. 50 embroidery thread, set the stitch length control so that both dots are opposite each other (see ill.).
Owner's Manual
Page 34
... Move right the and stitch make width two or control toward the three tying stitches. mastLoeeownrwioiangelgrrainmfthodeoatornpnarinendtsghseedhrroofoapbpbasrtr.ihcelifamtnedra. qual Li 32 width to its drop the machine feed. Button Sewing Flick the needle to suit the size of 93100179 pTRclhreaaimcnceeeovtefhteheetehdme.
... Move right the and stitch make width two or control toward the three tying stitches. mastLoeeownrwioiangelgrrainmfthodeoatornpnarinendtsghseedhrroofoapbpbasrtr.ihcelifamtnedra. qual Li 32 width to its drop the machine feed. Button Sewing Flick the needle to suit the size of 93100179 pTRclhreaaimcnceeeovtefhteheetehdme.

Owner's Manual
Page 39
The raceway in the sewing hook is the most important oiling point. From time to time, put a drop of oil into the hook raceway (see ill, at left . Since your Pfaff sewing mochines has been mode from high-grade materials, there ore only o few oiling points left and center). Pfaff 94 37 Do not oil the bobbin winder. Machine Care Longevity and smooth machine performance are dependent on regular cleaning and pro per oiling.
The raceway in the sewing hook is the most important oiling point. From time to time, put a drop of oil into the hook raceway (see ill, at left . Since your Pfaff sewing mochines has been mode from high-grade materials, there ore only o few oiling points left and center). Pfaff 94 37 Do not oil the bobbin winder. Machine Care Longevity and smooth machine performance are dependent on regular cleaning and pro per oiling.

Owner's Manual
Page 40
To this end, re move the needle, the sewing foot and the bobbin case with a soft brush. Pfaff 94 machines are tilted back. ii. - 38 3 On port able machines, loosen the screw on the bottom of the arm (1 & 2). From time to time, clean the parts in the machine arm and in the vicinity of the sew ing hook with the bobbin. On Pfaff 95 machines, loosen the set screw, lift the front of the free arm cover and pull the cover out lengthwise of the machine base and tilt the machine back cautiously (3).
To this end, re move the needle, the sewing foot and the bobbin case with a soft brush. Pfaff 94 machines are tilted back. ii. - 38 3 On port able machines, loosen the screw on the bottom of the arm (1 & 2). From time to time, clean the parts in the machine arm and in the vicinity of the sew ing hook with the bobbin. On Pfaff 95 machines, loosen the set screw, lift the front of the free arm cover and pull the cover out lengthwise of the machine base and tilt the machine back cautiously (3).
Owner's Manual
Page 41
...of thread wedged between the tension discs. • The Pfaff rotary hook will hardly develop any trouble. Please remember to restore the normal set ting after you have completed your sewing ma chine will not normally jam even if the machine should be balanced correctly. • Don't farce the... thread from the Needle and Thread Chart. • Check whether the needle has been threaded correctly. • Use only high-grade machine thread or sewing silk. • Check to see that the bobbin case has been inserted correctly. • Both tensions must be handled improperly. Trouble...
...of thread wedged between the tension discs. • The Pfaff rotary hook will hardly develop any trouble. Please remember to restore the normal set ting after you have completed your sewing ma chine will not normally jam even if the machine should be balanced correctly. • Don't farce the... thread from the Needle and Thread Chart. • Check whether the needle has been threaded correctly. • Use only high-grade machine thread or sewing silk. • Check to see that the bobbin case has been inserted correctly. • Both tensions must be handled improperly. Trouble...

Owner's Manual
Page 42
... Darning 18 Darning Foot 18 Drawing Up the Bobbin Thread 12 Dropping the Machine Feed 18 Electrical Equipment 4 Engaging and Disengaging the Sewing Mechanism 7 Essential Parts of Pfaff 94 2 Essential Parts of Pfaff 95 3 Flat Felled Seams 21 Foot Control Foreword Fundamentals of Machine Operation 13 Hemming 22 Hemstitching 24 Inserting a Full Bobbin B Inserting Lace 28...
... Darning 18 Darning Foot 18 Drawing Up the Bobbin Thread 12 Dropping the Machine Feed 18 Electrical Equipment 4 Engaging and Disengaging the Sewing Mechanism 7 Essential Parts of Pfaff 94 2 Essential Parts of Pfaff 95 3 Flat Felled Seams 21 Foot Control Foreword Fundamentals of Machine Operation 13 Hemming 22 Hemstitching 24 Inserting a Full Bobbin B Inserting Lace 28...


