
Owner's Manual
Page 8
Contents Page Accessories ...6 Accessories, optional 62, 63 Accessory box...6 Adjusting the machine to Prog. 01, 02 34, 35 Changing a spool on a threaded machine 24 Clamp spring...29 Cleaning the machine 58 Cone thread ...
Contents Page Accessories ...6 Accessories, optional 62, 63 Accessory box...6 Adjusting the machine to Prog. 01, 02 34, 35 Changing a spool on a threaded machine 24 Clamp spring...29 Cleaning the machine 58 Cone thread ...
Owner's Manual
Page 10
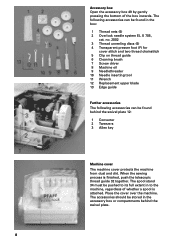
... Cleaning brush 7 Screw driver 8 Machine oil 9 Needlethreader 10 Needle inserting tool 11 Wrench 12 Replacement upper blade 13 Edge guide Further accessories The following accessories can be pushed to its full extent in to the machine, regardless of the box inwards. When the sewing process is attached. The... spool stand 34 must be found in the accessory box or compartments behind the swivel plate 12: 1 Converter 2 Tweezers 3 Allen key Machine cover The machine cover protects the machine from ...
... Cleaning brush 7 Screw driver 8 Machine oil 9 Needlethreader 10 Needle inserting tool 11 Wrench 12 Replacement upper blade 13 Edge guide Further accessories The following accessories can be pushed to its full extent in to the machine, regardless of the box inwards. When the sewing process is attached. The... spool stand 34 must be found in the accessory box or compartments behind the swivel plate 12: 1 Converter 2 Tweezers 3 Allen key Machine cover The machine cover protects the machine from ...
Owner's Manual
Page 13
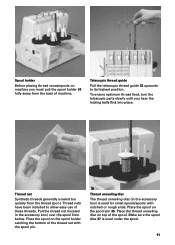
Thread unreeling disc The thread unreeling disc (in the accessory box) over the spool from the thread spool. Thread net Synthetic threads generally unwind too quickly from below. Place the spool on the spool holder ... telescopic thread guide 32 upwards to allow easy use of the thread net with notched or rough ends. Pull the thread net (located in the accessory box) is used for small spools/spools with the spool pin. Place the spool on the spool pin 35. Spool holder Before placing thread cones...
Thread unreeling disc The thread unreeling disc (in the accessory box) over the spool from the thread spool. Thread net Synthetic threads generally unwind too quickly from below. Place the spool on the spool holder ... telescopic thread guide 32 upwards to allow easy use of the thread net with notched or rough ends. Pull the thread net (located in the accessory box) is used for small spools/spools with the spool pin. Place the spool on the spool pin 35. Spool holder Before placing thread cones...
Owner's Manual
Page 14
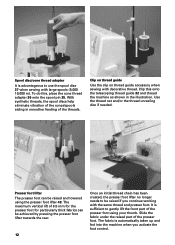
... threads, the spool discs help eliminate vibration of the cones/spools aiding in the illustration. Clip on thread guide Use the clip on thread guide accessory when sewing with the same thread and presser foot. Slide the fabric under the raised part of the threads. Presser foot lifter The presser foot...
... threads, the spool discs help eliminate vibration of the cones/spools aiding in the illustration. Clip on thread guide Use the clip on thread guide accessory when sewing with the same thread and presser foot. Slide the fabric under the raised part of the threads. Presser foot lifter The presser foot...
Owner's Manual
Page 15
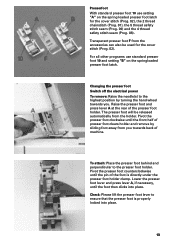
... the presser foot behind and perpendicular to ensure that the presser foot is directly under the presser foot holder clamp. Transparent presser foot F from the accessories can also be released automatically from you . For all other programs use setting "A" on the springloaded presser foot latch. Pivot the presser foot clockwise until...
... the presser foot behind and perpendicular to ensure that the presser foot is directly under the presser foot holder clamp. Transparent presser foot F from the accessories can also be released automatically from you . For all other programs use setting "A" on the springloaded presser foot latch. Pivot the presser foot clockwise until...

Owner's Manual
Page 17
... move the needle(s) to remove. To insert: Insert the needle into the holder and tighten the fastening screws. Push the needle inserting tool (from the accessory box 49) from below upward fully over the needle. Loosen the fastening screw of the inserting tool. Remove the needle inserting tool. Insert the needle...
... move the needle(s) to remove. To insert: Insert the needle into the holder and tighten the fastening screws. Push the needle inserting tool (from the accessory box 49) from below upward fully over the needle. Loosen the fastening screw of the inserting tool. Remove the needle inserting tool. Insert the needle...

Owner's Manual
Page 29
Place the needle threader onto the front groove of the two triangles must be pulled to be found in notch A of the needle threader (to the back. 27 A small metal pin is pushed through the needle eye and the needle is automatically threaded. Thread loops must point upwards. Needle threader Move the needle(s) into the highest position and lower the presser foot. One of the needle. Place the thread from right to left in the accessory box). Slide the needle threader down to the needle eye and press it lightly against the needle.
Place the needle threader onto the front groove of the two triangles must be pulled to be found in notch A of the needle threader (to the back. 27 A small metal pin is pushed through the needle eye and the needle is automatically threaded. Thread loops must point upwards. Needle threader Move the needle(s) into the highest position and lower the presser foot. One of the needle. Place the thread from right to left in the accessory box). Slide the needle threader down to the needle eye and press it lightly against the needle.
Owner's Manual
Page 48
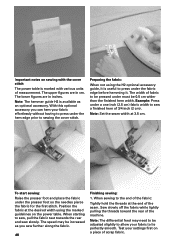
... fabric: Tightly hold the threads at the end of fabric to be pressed under a one inch (2.5 cm) fabric width to be increased as an optional accessory. The width of the seam. Example: Press under must be 0.5 cm wider than the finished hem width. Position the fabric at 3.5 cm.... with various units of 3/4 inch (2 cm). Test your fabric to allow your settings first on a piece of the machine. With this optional accessory you sew further along the fabric. 46 Finishing sewing: 1. To start sewing: Raise the presser foot and place the fabric under the fabric edge before...
... fabric: Tightly hold the threads at the end of fabric to be pressed under a one inch (2.5 cm) fabric width to be increased as an optional accessory. The width of the seam. Example: Press under must be 0.5 cm wider than the finished hem width. Position the fabric at 3.5 cm.... with various units of 3/4 inch (2 cm). Test your fabric to allow your settings first on a piece of the machine. With this optional accessory you sew further along the fabric. 46 Finishing sewing: 1. To start sewing: Raise the presser foot and place the fabric under the fabric edge before...
Owner's Manual
Page 49
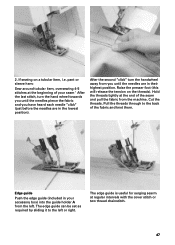
... chainstitch. 47 Pull the threads through to the left . The edge guide can be set as required by sliding it to the back of your accessory box) into the guide holder A from you have heard each needle "click" (just before the needles are in the lowest position). 2. pant or sleeve hem...
... chainstitch. 47 Pull the threads through to the left . The edge guide can be set as required by sliding it to the back of your accessory box) into the guide holder A from you have heard each needle "click" (just before the needles are in the lowest position). 2. pant or sleeve hem...

Owner's Manual
Page 62
Machine maintenance Cleaning the machine Switch off the electrical power Move the upper overedge looper into its highest position. One or two drops of PFAFF sewing machine oil are manufactured from special materials and do not require any waste thread from time to remove any lubrication. 60 Cleaning the rubber .... Disengage the upper blade (see page 30) and remove the presser foot and the needle plate. Lubricate the points shown above with alcohol. Use the accessory brush provided to time with the oil provided (located in the...
Machine maintenance Cleaning the machine Switch off the electrical power Move the upper overedge looper into its highest position. One or two drops of PFAFF sewing machine oil are manufactured from special materials and do not require any waste thread from time to remove any lubrication. 60 Cleaning the rubber .... Disengage the upper blade (see page 30) and remove the presser foot and the needle plate. Lubricate the points shown above with alcohol. Use the accessory brush provided to time with the oil provided (located in the...

Owner's Manual
Page 63
... front edge of the upper blade must be 0.5 to the movable upper blade. 61 Then turn the handwheel until the upper blade is in the accessory box. To insert: Attach the new upper blade and gently tighten the fastening screw. Loosen the screw to 1.0 mm lower than the cutting edge of...
... front edge of the upper blade must be 0.5 to the movable upper blade. 61 Then turn the handwheel until the upper blade is in the accessory box. To insert: Attach the new upper blade and gently tighten the fastening screw. Loosen the screw to 1.0 mm lower than the cutting edge of...

Owner's Manual
Page 64
Guide the new light bulb (max. 15 W) into the socket and twist until both pins on the bulb click into the socket, twisting it clockwise until the cover can be removed. Press the bulb right into place. Rotate counter clockwise through half a turn and remove. Push the light bulb fully into its socket. Changing the light bulb Switch off the electrical power Using the screw driver in the accessory box loosen the fastening screw to the sewing light cover 16 until it is securely fixed. Replace the sewing light cover and tighten the fastening screw. 62
Guide the new light bulb (max. 15 W) into the socket and twist until both pins on the bulb click into the socket, twisting it clockwise until the cover can be removed. Press the bulb right into place. Rotate counter clockwise through half a turn and remove. Push the light bulb fully into its socket. Changing the light bulb Switch off the electrical power Using the screw driver in the accessory box loosen the fastening screw to the sewing light cover 16 until it is securely fixed. Replace the sewing light cover and tighten the fastening screw. 62
Owner's Manual
Page 66
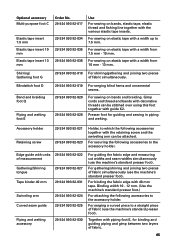
...PFAFF dealer. Lace and braiding guide Hl 29 924 993 82-003 Guide for applying lace or braiding (to the under one inch while serging. Use transparent presser foot F from the accessory box. Use transparent presser foot F from the accessory box. Optional accessories This machine offers a wide range of optional accessories...Bead needle plate P 29 924 993 82-016 The bead needle plate P together with various widths of the fabric). Optional accessory Order No. Guide for hemming/turns under side of fabric with the cording tomgue K1 and the guide K2 Cording tongue Kl...
...PFAFF dealer. Lace and braiding guide Hl 29 924 993 82-003 Guide for applying lace or braiding (to the under one inch while serging. Use transparent presser foot F from the accessory box. Use transparent presser foot F from the accessory box. Optional accessories This machine offers a wide range of optional accessories...Bead needle plate P 29 924 993 82-016 The bead needle plate P together with various widths of the fabric). Optional accessory Order No. Guide for hemming/turns under side of fabric with the cording tomgue K1 and the guide K2 Cording tongue Kl...
Owner's Manual
Page 67
... on elastic tape with a width from 10 mm - 13 mm. For binding the fabric edge with guide K2. For serging a curved piece to the accessory holder. For sewing on elastic tape with units 29 924 993 82-022 of fabric simultaneously (use the machine's standard presser foot). For gathering/shirring...Use For sewing on bands, elastic tape, elastic thread and fishing line together with the retaining screw and the swiveling arm can be attached. Accessory holder Retaining screw 29 924 993 82-021 29 924 993 82-023 Holder, to 7.5 mm. Edge guide with a width up to which the...
... on elastic tape with a width from 10 mm - 13 mm. For binding the fabric edge with guide K2. For serging a curved piece to the accessory holder. For sewing on elastic tape with units 29 924 993 82-022 of fabric simultaneously (use the machine's standard presser foot). For gathering/shirring...Use For sewing on bands, elastic tape, elastic thread and fishing line together with the retaining screw and the swiveling arm can be attached. Accessory holder Retaining screw 29 924 993 82-021 29 924 993 82-023 Holder, to 7.5 mm. Edge guide with a width up to which the...
Owner's Manual
Page 68
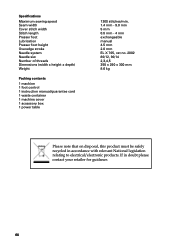
... Needle system Needle siw Number of threads Dimensions (width x height x depth) Weight Packing contents 1 machine 1 foot control 1 instruction manual/guarantee card 1 waste container 1 machine cover 1 accessory box 1 power table 1300 stitches/min. 1.4 mm - 9.0 mm 5 mm 0.5 mm - 4 mm exchangeable manual 4.5 mm 2.0 mm EL X 705, cat no. 2002 80/12, 90/14 2,3,4,5 355...
... Needle system Needle siw Number of threads Dimensions (width x height x depth) Weight Packing contents 1 machine 1 foot control 1 instruction manual/guarantee card 1 waste container 1 machine cover 1 accessory box 1 power table 1300 stitches/min. 1.4 mm - 9.0 mm 5 mm 0.5 mm - 4 mm exchangeable manual 4.5 mm 2.0 mm EL X 705, cat no. 2002 80/12, 90/14 2,3,4,5 355...

Owner's Manual
Page 70
Parts of the coverlock 4852 31 Thread guides with color coding 32 Telescoping thread guide 33 Thread chain cutter 34 Thread spool stand 35 Thread spool pin 36 Cone thread adapter 37 Spool disc 38 Electrical power master switch 39 Machine socket, foot control 40 Handwheel 41 Regulator wheel for differential feed 42 Stitch length adjustment knob 43 Presser foot lifter 44 Rear thread guides 45 Waste container 46 Foot control 47 Foot control plug for machine 48 Power cord 49 Accessory box 50 Power table
Parts of the coverlock 4852 31 Thread guides with color coding 32 Telescoping thread guide 33 Thread chain cutter 34 Thread spool stand 35 Thread spool pin 36 Cone thread adapter 37 Spool disc 38 Electrical power master switch 39 Machine socket, foot control 40 Handwheel 41 Regulator wheel for differential feed 42 Stitch length adjustment knob 43 Presser foot lifter 44 Rear thread guides 45 Waste container 46 Foot control 47 Foot control plug for machine 48 Power cord 49 Accessory box 50 Power table


