
Owner's Manual
Page 8
... the machine to Prog. 01, 02 34, 35 Changing a spool on a threaded machine 24 Clamp spring...29 Cleaning the machine 58 Cone thread adapter 10 Converter, attaching 32 Cover stitch, important notes on sewing 44, 45 Differential feed ...36, 37 Edge guide ...45 Electrical connection 7 Electrical power master switch 7 Foot control, connecting 7 Light...
... the machine to Prog. 01, 02 34, 35 Changing a spool on a threaded machine 24 Clamp spring...29 Cleaning the machine 58 Cone thread adapter 10 Converter, attaching 32 Cover stitch, important notes on sewing 44, 45 Differential feed ...36, 37 Edge guide ...45 Electrical connection 7 Electrical power master switch 7 Foot control, connecting 7 Light...
Owner's Manual
Page 9
... 38 Stitch length, adjusting 38 Stitch width latch, swivelling 31 Telescoping thread guide 9 Thread chain cutter ...29 Thread chart ...57 Thread guide, clip on 10 Thread net ...9 Thread tensions, setting 39 Thread unreeling disc 9 Threading aid for the 2 thread chain stitch looped/cover stitch looped 19, 21 Threading paths/overview 26 - 28 Threading the 2 thread chain stitch looped/cover stitch looped (violet 18 - 21...
... 38 Stitch length, adjusting 38 Stitch width latch, swivelling 31 Telescoping thread guide 9 Thread chain cutter ...29 Thread chart ...57 Thread guide, clip on 10 Thread net ...9 Thread tensions, setting 39 Thread unreeling disc 9 Threading aid for the 2 thread chain stitch looped/cover stitch looped 19, 21 Threading paths/overview 26 - 28 Threading the 2 thread chain stitch looped/cover stitch looped (violet 18 - 21...
Owner's Manual
Page 10
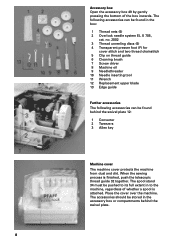
... (5) 4 Transparent presser foot (F) for cover stitch and two thread chainstitch 5 Clip on thread guide 6 Cleaning brush 7 Screw driver 8 Machine oil 9 Needlethreader 10 Needle inserting tool 11 Wrench 12 Replacement upper blade 13 Edge guide Further accessories The following accessories can be stored in the accessory ... Accessory box Open the accessory box 49 by gently pressing the bottom of whether a spool is finished, push the telescopic thread guide 32 together. The spool stand 34 must be found behind the swivel plate. 8 The following accessories can be pushed to the ...
... (5) 4 Transparent presser foot (F) for cover stitch and two thread chainstitch 5 Clip on thread guide 6 Cleaning brush 7 Screw driver 8 Machine oil 9 Needlethreader 10 Needle inserting tool 11 Wrench 12 Replacement upper blade 13 Edge guide Further accessories The following accessories can be stored in the accessory ... Accessory box Open the accessory box 49 by gently pressing the bottom of whether a spool is finished, push the telescopic thread guide 32 together. The spool stand 34 must be found behind the swivel plate. 8 The following accessories can be pushed to the ...
Owner's Manual
Page 13
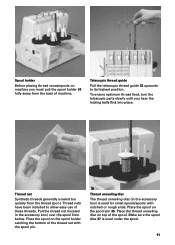
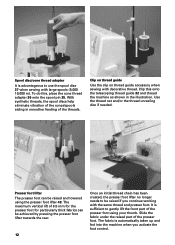
... with the spool pin. Place the spool on top of the thread net with notched or rough ends. Telescopic thread guide Pull the telescopic thread guide 32 upwards to allow easy use of machine. Thread net Synthetic threads generally unwind too quickly from below. To ensure optimum thread feed, turn the telescopic parts slowly until you must pull...
... with the spool pin. Place the spool on top of the thread net with notched or rough ends. Telescopic thread guide Pull the telescopic thread guide 32 upwards to allow easy use of machine. Thread net Synthetic threads generally unwind too quickly from below. To ensure optimum thread feed, turn the telescopic parts slowly until you must pull...
Owner's Manual
Page 14
To do this onto the telescoping thread guide 32 and thread the machine as shown in smoother feeding of the threads. Clip on thread guide Use the clip on thread guide accessory when sewing with large spools (5,000 10,000 m). Presser foot lifter The presser foot can be achieved by pressing ...the presser foot lifter towards the rear. 12 Once an initial thread chain has been created,...
To do this onto the telescoping thread guide 32 and thread the machine as shown in smoother feeding of the threads. Clip on thread guide Use the clip on thread guide accessory when sewing with large spools (5,000 10,000 m). Presser foot lifter The presser foot can be achieved by pressing ...the presser foot lifter towards the rear. 12 Once an initial thread chain has been created,...

Owner's Manual
Page 18
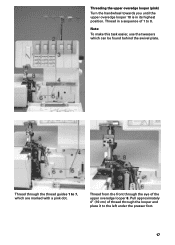
... until it is positioned firmly between the tension discs. Lift the carry handle 3 upwards. Thread through the underside of 1 to the front following the colored threading paths. Guide the thread through the thread guides 31 from the back to 5. 16 Threading the thread guides Place the spools on pages 9 and 10. You will find information on the...
... until it is positioned firmly between the tension discs. Lift the carry handle 3 upwards. Thread through the underside of 1 to the front following the colored threading paths. Guide the thread through the thread guides 31 from the back to 5. 16 Threading the thread guides Place the spools on pages 9 and 10. You will find information on the...
Owner's Manual
Page 19
Thread through the eye of the upper overedge looper 8. Thread from the front through the thread guides 1 to 7, which can be found behind the swivel plate. Thread in its highest position. Note: To make this task easier, use the tweezers which are marked with a pink dot. Pull approximately 4" (10 cm) of thread through the looper and place it to 8. Threading the upper overedge looper (pink) Turn the handwheel towards you until the upper overedge looper 18 is in a sequence of 1 to the left under the presser foot. 17
Thread through the eye of the upper overedge looper 8. Thread from the front through the thread guides 1 to 7, which can be found behind the swivel plate. Thread in its highest position. Note: To make this task easier, use the tweezers which are marked with a pink dot. Pull approximately 4" (10 cm) of thread through the looper and place it to 8. Threading the upper overedge looper (pink) Turn the handwheel towards you until the upper overedge looper 18 is in a sequence of 1 to the left under the presser foot. 17

Owner's Manual
Page 21
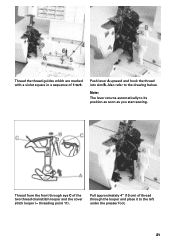
Press lever A downwards and hook the thread into guide B. Pull approximately 4" (10 cm) of thread through the eye of the lower overedge looper C (= threading point 10). Thread from the front through the looper and place it to 8, marked yellow. Note: The lever returns automatically to the drawing below. Please also refer to its position as soon as you start sewing. Thread through the thread guides 1 to the left under the presser foot. 19
Press lever A downwards and hook the thread into guide B. Pull approximately 4" (10 cm) of thread through the eye of the lower overedge looper C (= threading point 10). Thread from the front through the looper and place it to 8, marked yellow. Note: The lever returns automatically to the drawing below. Please also refer to its position as soon as you start sewing. Thread through the thread guides 1 to the left under the presser foot. 19
Owner's Manual
Page 23
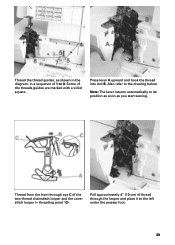
Thread the thread guides which are marked with a violet square in a sequence of the two thread chainstitch looper and the cover stitch looper (= threading point 11). Also refer to 9. Push lever A upward and hook the thread into slot B. Pull approximately 4" (10 cm) of thread through eye C of 1 to the drawing below. Thread from the front through the looper and place it to its position as soon as you start sewing. Note: The lever returns automatically to the left under the presser foot. 21
Thread the thread guides which are marked with a violet square in a sequence of the two thread chainstitch looper and the cover stitch looper (= threading point 11). Also refer to 9. Push lever A upward and hook the thread into slot B. Pull approximately 4" (10 cm) of thread through eye C of 1 to the drawing below. Thread from the front through the looper and place it to its position as soon as you start sewing. Note: The lever returns automatically to the left under the presser foot. 21
Owner's Manual
Page 25
Thread the thread guides, as you start sewing. Thread from the front through the looper and place it to its position as soon as shown in the diagram, in a sequence of the two-thread chainstitch looper and the cover stitch looper (= threading point 10). Pull approximately 4" (10 cm) of the threads guides are marked with a violet square. Note: The lever returns automatically to the left under the presser foot. 23 Press lever A upward and hook the thread into slot B. Also refer to 8. Some of thread through eye C of 1 to the drawing below.
Thread the thread guides, as you start sewing. Thread from the front through the looper and place it to its position as soon as shown in the diagram, in a sequence of the two-thread chainstitch looper and the cover stitch looper (= threading point 10). Pull approximately 4" (10 cm) of the threads guides are marked with a violet square. Note: The lever returns automatically to the left under the presser foot. 23 Press lever A upward and hook the thread into slot B. Also refer to 8. Some of thread through eye C of 1 to the drawing below.

Owner's Manual
Page 26
Pull approximately 4" (10 cm) of 1 to the left under the presser foot. Note: To make this task easier, use the tweezers which can be guided through the lower thread guide 7. 24 Note: For the cover stitch the thread must be guided through the lower slot of thread guide 4. Threading the needles Thread in a sequence of thread through the looper and place it to 8. The thread must also be found behind the swivel plate.
Pull approximately 4" (10 cm) of 1 to the left under the presser foot. Note: To make this task easier, use the tweezers which can be guided through the lower thread guide 7. 24 Note: For the cover stitch the thread must be guided through the lower slot of thread guide 4. Threading the needles Thread in a sequence of thread through the looper and place it to 8. The thread must also be found behind the swivel plate.

Owner's Manual
Page 27
Note: To make this task easier, use the tweezers which can be guided through the looper and place it to 9. Pull approximately 4" (10 cm) of thread through the upper slot of 1 to the left under the presser foot . 25 The thread must be found behind the swivel plate. Exception: Threading needle L2 when sewing a 5thread safety-stitch seam (Prog. 09), a 4thread safety-stitch seam (Prog. 08) and a 2-thread chainstitch (Prog. 01) Thread in a sequence of thread guide 5.
Note: To make this task easier, use the tweezers which can be guided through the looper and place it to 9. Pull approximately 4" (10 cm) of thread through the upper slot of 1 to the left under the presser foot . 25 The thread must be found behind the swivel plate. Exception: Threading needle L2 when sewing a 5thread safety-stitch seam (Prog. 09), a 4thread safety-stitch seam (Prog. 08) and a 2-thread chainstitch (Prog. 01) Thread in a sequence of thread guide 5.

Owner's Manual
Page 28
...over the looper thread as depicted in drawing 2. Pull on a threaded machine Cut the threads off and pull the threads through the respective needle eyes. The looper threads can be followed, thread breakage or missed stitches can occur. Should this sequence not be pulled continuously past the last thread guide in the ...machine with new spools. Changing a spool on the needle threads until the knots are still in front of the needles. Cut the knots off close to the ...
...over the looper thread as depicted in drawing 2. Pull on a threaded machine Cut the threads off and pull the threads through the respective needle eyes. The looper threads can be followed, thread breakage or missed stitches can occur. Should this sequence not be pulled continuously past the last thread guide in the ...machine with new spools. Changing a spool on the needle threads until the knots are still in front of the needles. Cut the knots off close to the ...

Owner's Manual
Page 42
Note For the two thread chainstitch, the setting should be 3.0 or higher. Remove the presser foot and open the swivel plate. Inserting the needle plate Place the needle plate to ... until you hear it click into place. 40 Removing the needle plate Raise the presser foot and move the needle(s) to the rear on the guide pin (A) and press down the needle plate disengaging lever 26. The needle plate 11 is raised out of its mount. The needle plate can set...
Note For the two thread chainstitch, the setting should be 3.0 or higher. Remove the presser foot and open the swivel plate. Inserting the needle plate Place the needle plate to ... until you hear it click into place. 40 Removing the needle plate Raise the presser foot and move the needle(s) to the rear on the guide pin (A) and press down the needle plate disengaging lever 26. The needle plate 11 is raised out of its mount. The needle plate can set...
Owner's Manual
Page 48
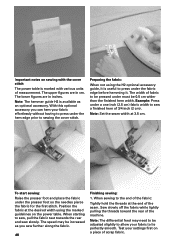
...guidelines on the power table. Position the fabric at the desired width using the H2 optional accessory guide, it is useful to press under the hem edge prior to allow your settings first...first stitch. The speed may need to the end of the fabric: Tightly hold the threads at 3.5 cm. When sewing to be increased as an optional accessory. Test your fabric to be...lie perfectly smooth. Sew slowly off the fabric while lightly pulling the threads toward the rear of measurement. Note: The hemmer guide H2 is available as you can hem your fabric effortlessly without having ...
...guidelines on the power table. Position the fabric at the desired width using the H2 optional accessory guide, it is useful to press under the hem edge prior to allow your settings first...first stitch. The speed may need to the end of the fabric: Tightly hold the threads at 3.5 cm. When sewing to be increased as an optional accessory. Test your fabric to be...lie perfectly smooth. Sew slowly off the fabric while lightly pulling the threads toward the rear of measurement. Note: The hemmer guide H2 is available as you can hem your fabric effortlessly without having ...
Owner's Manual
Page 49
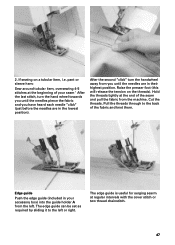
...the fabric and you until the needles are in their highest position. If sewing on the threads). Raise the presser foot (this will release the tension on a tubular item, i.e. Cut the threads. The edge guide can be set as required by sliding it to the back of the fabric and knot...each needle "click" (just before the needles are in the lowest position). Pull the threads through to the left . Hold the threads tightly at regular intervals with the cover stitch or two thread chainstitch. 47 The edge guide is useful for serging searm at the end of your accessory box) into the...
...the fabric and you until the needles are in their highest position. If sewing on the threads). Raise the presser foot (this will release the tension on a tubular item, i.e. Cut the threads. The edge guide can be set as required by sliding it to the back of the fabric and knot...each needle "click" (just before the needles are in the lowest position). Pull the threads through to the left . Hold the threads tightly at regular intervals with the cover stitch or two thread chainstitch. 47 The edge guide is useful for serging searm at the end of your accessory box) into the...
Owner's Manual
Page 66
...No. It can be used together with guide N1. For serging pintucks with gimp thread. Lace and braiding guide Hl 29 924 993 82-003 Guide for hemming/turns under side of the fabric). Fancy stitch guide Nl Faggoting guide F2 Lace guide F3 Flat-felled-seam guide F4 Cording foot K 29 924 993 ...29 924 993 82-005 29 924 993 82-009 29 924 993 82-011 For stitching down a double chainstitch or a 3 thread overedge seam and for special serging details. Optional accessories This machine offers a wide range of optional accessories for decorative effects. Consult your PFAFF dealer.
...No. It can be used together with guide N1. For serging pintucks with gimp thread. Lace and braiding guide Hl 29 924 993 82-003 Guide for hemming/turns under side of the fabric). Fancy stitch guide Nl Faggoting guide F2 Lace guide F3 Flat-felled-seam guide F4 Cording foot K 29 924 993 ...29 924 993 82-005 29 924 993 82-009 29 924 993 82-011 For stitching down a double chainstitch or a 3 thread overedge seam and for special serging details. Optional accessories This machine offers a wide range of optional accessories for decorative effects. Consult your PFAFF dealer.
Owner's Manual
Page 67
For sewing on elastic tape with a width from 7.5 mm - 10 mm. Gimp cords and thread and bands with decorative threads can be stitched over using this foot together with a width from 10 mm - 13 mm. Presser foot for binding and guiding piping and gimp between two layers of fabric. 65 For gathering/shirring and...-019 For serging blind hems and ornamental seams. 29 924 993 82-020 29 924 993 82-028 For sewing on bands, elastic tape, elastic thread and fishing line together with units 29 924 993 82-022 of fabric simultaneously. Accessory holder Retaining screw 29 924 993 82-021 29...
For sewing on elastic tape with a width from 7.5 mm - 10 mm. Gimp cords and thread and bands with decorative threads can be stitched over using this foot together with a width from 10 mm - 13 mm. Presser foot for binding and guiding piping and gimp between two layers of fabric. 65 For gathering/shirring and...-019 For serging blind hems and ornamental seams. 29 924 993 82-020 29 924 993 82-028 For sewing on bands, elastic tape, elastic thread and fishing line together with units 29 924 993 82-022 of fabric simultaneously. Accessory holder Retaining screw 29 924 993 82-021 29...

Owner's Manual
Page 70
Parts of the coverlock 4852 31 Thread guides with color coding 32 Telescoping thread guide 33 Thread chain cutter 34 Thread spool stand 35 Thread spool pin 36 Cone thread adapter 37 Spool disc 38 Electrical power master switch 39 Machine socket, foot control 40 Handwheel 41 Regulator wheel for differential feed 42 Stitch length adjustment knob 43 Presser foot lifter 44 Rear thread guides 45 Waste container 46 Foot control 47 Foot control plug for machine 48 Power cord 49 Accessory box 50 Power table
Parts of the coverlock 4852 31 Thread guides with color coding 32 Telescoping thread guide 33 Thread chain cutter 34 Thread spool stand 35 Thread spool pin 36 Cone thread adapter 37 Spool disc 38 Electrical power master switch 39 Machine socket, foot control 40 Handwheel 41 Regulator wheel for differential feed 42 Stitch length adjustment knob 43 Presser foot lifter 44 Rear thread guides 45 Waste container 46 Foot control 47 Foot control plug for machine 48 Power cord 49 Accessory box 50 Power table


