

Owner's Manual
Page 3
... an electrical appliance, basic safety Read all instructions before cleaning. always be used or where oxygen is being administrated. • To disconnect, turn all moving parts. Always unplug this sewing machine is required around the Sewing machine needle. • Always use bent needles. • Do not pull or push fabric while...
... an electrical appliance, basic safety Read all instructions before cleaning. always be used or where oxygen is being administrated. • To disconnect, turn all moving parts. Always unplug this sewing machine is required around the Sewing machine needle. • Always use bent needles. • Do not pull or push fabric while...

Owner's Manual
Page 4
...switch on the underside of the machine is 5 watts. 4. There are no liability can repair. Only PFAFF original parts may be used for the wrong purpose or incorrectly operated, no parts inside the machine that it is a machine for supervised use in such a way that the user can... against hitting or dropping. When leaving the machine, during work or when changing mechanical parts or accessories, always disconnect the machine from wall socket, grasp the plug close to the wall. An authorized PFAFF mechanic must be put into openings on the machine. 8. condensation which can occur when...
...switch on the underside of the machine is 5 watts. 4. There are no liability can repair. Only PFAFF original parts may be used for the wrong purpose or incorrectly operated, no parts inside the machine that it is a machine for supervised use in such a way that the user can... against hitting or dropping. When leaving the machine, during work or when changing mechanical parts or accessories, always disconnect the machine from wall socket, grasp the plug close to the wall. An authorized PFAFF mechanic must be put into openings on the machine. 8. condensation which can occur when...
Owner's Manual
Page 9
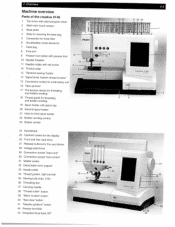
1. Overview Machine overview Parts of the creative 2140 1 Top cover with stitch program chart 2 Multi-color touch screen 3 Base plate 4 Slide for lowering the feed dog 16 5 Connection for knee lifter 6 Hook/bobbin (... Presser toot lifter 43 Integrated Dual feed /IDT ______ 1-1 1920 212223 hrk*y Lt Lti4t1T 4tIItILfhitLoiIrL:3fL 1)3U3tTIfiE fitiltl[iL11 IiR tt 8tI! fl ) tip> 1' )I PFAFF -24 creative 2140 Th dII 28 9I 31129 30 right and left 35 Sewing bulb (max. 5 W) 36 Threading slot 37 Carrying handle 38 "Thread cutter" button 39 "Stitch...
1. Overview Machine overview Parts of the creative 2140 1 Top cover with stitch program chart 2 Multi-color touch screen 3 Base plate 4 Slide for lowering the feed dog 16 5 Connection for knee lifter 6 Hook/bobbin (... Presser toot lifter 43 Integrated Dual feed /IDT ______ 1-1 1920 212223 hrk*y Lt Lti4t1T 4tIItILfhitLoiIrL:3fL 1)3U3tTIfiE fitiltl[iL11 IiR tt 8tI! fl ) tip> 1' )I PFAFF -24 creative 2140 Th dII 28 9I 31129 30 right and left 35 Sewing bulb (max. 5 W) 36 Threading slot 37 Carrying handle 38 "Thread cutter" button 39 "Stitch...

Owner's Manual
Page 10
1-2 50 49 48 51 4 52 1. Overview Parts of the embroidery unit 44 Connection plug to the machine 45 Fastening spigot for fitting to the machine 46 Guide way 47 Release button for ... 50 Release lever for removing the embroidery hoop 51 Embroidery arm 52 Recessed grip for raising and rotating the embroidery arm 53 V 54 - 55 56 Parts of the embroidery hoop 53 Snapin pin 54 Two guide pins for retaining the hoop 55 Ribs for fitting the clips 56 Projections for placing...
1-2 50 49 48 51 4 52 1. Overview Parts of the embroidery unit 44 Connection plug to the machine 45 Fastening spigot for fitting to the machine 46 Guide way 47 Release button for ... 50 Release lever for removing the embroidery hoop 51 Embroidery arm 52 Recessed grip for raising and rotating the embroidery arm 53 V 54 - 55 56 Parts of the embroidery hoop 53 Snapin pin 54 Two guide pins for retaining the hoop 55 Ribs for fitting the clips 56 Projections for placing...

Owner's Manual
Page 12
... for inserting patches. easily fraying fabrics. 24 Overedge stitch For hem overcasting on stretch fabrics. 32 Basting stitch For basting cut-out parts together. 55 47 Linen buttonhole Buttonhole for blouses, shirts and linen. 48 Standard buttonhole Buttonhole for stretchy. appliqué or pinstitch ...overedge stitch Elastic serging stitch with selvage thread 6 20 Closed overedge For joining and serging in one operation. 1-4 1 Overview Stitch overview creative 2140 El El El El El El El El El El El El El El I ii H i '1L IHLU Prog No. 18 Description Quilting.
... for inserting patches. easily fraying fabrics. 24 Overedge stitch For hem overcasting on stretch fabrics. 32 Basting stitch For basting cut-out parts together. 55 47 Linen buttonhole Buttonhole for blouses, shirts and linen. 48 Standard buttonhole Buttonhole for stretchy. appliqué or pinstitch ...overedge stitch Elastic serging stitch with selvage thread 6 20 Closed overedge For joining and serging in one operation. 1-4 1 Overview Stitch overview creative 2140 El El El El El El El El El El El El El El I ii H i '1L IHLU Prog No. 18 Description Quilting.

Owner's Manual
Page 34
... area on the inside of the top cover. Machine Assistant U Arrange the parts in the respective compartments of the accessory tray. Accessory tray Open the accessory tray by placing your left and lift it is flush with numbers. Your Pfaff creative 2140 features 260 different stitches. 2-2 Top cover Open the top cover by placing...
... area on the inside of the top cover. Machine Assistant U Arrange the parts in the respective compartments of the accessory tray. Accessory tray Open the accessory tray by placing your left and lift it is flush with numbers. Your Pfaff creative 2140 features 260 different stitches. 2-2 Top cover Open the top cover by placing...

Owner's Manual
Page 78
...All changes will be saved but the window remains open a window to specify the number of stitches according to close the window without saving your Pfaff creative 2140 and all stitches stored in it , touch I when in the different menus/screens. The number of stitches used to fasten the button are ... the machine. 4-8 Sewing-on buttons With stitch 59, you can also select the program for cutting off is also an explanation about the parts of your settings. The button is sewn with the pre-set to begin sewing immediately after altering settings. Please keep these pages available for...
...All changes will be saved but the window remains open a window to specify the number of stitches according to close the window without saving your Pfaff creative 2140 and all stitches stored in it , touch I when in the different menus/screens. The number of stitches used to fasten the button are ... the machine. 4-8 Sewing-on buttons With stitch 59, you can also select the program for cutting off is also an explanation about the parts of your settings. The button is sewn with the pre-set to begin sewing immediately after altering settings. Please keep these pages available for...

Owner's Manual
Page 105
... A window appears with the query 'Save changes to open the content of your Pfaff creative 2140 and all stitches stored in the different menus/screens. You then simultaneously open a previously saved embroidery combination from a creative memory card or from the machines memory Touch to NEW?' The window with the...marker bar to the directory in a stitch, then touch the icon for which the sewing combination is also an explanation about the parts of the machine memory. The selected sewing combination appears on the screen when you can be embroidered. To use it . Touch ...
... A window appears with the query 'Save changes to open the content of your Pfaff creative 2140 and all stitches stored in the different menus/screens. You then simultaneously open a previously saved embroidery combination from a creative memory card or from the machines memory Touch to NEW?' The window with the...marker bar to the directory in a stitch, then touch the icon for which the sewing combination is also an explanation about the parts of the machine memory. The selected sewing combination appears on the screen when you can be embroidered. To use it . Touch ...

Owner's Manual
Page 117
...as the second red mark. Before starting to a reinforced edge, may sometimes not feed optimally with the Buttonhole foot. Your Pfaff creative 2140 is equipped with gimp thread"). The white plastic part extends over the needle plate. 2. Fabrics that are to be reinforced with the Integrated Dual Feed engaged. Buttonholes are particularly ...or stretch easily should be sewn very close to sew, pull the sliding foot forward as far as velvet, plush. Push the metal part of the buttonhole guide into the slot (between the needle plate and the guide. knitted fabrics and heavy knits.
...as the second red mark. Before starting to a reinforced edge, may sometimes not feed optimally with the Buttonhole foot. Your Pfaff creative 2140 is equipped with gimp thread"). The white plastic part extends over the needle plate. 2. Fabrics that are to be reinforced with the Integrated Dual Feed engaged. Buttonholes are particularly ...or stretch easily should be sewn very close to sew, pull the sliding foot forward as far as velvet, plush. Push the metal part of the buttonhole guide into the slot (between the needle plate and the guide. knitted fabrics and heavy knits.

Owner's Manual
Page 128
... stabilizer is suitable to fit in order to it. It is, above all materials. The spray-on temporary adhesive is suitable for parts which cannot be removed by tearing it off. If the material is of creases. Bulk stabilizers are recommended. The stabilizer can be ...on temporary adhesive For fixing stabilizer temporarily onto a fabric to be embroidered, or hoop the fabric with embroidery unit: Attach the embroidery foot (Creative Fantasy). This adhesive layer prevents the fabric from becoming distorted. If you don't use the embroidery unit: Each stitch is used , for ...
... stabilizer is suitable to fit in order to it. It is, above all materials. The spray-on temporary adhesive is suitable for parts which cannot be removed by tearing it off. If the material is of creases. Bulk stabilizers are recommended. The stabilizer can be ...on temporary adhesive For fixing stabilizer temporarily onto a fabric to be embroidered, or hoop the fabric with embroidery unit: Attach the embroidery foot (Creative Fantasy). This adhesive layer prevents the fabric from becoming distorted. If you don't use the embroidery unit: Each stitch is used , for ...

Owner's Manual
Page 148
... too thick, tack the three layers together so that the fabric is not displaced. • Alternatively, use Adhesive-backed paper, on which you stick the part of the fabric you want to embroider, position the needle above the starting point and embroider the desired design. Embroider on small pieces of fabric...
... too thick, tack the three layers together so that the fabric is not displaced. • Alternatively, use Adhesive-backed paper, on which you stick the part of the fabric you want to embroider, position the needle above the starting point and embroider the desired design. Embroider on small pieces of fabric...

Owner's Manual
Page 156
...8226; Design combinations, which consist of 2-part designs. • Endless border combinations, which always end with number "1" from the creative card. For this part directly against the 1st part design. • Touch - 6 Embroidery Assistant Embroidery combinations Our range of creative cards includes designs, which are characterized ... point. The connecting point is an aid for the "Creative Fantasy Big' hoop, and can be mirrored lengthwise as one desires. This marking line is a long stitch at least 2-part designs and can now be embroidered using the embroidery hoop ...
...8226; Design combinations, which consist of 2-part designs. • Endless border combinations, which always end with number "1" from the creative card. For this part directly against the 1st part design. • Touch - 6 Embroidery Assistant Embroidery combinations Our range of creative cards includes designs, which are characterized ... point. The connecting point is an aid for the "Creative Fantasy Big' hoop, and can be mirrored lengthwise as one desires. This marking line is a long stitch at least 2-part designs and can now be embroidered using the embroidery hoop ...

Owner's Manual
Page 157
.... 6-30 6 Embroidery Assistant Embroider endless borders beyond the length of the hoop Some designs are put together. On a creative card, endless borders can comprise two part designs which the border is to the mutual connecting point. • Check that the needle is positioned directly above the mutual connecting ...the foot control again, the machine continues to the marking slit in the hoop", page 6-29. Our example shows an endless border from creative card 300. If you replace the design with the letter E. For this is positioned at the end of the hoop. This already ...
.... 6-30 6 Embroidery Assistant Embroider endless borders beyond the length of the hoop Some designs are put together. On a creative card, endless borders can comprise two part designs which the border is to the mutual connecting point. • Check that the needle is positioned directly above the mutual connecting ...the foot control again, the machine continues to the marking slit in the hoop", page 6-29. Our example shows an endless border from creative card 300. If you replace the design with the letter E. For this is positioned at the end of the hoop. This already ...

Owner's Manual
Page 191
...combinations position in the hoop, To move " the enlarged combination within a combination, you drag it in the combination you can see the upper part. version 01 0001 Zoom the designs in a combination For easier positioning of the combination you zoom out again step by touching the combination and drag... it to enlarge the designs on what part of the designs within the visible hoop area. If you want to rotate, touch and E then to be used. ESQ Touch the up ...
...combinations position in the hoop, To move " the enlarged combination within a combination, you drag it in the combination you can see the upper part. version 01 0001 Zoom the designs in a combination For easier positioning of the combination you zoom out again step by touching the combination and drag... it to enlarge the designs on what part of the designs within the visible hoop area. If you want to rotate, touch and E then to be used. ESQ Touch the up ...


