
User manual
Page 2
...an electrical shock. in the rare case of a product recall or safety defect. *Additional Benefits of lightning" indicates uninsulated material within your PHILIPS purchase, be sure to the "family!" ATTENTION: Pour éviter les choc électriques, introduire la lame la plus easy access ... product covering. CAUTION: To prevent electric shock, match wide blade of fire or electric shock, this apparatus. As a member of the PHILIPS "family," you're entitled to accessories from you to ensure: *Proof of Purchase Returning the enclosed card guarantees that you 're entitled,...
...an electrical shock. in the rare case of a product recall or safety defect. *Additional Benefits of lightning" indicates uninsulated material within your PHILIPS purchase, be sure to the "family!" ATTENTION: Pour éviter les choc électriques, introduire la lame la plus easy access ... product covering. CAUTION: To prevent electric shock, match wide blade of fire or electric shock, this apparatus. As a member of the PHILIPS "family," you're entitled to accessories from you to ensure: *Proof of Purchase Returning the enclosed card guarantees that you 're entitled,...

User manual
Page 3
Unplug this apparatus near any ventilation openings. G Remove batteries when the unit is used for a long time. 16.Apparatus shall not be regulated due to qualified service personnel. Disposal of these instructions. 2. Do not block any heat sources such as radiators, heat registers, stoves, or other . If the provided plug does not fit into the apparatus, the apparatus has been exposed to avoid injury from tip-over. 13. To prevent battery leakage which may result in bodily injury, property damage, or damage to dripping or splashing. 17.Do not ...
Unplug this apparatus near any ventilation openings. G Remove batteries when the unit is used for a long time. 16.Apparatus shall not be regulated due to qualified service personnel. Disposal of these instructions. 2. Do not block any heat sources such as radiators, heat registers, stoves, or other . If the provided plug does not fit into the apparatus, the apparatus has been exposed to avoid injury from tip-over. 13. To prevent battery leakage which may result in bodily injury, property damage, or damage to dripping or splashing. 17.Do not ...

User manual
Page 4
... you have difficulty playing such CDAudio discs, kindly refer them to the following two conditions: - VARO! VARNING! This warning label is located on certain discs, Philips is subject to your CD-Audio disc retailer. 'CONSUMERS SHOULD NOTE THAT NOT ALL HIGH DEFINITION TELEVISION SETS ARE FULLY COMPATIBLE WITH THIS PRODUCT AND...
... you have difficulty playing such CDAudio discs, kindly refer them to the following two conditions: - VARO! VARNING! This warning label is located on certain discs, Philips is subject to your CD-Audio disc retailer. 'CONSUMERS SHOULD NOTE THAT NOT ALL HIGH DEFINITION TELEVISION SETS ARE FULLY COMPATIBLE WITH THIS PRODUCT AND...

User manual
Page 6
Manufactured under license from Dolby Laboratories."Dolby","Pro Logic" and the double-D symbol are registered trademarks of Dolby Laboratories. "DTS" and "DTS Digital Surround" are trademarks of Digital Theater Systems, Inc. We have tried to make the packaging easy to separate into three materials: cardboard (box), polystyrene foam (buffer) and polyethylene (bags, protective foam sheet). Reverse engineering or disassembly is intended for home and other limited viewing uses only unless otherwise authorized by method claims of this copyright protection technology must be recycled and ...
Manufactured under license from Dolby Laboratories."Dolby","Pro Logic" and the double-D symbol are registered trademarks of Dolby Laboratories. "DTS" and "DTS Digital Surround" are trademarks of Digital Theater Systems, Inc. We have tried to make the packaging easy to separate into three materials: cardboard (box), polystyrene foam (buffer) and polyethylene (bags, protective foam sheet). Reverse engineering or disassembly is intended for home and other limited viewing uses only unless otherwise authorized by method claims of this copyright protection technology must be recycled and ...
User manual
Page 7
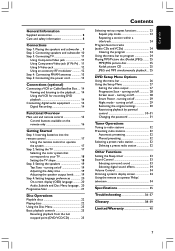
... Sound Control 33 Selecting surround sound 33 Selecting digital sound effects 34 Volume Control 34 Dimming system's display screen 34 Using the remote to operate 'Philips' television 34 Specifications 35 Troubleshooting 36-37 Glossary 38-39 Limited Warranty 40 7 English General Information Supplied accessories 8 Care and safety information 8 Connections Step 1: Placing...
... Sound Control 33 Selecting surround sound 33 Selecting digital sound effects 34 Volume Control 34 Dimming system's display screen 34 Using the remote to operate 'Philips' television 34 Specifications 35 Troubleshooting 36-37 Glossary 38-39 Limited Warranty 40 7 English General Information Supplied accessories 8 Care and safety information 8 Connections Step 1: Placing...
User manual
Page 8
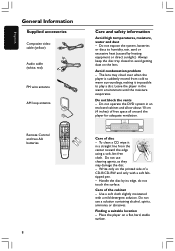
... an enclosed cabinet and allow about 10 cm (4 inches) of free space all around the player for adequate ventilation. 10 cm (4 inches) 10 cm (4 inches) PHILIPS DVD Home Cinema System 10 cm (4 inches) Care of the cabinet - Finding a suitable location - Do not use a solution containing alcohol, spirits, ammonia or abrasives. Care...
... an enclosed cabinet and allow about 10 cm (4 inches) of free space all around the player for adequate ventilation. 10 cm (4 inches) 10 cm (4 inches) PHILIPS DVD Home Cinema System 10 cm (4 inches) Care of the cabinet - Finding a suitable location - Do not use a solution containing alcohol, spirits, ammonia or abrasives. Care...
User manual
Page 9
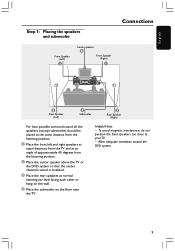
Allow adequate ventilation around the DVD system. 9 To avoid magnetic interference, do not position the front speakers too close to your TV. - English Step 1: Placing the speakers and subwoofer Front Speaker (Left) 1 Center speaker 2 Front Speaker (Right) 1 Connections 3 Rear Speaker (Left) 4 Subwoofer 3 Rear Speaker (Right) For best possible surround sound, all the speakers (except subwoofer) should be placed at the same distance from the listening position. 1 Place the front left and right speakers at equal distances from the TV and at an angle of approximately 45 degrees from the...
Allow adequate ventilation around the DVD system. 9 To avoid magnetic interference, do not position the front speakers too close to your TV. - English Step 1: Placing the speakers and subwoofer Front Speaker (Left) 1 Center speaker 2 Front Speaker (Right) 1 Connections 3 Rear Speaker (Left) 4 Subwoofer 3 Rear Speaker (Right) For best possible surround sound, all the speakers (except subwoofer) should be placed at the same distance from the listening position. 1 Place the front left and right speakers at equal distances from the TV and at an angle of approximately 45 degrees from the...
User manual
Page 10
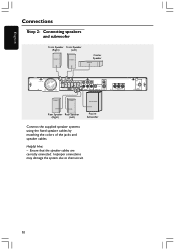
Helpful Hint: - Ensure that the speaker cables are correctly connected. Improper connections may damage the system due to short-circuit. 10 English Connections Step 2: Connecting speakers and subwoofer Front Speaker Front Speaker (Right) (Left) FRONT R FRONT L Center Speaker CENTER REAR R REAR L SUBWOOFER Rear Speaker Rear Speaker (Right) (Left) Passive Subwoofer Connect the supplied speaker systems using the fixed speaker cables by matching the colors of the jacks and speaker cables.
Helpful Hint: - Ensure that the speaker cables are correctly connected. Improper connections may damage the system due to short-circuit. 10 English Connections Step 2: Connecting speakers and subwoofer Front Speaker Front Speaker (Right) (Left) FRONT R FRONT L Center Speaker CENTER REAR R REAR L SUBWOOFER Rear Speaker Rear Speaker (Right) (Left) Passive Subwoofer Connect the supplied speaker systems using the fixed speaker cables by matching the colors of the jacks and speaker cables.

User manual
Page 11
The progressive scan video quality is only possible when usingY Pb Pr, and a progressive scan TV is required. If your TV does not support Progressive Scan, you are using a Progressive Scan TV (TV must indicate Progressive Scan or ProScan capability), to activate TV Progressive Scan, please refer to the TV. Press and hold OPEN/CLOSE button and press '1' to view the picture. English Step 3: Connecting TV Option 1 Connections Option 2 1 1 2 2 IMPORTANT! - Helpful Hint: - For DVD system Progressive Scan function, see page 28. not supplied) to connect the DVD system's Y Pb Pr...
The progressive scan video quality is only possible when usingY Pb Pr, and a progressive scan TV is required. If your TV does not support Progressive Scan, you are using a Progressive Scan TV (TV must indicate Progressive Scan or ProScan capability), to activate TV Progressive Scan, please refer to the TV. Press and hold OPEN/CLOSE button and press '1' to view the picture. English Step 3: Connecting TV Option 1 Connections Option 2 1 1 2 2 IMPORTANT! - Helpful Hint: - For DVD system Progressive Scan function, see page 28. not supplied) to connect the DVD system's Y Pb Pr...

User manual
Page 12
IMPORTANT! See your electronics retailer or contact Philips for DVD playback connection, the system's VIDEO OUT setting will need to be changed accordingly. Using S-Video jack 1 Use an S-video cable (not supplied) to ...
IMPORTANT! See your electronics retailer or contact Philips for DVD playback connection, the system's VIDEO OUT setting will need to be changed accordingly. Using S-Video jack 1 Use an S-video cable (not supplied) to ...

User manual
Page 13
Place the AM loop antenna on the rear or bottom of the antennas for identification and supply ratings. Helpful Hint: - Position the antennas as far as possible from your TV,VCR or other radiation source to the wall. For better FM stereo reception, connect an external FM antenna (not supplied.) After everything is connected properly, 1 Plug the AC power cord into the slot ➠ AM antenna 1 FM antenna 2 1 ~ AC MAINS Power Outlet 1 Connect the supplied AM loop antenna to the FM (75Ω) jack. Adjust the position of the system for optimal reception. - English Step 4: ...
Place the AM loop antenna on the rear or bottom of the antennas for identification and supply ratings. Helpful Hint: - Position the antennas as far as possible from your TV,VCR or other radiation source to the wall. For better FM stereo reception, connect an external FM antenna (not supplied.) After everything is connected properly, 1 Plug the AC power cord into the slot ➠ AM antenna 1 FM antenna 2 1 ~ AC MAINS Power Outlet 1 Connect the supplied AM loop antenna to the FM (75Ω) jack. Adjust the position of the system for optimal reception. - English Step 4: ...
User manual
Page 14
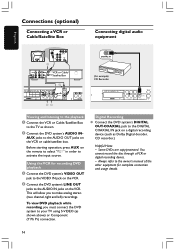
You cannot record the disc through a VCR or digital recording device. - This will allow you must connect the DVD system to the TV as shown. 2 Connect the DVD system's AUDIO IN- Some DVDs are copy-protected. AUX jacks to make analog stereo (two channel, right and left) recordings. Always refer to the AUDIO IN jacks on the VCR. 4 Connect the DVD system's LINE OUT jacks to the owner's manual of the other equipment for complete connection and usage details. 14 Using the VCR for recording DVD playback 3 Connect the DVD system's VIDEO OUT jack to the VIDEO IN jack on the VCR. To...
You cannot record the disc through a VCR or digital recording device. - This will allow you must connect the DVD system to the TV as shown. 2 Connect the DVD system's AUDIO IN- Some DVDs are copy-protected. AUX jacks to make analog stereo (two channel, right and left) recordings. Always refer to the AUDIO IN jacks on the VCR. 4 Connect the DVD system's LINE OUT jacks to the owner's manual of the other equipment for complete connection and usage details. 14 Using the VCR for recording DVD playback 3 Connect the DVD system's VIDEO OUT jack to the VIDEO IN jack on the VCR. To...
User manual
Page 15
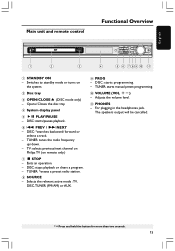
... relevant active mode :TV, DISC,TUNER (FM/AM) or AUX. 9 PROG - PHONES - DISC: *searches backward/forward or selects a track. - TV: selects previous/next channel on Philips TV (on the system. 2 Disc tray 3 OPEN /CLOSE 0 (DISC mode only) - Adjusts the volume level. ! Exits an operation. - DISC: starts programming. - TUNER: starts manual preset...
... relevant active mode :TV, DISC,TUNER (FM/AM) or AUX. 9 PROG - PHONES - DISC: *searches backward/forward or selects a track. - TV: selects previous/next channel on Philips TV (on the system. 2 Disc tray 3 OPEN /CLOSE 0 (DISC mode only) - Adjusts the volume level. ! Exits an operation. - DISC: starts programming. - TUNER: starts manual preset...
User manual
Page 16
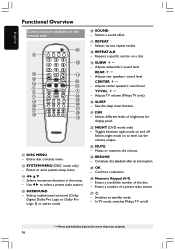
Enters disc contents menu. # SYSTEM MENU (DISC mode only) - Adjusts subwoofer's sound level. Adjusts TV volume (Philips TV only.) ) SLEEP - Sets the sleep timer function. ¡ DIM - Toggles between night mode on and off . * = Press and hold the button for display panel. &#... surround (Dolby Digital, Dolby Pro Logic or Dolby Pro Logic II) or stereo mode. ^ SOUND - Selects night mode on a disc. ( SUBW +- In TV mode, switches Philips TV on the remote only 27 8 26 12 10 13 25 14 14 6 6 5 7 24 15 23 16 22 17 21 18 20 19 @ DISC MENU...
Enters disc contents menu. # SYSTEM MENU (DISC mode only) - Adjusts subwoofer's sound level. Adjusts TV volume (Philips TV only.) ) SLEEP - Sets the sleep timer function. ¡ DIM - Toggles between night mode on and off . * = Press and hold the button for display panel. &#... surround (Dolby Digital, Dolby Pro Logic or Dolby Pro Logic II) or stereo mode. ^ SOUND - Selects night mode on a disc. ( SUBW +- In TV mode, switches Philips TV on the remote only 27 8 26 12 10 13 25 14 14 6 6 5 7 24 15 23 16 22 17 21 18 20 19 @ DISC MENU...
User manual
Page 17
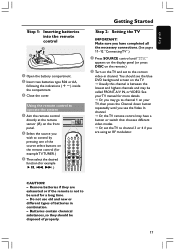
Using the remote control to operate the system 1 Aim the remote control directly at the remote sensor (iR) on the front panel. 2 Select the source you wish to be used for a long time. - Batteries contain chemical substances, so they are using an RF modulator. You should be called FRONT, A/V IN, or VIDEO. See your TV, then press the Channel down button repeatedly until "DISC" appears on the display panel (or press DISC on the remote.) 2 Turn on the TV. ➜ Usually this channel is not to control by pressing one of batteries in channel. Do not use old and new or ...
Using the remote control to operate the system 1 Aim the remote control directly at the remote sensor (iR) on the front panel. 2 Select the source you wish to be used for a long time. - Batteries contain chemical substances, so they are using an RF modulator. You should be called FRONT, A/V IN, or VIDEO. See your TV, then press the Channel down button repeatedly until "DISC" appears on the display panel (or press DISC on the remote.) 2 Turn on the TV. ➜ Usually this channel is not to control by pressing one of batteries in channel. Do not use old and new or ...
User manual
Page 18
Move to {TV SHAPE} and press 2. If it is compatible with black bands on the disc. Select this if you have a widescreen TV. 3 Press 34 to select a setting and press OK to confirm. NTSC - It will change the video signal of the disc. Select this if the connected TV is not, the setting for TV display will be in accordance with the video signal of a PAL disc (VCD only) and output it to PAL format. 3 Press 34 to select a setting and press OK to confirm. ➜ Follow the instructions shown on the TV to confirm the selection (if any). ➜ If a blank/distorted TV screen ...
Move to {TV SHAPE} and press 2. If it is compatible with black bands on the disc. Select this if you have a widescreen TV. 3 Press 34 to select a setting and press OK to confirm. NTSC - It will change the video signal of the disc. Select this if the connected TV is not, the setting for TV display will be in accordance with the video signal of a PAL disc (VCD only) and output it to PAL format. 3 Press 34 to select a setting and press OK to confirm. ➜ Follow the instructions shown on the TV to confirm the selection (if any). ➜ If a blank/distorted TV screen ...
User manual
Page 19
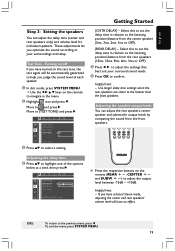
Select this to set the delay time in relation to the listening position/distance from the rear speakers (15ms, 12ms, 9ms, 6ms, 3ms or OFF). 5 Press 1 2 to adjust the settings that best suit your surroundings and setup. Select this to set the delay time in relation to your surround sound needs. 6 Press OK to confirm. Adjusting the delay time 4 Press 34 to select a setting. {CNTR DELAY} - If you optimize the sound according to the listening position/distance from the front speakers. Test Tone - NIGHT MODE CNTR DELAY REAR DELAY TEST TONE OFF ON TEST TONE 3 Press 34 to ...
Select this to set the delay time in relation to the listening position/distance from the rear speakers (15ms, 12ms, 9ms, 6ms, 3ms or OFF). 5 Press 1 2 to adjust the settings that best suit your surroundings and setup. Select this to set the delay time in relation to your surround sound needs. 6 Press OK to confirm. Adjusting the delay time 4 Press 34 to select a setting. {CNTR DELAY} - If you optimize the sound according to the listening position/distance from the front speakers. Test Tone - NIGHT MODE CNTR DELAY REAR DELAY TEST TONE OFF ON TEST TONE 3 Press 34 to ...

User manual
Page 20
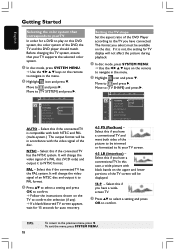
On-screen display (OSD) language 1 In disc mode, press SYSTEM MENU. ➜ Use the 1 2 3 4 keys on the remote to navigate in the menu. 2 Highlight icon and press 4. Move to highlight one of various disc languages. Move to confirm. 4 Repeat steps 2~3 for other settings. OSD LANGUAGE SET TO ENGLISH 3 Press 34 to select a language and press OK to the previous menu, press 1. TIPS: 20 To return to confirm. Move to and press 2. PARENTAL PASSWORD MENU LANG DEFAULTS ENGLISH FRENCH SPANISH Audio, Subtitle and Disc menu language 1 In disc stop mode, stop playback and press ...
On-screen display (OSD) language 1 In disc mode, press SYSTEM MENU. ➜ Use the 1 2 3 4 keys on the remote to navigate in the menu. 2 Highlight icon and press 4. Move to highlight one of various disc languages. Move to confirm. 4 Repeat steps 2~3 for other settings. OSD LANGUAGE SET TO ENGLISH 3 Press 34 to select a language and press OK to the previous menu, press 1. TIPS: 20 To return to confirm. Move to and press 2. PARENTAL PASSWORD MENU LANG DEFAULTS ENGLISH FRENCH SPANISH Audio, Subtitle and Disc menu language 1 In disc stop mode, stop playback and press ...
User manual
Page 21
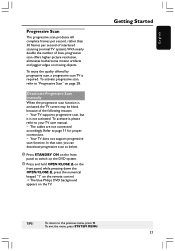
... and hold OPEN/CLOSE 0 on the front panel, while pressing down the OPEN/CLOSE 0, press the numerical keypad "1" on the remote control. ➜ The blue Philips DVD background appears on the front panel to the previous menu, press 1. Your TV supports progressive scan, but it , please refer to your TV user...
... and hold OPEN/CLOSE 0 on the front panel, while pressing down the OPEN/CLOSE 0, press the numerical keypad "1" on the remote control. ➜ The blue Philips DVD background appears on the front panel to the previous menu, press 1. Your TV supports progressive scan, but it , please refer to your TV user...
User manual
Page 22
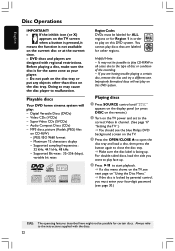
... to the instructions supplied with regional restrictions. DVD discs and players are labeled 1 for the same zone as your four-digit password (see the blue Philips DVD background screen on this DVD system. Always refer to the type of disc or condition of the recording. - Playing discs 1 Press SOURCE control until...
... to the instructions supplied with regional restrictions. DVD discs and players are labeled 1 for the same zone as your four-digit password (see the blue Philips DVD background screen on this DVD system. Always refer to the type of disc or condition of the recording. - Playing discs 1 Press SOURCE control until...