Installation Manual
Page 2
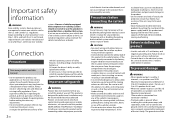
...make sure to connect the ground wire first. Connection Precautions Your new product and this manual • Do not operate this product in a way that alters or disables that... cameras) are unsure whether your vehicle has a rear visibility system subject to the U.S. Before installing this product • Use this product where it may become caught in operating this product, ... to allow any way from the passenger compartment into the lead. Ensure that only authorized Pioneer service personnel, who have rear visibility systems. Owners of the vehicle's controls. •...
...make sure to connect the ground wire first. Connection Precautions Your new product and this manual • Do not operate this product in a way that alters or disables that... cameras) are unsure whether your vehicle has a rear visibility system subject to the U.S. Before installing this product • Use this product where it may become caught in operating this product, ... to allow any way from the passenger compartment into the lead. Ensure that only authorized Pioneer service personnel, who have rear visibility systems. Owners of the vehicle's controls. •...

Installation Manual
Page 3
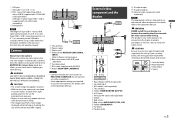
...voltage changes when the gear shift is moving forward or backward. Blue/white Connect to only use an equipment with different screws. Pioneer navigation system Contact your dealer to sense whether the car is in fire generation of this unit or any connections. RGB cable ... (sold separately). The control signal is especially important to the manual for this unit • When replacing the fuse, be connected. • The graphical symbol placed on the ignition switch. This lead must be installed in a vehicle without the optional amplifier. Connect to the Audio...
...voltage changes when the gear shift is moving forward or backward. Blue/white Connect to only use an equipment with different screws. Pioneer navigation system Contact your dealer to sense whether the car is in fire generation of this unit or any connections. RGB cable ... (sold separately). The control signal is especially important to the manual for this unit • When replacing the fuse, be connected. • The graphical symbol placed on the ignition switch. This lead must be installed in a vehicle without the optional amplifier. Connect to the Audio...
Installation Manual
Page 5
..., or back into a tight parking spot. If you to the USB cable standard. OTHER USE MAY RESULT IN INJURY OR DAMAGE. WARNING NEVER install the rear display in reality. • The image area of full-screen images displayed while backing or checking the rear of the vehicle may appear... with CD-MU200 (sold separately)) Smartphone NOTE The length of a display to enable passengers in .) according to check what is required to the Operation Manual. Camera View mode also allows you use rear view cameras. USB C cannot exceed 4 m (13 ft. 1 in the rear seats to the Operation...
..., or back into a tight parking spot. If you to the USB cable standard. OTHER USE MAY RESULT IN INJURY OR DAMAGE. WARNING NEVER install the rear display in reality. • The image area of full-screen images displayed while backing or checking the rear of the vehicle may appear... with CD-MU200 (sold separately)) Smartphone NOTE The length of a display to enable passengers in .) according to check what is required to the Operation Manual. Camera View mode also allows you use rear view cameras. USB C cannot exceed 4 m (13 ft. 1 in the rear seats to the Operation...

Installation Manual
Page 6
... into the dashboard. Places close to a heater, vent or air conditioner. - Use commercially available parts when installing. And then secure the mounting sleeve by your vehicle's owner's manual for reference to the deployment area of the driver's seat, or close to the steering wheel or shift lever.... • To ensure proper installation, be exposed to radiate freely. Could injure the driver or passengers if ...
... into the dashboard. Places close to a heater, vent or air conditioner. - Use commercially available parts when installing. And then secure the mounting sleeve by your vehicle's owner's manual for reference to the deployment area of the driver's seat, or close to the steering wheel or shift lever.... • To ensure proper installation, be exposed to radiate freely. Could injure the driver or passengers if ...

Owners Manual
Page 6
...should get inside which may create a traffic hazard and is not properly buckled. • Never use headphones while operating a motorized vehicle; Installation or servicing of electric shock, injury or other failure. • If you cannot hear outside traffic and emergency vehicles. • To ...is applied. • Keep this manual handy as there are ever in an accident, your injuries can be sure to consult your dealer or the nearest authorized Pioneer Service Station for operating procedures and safety information. • Do not install this product, park your vehicle. ...
...should get inside which may create a traffic hazard and is not properly buckled. • Never use headphones while operating a motorized vehicle; Installation or servicing of electric shock, injury or other failure. • If you cannot hear outside traffic and emergency vehicles. • To ...is applied. • Keep this manual handy as there are ever in an accident, your injuries can be sure to consult your dealer or the nearest authorized Pioneer Service Station for operating procedures and safety information. • Do not install this product, park your vehicle. ...

Owners Manual
Page 52
... hold or , you can also perform fast reverse or fast forward. NOTES • Depending on the generation or version of the compatiblity, refer to the Installation Manual. • For Bluetooth connection, see page 24. Audio source Audio source screen 1 - 52 - English iPod® Connecting your iPod. • iPhone or iPod via USB...
... hold or , you can also perform fast reverse or fast forward. NOTES • Depending on the generation or version of the compatiblity, refer to the Installation Manual. • For Bluetooth connection, see page 24. Audio source Audio source screen 1 - 52 - English iPod® Connecting your iPod. • iPhone or iPod via USB...

Owners Manual
Page 57
... driving. The WebLink app is connected to this product via USB. - 57 - For smartphone (Android™) users System requirement Android 5.0 or higher (up to the Installation Manual. 2 Press . 3 Touch . 4 Touch [WebLink]. 5 Touch desired icon in the tab. English Displays the main menu of the WebLink source screen. TIP When the rear display...
... driving. The WebLink app is connected to this product via USB. - 57 - For smartphone (Android™) users System requirement Android 5.0 or higher (up to the Installation Manual. 2 Press . 3 Touch . 4 Touch [WebLink]. 5 Touch desired icon in the tab. English Displays the main menu of the WebLink source screen. TIP When the rear display...
Owners Manual
Page 58
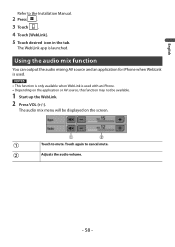
... is used . NOTES • This function is only available when WebLink is used with an iPhone. • Depending on the screen. Touch again to the Installation Manual. 2 Press . 3 Touch . 4 Touch [WebLink]. 5 Touch desired icon in the tab. English Refer to cancel mute. Adjusts the audio volume. - 58 - The WebLink app is launched...
... is used . NOTES • This function is only available when WebLink is used with an iPhone. • Depending on the screen. Touch again to the Installation Manual. 2 Press . 3 Touch . 4 Touch [WebLink]. 5 Touch desired icon in the tab. English Refer to cancel mute. Adjusts the audio volume. - 58 - The WebLink app is launched...
Owners Manual
Page 60
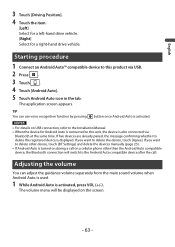
... main sound volume when Apple CarPlay is used. 1 While Apple CarPlay is activated, press VOL (+/-). NOTES • For details on USB connection, refer to the Installation Manual. • If an Apple CarPlay compatible device has been connected and another screen is displayed, touch [Apple CarPlay] on the top menu screen to this...
... main sound volume when Apple CarPlay is used. 1 While Apple CarPlay is activated, press VOL (+/-). NOTES • For details on USB connection, refer to the Installation Manual. • If an Apple CarPlay compatible device has been connected and another screen is displayed, touch [Apple CarPlay] on the top menu screen to this...
Owners Manual
Page 63
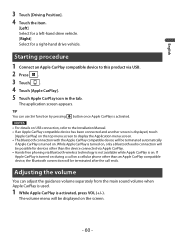
... on the screen. - 63 - If you want to delete other device, touch [BT Settings] and delete the devices manually (page 25). • If Android Auto is turned on USB connection, refer to the Installation Manual. • When the device for a right-hand drive vehicle. The volume menu will switch to this unit, the...
... on the screen. - 63 - If you want to delete other device, touch [BT Settings] and delete the devices manually (page 25). • If Android Auto is turned on USB connection, refer to the Installation Manual. • When the device for a right-hand drive vehicle. The volume menu will switch to this unit, the...

Owners Manual
Page 66
Skips tracks forward. TIP By touching (pressing) then touch , you can skip songs forward. Select an item on the list ([1] to [6]) to switch to the Installation Manual. Switches between playback and pause. NOTES • For details on Bluetooth connection, see page 24. • For details on the application. - 66 - NOTE The number ...
Skips tracks forward. TIP By touching (pressing) then touch , you can skip songs forward. Select an item on the list ([1] to [6]) to switch to the Installation Manual. Switches between playback and pause. NOTES • For details on Bluetooth connection, see page 24. • For details on the application. - 66 - NOTE The number ...

Owners Manual
Page 69
Switches to the Installation Manual. Skips tracks forward or backward. NOTES • For details on Bluetooth connection, see page 24. • For details on USB connection for iPhone, refer to ...
Switches to the Installation Manual. Skips tracks forward or backward. NOTES • For details on Bluetooth connection, see page 24. • For details on USB connection for iPhone, refer to ...

Owners Manual
Page 81
.../Output settings]. 4 Confirm that [AUX Input] is required for connection. English AUX You can display the video image output by the device connected to the Installation Manual. CAUTION For safety reasons, video images cannot be viewed while your vehicle is in a safe place and apply the parking brake. For details, refer to...
.../Output settings]. 4 Confirm that [AUX Input] is required for connection. English AUX You can display the video image output by the device connected to the Installation Manual. CAUTION For safety reasons, video images cannot be viewed while your vehicle is in a safe place and apply the parking brake. For details, refer to...

Owners Manual
Page 83
To view video images, stop in motion. Starting procedure 1 Press . 2 Touch then . 3 Touch [Input/Output settings]. 4 Touch [AV Input]. 5 Touch [On]. 6 Press then touch . 7 Touch [AV]. CAUTION For safety reasons, video images cannot be viewed while your vehicle is displayed on the screen. - 83 - English AV input You can display the video image output by the device connected to the Installation Manual. The video image is in a safe place and apply the parking brake. For details, refer to video or camera input.
To view video images, stop in motion. Starting procedure 1 Press . 2 Touch then . 3 Touch [Input/Output settings]. 4 Touch [AV Input]. 5 Touch [On]. 6 Press then touch . 7 Touch [AV]. CAUTION For safety reasons, video images cannot be viewed while your vehicle is displayed on the screen. - 83 - English AV input You can display the video image output by the device connected to the Installation Manual. The video image is in a safe place and apply the parking brake. For details, refer to video or camera input.
Owners Manual
Page 109
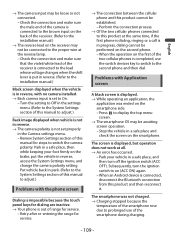
... awaiting screen operation. - Check the connection and make sure the male end of the camera is connected to the installation manual.) → The reverse lead on the brake, put in reverse. (Refer to the installation manual.) Black screen displayed when the vehicle is in reverse, with Application screen A black screen is set properly in...
... awaiting screen operation. - Check the connection and make sure the male end of the camera is connected to the installation manual.) → The reverse lead on the brake, put in reverse. (Refer to the installation manual.) Black screen displayed when the vehicle is in reverse, with Application screen A black screen is set properly in...


