
Other Manual
Page 1
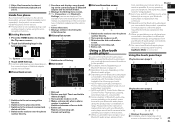
... the Bluetooth connection. The audio source screen appears. 3.Tap the control keys to enable launching of mobile device applications from Pioneer and other configuration when connecting your device in the AppRadio Mode. MirrorLinkTM When you connect a MirrorLink device with an MHL ... in the vehicle. Connecting your audio device is established with the A2DP (Advanced Audio Distribution Profile)/AVRCP (Audio/Video Remote Control Profile). Illuminates when your MirrorLink device Please check the [App Connection Settings] setting before connecting a mobile device....
... the Bluetooth connection. The audio source screen appears. 3.Tap the control keys to enable launching of mobile device applications from Pioneer and other configuration when connecting your device in the AppRadio Mode. MirrorLinkTM When you connect a MirrorLink device with an MHL ... in the vehicle. Connecting your audio device is established with the A2DP (Advanced Audio Distribution Profile)/AVRCP (Audio/Video Remote Control Profile). Illuminates when your MirrorLink device Please check the [App Connection Settings] setting before connecting a mobile device....
Owner's Manual
Page 2
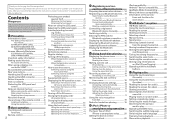
...channel list............23 Storing broadcast frequencies 23 Storing the strongest broad- After you have finished reading the instructions, keep this Pioneer product. cast frequencies 23 Tuning into strong frequencies 23 Switching the seek mode 24 Switching the reception mode 24 Storing ... Changing the display order of source icons 13 Changing the display order of the remote control........8 Installing the battery 8 Using the remote control 8 Basic operation Checking part names and functions 9 Remote control 9 2 Protecting your product against theft 9 Removing the front panel 10 ...
...channel list............23 Storing broadcast frequencies 23 Storing the strongest broad- After you have finished reading the instructions, keep this Pioneer product. cast frequencies 23 Tuning into strong frequencies 23 Switching the seek mode 24 Switching the reception mode 24 Storing ... Changing the display order of source icons 13 Changing the display order of the remote control........8 Installing the battery 8 Using the remote control 8 Basic operation Checking part names and functions 9 Remote control 9 2 Protecting your product against theft 9 Removing the front panel 10 ...
Owner's Manual
Page 8
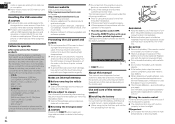
...settings and recorded contents to this product. The microprocessor must not be sure to California, U.S.A.)" ■■Using the remote control Point the remote control in the direction of Canada, Inc. However, the screens on media players, iPhone, smartphone, or other devices ...p Some of the settings and recorded contents will not be reset. ■■Data subject to be swallowed, consult a doctor immediately. Pioneer cannot guarantee compatibility with your product. 8 En Visit our website Visit us at the addresses listed below . CUSTOMER SATISFACTION DEPARTMENT 340 Ferrier ...
...settings and recorded contents to this product. The microprocessor must not be sure to California, U.S.A.)" ■■Using the remote control Point the remote control in the direction of Canada, Inc. However, the screens on media players, iPhone, smartphone, or other devices ...p Some of the settings and recorded contents will not be reset. ■■Data subject to be swallowed, consult a doctor immediately. Pioneer cannot guarantee compatibility with your product. 8 En Visit our website Visit us at the addresses listed below . CUSTOMER SATISFACTION DEPARTMENT 340 Ferrier ...

Owner's Manual
Page 9
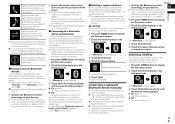
...to detach the front panel while DISC/SD is in motion. ANGLE Press to use the screens on page 8. Disc - Do not let the remote control fall onto the floor, where it is fully open. 9 En Basic operation Checking part names and functions This chapter gives information about the .... For details, refer to mute. c SD card slot For details, refer to Inserting and ejecting an SD memory card on page 10. 1 LCD screen 2 Remote control sensor 3 VOL (+/-) button Press to adjust the AV (Audio and Video) source volume. 4 MUTE button Press to Inserting and ejecting a disc on page...
...to detach the front panel while DISC/SD is in motion. ANGLE Press to use the screens on page 8. Disc - Do not let the remote control fall onto the floor, where it is fully open. 9 En Basic operation Checking part names and functions This chapter gives information about the .... For details, refer to mute. c SD card slot For details, refer to Inserting and ejecting an SD memory card on page 10. 1 LCD screen 2 Remote control sensor 3 VOL (+/-) button Press to adjust the AV (Audio and Video) source volume. 4 MUTE button Press to Inserting and ejecting a disc on page...
Owner's Manual
Page 15
... HOME button to make sure that you can register a Bluetooth device by setting this product with the A2DP (Advanced Audio Distribution Profile)/AVRCP (Audio/Video Remote Control Profile). Switching visibility This function sets whether or not to display the Top menu screen. 2 Touch the following order.
... HOME button to make sure that you can register a Bluetooth device by setting this product with the A2DP (Advanced Audio Distribution Profile)/AVRCP (Audio/Video Remote Control Profile). Switching visibility This function sets whether or not to display the Top menu screen. 2 Touch the following order.
Owner's Manual
Page 45
... number directly. 5 Functions and displays vary depending on page 13. 45 En p The [Connection] and [Bluetooth Settings] menus are possible. A2DP and AVRCP (Audio/Video Remote Control Profile): Playing back, pausing, selecting songs, etc., are displayed. If you are available on your Bluetooth devices on the Bluetooth audio player. a Switches between...
... number directly. 5 Functions and displays vary depending on page 13. 45 En p The [Connection] and [Bluetooth Settings] menus are possible. A2DP and AVRCP (Audio/Video Remote Control Profile): Playing back, pausing, selecting songs, etc., are displayed. If you are available on your Bluetooth devices on the Bluetooth audio player. a Switches between...

Owner's Manual
Page 73
... product that the ground wire is ground. To prevent damage WARNING Use speakers over 50 W (output value) and between 4 W to an external power amp's system remote control terminal, the auto-antenna relay control terminal, or the antenna booster power control terminal (max. 300 mA 12 V DC). Do not use a fuse of...
... product that the ground wire is ground. To prevent damage WARNING Use speakers over 50 W (output value) and between 4 W to an external power amp's system remote control terminal, the auto-antenna relay control terminal, or the antenna booster power control terminal (max. 300 mA 12 V DC). Do not use a fuse of...
Owner's Manual
Page 74
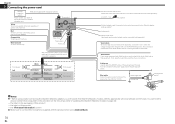
... do not connect anything to the speaker leads that is required for the iDatalink adapter (sold separately).* Antenna jack Wired remote input Hard-wired remote control adapter can find the device number that are not connected to Updating the iDatalink Maestro module on the followings (refer...the parking brake switch. This product Yellow To terminal supplied with power regardless of any connections. Chapter 31 Connecting the power cord Pioneer navigation system RGB cable (supplied with navigation system) Please contact your dealer to the back lamp, connect the one in which...
... do not connect anything to the speaker leads that is required for the iDatalink adapter (sold separately).* Antenna jack Wired remote input Hard-wired remote control adapter can find the device number that are not connected to Updating the iDatalink Maestro module on the followings (refer...the parking brake switch. This product Yellow To terminal supplied with power regardless of any connections. Chapter 31 Connecting the power cord Pioneer navigation system RGB cable (supplied with navigation system) Please contact your dealer to the back lamp, connect the one in which...

Owner's Manual
Page 75
... 5 iPod (audio) Refer to use aha and Pandora. Note Any connections mentioned above are available to use aha and Pandora. Power supply Power cord System remote control Front speaker Rear speaker Subwoofer Notes · You can change the RCA...
... 5 iPod (audio) Refer to use aha and Pandora. Note Any connections mentioned above are available to use aha and Pandora. Power supply Power cord System remote control Front speaker Rear speaker Subwoofer Notes · You can change the RCA...


