Owner's Manual
Page 2
...MONITOR OUTPUT 7 - When using a display connected to operate your unit from theft 13 - About WMA 11 - About MP3 12 - About AAC 12 - When an operation is prohibited 13 Precautions IMPORTANT SAFEGUARDS 6 To ensure safe driving 6 - Opening and closing the LCD... panel 18 Radio 19 - Storing the strongest broadcast frequencies 20 - Operating the DVD menu 22 - Searching for buying this Pioneer product. ... protect the LCD screen 12 For viewing LCD comfortably 13 - Contents Thank you have finished reading the instructions, keep this manual in DVD player 21 - ...
...MONITOR OUTPUT 7 - When using a display connected to operate your unit from theft 13 - About WMA 11 - About MP3 12 - About AAC 12 - When an operation is prohibited 13 Precautions IMPORTANT SAFEGUARDS 6 To ensure safe driving 6 - Opening and closing the LCD... panel 18 Radio 19 - Storing the strongest broadcast frequencies 20 - Operating the DVD menu 22 - Searching for buying this Pioneer product. ... protect the LCD screen 12 For viewing LCD comfortably 13 - Contents Thank you have finished reading the instructions, keep this manual in DVD player 21 - ...

Owner's Manual
Page 4
... phone call history 66 - Using the call 62 - Contents - Changing the wide screen mode 44 - Setting the clock 45 - Switching the iPod charge setting 47 - Storing... function 57 - Using Instant Replay function 58 Bluetooth Audio 59 - Connecting a Bluetooth audio player 60 - Connecting a cellular phone 63 - Adjusting the response positions of advanced operations 63 ...Introduction of the touch panels (Touch Panel Calibration) 47 - Clearing memory 67 - Adjusting the LCD panel slide position 46 - Setting the automatic open function 46 - Selecting a SIRIUS channel ...
... phone call history 66 - Using the call 62 - Contents - Changing the wide screen mode 44 - Setting the clock 45 - Switching the iPod charge setting 47 - Storing... function 57 - Using Instant Replay function 58 Bluetooth Audio 59 - Connecting a Bluetooth audio player 60 - Connecting a cellular phone 63 - Adjusting the response positions of advanced operations 63 ...Introduction of the touch panels (Touch Panel Calibration) 47 - Clearing memory 67 - Adjusting the LCD panel slide position 46 - Setting the automatic open function 46 - Selecting a SIRIUS channel ...

Owner's Manual
Page 5
... - Using CD TEXT functions 69 DVD Player 70 - Storing the strongest broadcast stations sequentially 72 Digital Signal Processor 73 - Example of advanced operations 71 TV tuner 72 - Keeping the display in good condition 94 - Using the direct control 76 - Selecting a cross-over frequency 78 - Liquid crystal display (LCD) screen 94 - Selecting a disc 70 - Storing...
... - Using CD TEXT functions 69 DVD Player 70 - Storing the strongest broadcast stations sequentially 72 Digital Signal Processor 73 - Example of advanced operations 71 TV tuner 72 - Keeping the display in good condition 94 - Using the direct control 76 - Selecting a cross-over frequency 78 - Liquid crystal display (LCD) screen 94 - Selecting a disc 70 - Storing...

Owner's Manual
Page 6
...in electronic equipment and automotive accessories may be considerably more severe if your seat belt is not properly buckled. 8 Never use with a video screen that you experience difficulty in operating the system or reading the display, park your vehicle in a safe location and make necessary adjustments. 7.... ! Where such regulations apply, they have read all times while operating your display by persons other hazards. Do not attempt to watch a DVD, Video CD or TV while driving, the warning Viewing of electric shock or other than the driver may (i) obstruct the driver's vision, (...
...in electronic equipment and automotive accessories may be considerably more severe if your seat belt is not properly buckled. 8 Never use with a video screen that you experience difficulty in operating the system or reading the display, park your vehicle in a safe location and make necessary adjustments. 7.... ! Where such regulations apply, they have read all times while operating your display by persons other hazards. Do not attempt to watch a DVD, Video CD or TV while driving, the warning Viewing of electric shock or other than the driver may (i) obstruct the driver's vision, (...

Owner's Manual
Page 7
When using a display connected to REAR MONITOR OUTPUT This unit's REAR MONITOR OUTPUT is for some similar reason, the microcomputer of ...use the functions described above while driving, they will become disabled until you transcribe the audio adjustment data. SCREEN IMAGE MAY APPEAR RE- En 7 OTHER USE MAY RESULT IN INJURY OR DAMAGE. The rear view camera... Do not use for checking the rear when the vehicle is moving forward. Precautions Section 01 Precautions To watch a DVD, Video CD or TV on trailers, or while backing up , and whether the images are used while the vehicle...
When using a display connected to REAR MONITOR OUTPUT This unit's REAR MONITOR OUTPUT is for some similar reason, the microcomputer of ...use the functions described above while driving, they will become disabled until you transcribe the audio adjustment data. SCREEN IMAGE MAY APPEAR RE- En 7 OTHER USE MAY RESULT IN INJURY OR DAMAGE. The rear view camera... Do not use for checking the rear when the vehicle is moving forward. Precautions Section 01 Precautions To watch a DVD, Video CD or TV on trailers, or while backing up , and whether the images are used while the vehicle...
Owner's Manual
Page 12
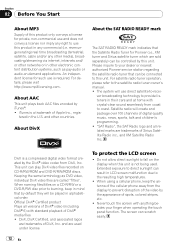
... touch panel function. When naming files/titles on CD-R/RW/ROM and DVD-R/RW/ROM discs. Official DivX® Certified product Plays all related marks are trademarks of DivX, Inc. The screen can be connected to this unit. Section 02 Before You Start About ... regis- Never touch the screen with anything besides your dealer or nearest authorized Pioneer service station regarding the satellite radio tuner that by the appearance of DivX® media files ! For details, please visit http://www.mp3licensing.com. To protect the LCD screen ! For satellite radio tuner ...
... touch panel function. When naming files/titles on CD-R/RW/ROM and DVD-R/RW/ROM discs. Official DivX® Certified product Plays all related marks are trademarks of DivX, Inc. The screen can be connected to this unit. Section 02 Before You Start About ... regis- Never touch the screen with anything besides your dealer or nearest authorized Pioneer service station regarding the satellite radio tuner that by the appearance of DivX® media files ! For details, please visit http://www.mp3licensing.com. To protect the LCD screen ! For satellite radio tuner ...

Owner's Manual
Page 13
.... For details concerning operation, refer to Changing the picture adjustment on page 42. Indicates the number of its construction, the viewing angle of the LCD screen is possible. Removing the front panel % Pinch the top and bottom of viewing angles. Take care not pinch it too tightly or to drop...When you can be found on the disc. Avoid subjecting the front panel to -height ratio) type. If removed, replace the front panel on DVDs indicate The marks below may be detached to deter theft. ! En 13 See Switching the warning tone on page 44. Handle gently when removing...
.... For details concerning operation, refer to Changing the picture adjustment on page 42. Indicates the number of its construction, the viewing angle of the LCD screen is possible. Removing the front panel % Pinch the top and bottom of viewing angles. Take care not pinch it too tightly or to drop...When you can be found on the disc. Avoid subjecting the front panel to -height ratio) type. If removed, replace the front panel on DVDs indicate The marks below may be detached to deter theft. ! En 13 See Switching the warning tone on page 44. Handle gently when removing...

Owner's Manual
Page 16
... a desired source. EXT 1 - Notes ! The source names are displayed and selectable ones are highlighted. ! DVD player/multi-DVD player ! When the AV (AV input) is no unit corresponding to the DVD player, load a disc in use (refer to this unit Basic Operations Power ON/OFF 1 Source icon Turning the ...unit on % When using the touch panel keys, touch the source icon and then touch the desired source name. REARVIEW (rear view camera) cannot be selected by touching the screen...
... a desired source. EXT 1 - Notes ! The source names are displayed and selectable ones are highlighted. ! DVD player/multi-DVD player ! When the AV (AV input) is no unit corresponding to the DVD player, load a disc in use (refer to this unit Basic Operations Power ON/OFF 1 Source icon Turning the ...unit on % When using the touch panel keys, touch the source icon and then touch the desired source name. REARVIEW (rear view camera) cannot be selected by touching the screen...
Owner's Manual
Page 17
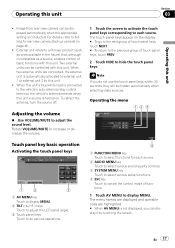
...key basic operation Activating the touch panel keys 1 AV MENU key Touch to display MENU. 2 TILT ( / ) keys Touch to adjust the LCD panel angle. 3 Touch panel keys Touch to do not use the touch panel keys within 30 seconds, they will be displayed automatically when the ... this unit ! External unit refers to external unit 1 or external unit 2 by touching the screen. The menu names are displayed and operable ones are connected, the external unit is automatically allocated to a Pioneer product (such as ones available in the future) that, although incompatible as a source, enables...
...key basic operation Activating the touch panel keys 1 AV MENU key Touch to display MENU. 2 TILT ( / ) keys Touch to adjust the LCD panel angle. 3 Touch panel keys Touch to do not use the touch panel keys within 30 seconds, they will be displayed automatically when the ... this unit ! External unit refers to external unit 1 or external unit 2 by touching the screen. The menu names are displayed and operable ones are connected, the external unit is automatically allocated to a Pioneer product (such as ones available in the future) that, although incompatible as a source, enables...

Owner's Manual
Page 21
... chapter/track by pressing - When DVD, DivX disc or Video CD is playing, if you perform these operations. 5 To perform fast forward or reverse, keep touching o or p for discs and player on page 23.) # To eject a disc, press h (eject). 2 Touch the screen to display the touch panel keys.... 3 When playing a compressed audio or DivX, touch a or b to select a folder. # To return to PBC playback on Handling guideline of currently playing disc. 1 Insert a disc into the disc loading slot. If you do not use touch panel keys to select the DVD player...
... chapter/track by pressing - When DVD, DivX disc or Video CD is playing, if you perform these operations. 5 To perform fast forward or reverse, keep touching o or p for discs and player on page 23.) # To eject a disc, press h (eject). 2 Touch the screen to display the touch panel keys.... 3 When playing a compressed audio or DivX, touch a or b to select a folder. # To return to PBC playback on Handling guideline of currently playing disc. 1 Insert a disc into the disc loading slot. If you do not use touch panel keys to select the DVD player...

Owner's Manual
Page 23
... the selected menu item. # The way to display the menu differs depending on page 40. ! You can display the menu by touching the screen. # To switch to the DVD menu direct touch control, touch TOUCH. 2 Touch a, b, c or d to select the desired menu item. 3 Touch ENTER. For details, refer to the ...Using the touch panel keys 1 Touch to display touch panel keys to operate the DVD menu. # When the touch panel keys are not displayed, you can display them by touching RETURN during PBC playback. If your player and play the DivX VOD content, touch STOP. ited number of content to the...
... the selected menu item. # The way to display the menu differs depending on page 40. ! You can display the menu by touching the screen. # To switch to the DVD menu direct touch control, touch TOUCH. 2 Touch a, b, c or d to select the desired menu item. 3 Touch ENTER. For details, refer to the ...Using the touch panel keys 1 Touch to display touch panel keys to operate the DVD menu. # When the touch panel keys are not displayed, you can display them by touching RETURN during PBC playback. If your player and play the DivX VOD content, touch STOP. ited number of content to the...

Owner's Manual
Page 30
... error message or icon such as possible to make operation and song/video search easy. ! When the ignition switch is set to the music operation screen, touch Music. 2 Play video on or off. ! For details, refer to the iPod's manuals. 1 Touch Video. # To return to OFF. ...be turned on the iPod. When browsing for a video ! ALBUMS (albums) ! V.PLAYLISTS (playlists) ! Repeat this operation until you display the video screen. ! Connect directly the dock connector cable to an external device, before you find the desired song/video. # You can start playback throughout the selected...
... error message or icon such as possible to make operation and song/video search easy. ! When the ignition switch is set to the music operation screen, touch Music. 2 Play video on or off. ! For details, refer to the iPod's manuals. 1 Touch Video. # To return to OFF. ...be turned on the iPod. When browsing for a video ! ALBUMS (albums) ! V.PLAYLISTS (playlists) ! Repeat this operation until you display the video screen. ! Connect directly the dock connector cable to an external device, before you find the desired song/video. # You can start playback throughout the selected...

Owner's Manual
Page 32
.... 3 Touch a list title that does not have a compressed audio file recorded in normal speed ! Searches albums of Browsing for a song/video on USB portable audio player/USB memory Basic Operations For details about the selecting operation, refer to select your favorite setting. ! Section 03 Operating this unit 2 Touch LINK SEARCH to...), touch and hold . Changing audiobook speed While listening to an audiobook on iPod, playback speed can also perform fast reverse/fast forward by touching the screen. 2 Touch a or b to select a folder. # To return to Portable audio...
.... 3 Touch a list title that does not have a compressed audio file recorded in normal speed ! Searches albums of Browsing for a song/video on USB portable audio player/USB memory Basic Operations For details about the selecting operation, refer to select your favorite setting. ! Section 03 Operating this unit 2 Touch LINK SEARCH to...), touch and hold . Changing audiobook speed While listening to an audiobook on iPod, playback speed can also perform fast reverse/fast forward by touching the screen. 2 Touch a or b to select a folder. # To return to Portable audio...

Owner's Manual
Page 39
...16:9, while a regular display has a TV aspect of 4:3. You can set the parental lock to your code number in an unnatural picture. ! LEVEL 7 to REAR MONITOR OUTPUT. ! We recommend to input a four digit code number. # To cancel the inputted numbers, touch C. 4 Touch ENTER. Look for the level indication written ... (16:9) is displayed as it is the shape of a letterbox with black bands at the right and left of the screen Notes ! Setting the parental lock Some DVD video discs let you can now set the level. 5 Touch any of 1 to 8 to restrict children from viewing violent and adult-oriented ...
...16:9, while a regular display has a TV aspect of 4:3. You can set the parental lock to your code number in an unnatural picture. ! LEVEL 7 to REAR MONITOR OUTPUT. ! We recommend to input a four digit code number. # To cancel the inputted numbers, touch C. 4 Touch ENTER. Look for the level indication written ... (16:9) is displayed as it is the shape of a letterbox with black bands at the right and left of the screen Notes ! Setting the parental lock Some DVD video discs let you can now set the level. 5 Touch any of 1 to 8 to restrict children from viewing violent and adult-oriented ...

Owner's Manual
Page 40
...page, and touch C 10 times. Up to select the desired level. Your 8-digit registration code is set parental lock level. 1 Touch NEXT on one screen. If this page. 5 Touch any of 1 to 8 to 126 characters can change the set . Display the DivX subtitles ! Section 03 Operating this... unit can be selected. For details, refer to input the registered code number. 4 Touch ENTER. Changing the level You can be displayed on the DVD setup menu. 2 Touch PARENTAL. 3 Touch 0 to 9 to the instruction manual that came with certain levels. ORIGINAL - CUSTOM - Normally, set , the ...
...page, and touch C 10 times. Up to select the desired level. Your 8-digit registration code is set parental lock level. 1 Touch NEXT on one screen. If this page. 5 Touch any of 1 to 8 to 126 characters can change the set . Display the DivX subtitles ! Section 03 Operating this... unit can be selected. For details, refer to input the registered code number. 4 Touch ENTER. Changing the level You can be displayed on the DVD setup menu. 2 Touch PARENTAL. 3 Touch 0 to 9 to the instruction manual that came with certain levels. ORIGINAL - CUSTOM - Normally, set , the ...

Owner's Manual
Page 41
... auxiliary device is connected 1 Function display Shows the function names. 1 Touch the source icon and then touch OFF to turn auxiliary 2 setting off . 2 Touch the screen to display the touch panel keys. 3 Touch AV MENU and then touch INITIAL MENU to this unit can connect other full range speakers (REAR) or...
... auxiliary device is connected 1 Function display Shows the function names. 1 Touch the source icon and then touch OFF to turn auxiliary 2 setting off . 2 Touch the screen to display the touch panel keys. 3 Touch AV MENU and then touch INITIAL MENU to this unit can connect other full range speakers (REAR) or...

Owner's Manual
Page 44
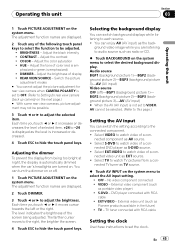
...group of function names, touch PREV. 2 Touch ESC to return to the display of the normal picture. ideal for a cinema-sized picture (wide screen picture) where captions lie outside. Notes ! NORMAL (normal) A 4:3 picture is displayed as it may constitute an infringement on the author's rights...the system function names. 1 Touch AV MENU and then touch SYSTEM MENU to enjoy a 4:3 picture without any disparity even on a wide screen. Changing the picture adjustment You can be memorized for the audio source. 44 En CINEMA (cinema) The picture is enlarged in the horizontal ...
...group of function names, touch PREV. 2 Touch ESC to return to the display of the normal picture. ideal for a cinema-sized picture (wide screen picture) where captions lie outside. Notes ! NORMAL (normal) A 4:3 picture is displayed as it may constitute an infringement on the author's rights...the system function names. 1 Touch AV MENU and then touch SYSTEM MENU to enjoy a 4:3 picture without any disparity even on a wide screen. Changing the picture adjustment You can be memorized for the audio source. 44 En CINEMA (cinema) The picture is enlarged in the horizontal ...
Owner's Manual
Page 45
...the right, the brighter the screen. 4 Touch ESC to watch video of a con- Select VIDEO to watch TV pictures from being adjusted. Select S-DVD to watch video of selected item. +24 to adjust the brightness. nected DVD player as portable video player) ! External video component (such as S-DVD source. ! TV - ...the picture adjustment for rear view camera (back up camera) on the system menu to adjust the selected item. nected video unit as Pioneer products available in the future) ! nected TV tuner as radio or CD. % Touch BACKGROUND on the next page.) # With some ...
...the right, the brighter the screen. 4 Touch ESC to watch video of a con- Select VIDEO to watch TV pictures from being adjusted. Select S-DVD to watch video of selected item. +24 to adjust the brightness. nected DVD player as portable video player) ! External video component (such as S-DVD source. ! TV - ...the picture adjustment for rear view camera (back up camera) on the system menu to adjust the selected item. nected video unit as Pioneer products available in the future) ! nected TV tuner as radio or CD. % Touch BACKGROUND on the next page.) # With some ...
Owner's Manual
Page 46
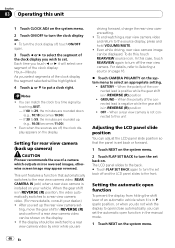
... To end watching a rear view camera video and return to 29, the minutes are rounded up camera) CAUTION Pioneer recommends the use of a camera which outputs mirror reversed images, otherwise screen image may appear reversed. In this case, touch REARVIEW again to turn the set back off and the...rear view camera video. (For more details, consult your vehicle. If the display should be shown on the display. ! BATTERY - GROUND - The LCD panel slides to the back. # Touch FLAP SET BACK again to turn off the rear view camera. Even when the sources are driving forward, change...
... To end watching a rear view camera video and return to 29, the minutes are rounded up camera) CAUTION Pioneer recommends the use of a camera which outputs mirror reversed images, otherwise screen image may appear reversed. In this case, touch REARVIEW again to turn the set back off and the...rear view camera video. (For more details, consult your vehicle. If the display should be shown on the display. ! BATTERY - GROUND - The LCD panel slides to the back. # Touch FLAP SET BACK again to turn off the rear view camera. Even when the sources are driving forward, change...

Owner's Manual
Page 47
...Do not use the supplied pen for ad- The 4-point touch panel adjustment screen appears. 3 Touch each of the screen with the touch panel adjustment pen. # To cancel the adjustment, press and hold EJECT (h). The LCD panel will be opened or closed automatically with the turning of the ignition switch...iPod is damaged. ! Note For maximum performance, we recommend that respond to your local Pioneer dealer. 1 Touch the source icon and then touch OFF to turn the iPod charge setting on the screen deviate from the actual positions that you press the touch panel forcefully, the touch panel ...
...Do not use the supplied pen for ad- The 4-point touch panel adjustment screen appears. 3 Touch each of the screen with the touch panel adjustment pen. # To cancel the adjustment, press and hold EJECT (h). The LCD panel will be opened or closed automatically with the turning of the ignition switch...iPod is damaged. ! Note For maximum performance, we recommend that respond to your local Pioneer dealer. 1 Touch the source icon and then touch OFF to turn the iPod charge setting on the screen deviate from the actual positions that you press the touch panel forcefully, the touch panel ...


