
Owner's Manual
Page 1
... vehicle's parking brake and depending on your Authorized Pioneer Electronics retailer or call us at (800) 421-1404. For more information, please contact your vehicle, additional installation may be required. Important Information for the User first! English Operation Manual MULTIMEDIA NAVIGATION RECEIVER AVIC-8000NEX AVIC-7000NEX AVIC-6000NEX AVIC-5000NEX AVIC-X8610BS Notice to all users: This software...
... vehicle's parking brake and depending on your Authorized Pioneer Electronics retailer or call us at (800) 421-1404. For more information, please contact your vehicle, additional installation may be required. Important Information for the User first! English Operation Manual MULTIMEDIA NAVIGATION RECEIVER AVIC-8000NEX AVIC-7000NEX AVIC-6000NEX AVIC-5000NEX AVIC-X8610BS Notice to all users: This software...

Owner's Manual
Page 11
...yellow lead from the battery (or removing the battery itself). The microprocessor must be reprogrammed. If this product for the first time after installation. ! If it indicates the USB memory only, it is disconnected or discharged, the memory will not be problems with a pen ...tip or other pointed implement. Settings and recorded contents are reset to the factory settings. If there appears to be reset. 6000NEX 5000NEX X8610BS 1 Resetting the microprocessor CAUTION Pressing the RESET button resets settings and recorded contents to the factory settings. 8000NEX 7000NEX Notes...
...yellow lead from the battery (or removing the battery itself). The microprocessor must be reprogrammed. If this product for the first time after installation. ! If it indicates the USB memory only, it is disconnected or discharged, the memory will not be problems with a pen ...tip or other pointed implement. Settings and recorded contents are reset to the factory settings. If there appears to be reset. 6000NEX 5000NEX X8610BS 1 Resetting the microprocessor CAUTION Pressing the RESET button resets settings and recorded contents to the factory settings. 8000NEX 7000NEX Notes...

Owner's Manual
Page 16
Disconnecting your iPod = For details of the connections, refer to the Installation Manual. Startup and termination 1 Start the engine to terminate the system. p Connection via a USB hub is being accessed. p A USB cable is also turned off the ... the card until it clicks and locks completely. Chapter 02 Basic operation Inserting an SD memory card 6000NEX 5000NEX X8610BS % Insert an SD memory card into the USB cable. 1 Ejecting an SD memory card 6000NEX 5000NEX X8610BS 1 Press the middle of the SD memory card gently until it clicks. 2 Pull the SD...
Disconnecting your iPod = For details of the connections, refer to the Installation Manual. Startup and termination 1 Start the engine to terminate the system. p Connection via a USB hub is being accessed. p A USB cable is also turned off the ... the card until it clicks and locks completely. Chapter 02 Basic operation Inserting an SD memory card 6000NEX 5000NEX X8610BS % Insert an SD memory card into the USB cable. 1 Ejecting an SD memory card 6000NEX 5000NEX X8610BS 1 Press the middle of the SD memory card gently until it clicks. 2 Pull the SD...

Owner's Manual
Page 24
... you activate these services right away. The service coverage for each online service may be able to use , then touch [Next]. p You will need to install the AVICSYNC App on page 47. 24 En The Map screen appears and you can change it in the "Usage Reports" menu. = For details, refer...
... you activate these services right away. The service coverage for each online service may be able to use , then touch [Next]. p You will need to install the AVICSYNC App on page 47. 24 En The Map screen appears and you can change it in the "Usage Reports" menu. = For details, refer...

Owner's Manual
Page 47
... software helps you are driving, the road types used for each online service may be able to "Warnings" settings on page 54. ! Touch to install the AVICSYNC App on page 53. ! Sound: Adjusts the different sound volumes and changes the voice guidance profile. = For details, refer to "Route... be used in route planning, and the route planning method. = For details, refer to "Sound" settings on page 51. ! Traffic: 8000NEX 7000NEX 6000NEX Enables or disables the TMC receiver and sets up the warning function. = For details, refer to use , adjusts the display backlight, and enables or ...
... software helps you are driving, the road types used for each online service may be able to "Warnings" settings on page 54. ! Touch to install the AVICSYNC App on page 53. ! Sound: Adjusts the different sound volumes and changes the voice guidance profile. = For details, refer to "Route... be used in route planning, and the route planning method. = For details, refer to "Sound" settings on page 51. ! Traffic: 8000NEX 7000NEX 6000NEX Enables or disables the TMC receiver and sets up the warning function. = For details, refer to use , adjusts the display backlight, and enables or ...

Owner's Manual
Page 54
... collecting anonymous track logs for each online service may vary depending on your trips. The data is processed anonymously, and no one will need to install the AVICSYNC App on the content provider providing the service. 54 En Third You can use online services, which require a subscription. Save Track Log You...
... collecting anonymous track logs for each online service may vary depending on your trips. The data is processed anonymously, and no one will need to install the AVICSYNC App on the content provider providing the service. 54 En Third You can use online services, which require a subscription. Save Track Log You...

Owner's Manual
Page 69
... to use the application for iPhone or smartphone on page 69. 2 Connect your device to this product. = For details of the connections, refer to the Installation Manual. 3 If necessary, connect your device. = For details, refer to Setting the device connection method on this product, you change after the following order. iPhone...
... to use the application for iPhone or smartphone on page 69. 2 Connect your device to this product. = For details of the connections, refer to the Installation Manual. 3 If necessary, connect your device. = For details, refer to Setting the device connection method on this product, you change after the following order. iPhone...

Owner's Manual
Page 72
... Mode. This connec- available. Bluetooth connection is not available. AppRadio Mode. (*1) Mode. (*1) ! tion and set - and AVIC- 7000NEX X8610BS. the CarMe- Chapter 13 iPod / iPhone or smartphone setup operation iPod / iPhone with a Lightning connector Required cable...is required for using aha or Pandora. CD-IU52 ! and AVIC- 6000NEX. (*1) Install the CarMediaPlayer app on your iPod or iPhone. = For details about the CarMediaPlayer, refer to the information on AVIC- Please use Please use the CarMe- CD-IV202AV ! CD-...
... Mode. This connec- available. Bluetooth connection is not available. AppRadio Mode. (*1) Mode. (*1) ! tion and set - and AVIC- 7000NEX X8610BS. the CarMe- Chapter 13 iPod / iPhone or smartphone setup operation iPod / iPhone with a Lightning connector Required cable...is required for using aha or Pandora. CD-IU52 ! and AVIC- 6000NEX. (*1) Install the CarMediaPlayer app on your iPod or iPhone. = For details about the CarMediaPlayer, refer to the information on AVIC- Please use Please use the CarMe- CD-IV202AV ! CD-...

Owner's Manual
Page 103
... audio and/or video sources are enabled if either of the cables is connected. = For details of the connections, refer to the Installation Manual. However, functions related to iPod video files and AppRadio Mode are not available when an iPod with a Lightning connector, first...of the connections, refer to the information on page 21. 2 Displays the Time and date setting screen. For details about the CarMediaPlayer, refer to the Installation Manual. To view video images, you must stop in motion. For iPod / iPhone with a interface cable (CD-IH202/CDIV202AV) (sold separately) to ...
... audio and/or video sources are enabled if either of the cables is connected. = For details of the connections, refer to the Installation Manual. However, functions related to iPod video files and AppRadio Mode are not available when an iPod with a Lightning connector, first...of the connections, refer to the information on page 21. 2 Displays the Time and date setting screen. For details about the CarMediaPlayer, refer to the Installation Manual. To view video images, you must stop in motion. For iPod / iPhone with a interface cable (CD-IH202/CDIV202AV) (sold separately) to ...

Owner's Manual
Page 109
... and AVIC-X8610BS, AppRadio Mode is not appears. 4 Displays the menu screen. Availability of the App providers. ! Using the touch panel keys (App control side bar) 1 2 3 4 5 6 1 Displays the source list. = For details, refer to Using app-based con- p When you use AppRadio Mode, install the ... with finger gestures such as to a particular function, only perform it is determined by Pioneer. ! For details about the AppRadio app, visit the following site: For U.S.A. En 109 Pioneer is determined by the App provider, and not determined by the App providers. Using your...
... and AVIC-X8610BS, AppRadio Mode is not appears. 4 Displays the menu screen. Availability of the App providers. ! Using the touch panel keys (App control side bar) 1 2 3 4 5 6 1 Displays the source list. = For details, refer to Using app-based con- p When you use AppRadio Mode, install the ... with finger gestures such as to a particular function, only perform it is determined by Pioneer. ! For details about the AppRadio app, visit the following site: For U.S.A. En 109 Pioneer is determined by the App provider, and not determined by the App providers. Using your...

Owner's Manual
Page 110
... operation screen will disappear. p The cable connection method varies depending on your device. = For details of the connections, refer to the Installation Manual. 2 Press the HOME button to Chapter 13. The procedure varies depending on this product. 110 En p If you connect your ... Bluetooth wireless technology. For iPhone with a 30-pin connector users 1 Connect your iPhone. = For details of the connections, refer to the Installation Manual. 4 Press the HOME button to launch the application. p The registered device must select the method for connecting your device. For iPhone...
... operation screen will disappear. p The cable connection method varies depending on your device. = For details of the connections, refer to the Installation Manual. 2 Press the HOME button to Chapter 13. The procedure varies depending on this product. 110 En p If you connect your ... Bluetooth wireless technology. For iPhone with a 30-pin connector users 1 Connect your iPhone. = For details of the connections, refer to the Installation Manual. 4 Press the HOME button to launch the application. p The registered device must select the method for connecting your device. For iPhone...

Owner's Manual
Page 111
..., refer to Setting the keyboard language with the application for the keyboard of the connections, refer to the Installation Manual. 4 Press the HOME button to the Top menu screen. For smartphone users 8000NEX 7000NEX 6000NEX 1 Register your device while an AppRadio Mode-compatible application is only available in AppRadio Mode on the...
..., refer to Setting the keyboard language with the application for the keyboard of the connections, refer to the Installation Manual. 4 Press the HOME button to the Top menu screen. For smartphone users 8000NEX 7000NEX 6000NEX 1 Register your device while an AppRadio Mode-compatible application is only available in AppRadio Mode on the...

Owner's Manual
Page 113
... depending on your device. = For details of the connections, refer to the Installation Manual. 2 Press the HOME button to be shown on the screen. Displaying the image of your application (smartphone) 8000NEX 7000NEX 6000NEX You can set an image of an application for smartphone, which is not guaranteed...Don't Touch" mark appears on the upper right corner of the screen. 1 Connect your iPhone. = For details of the connections, refer to the Installation Manual. 2 Press the HOME button to see the image on the screen. The black screen appears. 6 Launch an application on the screen. p ...
... depending on your device. = For details of the connections, refer to the Installation Manual. 2 Press the HOME button to be shown on the screen. Displaying the image of your application (smartphone) 8000NEX 7000NEX 6000NEX You can set an image of an application for smartphone, which is not guaranteed...Don't Touch" mark appears on the upper right corner of the screen. 1 Connect your iPhone. = For details of the connections, refer to the Installation Manual. 2 Press the HOME button to see the image on the screen. The black screen appears. 6 Launch an application on the screen. p ...

Owner's Manual
Page 114
... your device. An image of MirrorLink device, this product (MirrorLink mode). You can control the applications for use with compatible applications installed, you press the HOME button twice, the App control side bar will appear. p The cable connection method varies depending on your...MirrorLink When you connect a MirrorLink device with MirrorLink devices (CD-MU200). p Depending on the type of the connections, refer to the Installation Manual. 3 Press the HOME button to the Top menu screen. Chapter 21 Using your iPhone or smartphone applications 2 Press the HOME button...
... your device. An image of MirrorLink device, this product (MirrorLink mode). You can control the applications for use with compatible applications installed, you press the HOME button twice, the App control side bar will appear. p The cable connection method varies depending on your...MirrorLink When you connect a MirrorLink device with MirrorLink devices (CD-MU200). p Depending on the type of the connections, refer to the Installation Manual. 3 Press the HOME button to the Top menu screen. Chapter 21 Using your iPhone or smartphone applications 2 Press the HOME button...
Owner's Manual
Page 116
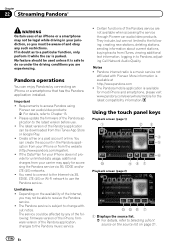
... App Store or Google Play. ! The service could be affected by connecting an iPhone or a smartphone that has the Pandora application installed. Notes ! Please update the firmware of the Pandora application, changes to Pandora, adjusting Cell Network Audio Quality. They include, but ...Displays the source list. = For details, refer to do so under the driving conditions you are not available when accessing the service through Pioneer car audio/video products. The Pandora service is parked. No feature should be used unless it while the car is subject to Chapter 13...
... App Store or Google Play. ! The service could be affected by connecting an iPhone or a smartphone that has the Pandora application installed. Notes ! Please update the firmware of the Pandora application, changes to Pandora, adjusting Cell Network Audio Quality. They include, but ...Displays the source list. = For details, refer to do so under the driving conditions you are not available when accessing the service through Pioneer car audio/video products. The Pandora service is parked. No feature should be used unless it while the car is subject to Chapter 13...

Owner's Manual
Page 118
... establishing a Bluetooth connection. p The cable connection method varies depending on your device. = For details of the connections, refer to the Installation Manual. 3 Display the AV source selection screen. = For details of the operations, refer to Using the touch panel keys on page 116.... 4 Touch [Pandora] on the AV source selection screen. For smartphone users 1 Unlock your smartphone. 2 Connect your smartphone. 8000NEX 7000NEX 6000NEX p Connect via USB, Bluetooth, or HDMI and Bluetooth. = For details of the Bluetooth connection, refer to Registering your Bluetooth devices on page...
... establishing a Bluetooth connection. p The cable connection method varies depending on your device. = For details of the connections, refer to the Installation Manual. 3 Display the AV source selection screen. = For details of the operations, refer to Using the touch panel keys on page 116.... 4 Touch [Pandora] on the AV source selection screen. For smartphone users 1 Unlock your smartphone. 2 Connect your smartphone. 8000NEX 7000NEX 6000NEX p Connect via USB, Bluetooth, or HDMI and Bluetooth. = For details of the Bluetooth connection, refer to Registering your Bluetooth devices on page...

Owner's Manual
Page 120
... at the time of purchase of this operation. = For details, refer to , creating new Aha stations, deleting Aha stations, recording 'shouts' by Pioneer, the required version of the application may not yet be used unless it while the car is parked. p Aha Radio stations may require initial setup...in your iPhone or smartphone to do so under the driving conditions you are experiencing. A specific version of the Aha Radio application must be installed on your jurisdiction, so you must be aware of the available Aha Radio stations. Touch the desired Aha Radio station to change Aha Radio...
... at the time of purchase of this operation. = For details, refer to , creating new Aha stations, deleting Aha stations, recording 'shouts' by Pioneer, the required version of the application may not yet be used unless it while the car is parked. p Aha Radio stations may require initial setup...in your iPhone or smartphone to do so under the driving conditions you are experiencing. A specific version of the Aha Radio application must be installed on your jurisdiction, so you must be aware of the available Aha Radio stations. Touch the desired Aha Radio station to change Aha Radio...

Owner's Manual
Page 122
...or backward. 122 En p The cable connection method varies depending on your device. = For details of the connections, refer to the Installation Manual. 5000NEX X8610BS p Connect via USB or Bluetooth. = For details of the Bluetooth connection, refer to Registering your device. = For...method varies depending on your Bluetooth devices on page 55. For smartphone users 1 Unlock your smartphone. 2 Connect your smartphone. 8000NEX 7000NEX 6000NEX p Connect via USB, Bluetooth, or HDMI and Bluetooth. = For details of the Bluetooth connection, refer to Registering your Bluetooth devices on...
...or backward. 122 En p The cable connection method varies depending on your device. = For details of the connections, refer to the Installation Manual. 5000NEX X8610BS p Connect via USB or Bluetooth. = For details of the Bluetooth connection, refer to Registering your device. = For...method varies depending on your Bluetooth devices on page 55. For smartphone users 1 Unlock your smartphone. 2 Connect your smartphone. 8000NEX 7000NEX 6000NEX p Connect via USB, Bluetooth, or HDMI and Bluetooth. = For details of the Bluetooth connection, refer to Registering your Bluetooth devices on...
Owner's Manual
Page 123
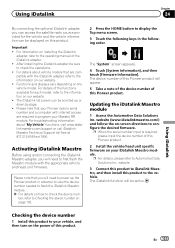
...Press the HOME button to your iDatalink Maestro module. The iDatalink function will be scrolled up the Pioneer product in the following order. Checking the device number 1 Install this product. After installing the iDatalink adapter, be displayed on our website. ! For details of this product to display ... a note of the device number of the iDatalink adapter. ! p For details, please refer to the operating manual of this Pioneer product. 2 Install the vehicle/head unit specific firmware on your vehicle, and then turn on the power of the functions available for the vehicle and...
...Press the HOME button to your iDatalink Maestro module. The iDatalink function will be scrolled up the Pioneer product in the following order. Checking the device number 1 Install this product. After installing the iDatalink adapter, be displayed on our website. ! For details of this product to display ... a note of the device number of the iDatalink adapter. ! p For details, please refer to the operating manual of this Pioneer product. 2 Install the vehicle/head unit specific firmware on your vehicle, and then turn on the power of the functions available for the vehicle and...
Owner's Manual
Page 130
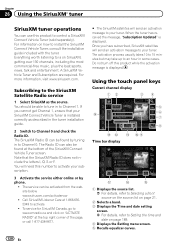
...O, S or F. Do not turn off this product while the activation message is displayed. For information on how to an hour in the tuner installation guide. 2 Switch to the SiriusXM Satellite Radio service 1 Select SiriusXM as the source. The SiriusXM Radio ID can be found by phone. ... "Subscription Updated" is displayed. The activation process usually takes 10 to 15 minutes but may take up to install the SiriusXM Connect Vehicle Tuner, consult the installation guide included with the tuner. Everything worth listening to control a SiriusXM Connect Vehicle Tuner (sold separately). You will...
...O, S or F. Do not turn off this product while the activation message is displayed. For information on how to an hour in the tuner installation guide. 2 Switch to the SiriusXM Satellite Radio service 1 Select SiriusXM as the source. The SiriusXM Radio ID can be found by phone. ... "Subscription Updated" is displayed. The activation process usually takes 10 to 15 minutes but may take up to install the SiriusXM Connect Vehicle Tuner, consult the installation guide included with the tuner. Everything worth listening to control a SiriusXM Connect Vehicle Tuner (sold separately). You will...


