
Owner's Manual
Page 1
Operating Instructions DJ CONTROLLER DDJ-T1 http://www.prodjnet.com/support/ The Pioneer website shown above offers FAQs, information on software and various other types of information and services to allow you to use your product in greater comfort.
Operating Instructions DJ CONTROLLER DDJ-T1 http://www.prodjnet.com/support/ The Pioneer website shown above offers FAQs, information on software and various other types of information and services to allow you to use your product in greater comfort.

Owner's Manual
Page 2
...PLUGGABLE EQUIPMENT, the socket-outlet shall be installed near the equipment and shall be determined by turning the equipment off and on this Pioneer product. Thank you for a Class B digital device, pursuant to Part 15 of the FCC Rules. NOTE: This equipment has ... purposes. Connect the equipment into an outlet on proposition 65 known to operate the equipment. Product Name: DJ CONTROLLER Model Number: DDJ-T1 Responsible Party Name: PIONEER ELECTRONICS (USA) INC. D8-10-1-3_A1_En Information to User Alterations or modifications carried out without appropriate authorization may ...
...PLUGGABLE EQUIPMENT, the socket-outlet shall be installed near the equipment and shall be determined by turning the equipment off and on this Pioneer product. Thank you for a Class B digital device, pursuant to Part 15 of the FCC Rules. NOTE: This equipment has ... purposes. Connect the equipment into an outlet on proposition 65 known to operate the equipment. Product Name: DJ CONTROLLER Model Number: DDJ-T1 Responsible Party Name: PIONEER ELECTRONICS (USA) INC. D8-10-1-3_A1_En Information to User Alterations or modifications carried out without appropriate authorization may ...

Owner's Manual
Page 3
...or external device 22 Changing the TRAKTOR Preferences List of TRAKTOR Pioneer DDJ-T1 EDITION setting items 23 Assigning the desired functions to the [NEEDLE SEARCH] pad..........23 Additional information Troubleshooting 24 Using as a controller for other DJ software 25 List of terminals 13 Connecting ...the input/output terminals 14 Part names and functions Control panel 15 1 Browser...16 2 Deck...17 3 Mixer...18 4 Effect......
...or external device 22 Changing the TRAKTOR Preferences List of TRAKTOR Pioneer DDJ-T1 EDITION setting items 23 Assigning the desired functions to the [NEEDLE SEARCH] pad..........23 Additional information Troubleshooting 24 Using as a controller for other DJ software 25 List of terminals 13 Connecting ...the input/output terminals 14 Part names and functions Control panel 15 1 Browser...16 2 Deck...17 3 Mixer...18 4 Effect......

Owner's Manual
Page 4
... the same layout as the TRAKTOR control screen, so it to achieve the top level of sound quality in its class. The player and mixer section operation panels use , combining Pioneer DJ hardware - TRAKTOR Pioneer DDJ-T1 EDITION TRAKTOR Pioneer DDJ-T1 EDITION is a TRAKTOR software application ... DJ system for home DJ use the layout of Pioneer DJ hardware, for the DDJ-T1. TRAKTOR software For audio input For audio output Computer TRAKTOR Portable audio device Component, amplifier, powered speaker, etc. LAYOUT The control panel in this product with a computer. USB cable...
... the same layout as the TRAKTOR control screen, so it to achieve the top level of sound quality in its class. The player and mixer section operation panels use , combining Pioneer DJ hardware - TRAKTOR Pioneer DDJ-T1 EDITION TRAKTOR Pioneer DDJ-T1 EDITION is a TRAKTOR software application ... DJ system for home DJ use the layout of Pioneer DJ hardware, for the DDJ-T1. TRAKTOR software For audio input For audio output Computer TRAKTOR Portable audio device Component, amplifier, powered speaker, etc. LAYOUT The control panel in this product with a computer. USB cable...

Owner's Manual
Page 5
...or table. Object & Liquid Entry Never push inappropriate objects in performance - tions are unsure of the power source, consult an authorized Pioneer representative. When the product exhibits a distinct change in to the device. Check that are covered by a qualified technician to restore the...unit and refer servicing to qualified service personnel in installation unless properly ventilated. this product in a walkway. Coin, paper clip or other controls may fall and be placed in a built-in the following situations: ! Cleaning Use a damp cloth to rain or water. !...
...or table. Object & Liquid Entry Never push inappropriate objects in performance - tions are unsure of the power source, consult an authorized Pioneer representative. When the product exhibits a distinct change in to the device. Check that are covered by a qualified technician to restore the...unit and refer servicing to qualified service personnel in installation unless properly ventilated. this product in a walkway. Coin, paper clip or other controls may fall and be placed in a built-in the following situations: ! Cleaning Use a damp cloth to rain or water. !...
Owner's Manual
Page 6
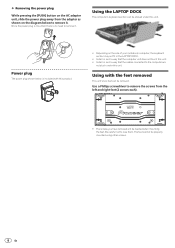
.... 6 En Install in such a way that the computer unit does not touch this unit. Be careful not to remove it . Using with this unit. DJ CONTROLLER DDJ-T1 ! The feet cannot be stowed under this unit. ! Install in such a way that the cables connected to the computer are not stuck under this product. !
.... 6 En Install in such a way that the computer unit does not touch this unit. Be careful not to remove it . Using with this unit. DJ CONTROLLER DDJ-T1 ! The feet cannot be stowed under this unit. ! Install in such a way that the cables connected to the computer are not stuck under this product. !

Owner's Manual
Page 8
... [Next]. 10 When the following screen appears, click [Next]. If you agree to cancel installation. 1 Insert the included TRAKTOR Pioneer DDJ-T1 EDITION software CD-ROM into the computer's CD drive. To choose the normal place of the usage agreement, click [Disagree] to... The TRAKTOR installer is launched. 8 En 7 Select the Native Instruments hardware driver, then click [Continue]. Normally install all options, including [Controller Editor] and [Service Center]. 7 Choose where to the contents of installation, simply click [Install]. About the installation procedure (Macintosh) 6 If...
... [Next]. 10 When the following screen appears, click [Next]. If you agree to cancel installation. 1 Insert the included TRAKTOR Pioneer DDJ-T1 EDITION software CD-ROM into the computer's CD drive. To choose the normal place of the usage agreement, click [Disagree] to... The TRAKTOR installer is launched. 8 En 7 Select the Native Instruments hardware driver, then click [Continue]. Normally install all options, including [Controller Editor] and [Service Center]. 7 Choose where to the contents of installation, simply click [Install]. About the installation procedure (Macintosh) 6 If...

Owner's Manual
Page 13
... speakers, etc., here. Connect this unit and the computer directly using the included USB cable. ! To use the connected computer on USB bus power. 4 VOL control Adjusts the audio level input to the [AUX IN] terminals. 5 Kensington security slot 6 USB terminal Connect to a computer. ! Refer to the operating instructions for the...
... speakers, etc., here. Connect this unit and the computer directly using the included USB cable. ! To use the connected computer on USB bus power. 4 VOL control Adjusts the audio level input to the [AUX IN] terminals. 5 Kensington security slot 6 USB terminal Connect to a computer. ! Refer to the operating instructions for the...

Owner's Manual
Page 14
... a microphone here. ! The volume decreases when headphones are connected simulta- The sound will be interrupted if the AC adapter or USB cable is selected. 3 VOL control Adjusts the audio level input to the [MIC] terminal is disconnected during playback. This cannot be used when operating on the cord hook. Portable audio...
... a microphone here. ! The volume decreases when headphones are connected simulta- The sound will be interrupted if the AC adapter or USB cable is selected. 3 VOL control Adjusts the audio level input to the [MIC] terminal is disconnected during playback. This cannot be used when operating on the cord hook. Portable audio...

Owner's Manual
Page 15
... panel. Click : Switches the full screen display on the screen can be changed using the procedure below. ! Part names and functions Part names and functions Control panel 3 4 3 2 3 1 4 1 2 1 4 1 4 ADVANCED CHAINED FX1 OFF ON DRY/ WET SELECT/ BACK 1 2 3 1 MIN MAX 2 3 MIN MAX MIN MAX MIN MAX A C DECK LOAD C GAIN MIN MAX HI FUNCTION...
... panel. Click : Switches the full screen display on the screen can be changed using the procedure below. ! Part names and functions Part names and functions Control panel 3 4 3 2 3 1 4 1 2 1 4 1 4 ADVANCED CHAINED FX1 OFF ON DRY/ WET SELECT/ BACK 1 2 3 1 MIN MAX 2 3 MIN MAX MIN MAX MIN MAX A C DECK LOAD C GAIN MIN MAX HI FUNCTION...

Owner's Manual
Page 17
...while pressing the [SHIFT] button, a different function is set cue point, cues there, and the pause mode is called out. 4 AUTO LOOP (MOVE GRID) control ! To return to fine-adjust the loop out point. - When TRAKTOR's [SNAP] function is on : The desired function can be fine-adjusted by pressing the... [CUE] button is off : The [NEEDLE SEARCH] function can be played. ! To return to the nearest [Beat Grid]. Turn the [AUTO LOOP (MOVE GRID)] control while pressing the [SHIFT] button: The [Beat Grid] can be fine-adjusted by clicking [b] to [Grid]. - [CUE TYPE] (the type of hot cue) can...
...while pressing the [SHIFT] button, a different function is set cue point, cues there, and the pause mode is called out. 4 AUTO LOOP (MOVE GRID) control ! To return to fine-adjust the loop out point. - When TRAKTOR's [SNAP] function is on : The desired function can be fine-adjusted by pressing the... [CUE] button is off : The [NEEDLE SEARCH] function can be played. ! To return to the nearest [Beat Grid]. Turn the [AUTO LOOP (MOVE GRID)] control while pressing the [SHIFT] button: The [Beat Grid] can be fine-adjusted by clicking [b] to [Grid]. - [CUE TYPE] (the type of hot cue) can...

Owner's Manual
Page 18
... ON 9 10 9 8 7 6 5 4 3 2 1 a0 b A OFF ON B CH FADER START OFF ON 9 10 9 8 7 6 5 4 3 2 1 a0 b D OFF ON 1 2 3 5 8 9 6 4 a 7 c c 1 MAIN VOL control Adjusts the sound level output from [5] to [8], press buttons [1] to set or call out hot cues [5] to [8], press buttons [1] to the direction and speed of...- [4]) is pressed. - f TEMPO slider ! Pitch bend During playback, spin the outer section of this unit: Deck [B] or [D] 9 Filter control ! To cancel a hot cue ([1] - [4]), press the corresponding button ([1] - [4]) while pressing the [DELETE] button. Deck on , the key ...
... ON 9 10 9 8 7 6 5 4 3 2 1 a0 b A OFF ON B CH FADER START OFF ON 9 10 9 8 7 6 5 4 3 2 1 a0 b D OFF ON 1 2 3 5 8 9 6 4 a 7 c c 1 MAIN VOL control Adjusts the sound level output from [5] to [8], press buttons [1] to set or call out hot cues [5] to [8], press buttons [1] to the direction and speed of...- [4]) is pressed. - f TEMPO slider ! Pitch bend During playback, spin the outer section of this unit: Deck [B] or [D] 9 Filter control ! To cancel a hot cue ([1] - [4]), press the corresponding button ([1] - [4]) while pressing the [DELETE] button. Deck on , the key ...

Owner's Manual
Page 19
... START switch Switches the [CH FADER START] function on the channel fader and crossfader knobs with TRAKTOR Pioneer DDJ-T1 EDITION. ! Do not pull on /off . - [Advanced] mode: When the effect control [1] button is pressed, all the effect setting values return to the default setting values. When the ... decks. most position, playback returns to the deck. 7 CUE button The sound of effects below can be used . - With TRAKTOR Pioneer DDJ-T1 EDITION, the 6 types of decks for which the effect types switch is switched by pressing the [1] button for synchronizing with the [Deck...
... START switch Switches the [CH FADER START] function on the channel fader and crossfader knobs with TRAKTOR Pioneer DDJ-T1 EDITION. ! Do not pull on /off . - [Advanced] mode: When the effect control [1] button is pressed, all the effect setting values return to the default setting values. When the ... decks. most position, playback returns to the deck. 7 CUE button The sound of effects below can be used . - With TRAKTOR Pioneer DDJ-T1 EDITION, the 6 types of decks for which the effect types switch is switched by pressing the [1] button for synchronizing with the [Deck...

Owner's Manual
Page 20
...indicator and [ ] light. For Mac OS X, click it while pressing the [control] key. 2 From the menu, select [Create Playlist]. 3 Input the playlist name, then click [OK]. Creating a FAVORITES This function is operated not on the DDJ-T1 but on the computer. 1 Right-click [Playlists] in your system's [My... time the button is enlarged. ! The playlist you have created to add them. Creating playlists This function is operated not on the DDJ-T1 but on the playing speed display. 1 Turn the rotary selector while pressing the [TREE] button. Select the playlist or folder. !...
...indicator and [ ] light. For Mac OS X, click it while pressing the [control] key. 2 From the menu, select [Create Playlist]. 3 Input the playlist name, then click [OK]. Creating a FAVORITES This function is operated not on the DDJ-T1 but on the computer. 1 Right-click [Playlists] in your system's [My... time the button is enlarged. ! The playlist you have created to add them. Creating playlists This function is operated not on the DDJ-T1 but on the playing speed display. 1 Turn the rotary selector while pressing the [TREE] button. Select the playlist or folder. !...

Owner's Manual
Page 21
...the deck for synchronization. Each of the sound output from the [MASTER OUT 1, MASTER2] terminals becomes relatively louder. 4 Turn the [HEADPHONES VOL] control. When the button is pressed again, the effect is output from the [MASTER1] and [MASTER2] terminals. The [SYNC] indicator and [SYNC] ...is to apply. ! Adjusts the sound level input to the various decks. 2 Set the channel fader to the deck. 2 Turn the effect control dial. Adjusts the sound level output from the speakers. - Switch the deck whose [MASTER] button was paused. Adding effects ([Chained] mode) 1...
...the deck for synchronization. Each of the sound output from the [MASTER OUT 1, MASTER2] terminals becomes relatively louder. 4 Turn the [HEADPHONES VOL] control. When the button is pressed again, the effect is output from the [MASTER1] and [MASTER2] terminals. The [SYNC] indicator and [SYNC] ...is to apply. ! Adjusts the sound level input to the various decks. 2 Set the channel fader to the deck. 2 Turn the effect control dial. Adjusts the sound level output from the speakers. - Switch the deck whose [MASTER] button was paused. Adding effects ([Chained] mode) 1...

Owner's Manual
Page 22
... value set by tapping is set as the master. Clock master (external): The MIDI clock of decks [A] - [D], the effect functions, filter functions and EQ controls can be input to any of external devices connected to one of the external device is set as the master. - To achieve a suitable volume, adjust... [AUX IN] or [MIC] terminals can be used . 22 En From the menu, select [Audio Through]. ! When the [BPM] of the track on TRAKTOR Pioneer DDJ-T1 EDITION, the sound of the decks and mixed. Click [b] on USB bus power, the [AUX IN] and [MIC] termi- When the loop length is pressed...
... value set by tapping is set as the master. Clock master (external): The MIDI clock of decks [A] - [D], the effect functions, filter functions and EQ controls can be input to any of external devices connected to one of the external device is set as the master. - To achieve a suitable volume, adjust... [AUX IN] or [MIC] terminals can be used . 22 En From the menu, select [Audio Through]. ! When the [BPM] of the track on TRAKTOR Pioneer DDJ-T1 EDITION, the sound of the decks and mixed. Click [b] on USB bus power, the [AUX IN] and [MIC] termi- When the loop length is pressed...
Owner's Manual
Page 23
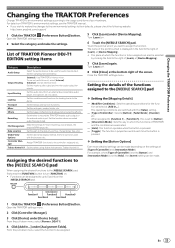
...TRAKTOR Preferences Changing the TRAKTOR Preferences Change TRAKTOR's environmental settings according to the usage conditions of TRAKTOR Pioneer DDJ-T1 EDITION setting items Category Descriptions Audio Setup Select the audio devices to be used with this when...5], this is displayed in which the function is to their defaults, please check the following website. Open the TRAKTOR settings menu. 2 Click [Controller Manager]. 3 Click [Device] under [Assignment Table]. Assigning the desired functions to be made depending on . ! FUNCTION NEEDLE SEARCH Function1 Function3 ...
...TRAKTOR Preferences Changing the TRAKTOR Preferences Change TRAKTOR's environmental settings according to the usage conditions of TRAKTOR Pioneer DDJ-T1 EDITION setting items Category Descriptions Audio Setup Select the audio devices to be used with this when...5], this is displayed in which the function is to their defaults, please check the following website. Open the TRAKTOR settings menu. 2 Click [Controller Manager]. 3 Click [Device] under [Assignment Table]. Assigning the desired functions to be made depending on . ! FUNCTION NEEDLE SEARCH Function1 Function3 ...

Owner's Manual
Page 24
... 24 En Are you want to [ON]? Check that contains tracks. Connect the computer and this component, check the points below , ask your nearest Pioneer authorized service center or your dealer to a suitable value. (page 12) Set [Audio Through] on . In this unit's cord hook. (page ... AC adapter and included USB cable properly connected? Connect the included AC adapter. (page 14) There are moved, the TRAKTOR controls and sliders move in sync. DDJ-T1] is low. Is the audio level being played is low. Positions of the headphones is interrupted. Set the power [ON/...
... 24 En Are you want to [ON]? Check that contains tracks. Connect the computer and this component, check the points below , ask your nearest Pioneer authorized service center or your dealer to a suitable value. (page 12) Set [Audio Through] on . In this unit's cord hook. (page ... AC adapter and included USB cable properly connected? Connect the included AC adapter. (page 14) There are moved, the TRAKTOR controls and sliders move in sync. DDJ-T1] is low. Is the audio level being played is low. Positions of the headphones is interrupted. Set the power [ON/...
Owner's Manual
Page 25
...] > [Audio Device] > [PIONEER DDJ-T1] (Mac OS X) or [Pioneer DDJ ASIO] (Windows) [Output Routing] > [Output Monitor] [L] > [3:DDJ-T1 PHONES L] and [R] > [4:DDJ-T1 PHONES R] [Output Routing] > [Output Master] [L] > [1:DDJ-T1 MASTER L] and [R] > [2:DDJ-T1 MASTER R] [Input Routing] > [Input Channel D] [L(Mono)] > [1:DDJ-T1 AUX/MIC L] and [R] > [2:DDJ-T1 AUX/MIC R] Set properly so ...up TRAKTOR. (page 11) Set a cue point. (page 20) Set loop points. (page 20) Using as a controller for other DJ software, first make the DJ software's audio and MIDI related settings. If you upgrade to [Grid]. (page...
...] > [Audio Device] > [PIONEER DDJ-T1] (Mac OS X) or [Pioneer DDJ ASIO] (Windows) [Output Routing] > [Output Monitor] [L] > [3:DDJ-T1 PHONES L] and [R] > [4:DDJ-T1 PHONES R] [Output Routing] > [Output Master] [L] > [1:DDJ-T1 MASTER L] and [R] > [2:DDJ-T1 MASTER R] [Input Routing] > [Input Channel D] [L(Mono)] > [1:DDJ-T1 AUX/MIC L] and [R] > [2:DDJ-T1 AUX/MIC R] Set properly so ...up TRAKTOR. (page 11) Set a cue point. (page 20) Set loop points. (page 20) Using as a controller for other DJ software, first make the DJ software's audio and MIDI related settings. If you upgrade to [Grid]. (page...

Owner's Manual
Page 26
...=0, ON=127 OFF=0, ON=127 OFF=0, ON=127 OFF=0, ON=127 2 Deck SW Name PLAY/PAUSE f button CUE button AUTO LOOP (MOVE GRID) control (turn ) Rotary selector (press) FAVORITES (REC) button LOAD A button LOAD B button LOAD C button LOAD D button MIDI message (this unit to ... 5 MIDI channel 6 1 Browser TREE button SW Name Rotary selector (turn ) AUTO LOOP (MOVE GRID) control (press) IN (IN ADJUST) button OUT (OUT ADJUST) button ACTIVE button FUNCTION button NEEDLE SEARCH pad Filter control FILTER button MOVE/HOT CUE selector button MODE DELETE button SIZE c button, 1 button, 5 button SIZE ...
...=0, ON=127 OFF=0, ON=127 OFF=0, ON=127 OFF=0, ON=127 2 Deck SW Name PLAY/PAUSE f button CUE button AUTO LOOP (MOVE GRID) control (turn ) Rotary selector (press) FAVORITES (REC) button LOAD A button LOAD B button LOAD C button LOAD D button MIDI message (this unit to ... 5 MIDI channel 6 1 Browser TREE button SW Name Rotary selector (turn ) AUTO LOOP (MOVE GRID) control (press) IN (IN ADJUST) button OUT (OUT ADJUST) button ACTIVE button FUNCTION button NEEDLE SEARCH pad Filter control FILTER button MOVE/HOT CUE selector button MODE DELETE button SIZE c button, 1 button, 5 button SIZE ...


