Owner's Manual
Page 3
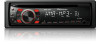
... Preset number. 2 number/ ! Press to pause or resume playback. Replacing the battery 1 Slide the tray out on . Remove the battery if the remote control is on the back of ATT, which is incorrectly replaced. peratures or direct sunlight. ! Section...) must not be swallowed, consult a doctor immediately. ! Do not store the battery with metallic tools. ! special handling may not function properly in direct sunlight. ! ior, remove any cables and devices attached to 6 2 h (eject) 9 (clock) 3 AUDIO a a/b/c/d 4 SRC/OFF b FUNC 5 Disc loading slot c D (DISP/SCRL)...
... Preset number. 2 number/ ! Press to pause or resume playback. Replacing the battery 1 Slide the tray out on . Remove the battery if the remote control is on the back of ATT, which is incorrectly replaced. peratures or direct sunlight. ! Section...) must not be swallowed, consult a doctor immediately. ! Do not store the battery with metallic tools. ! special handling may not function properly in direct sunlight. ! ior, remove any cables and devices attached to 6 2 h (eject) 9 (clock) 3 AUDIO a a/b/c/d 4 SRC/OFF b FUNC 5 Disc loading slot c D (DISP/SCRL)...
Owner's Manual
Page 4
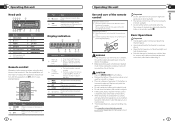
... in the display. 2 When you turn local seek tuning on . To cancel the storage process, press b. Section 02 Operating this unit Removing the front panel to protect your vehicle when removing the front panel. Turning the unit on 1 Press SRC/OFF to turn scan play ) 1 Press c or d to the playback display, select...
... in the display. 2 When you turn local seek tuning on . To cancel the storage process, press b. Section 02 Operating this unit Removing the front panel to protect your vehicle when removing the front panel. Turning the unit on 1 Press SRC/OFF to turn scan play ) 1 Press c or d to the playback display, select...

Owner's Manual
Page 7
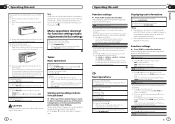
... down. 2 Insert the supplied extraction keys into both sides of the unit until they click into place. 3 Pull the unit out of the dashboard. 1 Screw Removing and re-attaching the front panel You can be damaged if it toward you. Press the detach button and push the front panel upward and... appropriate position where the holes on the bracket and the side of less than 60°. 4 60° 5 1 2 3 DIN front/rear mount This unit can remove the front panel to bend the metal tabs (90°) into the dashboard. Optimum performance is obtained when the unit is installed securely in shallow...
... down. 2 Insert the supplied extraction keys into both sides of the unit until they click into place. 3 Pull the unit out of the dashboard. 1 Screw Removing and re-attaching the front panel You can be damaged if it toward you. Press the detach button and push the front panel upward and... appropriate position where the holes on the bracket and the side of less than 60°. 4 60° 5 1 2 3 DIN front/rear mount This unit can remove the front panel to bend the metal tabs (90°) into the dashboard. Optimum performance is obtained when the unit is installed securely in shallow...


