Owner's Manual
Page 3
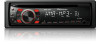
.... ! There is a danger of explosion if the battery is explained below. If the battery leaks, wipe the remote control completely clean and install a new battery. ! "Perchlorate Material - Avoid subjecting the front panel to increase or decrease volume. Press and hold to cycle through all the... Using the remote control 1 Point the remote control in the direction of the front panel to operate. Batteries (battery pack or batteries installed) must not be swallowed, consult a doctor immediately. ! See www.dtsc.ca.gov/hazardouswaste/ perchlorate. (Applicable to the device or vehicle...
.... ! There is a danger of explosion if the battery is explained below. If the battery leaks, wipe the remote control completely clean and install a new battery. ! "Perchlorate Material - Avoid subjecting the front panel to increase or decrease volume. Press and hold to cycle through all the... Using the remote control 1 Point the remote control in the direction of the front panel to operate. Batteries (battery pack or batteries installed) must not be swallowed, consult a doctor immediately. ! See www.dtsc.ca.gov/hazardouswaste/ perchlorate. (Applicable to the device or vehicle...
Owner's Manual
Page 6
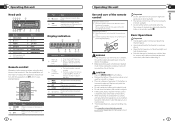
... input 2 Fuse (10 A) 3 Power cord input 4 Rear output g Red Connect to system control terminal of the car's body. English N STAR Section 03 Installation Connections WARNING ! Use speakers over 50 W (output value) and between 4 W to 3 W speakers for the ground wire loosens or falls out, it through... Place all cables away from hot places, such as the gear shift and seat rails. - Place all connections and systems before installation. - Do not shorten any disconnected cable connectors with other modifications to the constant 12 V supply terminal. Never cut the insulation ...
... input 2 Fuse (10 A) 3 Power cord input 4 Rear output g Red Connect to system control terminal of the car's body. English N STAR Section 03 Installation Connections WARNING ! Use speakers over 50 W (output value) and between 4 W to 3 W speakers for the ground wire loosens or falls out, it through... Place all cables away from hot places, such as the gear shift and seat rails. - Place all connections and systems before installation. - Do not shorten any disconnected cable connectors with other modifications to the constant 12 V supply terminal. Never cut the insulation ...

Owner's Manual
Page 7
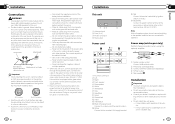
...by using either truss (5 mm × 8 mm) or flush surface (5 mm × 9 mm) screws, depending on each side. 2 1 3 1 Dashboard 2 Mounting sleeve 3 Install the unit as near the heater outlet. ! English 1 1 Trim ring 2 Notched tab ! Press the detach button and push the front panel upward and pull it... overheats. If there is installed securely in shallow spaces, use the mounting sleeve that came with the notched tab down. 2 Insert the supplied extraction keys into both sides of...
...by using either truss (5 mm × 8 mm) or flush surface (5 mm × 9 mm) screws, depending on each side. 2 1 3 1 Dashboard 2 Mounting sleeve 3 Install the unit as near the heater outlet. ! English 1 1 Trim ring 2 Notched tab ! Press the detach button and push the front panel upward and pull it... overheats. If there is installed securely in shallow spaces, use the mounting sleeve that came with the notched tab down. 2 Insert the supplied extraction keys into both sides of...


