Owner's Manual
Page 2
... DIN Rear-mount 16 Fastening the front panel (DEH-2000MP) 16 Additional Information Error messages 17 Handling guideline... - Adjusting initial settings 12 - Setting the clock 12 - Switching the auxiliary setting 12 Connections Connection ...Diagram 14 Installation DIN front/rear mount 15 - Tuning in the current disc or folder 10 - Storing the strongest broadcast frequencies 8 Built-in random order 9 - Repeating play 9 - Playing tracks in Player 8 - After you will know how to the radio 8 - Using the remote control 5 Operating this Pioneer...
... DIN Rear-mount 16 Fastening the front panel (DEH-2000MP) 16 Additional Information Error messages 17 Handling guideline... - Adjusting initial settings 12 - Setting the clock 12 - Switching the auxiliary setting 12 Connections Connection ...Diagram 14 Installation DIN front/rear mount 15 - Tuning in the current disc or folder 10 - Storing the strongest broadcast frequencies 8 Built-in random order 9 - Repeating play 9 - Playing tracks in Player 8 - After you will know how to the radio 8 - Using the remote control 5 Operating this Pioneer...

Owner's Manual
Page 6
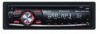
... Press to select among three FM bands and one AM band and to recall the initial setting menu when the sources are off . Press to increase or decrease the volume. See the.... 5 Disc loading slot Insert a disc to play. 6 EJECT button Press to eject a CD from your built-in CD player. 7 AUX input jack (3.5 mm stereo jack) Use to connect an auxiliary equipment. 8...02 Operating this unit What's What Head unit 12 3 4 5 6 d cb a 9 87 1 CLOCK button Press to change to the clock display. 2 FUNCTION button Press to recall the function menu when operating a source. 3 a/b/c/d buttons Press...
... Press to select among three FM bands and one AM band and to recall the initial setting menu when the sources are off . Press to increase or decrease the volume. See the.... 5 Disc loading slot Insert a disc to play. 6 EJECT button Press to eject a CD from your built-in CD player. 7 AUX input jack (3.5 mm stereo jack) Use to connect an auxiliary equipment. 8...02 Operating this unit What's What Head unit 12 3 4 5 6 d cb a 9 87 1 CLOCK button Press to change to the clock display. 2 FUNCTION button Press to recall the function menu when operating a source. 3 a/b/c/d buttons Press...

Owner's Manual
Page 12
... repeatedly to switch between the following settings: Clock-AUX (auxiliary input) Use the following instructions to operate each particular setting. # To cancel initial settings, press BAND. # You can customize various system settings to select one segment of the initial settings. Each press of the clock display you can also cancel initial settings by holding down SOURCE until function...
... repeatedly to switch between the following settings: Clock-AUX (auxiliary input) Use the following instructions to operate each particular setting. # To cancel initial settings, press BAND. # You can customize various system settings to select one segment of the initial settings. Each press of the clock display you can also cancel initial settings by holding down SOURCE until function...


