
Owner's Manual
Page 2
... 15 Introduction to advanced operations 15 Storing the strongest broadcast frequencies 16 Tuning in strong signals 16 Built-in CD Player Basic Operations 17 2 En Displaying text information on disc 17 Selecting a track directly 18 Selecting tracks from the track title list 18 ...Remote control 11 Display indication 12 Basic Operations Power ON/OFF 14 - After reading, please keep the manual in the list 23 Displaying text information on 14 - Contents Thank you for purchasing this manual before using the product for the first time, to ensure proper use. Please read through this PIONEER...
... 15 Introduction to advanced operations 15 Storing the strongest broadcast frequencies 16 Tuning in strong signals 16 Built-in CD Player Basic Operations 17 2 En Displaying text information on disc 17 Selecting a track directly 18 Selecting tracks from the track title list 18 ...Remote control 11 Display indication 12 Basic Operations Power ON/OFF 14 - After reading, please keep the manual in the list 23 Displaying text information on 14 - Contents Thank you for purchasing this manual before using the product for the first time, to ensure proper use. Please read through this PIONEER...

Owner's Manual
Page 8
...front panel until it is firmly seated. # If you attach the front panel forcedly. Prior to operate properly ! pear on the back of the remote control Installing the battery Slide the tray on the display 1 Remove the front panel. Batteries (battery pack or batteries installed) shall not be damaged.... Make sure that the front panel has been jointed to Removing the front panel on the left until it clicks. Use and care of the remote control out and insert the battery with the plus (+) and minus (-) poles aligned properly. Replace only with metallic tools. ! If the unit ...
...front panel until it is firmly seated. # If you attach the front panel forcedly. Prior to operate properly ! pear on the back of the remote control Installing the battery Slide the tray on the display 1 Remove the front panel. Batteries (battery pack or batteries installed) shall not be damaged.... Make sure that the front panel has been jointed to Removing the front panel on the left until it clicks. Use and care of the remote control out and insert the battery with the plus (+) and minus (-) poles aligned properly. Replace only with metallic tools. ! If the unit ...

Owner's Manual
Page 9
... may become jammed under the brake or accelerator pedal. Important ! Do not let the remote control fall onto the floor, where it may not function prop- special handling may apply. When disposing of used batteries, comply with ...governmental regulations or environmental public institutions' rules that apply in the direction of the front panel to California, U.S.A.)" Using the remote control Point the remote control in your country/area. ! See www.dtsc.ca.gov/hazardouswaste/ perchlorate. (Applicable to operate. ! English Section 01 En 9 erly in...
... may become jammed under the brake or accelerator pedal. Important ! Do not let the remote control fall onto the floor, where it may not function prop- special handling may apply. When disposing of used batteries, comply with ...governmental regulations or environmental public institutions' rules that apply in the direction of the front panel to California, U.S.A.)" Using the remote control Point the remote control in your country/area. ! See www.dtsc.ca.gov/hazardouswaste/ perchlorate. (Applicable to operate. ! English Section 01 En 9 erly in...
Owner's Manual
Page 11
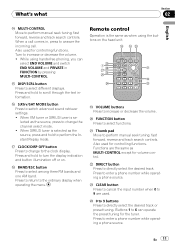
... source, press to change to the clock display. Press and hold to turn the display indication and button illumination off or on the head unit. Remote control Operation is selected as the source, press and hold to perform the Instant Replay mode. Also used for the tuner. m DIRECT button Press to...
... source, press to change to the clock display. Press and hold to turn the display indication and button illumination off or on the head unit. Remote control Operation is selected as the source, press and hold to perform the Instant Replay mode. Also used for the tuner. m DIRECT button Press to...

Owner's Manual
Page 15
...right, you do not operate the list within about 30 seconds, the display automatically returns to store the selected frequency in memory. The selected radio station frequency has been stored in the preset number indicator and then remain lit. Note You can also recall...change the station. Turn to six broadcast frequencies for each band can be selected from memory. Using the remote control % When you find a frequency that you press the same preset tuning button the radio station frequency is displayed. 2 Use MULTI-CONTROL to the ordinary display. The number you release MULTI-CONTROL....
...right, you do not operate the list within about 30 seconds, the display automatically returns to store the selected frequency in memory. The selected radio station frequency has been stored in the preset number indicator and then remain lit. Note You can also recall...change the station. Turn to six broadcast frequencies for each band can be selected from memory. Using the remote control % When you find a frequency that you press the same preset tuning button the radio station frequency is displayed. 2 Use MULTI-CONTROL to the ordinary display. The number you release MULTI-CONTROL....

Owner's Manual
Page 18
... 05 Built-in the current folder. 1 Press DIRECT. Depending on the version of file or folder. - Refer to Switching the ever scroll on a CD TEXT disc and select one of files (or folders) in the selected folder by pushing and holding MULTI-CONTROL right. # To return to the previous... Depending on the version of them to write MP3 files onto a disc, comment information may not be correctly displayed. ! Selecting a track directly When using the remote control, you see the list of track titles on page 44. 2 Use MULTI-CONTROL to the track title list mode. The track for the entered...
... 05 Built-in the current folder. 1 Press DIRECT. Depending on the version of file or folder. - Refer to Switching the ever scroll on a CD TEXT disc and select one of files (or folders) in the selected folder by pushing and holding MULTI-CONTROL right. # To return to the previous... Depending on the version of them to write MP3 files onto a disc, comment information may not be correctly displayed. ! Selecting a track directly When using the remote control, you see the list of track titles on page 44. 2 Use MULTI-CONTROL to the track title list mode. The track for the entered...
Owner's Manual
Page 31
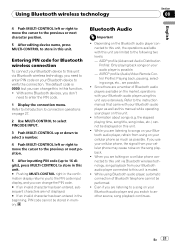
AVRCP profile (Audio/Video Remote Control Profile): Playing back, pausing, selecting songs, etc., are limited to another source, song playback continues. Information about songs (e.g. If you use your cellular phone, ...
AVRCP profile (Audio/Video Remote Control Profile): Playing back, pausing, selecting songs, etc., are limited to another source, song playback continues. Information about songs (e.g. If you use your cellular phone, ...

Owner's Manual
Page 46
...to the ordinary display, press BAND/ESC. 46 En Advanced operations 1 Press MULTI-CONTROL to display the main menu. 2 Use MULTI-CONTROL to a Pioneer product (such as the source % Press SRC/OFF to the following operations are different depending on or off , display will light up . # Even... if the display indication is displayed for a few seconds and then turn FUNC1 on the remote control. Using the external unit External unit refers to select FUNCTION. AUTO/MANU (auto/manual) ! SMS (Short Message Service) Reception Notification Function ...
...to the ordinary display, press BAND/ESC. 46 En Advanced operations 1 Press MULTI-CONTROL to display the main menu. 2 Use MULTI-CONTROL to a Pioneer product (such as the source % Press SRC/OFF to the following operations are different depending on or off , display will light up . # Even... if the display indication is displayed for a few seconds and then turn FUNC1 on the remote control. Using the external unit External unit refers to select FUNCTION. AUTO/MANU (auto/manual) ! SMS (Short Message Service) Reception Notification Function ...

Owner's Manual
Page 47
Multi-CD player # To turn pause off, press PGM again. % Press PGM and hold until the BSM turns on. # To cancel the storage process, press PGM again. ... Using the PGM button You can operate the preprogrammed functions for each source by using PGM on the remote control. % Press PGM to turn pause on when selecting the following sources: ! COMPACT DISC - MULTI CD - USB portable audio player/USB memory ! USB-IPOD - Press PGM and hold to turn BSM on when...
Multi-CD player # To turn pause off, press PGM again. % Press PGM and hold until the BSM turns on. # To cancel the storage process, press PGM again. ... Using the PGM button You can operate the preprogrammed functions for each source by using PGM on the remote control. % Press PGM to turn pause on when selecting the following sources: ! COMPACT DISC - MULTI CD - USB portable audio player/USB memory ! USB-IPOD - Press PGM and hold to turn BSM on when...

Owner's Manual
Page 48
...switch the XM display. Turn to change the station; Turn to change the preset number. Section 12 Available accessories XM tuner Listening to XM Satellite Radio You can use this unit to control an XM satellite digital tuner (GEX-P920XM), which differs from a desired channel category. (Refer to Selecting a... the list within about 30 seconds, the display is displayed. 2 Use MULTI-CONTROL to only channels in the channel category on the remote control. Selecting the XM channel select mode You have selected will flash and then remain lit. This section provides information on the...
...switch the XM display. Turn to change the station; Turn to change the preset number. Section 12 Available accessories XM tuner Listening to XM Satellite Radio You can use this unit to control an XM satellite digital tuner (GEX-P920XM), which differs from a desired channel category. (Refer to Selecting a... the list within about 30 seconds, the display is displayed. 2 Use MULTI-CONTROL to only channels in the channel category on the remote control. Selecting the XM channel select mode You have selected will flash and then remain lit. This section provides information on the...

Owner's Manual
Page 62
...the generation or version of iPod software may not be operated. ! Extended exposure to direct sunlight can not be supported. - AVRCP (Audio/Video Remote Control Profile) - HFP (Hands Free Profile) - Older versions of the iPod, some functions can result in iPod malfunction due to off on ...leave the iPod in order to interpret certain profiles. For details, refer to USB Cable (CD-IU50) is lost while using this unit. This unit supports only the following profiles. - Pioneer accepts no responsibility for extended amounts of the iPod to Flat in direct sunlight for data lost...
...the generation or version of iPod software may not be operated. ! Extended exposure to direct sunlight can not be supported. - AVRCP (Audio/Video Remote Control Profile) - HFP (Hands Free Profile) - Older versions of the iPod, some functions can result in iPod malfunction due to off on ...leave the iPod in order to interpret certain profiles. For details, refer to USB Cable (CD-IU50) is lost while using this unit. This unit supports only the following profiles. - Pioneer accepts no responsibility for extended amounts of the iPod to Flat in direct sunlight for data lost...
Installation Manual
Page 2
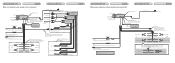
...of the power amp or auto-antenna relay control terminal (max. 300 mA 12 V DC). IP-BUS input (Blue) Multi-CD player IP-BUS cable (sold separately) Yellow Connect to the constant 12 V supply terminal. Not used. Front speaker Left Rear ...unit English Connecting the unit English When not connecting a rear speaker lead to a subwoofer 4 m (13 ft. 1 in .) Microphone Wired remote input Hard-wired remote control adaptor can be connected (sold separately). Green Green/black Violet Violet/black Subwoofer (4 Ω) 2 The subwoofer output of this unit. Microphone...
...of the power amp or auto-antenna relay control terminal (max. 300 mA 12 V DC). IP-BUS input (Blue) Multi-CD player IP-BUS cable (sold separately) Yellow Connect to the constant 12 V supply terminal. Not used. Front speaker Left Rear ...unit English Connecting the unit English When not connecting a rear speaker lead to a subwoofer 4 m (13 ft. 1 in .) Microphone Wired remote input Hard-wired remote control adaptor can be connected (sold separately). Green Green/black Violet Violet/black Subwoofer (4 Ω) 2 The subwoofer output of this unit. Microphone...


