
Owner's Manual
Page 33
...set up for detailed instructions. 1 Press BAND/ESC and hold until CANCEL appears in this unit, adjusting the volume level and adjusting the microphone angle. 1 Connecting and pairing For detailed instructions on the type of cellular phone. # If the difference between this unit and your ...use with this unit as dialing numbers on your contact. When VOICE DIAL ON is displayed, voice recognition function is disconnected. 3 Microphone angle adjustment The microphone needs to simply dial the number. When you are prohibited while you need to this unit, make a call Press PHONE/ /...
...set up for detailed instructions. 1 Press BAND/ESC and hold until CANCEL appears in this unit, adjusting the volume level and adjusting the microphone angle. 1 Connecting and pairing For detailed instructions on the type of cellular phone. # If the difference between this unit and your ...use with this unit as dialing numbers on your contact. When VOICE DIAL ON is displayed, voice recognition function is disconnected. 3 Microphone angle adjustment The microphone needs to simply dial the number. When you are prohibited while you need to this unit, make a call Press PHONE/ /...
Installation Manual
Page 2
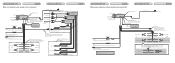
... the unit English Connecting the unit English When not connecting a rear speaker lead to a subwoofer 4 m (13 ft. 1 in .) Microphone Wired remote input Hard-wired remote control adaptor can be connected (sold separately) Front speaker Left Subwoofer (4 Ω) Blue/white Connect to system...A) Yellow Connect to terminal controlled by ignition switch (12 V DC). IP-BUS input (Blue) Multi-CD player IP-BUS cable (sold separately) To front output To subwoofer output Microphone Connect with RCA cables (sold separately) Power amp (sold separately) Power amp (sold separately) Power amp...
... the unit English Connecting the unit English When not connecting a rear speaker lead to a subwoofer 4 m (13 ft. 1 in .) Microphone Wired remote input Hard-wired remote control adaptor can be connected (sold separately) Front speaker Left Subwoofer (4 Ω) Blue/white Connect to system...A) Yellow Connect to terminal controlled by ignition switch (12 V DC). IP-BUS input (Blue) Multi-CD player IP-BUS cable (sold separately) To front output To subwoofer output Microphone Connect with RCA cables (sold separately) Power amp (sold separately) Power amp (sold separately) Power amp...
Installation Manual
Page 5
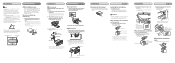
... the metal tabs (90°) into place. When installing the microphone on the microphone clip. Install the microphone on the sun visor 1. Install the microphone clip on the microphone clip. Installation English Note • Check all connections and systems ...use a supplied mounting sleeve. Microphone Microphone clip Microphone base • Microphone can be fastened with metal strap and screws 1. Dashboard or Console Factory radio mounting bracket Installation 2. Screw English Installing the microphone Installation notes Install the microphone in such a way that the...
... the metal tabs (90°) into place. When installing the microphone on the microphone clip. Install the microphone on the sun visor 1. Install the microphone clip on the microphone clip. Installation English Note • Check all connections and systems ...use a supplied mounting sleeve. Microphone Microphone clip Microphone base • Microphone can be fastened with metal strap and screws 1. Dashboard or Console Factory radio mounting bracket Installation 2. Screw English Installing the microphone Installation notes Install the microphone in such a way that the...


