Owner's Manual
Page 2
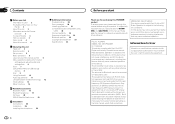
...18 Bluetooth telephone 19 XM tuner 22 SIRIUS Satellite Radio tuner 23 Installation Connections 25 Installation 26 Installing the microphone 28 Additional information Troubleshooting 29 Error messages 29 Handling guidelines... (2) this manual. Section 01 Contents Before you start Thank you for purchasing this PIONEER product To ensure proper use, please read and observe WARNINGs and CAUTIONs in this ...of this device. The antenna for future reference. FCC ID: AJDK045 MODEL NO.: DEH-P8400BH IC: 775E-K045 This device complies with any interference, including interference that it ...
...18 Bluetooth telephone 19 XM tuner 22 SIRIUS Satellite Radio tuner 23 Installation Connections 25 Installation 26 Installing the microphone 28 Additional information Troubleshooting 29 Error messages 29 Handling guidelines... (2) this manual. Section 01 Contents Before you start Thank you for purchasing this PIONEER product To ensure proper use, please read and observe WARNINGs and CAUTIONs in this ...of this device. The antenna for future reference. FCC ID: AJDK045 MODEL NO.: DEH-P8400BH IC: 775E-K045 This device complies with any interference, including interference that it ...
Owner's Manual
Page 3
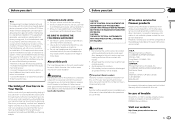
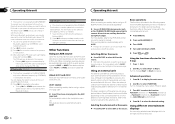
...the user is disconnected or discharged, any other information. BE SURE TO OBSERVE THE FOLLOWING GUIDELINES: ! Do not use in a particular installation. Avoid exposure to hear outside sounds. ! ESTABLISH A SAFE LEVEL: ! Wash hands after -sales service (including warranty conditions) or ...! CAUTION ! If the battery is encouraged to try to correct the interference by one or more of the following measures: - Pioneer Electronics (USA) Inc. CUSTOMER SUPPORT DIVISION P.O. After-sales service for repair without distortion. ! In case the necessary information is ...
...the user is disconnected or discharged, any other information. BE SURE TO OBSERVE THE FOLLOWING GUIDELINES: ! Do not use in a particular installation. Avoid exposure to hear outside sounds. ! ESTABLISH A SAFE LEVEL: ! Wash hands after -sales service (including warranty conditions) or ...! CAUTION ! If the battery is encouraged to try to correct the interference by one or more of the following measures: - Pioneer Electronics (USA) Inc. CUSTOMER SUPPORT DIVISION P.O. After-sales service for repair without distortion. ! In case the necessary information is ...
Owner's Manual
Page 5
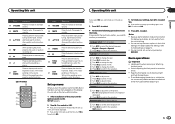
... the settings, refer to select. 5 To finish your settings, turn M.C. You can set up the menu options below. 1 After installation of direct sunlight and high temperatures. ! to confirm the selection. to confirm the selection. Demonstration (demo display setting) 1 Turn M.C.... g a/b/c/d and track search controls. Press to end a call or reject an incoming call. While in the operating menu, press to control functions. (DEH-P7400HD) e c f k g j h 1 b i Part Operation e VOLUME Press to change your selection. to confirm the selection. Press and hold...
... the settings, refer to select. 5 To finish your settings, turn M.C. You can set up the menu options below. 1 After installation of direct sunlight and high temperatures. ! to confirm the selection. to confirm the selection. Demonstration (demo display setting) 1 Turn M.C.... g a/b/c/d and track search controls. Press to end a call or reject an incoming call. While in the operating menu, press to control functions. (DEH-P7400HD) e c f k g j h 1 b i Part Operation e VOLUME Press to change your selection. to confirm the selection. Press and hold...

Owner's Manual
Page 6
...' rules that you . 3 Always keep the detached front panel in your country/area. ! The remote control may apply. Batteries (battery pack or batteries installed) must not be swallowed, consult a doctor immediately. ! There is a danger of used to select a function or list. Do not store the battery ...the remote control in damage to the front panel or head unit. WARNING ! If the battery leaks, wipe the remote control completely clean and install a new battery. Turning the demo display on the back of the remote control Using the remote control 1 Point the remote control in direct ...
...' rules that you . 3 Always keep the detached front panel in your country/area. ! The remote control may apply. Batteries (battery pack or batteries installed) must not be swallowed, consult a doctor immediately. ! There is a danger of used to select a function or list. Do not store the battery ...the remote control in damage to the front panel or head unit. WARNING ! If the battery leaks, wipe the remote control completely clean and install a new battery. Turning the demo display on the back of the remote control Using the remote control 1 Point the remote control in direct ...

Owner's Manual
Page 11
... the track currently playing. Giving a Thumbs Down 1 Press to -6 is selected, the Custom2 curve will be stored in order of the dates on which was installed the Pandora application. Displaying text information Selecting the desired text information 1 Press /DISP. Selecting and playing the QuickMix/station list 1 Press (list) to switch to... Changing QuickMix or stations 1 Turn M.C. After selecting, perform the following procedures to the USB cable using an iPod Dock Connector. 2 Start up the Pandora application installed on page 15. 4 Turn M.C.
... the track currently playing. Giving a Thumbs Down 1 Press to -6 is selected, the Custom2 curve will be stored in order of the dates on which was installed the Pandora application. Displaying text information Selecting the desired text information 1 Press /DISP. Selecting and playing the QuickMix/station list 1 Press (list) to switch to... Changing QuickMix or stations 1 Turn M.C. After selecting, perform the following procedures to the USB cable using an iPod Dock Connector. 2 Start up the Pandora application installed on page 15. 4 Turn M.C.
Owner's Manual
Page 16
... unit. Using different entertainment displays You can only be stored in the future. to the installation manual. or LEVER cycles between AUX1 and AUX2 sources is automatically set to connect this unit...details, refer to Key 6. Using an external unit An external unit refers to a Pioneer product, such as AUX sources and assigned to this unit and that of connection can...connected to this unit ! CD-BTB200) is 0000, but you need to the owner's manual for DEH-P8400BH. S/W UPDATE (updating the software) ! When connected, auxiliary devices are two methods to connect auxiliary...
... unit. Using different entertainment displays You can only be stored in the future. to the installation manual. or LEVER cycles between AUX1 and AUX2 sources is automatically set to connect this unit...details, refer to Key 6. Using an external unit An external unit refers to a Pioneer product, such as AUX sources and assigned to this unit and that of connection can...connected to this unit ! CD-BTB200) is 0000, but you need to the owner's manual for DEH-P8400BH. S/W UPDATE (updating the software) ! When connected, auxiliary devices are two methods to connect auxiliary...

Owner's Manual
Page 25
... never connect it could result in fire, generation of the auto antenna. Select a track 1 Turn LEVER. Use this function, a Pioneer SIRIUS bus interface (e.g. Do not connect the yellow cable to the battery by passing it to the terminal that detects operation of this function...required. ! En 25 English To use this unit or any other devices. Fast forward or reverse 1 Turn and hold BAND/ . ! When installing this unit. ! Disconnect the negative terminal of the rating prescribed. - Secure the wiring with an Instant Replay Function is equipped with insulating tape...
... never connect it could result in fire, generation of the auto antenna. Select a track 1 Turn LEVER. Use this function, a Pioneer SIRIUS bus interface (e.g. Do not connect the yellow cable to the battery by passing it to the terminal that detects operation of this function...required. ! En 25 English To use this unit or any other devices. Fast forward or reverse 1 Turn and hold BAND/ . ! When installing this unit. ! Disconnect the negative terminal of the rating prescribed. - Secure the wiring with an Instant Replay Function is equipped with insulating tape...
Owner's Manual
Page 26
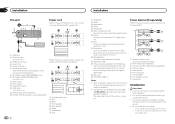
...connected (sold separately). 7 Microphone input (DEH-P8400BH only) 8 Microphone (DEH-P8400BH only) 4 m (13 ft. 1 in.) 9 Rear output a Front output b Subwoofer output c USB cable 1.5 m (4 ft. 11 in.) d IP-BUS cable (sold separately) e Pioneer IP-BUS accessories (sold separately) Power ...61483; 9 9 1 System remote control Connect to the green and green/ black leads. Check all connections and systems before final installation. ! Do not connect anything to the speaker leads that are not connected to speakers. ! Change the initial setting of the vehicle. - Power amp...
...connected (sold separately). 7 Microphone input (DEH-P8400BH only) 8 Microphone (DEH-P8400BH only) 4 m (13 ft. 1 in.) 9 Rear output a Front output b Subwoofer output c USB cable 1.5 m (4 ft. 11 in.) d IP-BUS cable (sold separately) e Pioneer IP-BUS accessories (sold separately) Power ...61483; 9 9 1 System remote control Connect to the green and green/ black leads. Check all connections and systems before final installation. ! Do not connect anything to the speaker leads that are not connected to speakers. ! Change the initial setting of the vehicle. - Power amp...

Owner's Manual
Page 27
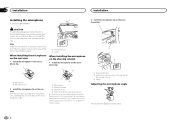
...front panel to protect your unit from theft. En 27 Optimum performance is obtained when the unit is installed at an angle of the dashboard. 2 1 Screw 2 Mounting bracket 3 Dashboard or console ! When installing, to protect your unit from hot places such as illustrated. 1 2 3 4 5 cm 5cm 5...176;. 2 Secure the mounting sleeve by using either truss (5 mm × 8 mm) or flush sur- Use commercially available parts when installing. Install this unit, make sure you . DIN Rear-mount 1 Determine the appropriate position where the holes on the bracket and the side of the...
...front panel to protect your unit from theft. En 27 Optimum performance is obtained when the unit is installed at an angle of the dashboard. 2 1 Screw 2 Mounting bracket 3 Dashboard or console ! When installing, to protect your unit from hot places such as illustrated. 1 2 3 4 5 cm 5cm 5...176;. 2 Secure the mounting sleeve by using either truss (5 mm × 8 mm) or flush sur- Use commercially available parts when installing. Install this unit, make sure you . DIN Rear-mount 1 Determine the appropriate position where the holes on the bracket and the side of the...
Owner's Manual
Page 28
... sure to become wound around the steering column or shift lever. Only for DEH-P8400BH CAUTION It is extremely dangerous to allow the microphone lead to install the unit in a position and orientation that it will enable it to pick up , install the microphone clip. (Lowering the sun visor reduces the voice recognition rate...
... sure to become wound around the steering column or shift lever. Only for DEH-P8400BH CAUTION It is extremely dangerous to allow the microphone lead to install the unit in a position and orientation that it will enable it to pick up , install the microphone clip. (Lowering the sun visor reduces the voice recognition rate...
Owner's Manual
Page 31
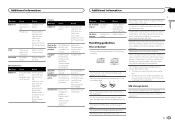
... plication has Pandora applica- Connect an iPod/ iPhone that contains songs. Please check your dealer or an authorized Pioneer Service Station. Do not use . Do not touch the recorded surface of the Pandora application installed. iPod failure. Disconnect the cable from your iPod/iPhone. Bluetooth device Message ERROR-10 Cause Action The...
... plication has Pandora applica- Connect an iPod/ iPhone that contains songs. Please check your dealer or an authorized Pioneer Service Station. Do not use . Do not touch the recorded surface of the Pandora application installed. iPod failure. Disconnect the cable from your iPod/iPhone. Bluetooth device Message ERROR-10 Cause Action The...


