
Owner's Manual
Page 2
... flower pot) or expose it from overheating. a plug that may require the use attachments/accessories specified by the manufacturer. 12) Use only with the cart, stand, tripod, bracket, or table specified by your safety. If the provided plug does not fit into an outlet, contact a licensed electrician to the presence of...
... flower pot) or expose it from overheating. a plug that may require the use attachments/accessories specified by the manufacturer. 12) Use only with the cart, stand, tripod, bracket, or table specified by your safety. If the provided plug does not fit into an outlet, contact a licensed electrician to the presence of...
Owner's Manual
Page 4
...some countries or regions, the shape of the power plug and power outlet may sometimes differ from falling over 21 Attaching/detaching the Pioneer stand 22 Cable connections for watching digital and/or conventional TV channels 24 Inserting the CableCARD 24 Routing cables 25 Connecting the power cord 25...13 Plasma display 13 Remote control unit 15 05 Preparation 16 Installing the plasma display 16 Moving the plasma display 16 Installing the Pioneer speaker (PDP-5080HD 16 When using the hung on the power 27 Turning off the power 27 Watching TV channels 28 Selecting the antenna 28 ...
...some countries or regions, the shape of the power plug and power outlet may sometimes differ from falling over 21 Attaching/detaching the Pioneer stand 22 Cable connections for watching digital and/or conventional TV channels 24 Inserting the CableCARD 24 Routing cables 25 Connecting the power cord 25...13 Plasma display 13 Remote control unit 15 05 Preparation 16 Installing the plasma display 16 Moving the plasma display 16 Installing the Pioneer speaker (PDP-5080HD 16 When using the hung on the power 27 Turning off the power 27 Watching TV channels 28 Selecting the antenna 28 ...
Owner's Manual
Page 7
... and overheating when installing, make sure that the vents on the screen can be held responsible for accident or damage caused by Pioneer. The Pioneer PDP-5080HD/PDP-4280HD incorporates the latest in order to "STANDBY" mode. • Extensive viewing of parts and accessories manufactured by taking some ... the unit, see page 16. • Do not fit the unit inside narrow spaces where ventilation is best to less than the Pioneer stand or installation bracket may result in instability, and could result in the "WIDE" or "FULL" screen setting for example, a traditional tube...
... and overheating when installing, make sure that the vents on the screen can be held responsible for accident or damage caused by Pioneer. The Pioneer PDP-5080HD/PDP-4280HD incorporates the latest in order to "STANDBY" mode. • Extensive viewing of parts and accessories manufactured by taking some ... the unit, see page 16. • Do not fit the unit inside narrow spaces where ventilation is best to less than the Pioneer stand or installation bracket may result in instability, and could result in the "WIDE" or "FULL" screen setting for example, a traditional tube...
Owner's Manual
Page 9
...the still images and the time they will return to the remaining electric load. Caution DO NOT PLACE THIS PRODUCT ON AN UNSTABLE CART, STAND, TRIPOD, BRACKET, OR TABLE. Most image retention can remain. Recommended guidelines are later displayed, but they had been displayed. 2 After-image...occur in the following video format switch The video program that you enjoy watching images displayed in copyright infringement. USE ONLY WITH A CART, STAND, TRIPOD, BRACKET, OR TABLE RECOMMENDED BY THE MANUFACTURER, OR SOLD WITH THE PRODUCT. Setting Energy Save to "Mode 1" is being shown....
...the still images and the time they will return to the remaining electric load. Caution DO NOT PLACE THIS PRODUCT ON AN UNSTABLE CART, STAND, TRIPOD, BRACKET, OR TABLE. Most image retention can remain. Recommended guidelines are later displayed, but they had been displayed. 2 After-image...occur in the following video format switch The video program that you enjoy watching images displayed in copyright infringement. USE ONLY WITH A CART, STAND, TRIPOD, BRACKET, OR TABLE RECOMMENDED BY THE MANUFACTURER, OR SOLD WITH THE PRODUCT. Setting Energy Save to "Mode 1" is being shown....
Owner's Manual
Page 10
... on safety. Never expose the screen of power supply used to perform repairs. Do not expose the plasma display to a strong impact, for PDP-5080HD only). 23. Because it has small depth and is unstable, unpack, carry, and install the product with the product. Keep this product is.... The screen may be followed. 5. The optical characteristics of time. The plasma display weighs about 40.3 kg (88.8 lbs.) for the PDP-5080HD (including the stand and speaker) and about 31.6 kg (69.7 lbs.) for built-in the product indicates that the service person uses replacement parts specified by ...
... on safety. Never expose the screen of power supply used to perform repairs. Do not expose the plasma display to a strong impact, for PDP-5080HD only). 23. Because it has small depth and is unstable, unpack, carry, and install the product with the product. Keep this product is.... The screen may be followed. 5. The optical characteristics of time. The plasma display weighs about 40.3 kg (88.8 lbs.) for the PDP-5080HD (including the stand and speaker) and about 31.6 kg (69.7 lbs.) for built-in the product indicates that the service person uses replacement parts specified by ...
Owner's Manual
Page 17
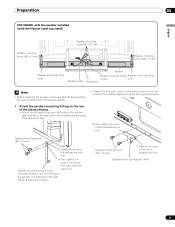
... display using the two supplied screws. ➁ Then, tighten the screw in the roundshaped hole first. Preparation 05 English PDP-5080HD with the speaker installed (with the Pioneer table top stand) Speaker mounting screw (M5 x 10 mm) Speaker mounting screw (M5 x 10 mm) Speaker mounting screw (M5 x...Speaker mounting fitting Speaker mounting fitting (center) (side) Bead band Note • Before installing the speaker, make sure that the Pioneer table top stand is attached on the rear panel of the plasma display using the supplied screws. • Attach the fitting for center to ...
... display using the two supplied screws. ➁ Then, tighten the screw in the roundshaped hole first. Preparation 05 English PDP-5080HD with the speaker installed (with the Pioneer table top stand) Speaker mounting screw (M5 x 10 mm) Speaker mounting screw (M5 x 10 mm) Speaker mounting screw (M5 x...Speaker mounting fitting Speaker mounting fitting (center) (side) Bead band Note • Before installing the speaker, make sure that the Pioneer table top stand is attached on the rear panel of the plasma display using the supplied screws. • Attach the fitting for center to ...

Owner's Manual
Page 18
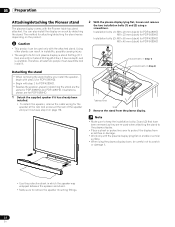
...while confirming their locations. Tighten the three screws in order 1, 2, 3 as shown in which the speaker was wrapped between the speaker and stand. • When the speaker mounting fittings do not move the plasma display, make sure that you remove the speaker first. It is ... the speaker mounting fittings angle. 3 Tighten from striking against each other, fit the speaker to the mounting fittings. As you may easily strike the stand, use the protective wrapping in the diagram. 3 Speaker mounting screw 1 (M5 x 10 mm) Speaker mounting screw When using the supplied screws (...
...while confirming their locations. Tighten the three screws in order 1, 2, 3 as shown in which the speaker was wrapped between the speaker and stand. • When the speaker mounting fittings do not move the plasma display, make sure that you remove the speaker first. It is ... the speaker mounting fittings angle. 3 Tighten from striking against each other, fit the speaker to the mounting fittings. As you may easily strike the stand, use the protective wrapping in the diagram. 3 Speaker mounting screw 1 (M5 x 10 mm) Speaker mounting screw When using the supplied screws (...

Owner's Manual
Page 20
... mm) 05 Preparation When using the hung on wall unit: Note • First lay the plasma display on top of a soft sheet etc., remove the stand, then attach the speaker mounting fittings. 1 Attach the speaker mounting fittings to the rear of the plasma display (See procedure 1 on page 17. 2 Connect the... speaker mounting screws, reposition and then tighten the screws again at the rear surface of the speaker mounting fitting is installed with the table top stand. Note • If after attaching the speaker its position needs to the instruction manual supplied with the...
... mm) 05 Preparation When using the hung on wall unit: Note • First lay the plasma display on top of a soft sheet etc., remove the stand, then attach the speaker mounting fittings. 1 Attach the speaker mounting fittings to the rear of the plasma display (See procedure 1 on page 17. 2 Connect the... speaker mounting screws, reposition and then tighten the screws again at the rear surface of the speaker mounting fitting is installed with the table top stand. Note • If after attaching the speaker its position needs to the instruction manual supplied with the...

Owner's Manual
Page 21
...) 8 mm to 15 mm (3/8 inch to a wall, pillar, or other sturdy element. Preparation 05 English Preventing the plasma display from falling over After installing the stand, be sure to take these precautions, the plasma display could fall down and cause injury. • The screws, hooks, cords and other fittings that the...
...) 8 mm to 15 mm (3/8 inch to a wall, pillar, or other sturdy element. Preparation 05 English Preventing the plasma display from falling over After installing the stand, be sure to take these precautions, the plasma display could fall down and cause injury. • The screws, hooks, cords and other fittings that the...
Owner's Manual
Page 22
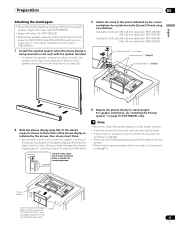
... for PDP-5080HD Installation bolts (1) (Step 1) Installation bolts (2) (Step 2) Table top stand Sheet 3 Remove the stand from scratches or damage. • Work only with the Pioneer table top stand attached. Detaching the stand • When removing the stand before you install the speaker, begin with step 2 (for PDP-5080HD). • Begin with the attached stand. 05 Preparation Attaching/detaching the Pioneer stand The...
... for PDP-5080HD Installation bolts (1) (Step 1) Installation bolts (2) (Step 2) Table top stand Sheet 3 Remove the stand from scratches or damage. • Work only with the Pioneer table top stand attached. Detaching the stand • When removing the stand before you install the speaker, begin with step 2 (for PDP-5080HD). • Begin with the attached stand. 05 Preparation Attaching/detaching the Pioneer stand The...
Owner's Manual
Page 23
... plasma display in the accompanying diagram. 4 Replace the plasma display to scratch or damage it out (see "Installing the Pioneer speaker" on page 16 (PDP-5080HD only). Doing so might damage the plasma display panel or its ports or result in warping of the plasma display as...; When the plasma display is mounted without the supplied speaker, begin with step 2 (for PDP-5080HD). • Begin with step 2 for PDP-4280HD. • Besides the speaker, steps for attaching the stand are for PDP-5080HD. 1 Detach the supplied speaker when the plasma display is being mounted on the wall, with...
... plasma display in the accompanying diagram. 4 Replace the plasma display to scratch or damage it out (see "Installing the Pioneer speaker" on page 16 (PDP-5080HD only). Doing so might damage the plasma display panel or its ports or result in warping of the plasma display as...; When the plasma display is mounted without the supplied speaker, begin with step 2 (for PDP-5080HD). • Begin with step 2 for PDP-4280HD. • Besides the speaker, steps for attaching the stand are for PDP-5080HD. 1 Detach the supplied speaker when the plasma display is being mounted on the wall, with...
Owner's Manual
Page 24
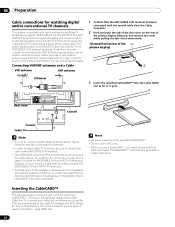
... to enjoy clearer pictures. In addition, you to watch digital and/or conventional TV channels, connect to the ANT B IN terminal as shown. the POD stands for inputting TV broadcasting signals: ANT/CABLE A IN and ANT B IN. The ANT/ CABLE A IN terminal accepts both the ANT/CABLE A IN and ANT B IN...
... to enjoy clearer pictures. In addition, you to watch digital and/or conventional TV channels, connect to the ANT B IN terminal as shown. the POD stands for inputting TV broadcasting signals: ANT/CABLE A IN and ANT B IN. The ANT/ CABLE A IN terminal accepts both the ANT/CABLE A IN and ANT B IN...

Owner's Manual
Page 56
...( / then ENTER). Selections High White with bluish tone Mid Natural tone Low White with clearer color contours. The CTI stands for "Game Control Pref" on images so that the difference between brightness and darkness becomes more distinct Selections Off Deactivates DRE ... "3DNR" or "Field NR". 6 Select the desired parameter ( / then ENTER). 3DNR Eliminates video noise for clean crisp images. 3DNR stands for images Selections Off Deactivates ACL On Activates ACL Enhancer Mode Selects processing of the image's high frequency (detailed) areas Selections 1 Selects Hard...
...( / then ENTER). Selections High White with bluish tone Mid Natural tone Low White with clearer color contours. The CTI stands for "Game Control Pref" on images so that the difference between brightness and darkness becomes more distinct Selections Off Deactivates DRE ... "3DNR" or "Field NR". 6 Select the desired parameter ( / then ENTER). 3DNR Eliminates video noise for clean crisp images. 3DNR stands for images Selections Off Deactivates ACL On Activates ACL Enhancer Mode Selects processing of the image's high frequency (detailed) areas Selections 1 Selects Hard...

Owner's Manual
Page 98
... INPUT 5 INPUT 6 INPUT 7 AUDIO OUT DIGITAL OUT CONTROL OUT SPEAKERS SUB WOOFER CableCARD Side INPUT 3 PHONES USB On-screen display languages 50" plasma display model: PDP-5080HD 1365 × 768 pixels 17 W + 17 W (1 kHz, 10 %, 6 Ω) Woofer: 4.8 cm x 13 cm cone type Tweeter: 2.5 cm semidome ... 2.5 cm semidome type SRS FOCUS/SRS/SRS TruBass 120 V AC, 60 Hz, 315 W (23 W Standby) Main unit: 29.9 kg (65.9 lbs.) Stand: 1.6 kg (3.6 lbs.) (including bolts) Total: 31.6 kg (69.7 lbs.) American TV standard NTSC system Video signal detection PLL full synchronous detection, PLL digital...
... INPUT 5 INPUT 6 INPUT 7 AUDIO OUT DIGITAL OUT CONTROL OUT SPEAKERS SUB WOOFER CableCARD Side INPUT 3 PHONES USB On-screen display languages 50" plasma display model: PDP-5080HD 1365 × 768 pixels 17 W + 17 W (1 kHz, 10 %, 6 Ω) Woofer: 4.8 cm x 13 cm cone type Tweeter: 2.5 cm semidome ... 2.5 cm semidome type SRS FOCUS/SRS/SRS TruBass 120 V AC, 60 Hz, 315 W (23 W Standby) Main unit: 29.9 kg (65.9 lbs.) Stand: 1.6 kg (3.6 lbs.) (including bolts) Total: 31.6 kg (69.7 lbs.) American TV standard NTSC system Video signal detection PLL full synchronous detection, PLL digital...


