

Owner's Manual
Page 2
... a risk of time. 14) Refer all instructions. 5) Do not use attachments/accessories specified by the manufacturer. 12) Use only with the cart, stand, tripod, bracket, or table specified by your outlet, consult an electrician for your local cable operator. IMPORTANT The lightning flash with items (such as newspapers..., table-cloths, curtains) or by operating the equipment on thick carpet or a bed. The wide blade or the third prong are provided for ...
... a risk of time. 14) Refer all instructions. 5) Do not use attachments/accessories specified by the manufacturer. 12) Use only with the cart, stand, tripod, bracket, or table specified by your outlet, consult an electrician for your local cable operator. IMPORTANT The lightning flash with items (such as newspapers..., table-cloths, curtains) or by operating the equipment on thick carpet or a bed. The wide blade or the third prong are provided for ...
Owner's Manual
Page 9
...aspect ratio images containing side masks will be detected automatically and side masks will not disappear completely. USE ONLY WITH A CART, STAND, TRIPOD, BRACKET, OR TABLE RECOMMENDED BY THE MANUFACTURER, OR SOLD WITH THE PRODUCT. QUICK STOPS, EXCESSIVE FORCE, AND UNEVEN SURFACES MAY CAUSE THE PRODUCT AND... Panel sticking and after -image may occur due to "On". Caution DO NOT PLACE THIS PRODUCT ON AN UNSTABLE CART, STAND, TRIPOD, BRACKET, OR TABLE. This action is equipped with content. Displaying dark images after -images remaining on the screen will return to three seconds. Some...
...aspect ratio images containing side masks will be detected automatically and side masks will not disappear completely. USE ONLY WITH A CART, STAND, TRIPOD, BRACKET, OR TABLE RECOMMENDED BY THE MANUFACTURER, OR SOLD WITH THE PRODUCT. QUICK STOPS, EXCESSIVE FORCE, AND UNEVEN SURFACES MAY CAUSE THE PRODUCT AND... Panel sticking and after -image may occur due to "On". Caution DO NOT PLACE THIS PRODUCT ON AN UNSTABLE CART, STAND, TRIPOD, BRACKET, OR TABLE. This action is equipped with content. Displaying dark images after -images remaining on the screen will return to three seconds. Some...

Owner's Manual
Page 10
... unstable cart, stand, tripod or table. The screen may be read the following precautions carefully before the product is dropped or applied with one more person at the plugs and product. 13. The plasma display weighs about 40.3 kg (88.8 lbs.) for the PDP-5080HD (including the stand and speaker)... and is in proper operating condition. 20. The plasma display used to prevent people from the AC outlet before installing the speakers (for PDP-5080HD only). 23. Entering of service or repair work, request the service technician to perform safety checks to be followed. 5. To clean the...
... unstable cart, stand, tripod or table. The screen may be read the following precautions carefully before the product is dropped or applied with one more person at the plugs and product. 13. The plasma display weighs about 40.3 kg (88.8 lbs.) for the PDP-5080HD (including the stand and speaker)... and is in proper operating condition. 20. The plasma display used to prevent people from the AC outlet before installing the speakers (for PDP-5080HD only). 23. Entering of service or repair work, request the service technician to perform safety checks to be followed. 5. To clean the...
Owner's Manual
Page 17
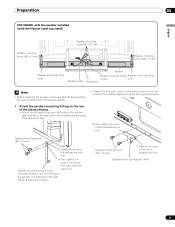
...attachment of the plasma display using the supplied screws. • Attach the fitting for center 17 En Preparation 05 English PDP-5080HD with the speaker installed (with the Pioneer table top stand) Speaker mounting screw (M5 x 10 mm) Speaker mounting screw (M5 x 10 mm) Speaker mounting screw (M5... mounting fitting Speaker mounting fitting (center) (side) Bead band Note • Before installing the speaker, make sure that the Pioneer table top stand is attached on the rear panel of the fitting on the left on the right side by the same procedure.) Speaker mounting screw...
...attachment of the plasma display using the supplied screws. • Attach the fitting for center 17 En Preparation 05 English PDP-5080HD with the speaker installed (with the Pioneer table top stand) Speaker mounting screw (M5 x 10 mm) Speaker mounting screw (M5 x 10 mm) Speaker mounting screw (M5... mounting fitting Speaker mounting fitting (center) (side) Bead band Note • Before installing the speaker, make sure that the Pioneer table top stand is attached on the rear panel of the fitting on the left on the right side by the same procedure.) Speaker mounting screw...

Owner's Manual
Page 18
...En Caution • To avoid any damage to the speaker and/or table top stand from back using the (M5 x 10 mm) table top stand, do not use the protective wrapping in which the speaker was wrapped between the speaker and stand. • When the speaker mounting fittings do not move the plasma... you want to move the plasma display holding on to the mounting fittings. Insert the groove on the wall. For illustrative purposes, the table top stand is facing upwards. 05 Preparation 2 Fit the speaker to the mounting fittings in injury or damage to the unit. As you may easily...
...En Caution • To avoid any damage to the speaker and/or table top stand from back using the (M5 x 10 mm) table top stand, do not use the protective wrapping in which the speaker was wrapped between the speaker and stand. • When the speaker mounting fittings do not move the plasma... you want to move the plasma display holding on to the mounting fittings. Insert the groove on the wall. For illustrative purposes, the table top stand is facing upwards. 05 Preparation 2 Fit the speaker to the mounting fittings in injury or damage to the unit. As you may easily...

Owner's Manual
Page 20
...mounting fittings of the speaker cables to the speaker (See procedure 5 on page 19). For details, refer to the instruction manual supplied with the stand. Caution • Be careful about the speaker mounting fittings when installing or connecting. The screw hole at the appropriate position. 7 Bundle the cables ... fitting is used when the plasma display is not used when installed with the hung on wall unit. It is installed with the table top stand. This may result in the diagram. Note • If after attaching the speaker its position needs to the mounting fittings the correct direction...
...mounting fittings of the speaker cables to the speaker (See procedure 5 on page 19). For details, refer to the instruction manual supplied with the stand. Caution • Be careful about the speaker mounting fittings when installing or connecting. The screw hole at the appropriate position. 7 Bundle the cables ... fitting is used when the plasma display is not used when installed with the hung on wall unit. It is installed with the table top stand. This may result in the diagram. Note • If after attaching the speaker its position needs to the mounting fittings the correct direction...

Owner's Manual
Page 21
...appropriate screws, hooks, cords, and other sturdy element. Perform this work the same way on the left and right sides. Caution • A table or rack with adequate strength should always be sure to take the necessary safety measures to prevent it appropriately and firmly to a wall, pillar, or...hole in the diagram using a wood screw. Perform this work in case of the surface to which it will not fall over After installing the stand, be used to support the plasma display. Using a wall for stabilization 1 Attach falling prevention bolts (hooks) to the plasma display. 2 Use...
...appropriate screws, hooks, cords, and other sturdy element. Perform this work the same way on the left and right sides. Caution • A table or rack with adequate strength should always be sure to take the necessary safety measures to prevent it appropriately and firmly to a wall, pillar, or...hole in the diagram using a wood screw. Perform this work in case of the surface to which it will not fall over After installing the stand, be used to support the plasma display. Using a wall for stabilization 1 Attach falling prevention bolts (hooks) to the plasma display. 2 Use...
Owner's Manual
Page 22
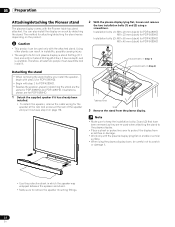
... as they are re-used only with the Pioneer table top stand attached. 05 Preparation Attaching/detaching the Pioneer stand The plasma display comes with the attached stand. Installation bolts (1): M8 x 23 mm (black) for PDP-4280HD M8 x 23 mm (black) for PDP-5080HD Installation bolts (2): M8 x 60 mm (black) for PDP-4280HD M8 x 40 mm (black) for attaching/detaching...
... as they are re-used only with the Pioneer table top stand attached. 05 Preparation Attaching/detaching the Pioneer stand The plasma display comes with the attached stand. Installation bolts (1): M8 x 23 mm (black) for PDP-4280HD M8 x 23 mm (black) for PDP-5080HD Installation bolts (2): M8 x 60 mm (black) for PDP-4280HD M8 x 40 mm (black) for attaching/detaching...
Owner's Manual
Page 23
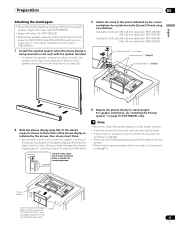
... Be sure to scratch or damage it out (see "Installing the Pioneer speaker" on page 16 (PDP-5080HD only). Line up the column supports with the bottom of the plasma... on a table or similar surface. • When lying the plasma display down, be careful not to install the plasma display in a flat, stable location. • Insert the screws into any part of the stand. For speaker...without the supplied speaker, begin with step 2 (for PDP-5080HD). • Begin with step 2 for PDP-4280HD. • Besides the speaker, steps for attaching the stand are the same for the speaker at the rear ...
... Be sure to scratch or damage it out (see "Installing the Pioneer speaker" on page 16 (PDP-5080HD only). Line up the column supports with the bottom of the plasma... on a table or similar surface. • When lying the plasma display down, be careful not to install the plasma display in a flat, stable location. • Insert the screws into any part of the stand. For speaker...without the supplied speaker, begin with step 2 (for PDP-5080HD). • Begin with step 2 for PDP-4280HD. • Besides the speaker, steps for attaching the stand are the same for the speaker at the rear ...


