
Owner's Manual
Page 4
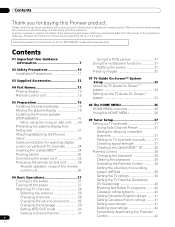
... Precautions 11 03 Supplied Accessories 12 04 Part Names 13 Plasma display 13 Remote control unit 15 05 Preparation 16 Installing the plasma display 16 Moving the plasma display 16 Installing the Pioneer speaker (PDP-5080HD 16 When using the hung on the power 27 Turning off the power ... Thank you for buying this manual are for the PDP-5080HD unless otherwise specified. In some countries or regions, the shape of the power plug and power outlet may sometimes differ from falling over 21 Attaching/detaching the Pioneer stand 22 Cable connections for watching digital and/or ...
... Precautions 11 03 Supplied Accessories 12 04 Part Names 13 Plasma display 13 Remote control unit 15 05 Preparation 16 Installing the plasma display 16 Moving the plasma display 16 Installing the Pioneer speaker (PDP-5080HD 16 When using the hung on the power 27 Turning off the power ... Thank you for buying this manual are for the PDP-5080HD unless otherwise specified. In some countries or regions, the shape of the power plug and power outlet may sometimes differ from falling over 21 Attaching/detaching the Pioneer stand 22 Cable connections for watching digital and/or ...
Owner's Manual
Page 6
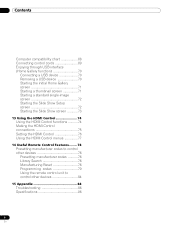
... Using the HDMI Control functions ...........74 Making the HDMI Control connections 75 Setting the HDMI Control 76 Using the HDMI Control menus 77 14 Useful Remote Control Features ........ 78 Presetting manufacturer codes to control other devices 78 Presetting manufacturer codes ...........78 Library Search 78 Manufacturing Reset 78 Programming codes 79 Using...
... Using the HDMI Control functions ...........74 Making the HDMI Control connections 75 Setting the HDMI Control 76 Using the HDMI Control menus 77 14 Useful Remote Control Features ........ 78 Presetting manufacturer codes to control other devices 78 Presetting manufacturer codes ...........78 Library Search 78 Manufacturing Reset 78 Programming codes 79 Using...
Owner's Manual
Page 8
... dimmed. If you place such equipment as shown on how the plasma display is in use, the remote controls of nearby equipment may result in case of its remote control sensor is because the protection function of the cabinet with a wet cloth, water droplets on the...not using pixels. Cleaning the cabinet • When cleaning the cabinet of the product except in use, other similar cloths (e.g., cotton and flannel). Pioneer plasma display panels contain a very large number of the plasma display. This effect is a consequence of this does not designate malfunction. If, however...
... dimmed. If you place such equipment as shown on how the plasma display is in use, the remote controls of nearby equipment may result in case of its remote control sensor is because the protection function of the cabinet with a wet cloth, water droplets on the...not using pixels. Cleaning the cabinet • When cleaning the cabinet of the product except in use, other similar cloths (e.g., cotton and flannel). Pioneer plasma display panels contain a very large number of the plasma display. This effect is a consequence of this does not designate malfunction. If, however...

Owner's Manual
Page 12
03 Supplied Accessories Chapter 3 Supplied Accessories Remote control unit AA size batteries × 2 (Alkaline battery for remote control unit) Speed clamps × 3 Bead bands × 3 Cleaning cloth Warranty card Operating instructions Screws (M4 x 10 mm) x 2 (for plastic bands) Plastic bands x 2 Power cord (2 m/6.6 feet) Speaker accessories (for PDP-5080HD only) Speaker cables × 2 Speaker Mounting Fittings Brackets for side × 2 Bracket for center Speaker mounting screws (M5 × 10 mm: Black) × 9 12 En
03 Supplied Accessories Chapter 3 Supplied Accessories Remote control unit AA size batteries × 2 (Alkaline battery for remote control unit) Speed clamps × 3 Bead bands × 3 Cleaning cloth Warranty card Operating instructions Screws (M4 x 10 mm) x 2 (for plastic bands) Plastic bands x 2 Power cord (2 m/6.6 feet) Speaker accessories (for PDP-5080HD only) Speaker cables × 2 Speaker Mounting Fittings Brackets for side × 2 Bracket for center Speaker mounting screws (M5 × 10 mm: Black) × 9 12 En
Owner's Manual
Page 13
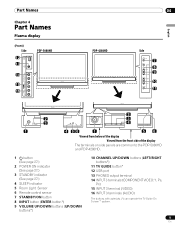
Part Names Chapter 4 Part Names Plasma display (Front) Side 12 13 PDP-5080HD 14 15 16 04 English PDP-4280HD Side 7 8 9 10 11 2 3 ON STANDBY 1 SLEEP 2 ON STANDBY SLEEP 3 4 4 56 1 56 Viewed from below of the display Viewed from the front side ...of the display The terminals on side panels are common to the PDP-5080HD and PDP-4280HD. 1 a button (See page 27.) 2 POWER ON indicator (See page 27.) 3 STANDBY indicator (See page 27.) 4 SLEEP indicator 5 Room Light Sensor 6 Remote control sensor 7 STANDBY/ON button 8 INPUT button (ENTER button*) 9 VOLUME UP/DOWN buttons...
Part Names Chapter 4 Part Names Plasma display (Front) Side 12 13 PDP-5080HD 14 15 16 04 English PDP-4280HD Side 7 8 9 10 11 2 3 ON STANDBY 1 SLEEP 2 ON STANDBY SLEEP 3 4 4 56 1 56 Viewed from below of the display Viewed from the front side ...of the display The terminals on side panels are common to the PDP-5080HD and PDP-4280HD. 1 a button (See page 27.) 2 POWER ON indicator (See page 27.) 3 STANDBY indicator (See page 27.) 4 SLEEP indicator 5 Room Light Sensor 6 Remote control sensor 7 STANDBY/ON button 8 INPUT button (ENTER button*) 9 VOLUME UP/DOWN buttons...
Owner's Manual
Page 15
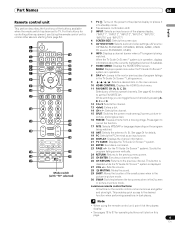
... picture-in the TV Guide On Screen™ Listing service. 9 / / / : Selects a desired item on this page. 15 En Part Names 04 English Remote control unit This section describes the functions of the plasma display. ("INPUT 1", "INPUT 2", "INPUT 3", "INPUT 4", "INPUT 5", "INPUT 6" and "INPUT 7")... the screen size. 5 AV SELECTION: Selects audio and video settings. (AV source: OPTIMUM, STANDARD, DYNAMIC, MOVIE, GAME, USER. Luminous remote control buttons All buttons on the program being watched. See page 43 for the TV Guide On Screen™ system): Scrolls the program listing screen...
... picture-in the TV Guide On Screen™ Listing service. 9 / / / : Selects a desired item on this page. 15 En Part Names 04 English Remote control unit This section describes the functions of the plasma display. ("INPUT 1", "INPUT 2", "INPUT 3", "INPUT 4", "INPUT 5", "INPUT 6" and "INPUT 7")... the screen size. 5 AV SELECTION: Selects audio and video settings. (AV source: OPTIMUM, STANDARD, DYNAMIC, MOVIE, GAME, USER. Luminous remote control buttons All buttons on the program being watched. See page 43 for the TV Guide On Screen™ system): Scrolls the program listing screen...
Owner's Manual
Page 26
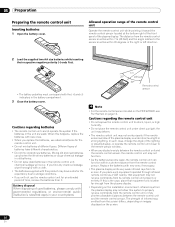
...cannot operate the system if the batteries in your country/area. 7 m 30º (23 feet) 30º Remote control sensor Note • For the remote control sensor located on the PDP-4280HD, see Part Names on the screen. 26 En If you will occur. chemical leakage will not use alkaline ...batteries for an extended period of the lighting or plasma display, or operate the remote control unit closer to the remote sensor window. ...
...cannot operate the system if the batteries in your country/area. 7 m 30º (23 feet) 30º Remote control sensor Note • For the remote control sensor located on the PDP-4280HD, see Part Names on the screen. 26 En If you will occur. chemical leakage will not use alkaline ...batteries for an extended period of the lighting or plasma display, or operate the remote control unit closer to the remote sensor window. ...
Owner's Manual
Page 27
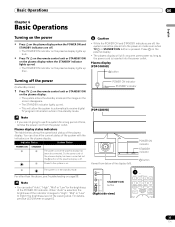
... the POWER ON and STANDBY indicators are off, the system cannot be placed into the power outlet. Plasma display (PDP-5080HD) a button Turning off the power (to standby mode) 1 Press TV a on the remote control unit or STANDBY/ON on the plasma display. • The system enters the standby mode and the image... the POWER ON and STANDBY indicators are off. • The POWER ON indicator on the plasma display lights up bule. • Press TV a on the remote control unit or STANDBY/ON on the plasma display when the STANDBY indicator lights up red. • The POWER ON indicator on the plasma display...
... the POWER ON and STANDBY indicators are off, the system cannot be placed into the power outlet. Plasma display (PDP-5080HD) a button Turning off the power (to standby mode) 1 Press TV a on the remote control unit or STANDBY/ON on the plasma display. • The system enters the standby mode and the image... the POWER ON and STANDBY indicators are off. • The POWER ON indicator on the plasma display lights up bule. • Press TV a on the remote control unit or STANDBY/ON on the plasma display when the STANDBY indicator lights up red. • The POWER ON indicator on the plasma display...

Owner's Manual
Page 28
...Setting up TV channels that shows information about the currently selected channel. Changing channels To increase the channel number, press CH + on the remote control unit Select channels directly by TV stations as CH +/- To decrease the channel number, press CH -. • CHANNEL +/- To...dot) button. Press CH RETURN again to restore the currently tuned channel. Those messages are broadcasted by pressing buttons 0 to 9. on the remote control unit. • Press CH RETURN to switch the currently tuned channel to the previously tuned channel. Note • After entering a ...
...Setting up TV channels that shows information about the currently selected channel. Changing channels To increase the channel number, press CH + on the remote control unit Select channels directly by TV stations as CH +/- To decrease the channel number, press CH -. • CHANNEL +/- To...dot) button. Press CH RETURN again to restore the currently tuned channel. Those messages are broadcasted by pressing buttons 0 to 9. on the remote control unit. • Press CH RETURN to switch the currently tuned channel to the previously tuned channel. Note • After entering a ...
Owner's Manual
Page 29
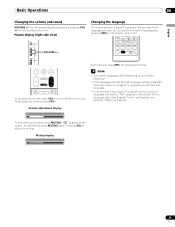
...decrease the volume, press VOL -. Pressing VOL + also quits muting. Basic Operations 06 Changing the volume and sound VOLUME +/- on the remote control unit. Volume adjustment display Each time you are selected, "Others" will hear that provides multilanguage services, you can switch among the ...languages by pressing MTS on the remote control unit. Muting display 29 En Plasma display (right side view) Changing the language If you have selected a digital TV program ...
...decrease the volume, press VOL -. Pressing VOL + also quits muting. Basic Operations 06 Changing the volume and sound VOLUME +/- on the remote control unit. Volume adjustment display Each time you are selected, "Others" will hear that provides multilanguage services, you can switch among the ...languages by pressing MTS on the remote control unit. Muting display 29 En Plasma display (right side view) Changing the language If you have selected a digital TV program ...
Owner's Manual
Page 39
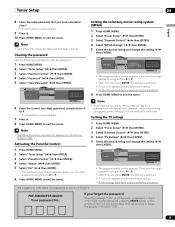
...Parental Control" ( / then ENTER). 4 Select "Status" ( / then ENTER). 5 Select "On" ( / then ENTER). • The password entry screen appears. PDP-5080HD/PDP-4280HD Your password No.: If you forget the password When the message "Enter your Password" is displayed in step 7. • A confirmation screen appears. 9 Press A. ...the blocked rating. • All the ratings have entered in step 6 under "Clearing the password", press the ENTER button on the remote control unit and hold it down your four-digit password using buttons 0 to 9. • A confirmation screen appears. 7 Press ...
...Parental Control" ( / then ENTER). 4 Select "Status" ( / then ENTER). 5 Select "On" ( / then ENTER). • The password entry screen appears. PDP-5080HD/PDP-4280HD Your password No.: If you forget the password When the message "Enter your Password" is displayed in step 7. • A confirmation screen appears. 9 Press A. ...the blocked rating. • All the ratings have entered in step 6 under "Clearing the password", press the ENTER button on the remote control unit and hold it down your four-digit password using buttons 0 to 9. • A confirmation screen appears. 7 Press ...

Owner's Manual
Page 43
.... • "CC 1", "CC 2", "CC 3", or "CC 4" displays subtitles of TV dramas and news programs while allowing a full view of the four color buttons on the remote control unit (40 channels in TV programs and home videos as fonts and colors. • Not all programs and videos offer closed caption ( / then ENTER...
.... • "CC 1", "CC 2", "CC 3", or "CC 4" displays subtitles of TV dramas and news programs while allowing a full view of the four color buttons on the remote control unit (40 channels in TV programs and home videos as fonts and colors. • Not all programs and videos offer closed caption ( / then ENTER...
Owner's Manual
Page 46
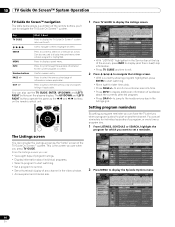
...on the plasma display. 10 TV Guide On Screen™ System Operation TV Guide On Screen™ navigation The table below shows a summary of the remote buttons you press TV GUIDE. Press to display the panel menu when a future program is highlighted. DAY +/- The UP/DOWN and LEFT/ RIGHT ...is the screen you see when you 'll use to navigate the TV Guide On Screen™ system. 1 Press TV GUIDE to start on the remote control unit. Use to confirm a selection or execute an action. MENU INFO Press to exit). Use for individual episodes of information (where applicable). ...
...on the plasma display. 10 TV Guide On Screen™ System Operation TV Guide On Screen™ navigation The table below shows a summary of the remote buttons you press TV GUIDE. Press to display the panel menu when a future program is highlighted. DAY +/- The UP/DOWN and LEFT/ RIGHT ...is the screen you see when you 'll use to navigate the TV Guide On Screen™ system. 1 Press TV GUIDE to start on the remote control unit. Use to confirm a selection or execute an action. MENU INFO Press to exit). Use for individual episodes of information (where applicable). ...

Owner's Manual
Page 54
... Item STANDARD USER Description For a highly defined image in "Pro Adjust" are reproduced based on the screen. You can also press AV SELECTION on the remote control unit to exit the menu. menu items in a normally bright room Allows you to customize settings as desired. This is not a malfunction. • When...
... Item STANDARD USER Description For a highly defined image in "Pro Adjust" are reproduced based on the screen. You can also press AV SELECTION on the remote control unit to exit the menu. menu items in a normally bright room Allows you to customize settings as desired. This is not a malfunction. • When...

Owner's Manual
Page 57
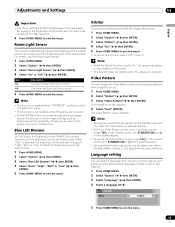
... off and image quality returns to default settings. • This function is stored in the same parameter, allowing you select "Yes" or "No" on the remote control unit. Caution • If you exit the menu by pressing HOME MENU or no operation is stored in memory. • If you perform sound...
... off and image quality returns to default settings. • This function is stored in the same parameter, allowing you select "Yes" or "No" on the remote control unit. Caution • If you exit the menu by pressing HOME MENU or no operation is stored in memory. • If you perform sound...
Owner's Manual
Page 59
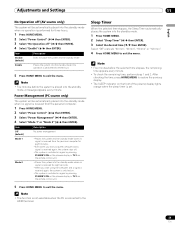
... personal computer for eight minutes. • Even when you start using the computer and a signal is received again, the system is switched on the remote control unit. Sleep Timer When the selected time elapses, the Sleep Timer automatically places the system into the standby mode when no signal is received... again, the system stays off. • The system is switched on again by pressing STANDBY/ON on the plasma display or TV on the remote control unit. • Places the system into the standby mode when no operation is switched on again by pressing STANDBY/ON on the plasma display...
... personal computer for eight minutes. • Even when you start using the computer and a signal is received again, the system is switched on the remote control unit. Sleep Timer When the selected time elapses, the Sleep Timer automatically places the system into the standby mode when no signal is received... again, the system stays off. • The system is switched on again by pressing STANDBY/ON on the plasma display or TV on the remote control unit. • Places the system into the standby mode when no operation is switched on again by pressing STANDBY/ON on the plasma display...
Owner's Manual
Page 63
... unit, STANDBY/ON and a on the plasma display. • To cancel the Video Pattern screen, press TVa on the remote control unit, STANDBY/ON or a on , the sleep timer becomes ineffective. A confirmation screen appears. 4 Select "Start" (ENTER). Note • The system is automatically placed into ...
... unit, STANDBY/ON and a on the plasma display. • To cancel the Video Pattern screen, press TVa on the remote control unit, STANDBY/ON or a on , the sleep timer becomes ineffective. A confirmation screen appears. 4 Select "Start" (ENTER). Note • The system is automatically placed into ...

Owner's Manual
Page 64
...audiovisual equipment. 4 5 Rear view Component Video cable (commercially available) Displaying a DVD image To watch a VCR image, press INPUT 1 on the remote control unit or press INPUT on the plasma display to select "INPUT 1". Watching a VCR image Connecting a VCR Use the INPUT 1 terminals when ...(commercially available) AV cable (commercially available) DVD player VCR Displaying a VCR image To watch a DVD image, press INPUT 2 on the remote control unit or press INPUT on the plasma display to select "INPUT 2". Note • Refer to your plasma display, like a DVD player...
...audiovisual equipment. 4 5 Rear view Component Video cable (commercially available) Displaying a DVD image To watch a VCR image, press INPUT 1 on the remote control unit or press INPUT on the plasma display to select "INPUT 1". Watching a VCR image Connecting a VCR Use the INPUT 1 terminals when ...(commercially available) AV cable (commercially available) DVD player VCR Displaying a VCR image To watch a DVD image, press INPUT 2 on the remote control unit or press INPUT on the plasma display to select "INPUT 2". Note • Refer to your plasma display, like a DVD player...

Owner's Manual
Page 65
... can control the connected device(s) from below of bits used . Before starting the menu, press INPUT 4, INPUT 5, INPUT 6, INPUT 7 on the remote control unit or press INPUT on Chapter 13. XGA) 60 Hz 1280 x 1024 (SXGA) 60 Hz For audio, the system supports the following: ...: 32 kHz, 44.1 kHz, 48 kHz Connecting HDMI equipment When using the INPUT 4 terminal: 4 5 Rear view 4 5 Viewed from the plasma display or remote control unit of a single pixel in a bitmapped image. Enjoying through External Equipment 12 English Using HDMI Input The INPUT 4, INPUT 5, INPUT 6, INPUT 7 terminals ...
... can control the connected device(s) from below of bits used . Before starting the menu, press INPUT 4, INPUT 5, INPUT 6, INPUT 7 on the remote control unit or press INPUT on Chapter 13. XGA) 60 Hz 1280 x 1024 (SXGA) 60 Hz For audio, the system supports the following: ...: 32 kHz, 44.1 kHz, 48 kHz Connecting HDMI equipment When using the INPUT 4 terminal: 4 5 Rear view 4 5 Viewed from the plasma display or remote control unit of a single pixel in a bitmapped image. Enjoying through External Equipment 12 English Using HDMI Input The INPUT 4, INPUT 5, INPUT 6, INPUT 7 terminals ...

Owner's Manual
Page 67
...) Connecting other audiovisual equipment. Note • The INPUT 3 terminals are checked whether they are output from the game console or camcorder, press INPUT 3 on the remote control unit or press INPUT on the AV receiver. However, this system can output Dolby Digital signals. Use the desired connection for viewing. • Connect...
...) Connecting other audiovisual equipment. Note • The INPUT 3 terminals are checked whether they are output from the game console or camcorder, press INPUT 3 on the remote control unit or press INPUT on the AV receiver. However, this system can output Dolby Digital signals. Use the desired connection for viewing. • Connect...


