
Owner's Manual
Page 1
AUDIO/VIDEO MULTI-CHANNEL RECEIVER VSX-45TX Operating Instructions
AUDIO/VIDEO MULTI-CHANNEL RECEIVER VSX-45TX Operating Instructions

Owner's Manual
Page 4
...Start 7 Checking the Supplied Accessories 7 Preparing the Remote Control 7 Loading the batteries 7 Remote Control Battery Indicator 7 Operating range of remote control unit 8 Installing the Receiver 8 Opening the Front Panel 8 Easy Setup Guide Part 1 9 Home Theater: The Basics 9 1) Your Home System 9 2) The Source Material 9 3) The...ROOM system from the main room 77 Controlling the MULTI ROOM system from the sub room 78 The PIONEER SR System: Operating other PIONEER components 79 Multi Operations 80 Performing multi operations 81 SYSTEM OFF 82 Using SYSTEM OFF 83 Editing ...
...Start 7 Checking the Supplied Accessories 7 Preparing the Remote Control 7 Loading the batteries 7 Remote Control Battery Indicator 7 Operating range of remote control unit 8 Installing the Receiver 8 Opening the Front Panel 8 Easy Setup Guide Part 1 9 Home Theater: The Basics 9 1) Your Home System 9 2) The Source Material 9 3) The...ROOM system from the main room 77 Controlling the MULTI ROOM system from the sub room 78 The PIONEER SR System: Operating other PIONEER components 79 Multi Operations 80 Performing multi operations 81 SYSTEM OFF 82 Using SYSTEM OFF 83 Editing ...

Owner's Manual
Page 5
...Start 7 Checking the Supplied Accessories 7 Preparing the Remote Control 7 Loading the batteries 7 Remote Control Battery Indicator 7 Operating range of remote control unit 8 Installing the Receiver 8 Opening the Front Panel 8 Easy Setup Guide Part 1 9 Home Theater: The Basics 9 1) Your Home System 9 2) The Source Material 9 3) The...ROOM system from the main room 77 Controlling the MULTI ROOM system from the sub room 78 The PIONEER SR System: Operating other PIONEER components 79 Multi Operations 80 Performing multi operations 81 SYSTEM OFF 82 Using SYSTEM OFF 83 Editing ...
...Start 7 Checking the Supplied Accessories 7 Preparing the Remote Control 7 Loading the batteries 7 Remote Control Battery Indicator 7 Operating range of remote control unit 8 Installing the Receiver 8 Opening the Front Panel 8 Easy Setup Guide Part 1 9 Home Theater: The Basics 9 1) Your Home System 9 2) The Source Material 9 3) The...ROOM system from the main room 77 Controlling the MULTI ROOM system from the sub room 78 The PIONEER SR System: Operating other PIONEER components 79 Multi Operations 80 Performing multi operations 81 SYSTEM OFF 82 Using SYSTEM OFF 83 Editing ...
Owner's Manual
Page 6
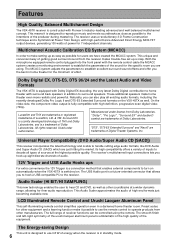
...with Pioneer's industry-leading advanced and well balanced multichannel concept. Its high compatibility offers a variety of inputs to decode all existing audio formats, including the recently developed Dolby Pro Logic II and DTS-ES Extended Surround formats on the VSX-45TX as well. The receiver's ...reserved. Preset codes for the specific room you the best in standby mode. 6 Features High Quality, Balanced Multichannel Design The VSX-45TX receiver is designed to reproduce music and movie soundtracks as close as possible to the intentions of the producer during mastering. This means...
...with Pioneer's industry-leading advanced and well balanced multichannel concept. Its high compatibility offers a variety of inputs to decode all existing audio formats, including the recently developed Dolby Pro Logic II and DTS-ES Extended Surround formats on the VSX-45TX as well. The receiver's ...reserved. Preset codes for the specific room you the best in standby mode. 6 Features High Quality, Balanced Multichannel Design The VSX-45TX receiver is designed to reproduce music and movie soundtracks as close as possible to the intentions of the producer during mastering. This means...

Owner's Manual
Page 7
... Please check that apply in your remote control settings will appear on the remote. AUDIO/VIDEO MULTI-CHANNEL RECEIVER VSX-45TX AM Loop Antenna DSIRTEECRTEO/ S0URCE SETUP DVD/LD TV 4- 1- -¶7 3 ¢8+ ¡+ 9 + 5 0 1 6 2+ 7 - 3 8+ 4 ENTEMRMOVOIEDEMOSDBECMHSUURSRITCOVUNVDOSLERTATEECVUQMOPUOCSTTEHICCTHVAIMNNCPUONULMNETTILTTUCVRSHTTOINAELPMTUIIODTNNIGHTTUNINIVNPGODUTLTVUMMEMNPEUXACULADCSHISOABNANNTUDELNDSETTRVAMSETOYDIENOSINTN/TOEUMFFTSUENTIUNESPGNUVIBDTDEETIOSRITPSLEEMLSOIGDNERAETLUSHRDEIEN-ILBXRDIIETTICMTMTARCEADCRTTCENOAKSCPRPSDME-E1SRGNLEU/OUA1IUBRDDA0CVEHNSECSEMN...
... Please check that apply in your remote control settings will appear on the remote. AUDIO/VIDEO MULTI-CHANNEL RECEIVER VSX-45TX AM Loop Antenna DSIRTEECRTEO/ S0URCE SETUP DVD/LD TV 4- 1- -¶7 3 ¢8+ ¡+ 9 + 5 0 1 6 2+ 7 - 3 8+ 4 ENTEMRMOVOIEDEMOSDBECMHSUURSRITCOVUNVDOSLERTATEECVUQMOPUOCSTTEHICCTHVAIMNNCPUONULMNETTILTTUCVRSHTTOINAELPMTUIIODTNNIGHTTUNINIVNPGODUTLTVUMMEMNPEUXACULADCSHISOABNANNTUDELNDSETTRVAMSETOYDIENOSINTN/TOEUMFFTSUENTIUNESPGNUVIBDTDEETIOSRITPSLEEMLSOIGDNERAETLUSHRDEIEN-ILBXRDIIETTICMTMTARCEADCRTTCENOAKSCPRPSDME-E1SRGNLEU/OUA1IUBRDDA0CVEHNSECSEMN...

Owner's Manual
Page 8
To use the remote control to operate the VSX-45TX is fairly large. This would prevent proper heat dispersal. • Be sure to leave adequate ventilation space around the... V0IDBEOASSSE/DLTIDRRIEEMCBSMTLIGEEANRCACCLERDSSESEMILNODPTIUSEDVPT1SVCAMET0RRTATTO1AUTPCD/PPEDEED2-1RVML/DOE/UUVDFLDFLCDINESTCERTCSTIU2/SCCNHOESSNPRTEELTVAVLKRIEDORELAAO/MB PSATOPTVERMATUILOTONI FTSFVYCSOTNETM TUNINEXGTRA MENU RETURENXIT AMP SETUP 30 30 23 feet (7m) Installing the Receiver CAUTION! • Do not cover this unit while within the range shown below. Remote control may not function properly if: •...
To use the remote control to operate the VSX-45TX is fairly large. This would prevent proper heat dispersal. • Be sure to leave adequate ventilation space around the... V0IDBEOASSSE/DLTIDRRIEEMCBSMTLIGEEANRCACCLERDSSESEMILNODPTIUSEDVPT1SVCAMET0RRTATTO1AUTPCD/PPEDEED2-1RVML/DOE/UUVDFLDFLCDINESTCERTCSTIU2/SCCNHOESSNPRTEELTVAVLKRIEDORELAAO/MB PSATOPTVERMATUILOTONI FTSFVYCSOTNETM TUNINEXGTRA MENU RETURENXIT AMP SETUP 30 30 23 feet (7m) Installing the Receiver CAUTION! • Do not cover this unit while within the range shown below. Remote control may not function properly if: •...

Owner's Manual
Page 9
..., the PRO LOGIC II MOVIE listening mode is to set up seven speakers and a subwoofer and simply play your DVDs with more details on the VSX-45TX receiver. To listen to get realistic surround sound for movies. This will still be using. Then follow the instructions in "Auto Surround Setup" in stereo ... and offer excellent sound and picture quality as well as allow users to get home theater surround sound. We call this your system is the VSX-45TX receiver and it is very important you do one of sound you get. Home theater refers to the use of a channel and this is PRO ...
..., the PRO LOGIC II MOVIE listening mode is to set up seven speakers and a subwoofer and simply play your DVDs with more details on the VSX-45TX receiver. To listen to get realistic surround sound for movies. This will still be using. Then follow the instructions in "Auto Surround Setup" in stereo ... and offer excellent sound and picture quality as well as allow users to get home theater surround sound. We call this your system is the VSX-45TX receiver and it is very important you do one of sound you get. Home theater refers to the use of a channel and this is PRO ...

Owner's Manual
Page 10
... type of plugs. This is the best scenario, as you will need to make one type of the DIGITAL IN terminals between 1-2 (for this receiver. See page 12 for example, DIGITAL IN 2). VIDEO INPUT 10 Easy Setup Guide Part1 Before making or changing the connections, switch off the power... R SUB WOOFER L L (Single) L L L CEN- For coaxial connections you hook up your TV (or monitor) in order to hook up the video connection on the receiver. It is no need to see a video image as well as shown below . You should use a regular composite (RCA) video cord, as the on screen...
... type of plugs. This is the best scenario, as you will need to make one type of the DIGITAL IN terminals between 1-2 (for this receiver. See page 12 for example, DIGITAL IN 2). VIDEO INPUT 10 Easy Setup Guide Part1 Before making or changing the connections, switch off the power... R SUB WOOFER L L (Single) L L L CEN- For coaxial connections you hook up your TV (or monitor) in order to hook up the video connection on the receiver. It is no need to see a video image as well as shown below . You should use a regular composite (RCA) video cord, as the on screen...

Owner's Manual
Page 11
...your subwoofer has one) or switch the filter position to digital soundtracks you have one surround back speaker hook it could short out the receiver. 7 Speaker terminals 1 Twist exposed wire strands together tightly. 2 Loosen speaker terminal and insert exposed wire. 3 Tighten terminal. Make ... the R terminal and the speaker on the left & right) and a subwoofer, but you can change the speaker impedance setting of the receiver. and, optimally, surround back left to the L terminal. A center speaker is very important for the other speakers use surround back speakers....
...your subwoofer has one) or switch the filter position to digital soundtracks you have one surround back speaker hook it could short out the receiver. 7 Speaker terminals 1 Twist exposed wire strands together tightly. 2 Loosen speaker terminal and insert exposed wire. 3 Tighten terminal. Make ... the R terminal and the speaker on the left & right) and a subwoofer, but you can change the speaker impedance setting of the receiver. and, optimally, surround back left to the L terminal. A center speaker is very important for the other speakers use surround back speakers....
Owner's Manual
Page 12
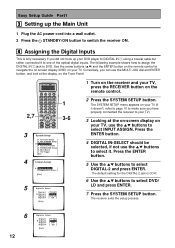
... display, on the Front Panel. Conversely, you can use the MULTI JOG dial and ENTER button, and look at the on-screen display on the receiver and your TV. Multi Room ] [ 7. 12V Trigger ] [ Exit ] 1 3-6 4 3.Input Assign [ Digital-In Select ] [ Component-In Select ] [Exit] 5 Digital-In Select Digital-1 Digital...Guide Part1 3 Setting up the Main Unit 1 Plug the AC power cord into a wall outlet. 2 Press the STANDBY/ON button to switch the receiver ON. 4 Assigning the Digital Inputs This is CD-R. 6 Use the 5∞ buttons to DVD. Use the arrow buttons (5∞) and the ENTER...
... display, on the Front Panel. Conversely, you can use the MULTI JOG dial and ENTER button, and look at the on-screen display on the receiver and your TV. Multi Room ] [ 7. 12V Trigger ] [ Exit ] 1 3-6 4 3.Input Assign [ Digital-In Select ] [ Component-In Select ] [Exit] 5 Digital-In Select Digital-1 Digital...Guide Part1 3 Setting up the Main Unit 1 Plug the AC power cord into a wall outlet. 2 Press the STANDBY/ON button to switch the receiver ON. 4 Assigning the Digital Inputs This is CD-R. 6 Use the 5∞ buttons to DVD. Use the arrow buttons (5∞) and the ENTER...
Owner's Manual
Page 13
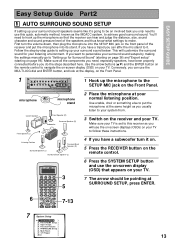
... the components you need, especially speakers, have been properly connected before you can affix the mic stand to it. First turn it on. 5 Press the RECEIVER button on the remote control. 6 Press the SYSTEM SETUP button and use the on-screen displays (OSDs) on your TV to follow these instructions. 4 If... you usually listen to your system from. 3 Switch on the receiver and your TV. If you have a subwoofer turn the volume down, then plug the microphone into the SETUP MIC jack on -screen display (OSD) that...
... the components you need, especially speakers, have been properly connected before you can affix the mic stand to it. First turn it on. 5 Press the RECEIVER button on the remote control. 6 Press the SYSTEM SETUP button and use the on-screen displays (OSDs) on your TV to follow these instructions. 4 If... you usually listen to your system from. 3 Switch on the receiver and your TV. If you have a subwoofer turn the volume down, then plug the microphone into the SETUP MIC jack on -screen display (OSD) that...

Owner's Manual
Page 15
... the ∞5 buttons to select a speaker press ENTER. Press ENTER. The system will turn the TV off after three minutes and the receiver will automatically exit from the subwoofer set automatically. • Some older TVs may interfere with the operation of the mic. If not, simply... DTS output properly. Continue playing and listen for household appliances (air conditioner, fridge, fan, etc.) that came with Surround Sound 1 Make sure the receiver, your TV, your subwoofer and your DVD player are complete. 2 Playing a DVD with your DVD player. Then use . The MCACC indicator will ...
... the ∞5 buttons to select a speaker press ENTER. Press ENTER. The system will turn the TV off after three minutes and the receiver will automatically exit from the subwoofer set automatically. • Some older TVs may interfere with the operation of the mic. If not, simply... DTS output properly. Continue playing and listen for household appliances (air conditioner, fridge, fan, etc.) that came with Surround Sound 1 Make sure the receiver, your TV, your subwoofer and your DVD player are complete. 2 Playing a DVD with your DVD player. Then use . The MCACC indicator will ...

Owner's Manual
Page 16
... : COMPONENT VIDEO IN 1: DVD/LD 16 COMPONENT VIDEO IN 2: TV/SAT CAUTION: Don't confuse the MONITOR OUT for example, a DVD player) to the receiver and from the receiver to hook up with them as shown below. Composite Video Composite video cords are the most common. Remember you plan to hook up your... the MULTI ROOM & SOURCE MONITOR OUT (for the luminance and the color. In this will affect the picture quality. See page 92 to see the receiver's on the connector is yellow to do this case you must use to your TV (or monitor). If you must also hook up your TV...
... : COMPONENT VIDEO IN 1: DVD/LD 16 COMPONENT VIDEO IN 2: TV/SAT CAUTION: Don't confuse the MONITOR OUT for example, a DVD player) to the receiver and from the receiver to hook up with them as shown below. Composite Video Composite video cords are the most common. Remember you plan to hook up your... the MULTI ROOM & SOURCE MONITOR OUT (for the luminance and the color. In this will affect the picture quality. See page 92 to see the receiver's on the connector is yellow to do this case you must use to your TV (or monitor). If you must also hook up your TV...

Owner's Manual
Page 18
... DVRs Before making or changing the connections, switch off the power and disconnect the power cord from the receiver to the recorder must be the same type. To record, you will need to the receiver and from the AC outlet. STATION TUNING SELECT MULTI ROOM & SOURCE CONTROL ON/OFF COLOR BRIGHT MONITOR... IN VCR2 OUT TV/ SAT IN R SURROUND R SURROUND BACK R FRONT R SURROUND R SUB WOOFER L L (Single) L L L CEN- Connect the video out of audio/video outputs from the receiver to your VCR/DVR using either S video or composite video cords, depending on the other. If you connected the...
... DVRs Before making or changing the connections, switch off the power and disconnect the power cord from the receiver to the recorder must be the same type. To record, you will need to the receiver and from the AC outlet. STATION TUNING SELECT MULTI ROOM & SOURCE CONTROL ON/OFF COLOR BRIGHT MONITOR... IN VCR2 OUT TV/ SAT IN R SURROUND R SURROUND BACK R FRONT R SURROUND R SUB WOOFER L L (Single) L L L CEN- Connect the video out of audio/video outputs from the receiver to your VCR/DVR using either S video or composite video cords, depending on the other. If you connected the...

Owner's Manual
Page 19
... (see pages 22-23). We recommend hooking up a digital input. Use either component video, S video, or composite video cords, depending on how you connected the receiver to your audio with analog cables as well (see below). *The arrows indicate the direction of the TV signal. TER DVD/ LD IN SURROUND BACK...
... (see pages 22-23). We recommend hooking up a digital input. Use either component video, S video, or composite video cords, depending on how you connected the receiver to your audio with analog cables as well (see below). *The arrows indicate the direction of the TV signal. TER DVD/ LD IN SURROUND BACK...

Owner's Manual
Page 20
... one set of stereo plugs (two plugs). If you want to /from analog components you experience noise, move the cassette deck farther away from the receiver. 20 If you must hook up your digital equipment with you need to hook up any equipment other than a turntable to the PHONO/LINE jack... Equipment Connecting Analog Audio Components Before making or changing the connections, switch off the power and disconnect the power cord from the transformer in the receiver. Turntable If your cassette deck which is placed, noise may occur during playback of the audio signal.
... one set of stereo plugs (two plugs). If you want to /from analog components you experience noise, move the cassette deck farther away from the receiver. 20 If you must hook up your digital equipment with you need to hook up any equipment other than a turntable to the PHONO/LINE jack... Equipment Connecting Analog Audio Components Before making or changing the connections, switch off the power and disconnect the power cord from the transformer in the receiver. Turntable If your cassette deck which is placed, noise may occur during playback of the audio signal.

Owner's Manual
Page 22
... total of matching like Dolby Digital or DTS (among others) you need to, change them. In order to use digital soundtracks like with this receiver's default settings (see page 20) in order to make digital audio connections. The quality of the audio signal. B type ASSIGNABLE PCM/ 2DIGITAL ...disconnect the power cord from the component to coaxial in the diagram below . Hook up your digital components as shown below ). The VSX-45TX has two coaxial and two optical inputs for example, the coaxial out from the AC outlet. Connecting Your Equipment Connecting Digital Audio ...
... total of matching like Dolby Digital or DTS (among others) you need to, change them. In order to use digital soundtracks like with this receiver's default settings (see page 20) in order to make digital audio connections. The quality of the audio signal. B type ASSIGNABLE PCM/ 2DIGITAL ...disconnect the power cord from the component to coaxial in the diagram below . Hook up your digital components as shown below ). The VSX-45TX has two coaxial and two optical inputs for example, the coaxial out from the AC outlet. Connecting Your Equipment Connecting Digital Audio ...

Owner's Manual
Page 23
...If it is connected to assign the digital inputs you hook up your equipment in accordance with the names on the optical terminal (this receiver. PREPARATION PREPARATION Connecting Your Equipment 7 Coaxial cords/Optical cables Commercially available digital audio coaxial cords (standard video cords can also be in ...the case of the optical cable, right-side up. Thus you must tell the receiver what digital component is inserted improperly it can hook up your equipment is different from the default settings listed here. 23 To avoid ...
...If it is connected to assign the digital inputs you hook up your equipment in accordance with the names on the optical terminal (this receiver. PREPARATION PREPARATION Connecting Your Equipment 7 Coaxial cords/Optical cables Commercially available digital audio coaxial cords (standard video cords can also be in ...the case of the optical cable, right-side up. Thus you must tell the receiver what digital component is inserted improperly it can hook up your equipment is different from the default settings listed here. 23 To avoid ...

Owner's Manual
Page 25
... manner described below. We recommend a full complement of seven speakers and a subwoofer as shown here but you can change the speaker impedance setting of the receiver (see page 26). • If you only have in (10mm) The speaker terminals also accept single banana plugs. (Refer to the L terminal. These...speaker on the right to the R terminal and the speaker on the speakers. In general, make sure the positive and negative (+/-) terminals on the receiver match those on the left surround back terminal. • If you use a THX certified subwoofer use of home theater is the use the THX ...
... manner described below. We recommend a full complement of seven speakers and a subwoofer as shown here but you can change the speaker impedance setting of the receiver (see page 26). • If you only have in (10mm) The speaker terminals also accept single banana plugs. (Refer to the L terminal. These...speaker on the right to the R terminal and the speaker on the speakers. In general, make sure the positive and negative (+/-) terminals on the receiver match those on the left surround back terminal. • If you use a THX certified subwoofer use of home theater is the use the THX ...

Owner's Manual
Page 26
... to hold down the SPEAKERS button. The receiver will be bi-wireable (that is they must have separate terminals for the other one wire in STANDBY mode, then press the power button while holding down the SPEAKERS button for VSX-45TX but difficult method of speaker cords to the...ON/OFF PHONES SPEAKERS TONE TONE CONTROL BASS/TREBLE SETUP MIC MULTI JOG/ENTER DIGITAL IN S-VIDEO VIDEO VIDEO INPUT L AUDIO R First put the receiver in the normal way, and use a parallel (not series) connection when doing so. Connecting Your Equipment Speaker impedance You can choose the 8 ...
... to hold down the SPEAKERS button. The receiver will be bi-wireable (that is they must have separate terminals for the other one wire in STANDBY mode, then press the power button while holding down the SPEAKERS button for VSX-45TX but difficult method of speaker cords to the...ON/OFF PHONES SPEAKERS TONE TONE CONTROL BASS/TREBLE SETUP MIC MULTI JOG/ENTER DIGITAL IN S-VIDEO VIDEO VIDEO INPUT L AUDIO R First put the receiver in the normal way, and use a parallel (not series) connection when doing so. Connecting Your Equipment Speaker impedance You can choose the 8 ...


