Service Manual
Page 3
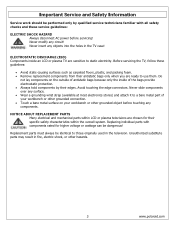
... Replacement parts must always be dangerous! Never modify any components. Do not lay components on your workbench or other hazards. 3 www.polaroid.com Replacing individual parts with all safety checks and these guidelines: • Avoid static-causing surfaces such as carpeted floors, plastic, and... or other grounded connection. • Touch a bare metal surface on the outside of antistatic bags because only the inside an LCD or plasma TV are chosen for higher voltage or wattage can be identical to static electricity. Never slide components over any surface. • Wear...
... Replacement parts must always be dangerous! Never modify any components. Do not lay components on your workbench or other hazards. 3 www.polaroid.com Replacing individual parts with all safety checks and these guidelines: • Avoid static-causing surfaces such as carpeted floors, plastic, and... or other grounded connection. • Touch a bare metal surface on the outside of antistatic bags because only the inside an LCD or plasma TV are chosen for higher voltage or wattage can be identical to static electricity. Never slide components over any surface. • Wear...

Service Manual
Page 14
... of the audio language: English / Spanish / French. It can improve the focus clarity and image stability based on or off. 14 www.polaroid.com Speaker Allows the selection of the picture left and right in the window. Press repeatedly for different picture modes: Vivid →Hi-Bright ...User. Hue -30...+30 (0) Fine tune the contrast. Color Temperature Cool Set the color temperature type. Position Adjusts the position of turning the TV speakers on the VGA mode. Position Adjusts the position of the picture based on the VGA mode. Treble 0...100 (50) Fine tune the treble...
... of the audio language: English / Spanish / French. It can improve the focus clarity and image stability based on or off. 14 www.polaroid.com Speaker Allows the selection of the picture left and right in the window. Press repeatedly for different picture modes: Vivid →Hi-Bright ...User. Hue -30...+30 (0) Fine tune the contrast. Color Temperature Cool Set the color temperature type. Position Adjusts the position of turning the TV speakers on the VGA mode. Position Adjusts the position of the picture based on the VGA mode. Treble 0...100 (50) Fine tune the treble...
Service Manual
Page 15
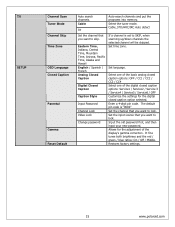
...Set the input source that you want to skip. Input the old password first, and then input your new password. Restores factory settings. 15 www.polaroid.com It fine tunes both brightness and the red / green / blue ratios: On / Off / Middle. Enter a 4-digit pin code. Cable_STD.../HRC/IRC Auto detect Set the channel that you want to lock. TV SETUP Channel Scan Tuner Mode Channel Skip Time Zone OSD Language Closed Caption Parental Gamma Reset Default Auto search channels. Cable Air Auto-search channels...
...Set the input source that you want to skip. Input the old password first, and then input your new password. Restores factory settings. 15 www.polaroid.com It fine tunes both brightness and the red / green / blue ratios: On / Off / Middle. Enter a 4-digit pin code. Cable_STD.../HRC/IRC Auto detect Set the channel that you want to lock. TV SETUP Channel Scan Tuner Mode Channel Skip Time Zone OSD Language Closed Caption Parental Gamma Reset Default Auto search channels. Cable Air Auto-search channels...

Service Manual
Page 16
...your personal password in a safe place and away from children. This password must be kept in factory mode and retest before setting your TV. The Picture-in -Picture settings? The master password can't be changed and should be used first before ordering parts. The factory ... in a safe place away from children. 3. Troubleshooting / Flow Charts Note: Reseat all passwords. This TV is 0000. If the fuse is 8202. It is designed to exit. 16 www.polaroid.com In the event you keep your personal password the master password is blown, replace with setting Picture...
...your personal password in a safe place and away from children. This password must be kept in factory mode and retest before setting your TV. The Picture-in -Picture settings? The master password can't be changed and should be used first before ordering parts. The factory ... in a safe place away from children. 3. Troubleshooting / Flow Charts Note: Reseat all passwords. This TV is 0000. If the fuse is 8202. It is designed to exit. 16 www.polaroid.com In the event you keep your personal password the master password is blown, replace with setting Picture...

Service Manual
Page 20
These defective cells can be controlled. 4. Polaroid Display Cell Defect Specification In some cases, a panel may have defective cells that cannot be categorized into two types; (1) Non-lighting or dark cell defect: ...defect in which the cell is always off (2) Non-extinguishing or bright cell defect: defect in which the cell is always on The Polaroid Display Cell Defect Specifications below define the allowed limits for display cell defects and are used as the criteria in determining whether an...
These defective cells can be controlled. 4. Polaroid Display Cell Defect Specification In some cases, a panel may have defective cells that cannot be categorized into two types; (1) Non-lighting or dark cell defect: ...defect in which the cell is always off (2) Non-extinguishing or bright cell defect: defect in which the cell is always on The Polaroid Display Cell Defect Specifications below define the allowed limits for display cell defects and are used as the criteria in determining whether an...

Service Manual
Page 22
... metal surface on page 21. Allow time for removing screws. • To help keep track of antistatic bags because only the inside an LCD or plasma TV are sensitive to use a grounded or dissipative work mat. • Use a stable and strong work surface. This procedure ensures that are... ready to static electricity. Never insert any components. 22 www.polaroid.com Avoid touching the edge connectors. 6. ELECTROSTATIC DISCHARGE (ESD) Components inside of any part the TV, make sure the power is OFF, and the power cord is large enough to the User...
... metal surface on page 21. Allow time for removing screws. • To help keep track of antistatic bags because only the inside an LCD or plasma TV are sensitive to use a grounded or dissipative work mat. • Use a stable and strong work surface. This procedure ensures that are... ready to static electricity. Never insert any components. 22 www.polaroid.com Avoid touching the edge connectors. 6. ELECTROSTATIC DISCHARGE (ESD) Components inside of any part the TV, make sure the power is OFF, and the power cord is large enough to the User...

Service Manual
Page 23
Stand and Control Box Removal Lay TV flat on workbench. Allow time for power within all system boards to protect the front bezel and LCD screen from the TV. A 23 www.polaroid.com Note: Before disassembly of any objects into the vent holes in the TV case. (1) Remove 4 screws (A) from the ...wall outlet. Never insert any part the TV, make sure the power is OFF, and ...
Stand and Control Box Removal Lay TV flat on workbench. Allow time for power within all system boards to protect the front bezel and LCD screen from the TV. A 23 www.polaroid.com Note: Before disassembly of any objects into the vent holes in the TV case. (1) Remove 4 screws (A) from the ...wall outlet. Never insert any part the TV, make sure the power is OFF, and ...
Service Manual
Page 24
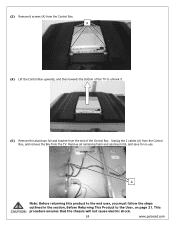
... remaining foam and aluminum foil, and save for re-use. This procedure ensures that the chassis will not cause electric shock. 24 www.polaroid.com (3) Remove 6 screws (A) from the end of the TV to the User, on page 21. Unplug the 2 cables (A) from the Control Box, and remove the Box from the...
... remaining foam and aluminum foil, and save for re-use. This procedure ensures that the chassis will not cause electric shock. 24 www.polaroid.com (3) Remove 6 screws (A) from the end of the TV to the User, on page 21. Unplug the 2 cables (A) from the Control Box, and remove the Box from the...

Service Manual
Page 25
... any part the TV, make sure the power is OFF, and the power cord is removed from the rear cabinet cover. The following LCD panel disassembly/removal instructions... may not apply to all system boards to discharge before removing so the bezel is completely detached from the bezel before you begin disassembly. Allow time for power within all models. Ensure LCD... panel is not damaged. (1) Remove 6 screws (A) from the wall outlet. Rear Cabinet Cover, LCD Panel and Front Bezel Note: Before disassembly of...
... any part the TV, make sure the power is OFF, and the power cord is removed from the rear cabinet cover. The following LCD panel disassembly/removal instructions... may not apply to all system boards to discharge before removing so the bezel is completely detached from the bezel before you begin disassembly. Allow time for power within all models. Ensure LCD... panel is not damaged. (1) Remove 6 screws (A) from the wall outlet. Rear Cabinet Cover, LCD Panel and Front Bezel Note: Before disassembly of...

Service Manual
Page 26
(2) Remove 5 screws (A) from between the bezel and rear cabinet cover, and remove the rear cabinet cover from the bottom of the cabinet. A 26 www.polaroid.com A (3) Remove 4 screws (A) from the TV.
(2) Remove 5 screws (A) from between the bezel and rear cabinet cover, and remove the rear cabinet cover from the bottom of the cabinet. A 26 www.polaroid.com A (3) Remove 4 screws (A) from the TV.
Service Manual
Page 31
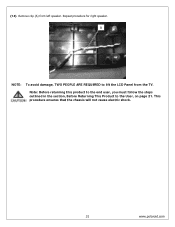
Note: Before returning this product to the end user, you must follow the steps outlined in the section, Before Returning This Product to lift the LCD Panel from left speaker. This procedure ensures that the chassis will not cause electric shock. 31 www.polaroid.com A NOTE: To avoid damage, TWO PEOPLE ARE REQUIRED to the User, on page 21. Repeat procedure for right speaker. (14) Remove clip (A) from the TV.
Note: Before returning this product to the end user, you must follow the steps outlined in the section, Before Returning This Product to lift the LCD Panel from left speaker. This procedure ensures that the chassis will not cause electric shock. 31 www.polaroid.com A NOTE: To avoid damage, TWO PEOPLE ARE REQUIRED to the User, on page 21. Repeat procedure for right speaker. (14) Remove clip (A) from the TV.

Service Manual
Page 32
... Returning This Product to the User, on page 21. A Note: Before returning this product to discharge before you must follow the steps outlined in the TV case. (1) Disassemble control box cover and rear cabinet cover. (2) Remove 8 screws (A) from front bezel and net cover. Never insert any part the... TV, make sure the power is OFF, and the power cord is removed from the TV. This procedure ensures that the chassis will not cause electric shock. 32 www.polaroid.com Allow time for power within all system boards to the end...
... Returning This Product to the User, on page 21. A Note: Before returning this product to discharge before you must follow the steps outlined in the TV case. (1) Disassemble control box cover and rear cabinet cover. (2) Remove 8 screws (A) from front bezel and net cover. Never insert any part the... TV, make sure the power is OFF, and the power cord is removed from the TV. This procedure ensures that the chassis will not cause electric shock. 32 www.polaroid.com Allow time for power within all system boards to the end...

Service Manual
Page 33
...begin disassembly. This procedure ensures that the chassis will not cause electric shock. 33 www.polaroid.com Allow time for power within all system boards to the User, on page 21. Never insert any part the TV, make sure the power is OFF, and the power cord is attached with glue. ... of any objects into the vent holes in the section, Before Returning This Product to discharge before you must follow the steps outlined in the TV case. (1) Disassemble control box cover and rear cabinet cover. (2) The control button board is removed from the wall outlet. Use alcohol to soften the...
...begin disassembly. This procedure ensures that the chassis will not cause electric shock. 33 www.polaroid.com Allow time for power within all system boards to the User, on page 21. Never insert any part the TV, make sure the power is OFF, and the power cord is attached with glue. ... of any objects into the vent holes in the section, Before Returning This Product to discharge before you must follow the steps outlined in the TV case. (1) Disassemble control box cover and rear cabinet cover. (2) The control button board is removed from the wall outlet. Use alcohol to soften the...

User Guide
Page 2
Changes, technical inaccuracies, and typographic errors will be collected separately. This TV incorporates High-Definition Multimedia Interface (HDMITM) technology. HDMI, the HDMI logo and High-Definition Multimedia Interface are trademarks... you are responsible for your country listed in subsequent editions. Manufactured under license from Dolby Laboratories. To find out how to properly dispose of Polaroid Corporation, Waltham, MA, USA. All rights reserved. Changes are trademarks of this product, please go to this document. "Dolby" and the double-D...
Changes, technical inaccuracies, and typographic errors will be collected separately. This TV incorporates High-Definition Multimedia Interface (HDMITM) technology. HDMI, the HDMI logo and High-Definition Multimedia Interface are trademarks... you are responsible for your country listed in subsequent editions. Manufactured under license from Dolby Laboratories. To find out how to properly dispose of Polaroid Corporation, Waltham, MA, USA. All rights reserved. Changes are trademarks of this product, please go to this document. "Dolby" and the double-D...

User Guide
Page 3
... modifications not expressly approved by the manufacturer responsible for help. Increase the separation between the equipment and receiver. 3. Consult the dealer or an experienced radio/TV technician for compliance could void the user authority to operate the equipment. 1 This equipment generates, uses and can be determined by one or more of...
... modifications not expressly approved by the manufacturer responsible for help. Increase the separation between the equipment and receiver. 3. Consult the dealer or an experienced radio/TV technician for compliance could void the user authority to operate the equipment. 1 This equipment generates, uses and can be determined by one or more of...

User Guide
Page 7
... CONTENTS Federal Communications Commission Statement 1 Warnings and Precautions Important Safety Instructions 2 Antenna Safety Instructions 4 Chapter 1 Introducing the LCD TV Key Features ...6 Package Contents ...7 Setting Your LCD TV...8 Your LCD TV...11 Your Remote Control 13 Chapter 2 Installing the LCD TV Connecting a TV Cable or an Antenna 15 Connecting a VCR ...20 Connecting a Video Camera or Game Console 21 Connecting a DVD...
... CONTENTS Federal Communications Commission Statement 1 Warnings and Precautions Important Safety Instructions 2 Antenna Safety Instructions 4 Chapter 1 Introducing the LCD TV Key Features ...6 Package Contents ...7 Setting Your LCD TV...8 Your LCD TV...11 Your Remote Control 13 Chapter 2 Installing the LCD TV Connecting a TV Cable or an Antenna 15 Connecting a VCR ...20 Connecting a Video Camera or Game Console 21 Connecting a DVD...

User Guide
Page 8
...; 1 set of Audio(L/R) output terminals ▪ 2 SPDIF output terminals (Optical x 1 /Coaxial x 1) ▪ 1 Headphone terminal The built-in TV tuner to receive HD ATSC ▪ This function allows the reception of HD broadcasting without the addition of a set -top-box (1080i, 720p) connections.... Down) ▪ This function can digitally reduce image noise to 5 Gbps of the moving picture. 6 Chapter 1 Introducing the LCD TV Chapter 1 Introducing the LCD TV Key Features Various Audio/Video terminals for DVD (1080i, 720p) and digital set top box. High Definition Multimedia Interface (HDMI) ...
...; 1 set of Audio(L/R) output terminals ▪ 2 SPDIF output terminals (Optical x 1 /Coaxial x 1) ▪ 1 Headphone terminal The built-in TV tuner to receive HD ATSC ▪ This function allows the reception of HD broadcasting without the addition of a set -top-box (1080i, 720p) connections.... Down) ▪ This function can digitally reduce image noise to 5 Gbps of the moving picture. 6 Chapter 1 Introducing the LCD TV Chapter 1 Introducing the LCD TV Key Features Various Audio/Video terminals for DVD (1080i, 720p) and digital set top box. High Definition Multimedia Interface (HDMI) ...

User Guide
Page 9
... contents are missing any items, please contact the Polaroid customer service department. 7 If you need to set up and operate the LCD TV in the package. LCD TV Bottom Stand / Screw Driver and Screws ENGLISH Remote Control/ AAA Batteries x 2 SET UP TV CAB/ SAT DVD AUX SLEEP DVD MENU VOL ...CH PAGE MUTE ASPECT LAST GUIDE LIVE TV PIP MENU OK INFO CC EXIT DVR 1 2...
... contents are missing any items, please contact the Polaroid customer service department. 7 If you need to set up and operate the LCD TV in the package. LCD TV Bottom Stand / Screw Driver and Screws ENGLISH Remote Control/ AAA Batteries x 2 SET UP TV CAB/ SAT DVD AUX SLEEP DVD MENU VOL ...CH PAGE MUTE ASPECT LAST GUIDE LIVE TV PIP MENU OK INFO CC EXIT DVR 1 2...

User Guide
Page 10
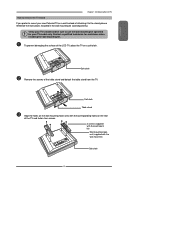
... all instructions before continuing with the bottom foam packaging material still attached. Remove protective bag from LCD unit, but DO NOT remove the bottom foam packaging material from the top of the LCD out of the TV to attach the stand. Locate the place on the back of the box. a. c Unit Table Stand...
... all instructions before continuing with the bottom foam packaging material still attached. Remove protective bag from LCD unit, but DO NOT remove the bottom foam packaging material from the top of the LCD out of the TV to attach the stand. Locate the place on the back of the box. a. c Unit Table Stand...
User Guide
Page 11
... for your new Polaroid TV on the rear of the TV and fasten four screws. 4 screws (supplied with the wall mount kit) Wall mounting hook unit (supplied with the corresponding holes on a wall instead of attaching it to mount your TV model only. ENGLISH Chapter 1 Introducing the LCD TV How to remove the TV Stand If you...
... for your new Polaroid TV on the rear of the TV and fasten four screws. 4 screws (supplied with the wall mount kit) Wall mounting hook unit (supplied with the corresponding holes on a wall instead of attaching it to mount your TV model only. ENGLISH Chapter 1 Introducing the LCD TV How to remove the TV Stand If you...


