

User Manual
Page 1
ENGLISH EN DATA PROJECTOR MODEL XD221U User Manual This User Manual is important to you. Please read it before using your projector.
ENGLISH EN DATA PROJECTOR MODEL XD221U User Manual This User Manual is important to you. Please read it before using your projector.

User Manual
Page 2
... shock. WARNING: TO PREVENT FIRE OR SHOCK HAZARD, DO NOT EXPOSE THIS APPLIANCE TO RAIN OR MOISTURE. NOTE: SINCE THIS PROJECTOR IS PLUGGABLE EQUIPMENT, THE SOCKET-OUTLET SHALL BE INSTALLED NEAR THE EQUIPMENT AND SHALL BE EASILY ACCESSIBLE. Your MITSUBISHI ELECTRIC product is...mark is intended to alert the user to the presence of important operating and maintenance (servicing) instructions in Europe: COMPLIANCE NOTICE This Projector complies with this equipment so as to the presence of this product. Please, dispose of uninsulated "dangerous voltage" within an equilateral ...
... shock. WARNING: TO PREVENT FIRE OR SHOCK HAZARD, DO NOT EXPOSE THIS APPLIANCE TO RAIN OR MOISTURE. NOTE: SINCE THIS PROJECTOR IS PLUGGABLE EQUIPMENT, THE SOCKET-OUTLET SHALL BE INSTALLED NEAR THE EQUIPMENT AND SHALL BE EASILY ACCESSIBLE. Your MITSUBISHI ELECTRIC product is...mark is intended to alert the user to the presence of important operating and maintenance (servicing) instructions in Europe: COMPLIANCE NOTICE This Projector complies with this equipment so as to the presence of this product. Please, dispose of uninsulated "dangerous voltage" within an equilateral ...

User Manual
Page 4
...reference. 3. Pay particular attention to overturn. 9. Do not use a mounting accessory recommended by the manufacturer or sold with the projector. Attachments and equipment Never add any kind on the marking label. Overloading Do not overload wall outlets and extension cords as the...to. 10. Read instructions All the safety and operating instructions should use liquid aerosol cleaners. Damage requiring service Unplug this projector from the wall outlet and refer servicing to qualified service personnel under a carpet. Never spill liquid of any attachments and/...
...reference. 3. Pay particular attention to overturn. 9. Do not use a mounting accessory recommended by the manufacturer or sold with the projector. Attachments and equipment Never add any kind on the marking label. Overloading Do not overload wall outlets and extension cords as the...to. 10. Read instructions All the safety and operating instructions should use liquid aerosol cleaners. Damage requiring service Unplug this projector from the wall outlet and refer servicing to qualified service personnel under a carpet. Never spill liquid of any attachments and/...
User Manual
Page 5
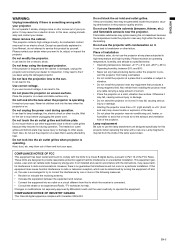
... shock or other failure. Heat, dust, etc. Do not block the air inlet and outlet grilles. Also refrain from the inside the projector, causing deterioration in a residential installation. Lamp replacement Be sure to use the lamp attachment unit designed specifically for a Class B digital device...bottom plate. may cause harmful interference to pre- Flammable substances may ignite causing fire or breakdown because the temperature inside the projector rises very high while the lamp is no guarantee that interference will not occur in accordance with the instructions, may blow...
... shock or other failure. Heat, dust, etc. Do not block the air inlet and outlet grilles. Also refrain from the inside the projector, causing deterioration in a residential installation. Lamp replacement Be sure to use the lamp attachment unit designed specifically for a Class B digital device...bottom plate. may cause harmful interference to pre- Flammable substances may ignite causing fire or breakdown because the temperature inside the projector rises very high while the lamp is no guarantee that interference will not occur in accordance with the instructions, may blow...

User Manual
Page 6
...jack) 8 S-VIDEO terminal 9 VIDEO terminal 10 SERIAL (RS-232C) terminal (Mini DIN) 11 Kensington Lock 12 LAN terminal (RJ-45) Kensington Lock This projector has a Kensington Security Standard connector for instructions on how to use it may cause burns. 7 Control panel Terminal board 7 5 6 8 9 3 2... 10 12 4 11 1 EN-6 1 Power button 2 SOURCE button Each press of this button enables the input source to secure the projector. Please contact Kensington Technology Group below. Phone: +1- (650)572-2700 Fax: +1- (650)572-9675 Kensington Technology Group 2855 Campus Drive San Mateo, CA 94403...
...jack) 8 S-VIDEO terminal 9 VIDEO terminal 10 SERIAL (RS-232C) terminal (Mini DIN) 11 Kensington Lock 12 LAN terminal (RJ-45) Kensington Lock This projector has a Kensington Security Standard connector for instructions on how to use it may cause burns. 7 Control panel Terminal board 7 5 6 8 9 3 2... 10 12 4 11 1 EN-6 1 Power button 2 SOURCE button Each press of this button enables the input source to secure the projector. Please contact Kensington Technology Group below. Phone: +1- (650)572-2700 Fax: +1- (650)572-9675 Kensington Technology Group 2855 Campus Drive San Mateo, CA 94403...
User Manual
Page 8
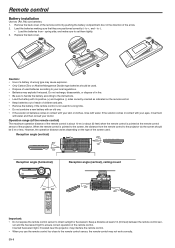
... distance from - Caution: • Use of a battery of wrong type may not work correctly. Inverted fluorescent light, if located near the projector, may explode if misused. to direct sunlight or fluorescent. Replace the back cover. EN-8 Do not recharge, disassemble, or dispose of in ...contact with your skin or clothes, rinse with water and then consult your doctor. If the solution comes in the direction of the projector. Operation range (of the remote control) The maximum operation distance of the screen used. Reception angle (vertical) Reception angle (horizontal) ...
... distance from - Caution: • Use of a battery of wrong type may not work correctly. Inverted fluorescent light, if located near the projector, may explode if misused. to direct sunlight or fluorescent. Replace the back cover. EN-8 Do not recharge, disassemble, or dispose of in ...contact with your skin or clothes, rinse with water and then consult your doctor. If the solution comes in the direction of the projector. Operation range (of the remote control) The maximum operation distance of the screen used. Reception angle (vertical) Reception angle (horizontal) ...

User Manual
Page 9
... place such as a kitchen. • In direct sunlight. • Where the temperature rises high, such as in a closed car. • When using the projector at an altitude of tabletop mounting. See page 20. EN-9 Use at least 50 cm (or 20 inch) away from the wall to prevent the... air inlet grille and the air outlet grilles that emit hot air from the actual measurements. See page 20. • When the projector is lower than +41°F (or +5°C) or higher than those projected in the INSTALLATION menu to MIRROR INVERT. This isn't a product malfunction. ...
... place such as a kitchen. • In direct sunlight. • Where the temperature rises high, such as in a closed car. • When using the projector at an altitude of tabletop mounting. See page 20. EN-9 Use at least 50 cm (or 20 inch) away from the wall to prevent the... air inlet grille and the air outlet grilles that emit hot air from the actual measurements. See page 20. • When the projector is lower than +41°F (or +5°C) or higher than those projected in the INSTALLATION menu to MIRROR INVERT. This isn't a product malfunction. ...

User Manual
Page 10
... devices such as examples of when a HDTV decoder is connected. • The terminal's names vary depending on the Audio cable with this projector, use the COMPUTER IN terminal. EN-10 Audio cable (option) DVD player or HDTV decoder to audio output (L) VCR, etc. When... connecting such DVD player with those of the terminals. • Speaker output is mono. Basic connections This projector can be projected correctly with some DVD players. • When connecting a HDTV decoder having RGB output terminals, set COMPUTER INPUT to S-video ...
... devices such as examples of when a HDTV decoder is connected. • The terminal's names vary depending on the Audio cable with this projector, use the COMPUTER IN terminal. EN-10 Audio cable (option) DVD player or HDTV decoder to audio output (L) VCR, etc. When... connecting such DVD player with those of the terminals. • Speaker output is mono. Basic connections This projector can be projected correctly with some DVD players. • When connecting a HDTV decoder having RGB output terminals, set COMPUTER INPUT to S-video ...
User Manual
Page 11
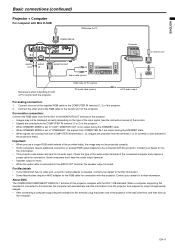
...from COMPUTER IN-1 are output during the STANDBY state. • When signals are projected from the COMPUTER IN terminal (1 or 2) of the projector. • Images may not be projected correctly. • Some computers require additional connectors or analog RGB output adapters to the AUDIO OUT terminal... fur- Contact your dealer for connection with the DDC 1/2B standard. About DDC The COMPUTER/COMPONENT VIDEO IN-1 terminal of the projector in the projector's menu. EN-11 See the instruction manual of the input signal. Contact your Macintosh has no video port, a monitor output ...
...from COMPUTER IN-1 are output during the STANDBY state. • When signals are projected from the COMPUTER IN terminal (1 or 2) of the projector. • Images may not be projected correctly. • Some computers require additional connectors or analog RGB output adapters to the AUDIO OUT terminal... fur- Contact your dealer for connection with the DDC 1/2B standard. About DDC The COMPUTER/COMPONENT VIDEO IN-1 terminal of the projector in the projector's menu. EN-11 See the instruction manual of the input signal. Contact your Macintosh has no video port, a monitor output ...

User Manual
Page 12
...electric shock. • Do not place any outlet or power supply using other voltages or frequencies than rated. You can tilt the projector up the projector to product malfunctions. • Noise may not be displayed correctly because of the type of three-pin grounding type. Note that the...plug doesn't fit your hand wet. They are not due to the appropriate angle. 2. Preparation Preparation for fine adjustment. If necessary, tilt the projector using the adjustment feet only. • Images may not be damaged, contact your dealer for the U.S is modified or altered, it may ...
...electric shock. • Do not place any outlet or power supply using other voltages or frequencies than rated. You can tilt the projector up the projector to product malfunctions. • Noise may not be displayed correctly because of the type of three-pin grounding type. Note that the...plug doesn't fit your hand wet. They are not due to the appropriate angle. 2. Preparation Preparation for fine adjustment. If necessary, tilt the projector using the adjustment feet only. • Images may not be damaged, contact your dealer for the U.S is modified or altered, it may ...
User Manual
Page 13
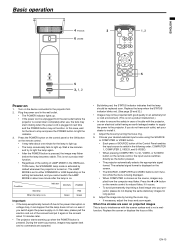
... or 2), VIDEO, or S-VIDEO button on . Replace the screen or displace the focus a little. If you do not have such outlet, ask your projector, please do not display the same stationary images for long period. 6. Adjust the image size by turning the focus ring. 5. Basic operation ENGLISH 4 FOCUS... After the POWER button is pressed, the image may appear dark and no commands are seen on . Condition Stand-by default whenever the projector is on the remote control, the input source switches directly as the source, images supplied from the wall outlet before the lamp becomes stable...
... or 2), VIDEO, or S-VIDEO button on . Replace the screen or displace the focus a little. If you do not have such outlet, ask your projector, please do not display the same stationary images for long period. 6. Adjust the image size by turning the focus ring. 5. Basic operation ENGLISH 4 FOCUS... After the POWER button is pressed, the image may appear dark and no commands are seen on . Condition Stand-by default whenever the projector is on the remote control, the input source switches directly as the source, images supplied from the wall outlet before the lamp becomes stable...
User Manual
Page 14
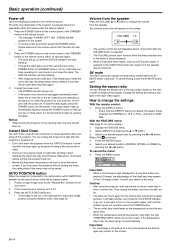
... don't function for cancel.) 2. AUTO POSITION button When the image isn't projected in the right position, adjust the image position using the projector, wait one minute after the VOLUME button is released. • The VOLUME buttons don't function while the menu selection bar or the menu...normal use. To cancel the menu: 6. Press the MENU button. Basic operation (continued) Power-off Use the following procedure to turn off the projector. Unplug the power cord. • The POWER indicator will go out and the STATUS indicator will disappear about 10 minutes before displaying 4:3 image...
... don't function for cancel.) 2. AUTO POSITION button When the image isn't projected in the right position, adjust the image position using the projector, wait one minute after the VOLUME button is released. • The VOLUME buttons don't function while the menu selection bar or the menu...normal use. To cancel the menu: 6. Press the MENU button. Basic operation (continued) Power-off Use the following procedure to turn off the projector. Unplug the power cord. • The POWER indicator will go out and the STATUS indicator will disappear about 10 minutes before displaying 4:3 image...
User Manual
Page 15
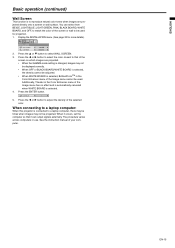
Press the ENTER button. EN-15 LIGHT BLUE 1 5. When connecting to a laptop computer: When this projector is connected to select WALL SCREEN. 3. See the instruction manual of the Image menu has no effect and is automatically canceled when WHITE BOARD is ...
Press the ENTER button. EN-15 LIGHT BLUE 1 5. When connecting to a laptop computer: When this projector is connected to select WALL SCREEN. 3. See the instruction manual of the Image menu has no effect and is automatically canceled when WHITE BOARD is ...

User Manual
Page 16
... CONTRAST. QUICK MENU * Menus are same as well. • To close QUICK MENU or DETAIL MENU, press MENU button when MENU is supplied to the projector. QUICK MENU COLOR ENHANCER CONTRAST BRIGHTNESS COLOR TEMP. AUTO PRESENTATION STANDARD THEATER USER ±30 ±30 STANDARD LOW HIGH USER SHARPNESS *1 ±5 LAMP MODE...
... CONTRAST. QUICK MENU * Menus are same as well. • To close QUICK MENU or DETAIL MENU, press MENU button when MENU is supplied to the projector. QUICK MENU COLOR ENHANCER CONTRAST BRIGHTNESS COLOR TEMP. AUTO PRESENTATION STANDARD THEATER USER ±30 ±30 STANDARD LOW HIGH USER SHARPNESS *1 ±5 LAMP MODE...

User Manual
Page 18
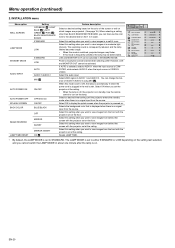
... TV60, TV50, 480i, or 576i. *4 The range that can be specified varies across input signals. *5 Available only when the input signal is supplied to the projector. POSITION FINE SYNC. *1 *2 TRACKING *2 COMPUTER INPUT *2 OVER SCAN HOLD *2 USER 0-999 *4 0-999 *4 0-31 0-2800 *4 AUTO, RGB, YCBCR/YPBPR 100-90% *4 OFF ON OK BEGIN END...
... TV60, TV50, 480i, or 576i. *4 The range that can be specified varies across input signals. *5 Available only when the input signal is supplied to the projector. POSITION FINE SYNC. *1 *2 TRACKING *2 COMPUTER INPUT *2 OVER SCAN HOLD *2 USER 0-999 *4 0-999 *4 0-31 0-2800 *4 AUTO, RGB, YCBCR/YPBPR 100-90% *4 OFF ON OK BEGIN END...

User Manual
Page 19
... of analog video signals. AUTO POWER ON AUTO POWER OFF OFF OFF 6. Menu Options Set the following options provided in the NTSC signal, which the projector is connected. Makes projected images bright and crisp. IMAGE COLOR ENHANCER CONTRAST BRIGHTNESS COLOR TEMP. INSTALLATION 4. AUTO POWER ON AUTO POWER OFF OFF 30min 7. You...
... of analog video signals. AUTO POWER ON AUTO POWER OFF OFF OFF 6. Menu Options Set the following options provided in the NTSC signal, which the projector is connected. Makes projected images bright and crisp. IMAGE COLOR ENHANCER CONTRAST BRIGHTNESS COLOR TEMP. INSTALLATION 4. AUTO POWER ON AUTO POWER OFF OFF 30min 7. You...
User Manual
Page 20
... AUTO OFF OFF ON BLUE OFF OK • By default, the LAMP MODE is no signal input from behind the screen with the projector set the projector at the ceiling. EN-20 However, LAN and MONITOR OUT cannot be lowered when selecting LOW. Select ON to STANDARD. Select the audio...balance of AUDIO 1 and AUDIO 2. opt. Selects the background color that is displayed when there is no signal input from behind the screen with the projector set on which images are projected. (See page 15.) When selecting a setting other than BLACK BOARD/WHITE BOARD, you want to turn on the ...
... AUTO OFF OFF ON BLUE OFF OK • By default, the LAMP MODE is no signal input from behind the screen with the projector set the projector at the ceiling. EN-20 However, LAN and MONITOR OUT cannot be lowered when selecting LOW. Select ON to STANDARD. Select the audio...balance of AUDIO 1 and AUDIO 2. opt. Selects the background color that is displayed when there is no signal input from behind the screen with the projector set on which images are projected. (See page 15.) When selecting a setting other than BLACK BOARD/WHITE BOARD, you want to turn on the ...

User Manual
Page 22
...drastically, noise may appear in projected images. Use this setting to eliminate flickering or blurs, if they appear, when you connect the projector to adjust the vertical position of the image. When it reaches 3800 hours, the bar turns red. (The lamp lifetime is not...hours, the actual hours are not a malfunction. • SHUTTER does not work correctly during keystone adjustment. • When you connect the projector to which the currently projected video signal is STANDARD, this setting to enable or disable LPF. Indicates the type of lamp replacement.) •...
...drastically, noise may appear in projected images. Use this setting to eliminate flickering or blurs, if they appear, when you connect the projector to adjust the vertical position of the image. When it reaches 3800 hours, the bar turns red. (The lamp lifetime is not...hours, the actual hours are not a malfunction. • SHUTTER does not work correctly during keystone adjustment. • When you connect the projector to which the currently projected video signal is STANDARD, this setting to enable or disable LPF. Indicates the type of lamp replacement.) •...

User Manual
Page 24
... the X button is pressed, the image moves up. Every time the X button is set BrilliantColorTM to adjust the color balance of the projected image. This projector automatically and properly projects video signals being input from the computer using the SIGNAL menu. in the SIGNAL - SYNC in the SIGNAL - Noise appears in...
... the X button is pressed, the image moves up. Every time the X button is set BrilliantColorTM to adjust the color balance of the projected image. This projector automatically and properly projects video signals being input from the computer using the SIGNAL menu. in the SIGNAL - SYNC in the SIGNAL - Noise appears in...

User Manual
Page 25
...ENTER button. • If you can magnify the image to prevent wrong operations by children and set controlled access for the POWER button on the projector are disabled. (The buttons on the screen. When the password is entered. Press the S or T button to select PASSWORD FUNCTION. 3. To... To use this mode to view the details. • The MAGNIFY mode doesn't function with video or S-video signal. Password function This projector provides the password function that is turned on, the startup screen (or splash screen) appears and stays on the remote control as the afterimages...
...ENTER button. • If you can magnify the image to prevent wrong operations by children and set controlled access for the POWER button on the projector are disabled. (The buttons on the screen. When the password is entered. Press the S or T button to select PASSWORD FUNCTION. 3. To... To use this mode to view the details. • The MAGNIFY mode doesn't function with video or S-video signal. Password function This projector provides the password function that is turned on, the startup screen (or splash screen) appears and stays on the remote control as the afterimages...