
Atrium Series - English
Page 2
...and refer servicing to qualified service personnel under the following the operating instructions. Unauthorized substitutions may result in a fire or electric shock. Safety Check. That number should use mounting accessories recommended by the manufacturer, or sold with rated power above... lower number indicates the lowest continuous rated power that specification will yield acceptable performance in the operating instructions should be adhered to your Polk Audio speakers. If liquid has been spilled, or objects have the same characteristics as they may apply ...
...and refer servicing to qualified service personnel under the following the operating instructions. Unauthorized substitutions may result in a fire or electric shock. Safety Check. That number should use mounting accessories recommended by the manufacturer, or sold with rated power above... lower number indicates the lowest continuous rated power that specification will yield acceptable performance in the operating instructions should be adhered to your Polk Audio speakers. If liquid has been spilled, or objects have the same characteristics as they may apply ...
Atrium Series - English
Page 5
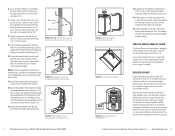
... on the screw heads to catch the keyhole slots. 8 Polk Audio Customer Service 800-377-7655 (Outside USA & Canada: 410-358-3600) FIGURE 14: Turn the bracket knobs to the bracket by following the wall-anchor-manufacturer's instructions. FIGURE 16: Make speaker connection using binding posts. 14....speaker wire through the hole in the wall behind the wall surface, drive #10 screws (not included) through a hole in the bracket before mounting the bracket [figure 12]. 10. A ratcheting system holds the speaker in a little further and then remount the speaker. 16. Use an ...
... on the screw heads to catch the keyhole slots. 8 Polk Audio Customer Service 800-377-7655 (Outside USA & Canada: 410-358-3600) FIGURE 14: Turn the bracket knobs to the bracket by following the wall-anchor-manufacturer's instructions. FIGURE 16: Make speaker connection using binding posts. 14....speaker wire through the hole in the wall behind the wall surface, drive #10 screws (not included) through a hole in the bracket before mounting the bracket [figure 12]. 10. A ratcheting system holds the speaker in a little further and then remount the speaker. 16. Use an ...


